For our Baronial Birthday this past April 29th, we were to Research a ten-minute topic for A&S night and possibly make the item(s) to display at Baronial Birthday (Tir y Don, Atlantia). Documentation to be in EZ Doc format. Which can be found Here If you don’t know what that is:
We had a challenge issued, and Challenge Accepted! While the clothing looks fun, making a proper houppelande would take yards and yards of fabric that I just don’t have the money for. I decided to make a book, using as many of the tools as could be cobbled together for a bookbinding project within a zero-dollar budget. With what I already had in the house, I only needed to dig through my supplies and I could start.
Leather. Check
Tool kit. Check
Paper, and Papers; Check! I said it twice. No regrets! There’re two different types of paper for this project. There’s the parchment look and the marbled endpapers.
Let’s Go!
Creating and Binding a Medieval Book
Tools:
The tools for creating and binding a book can often be costly for the best of the best, but can also be gotten for far less by purchasing the very basics needed. My tools represent the very basics, many of which are hand-made to fit my needs and space. The basic tools for creating a book are: mallet, chisel, clamps, glue, x-acto blade/handle, sewing needles, thread, thread snips, bone folder, ruler, pen or pencil, stitching awl, and scissors. When it comes to sewing the pages into the book block you will need a sewing frame.
Stitching the Book Block
The pages of a book when sewn together are called a book block, and can be the very expensive hide parchment called vellum used in medieval books, or the inexpensive version from pressed paper. I chose 24 lb. Ivory Parchment pressed paper from southworth, due to the affordability, also it’s very pretty. Without a punching cradle for punching the stitching holes in the signatures, it is recommended to use a thick piece of foam or a well packed pillow, if only to protect a table’s surface. Not something really needed for a raw workbench, however, it is on the list of things to eventually acquire.
I already own a sewing stand that I made myself. It’s not pretty, but it works really well.
Book boards cut and marked for thongsBook boards set up.End CapsGlued up and waiting for end papersIn press and spine glued.secondary spine support glued on and tabs pulled through.Setting the thongs with the template.Sewing frame with 3 thongs.Sewing station set up for thongs.Punching and book board templateLeather cover cut to size and thinned appropriately.
The Steps in making a book block
Decided which images to use in the pages.
Copied the images to paint and cleaned them of all original text.
Opened a word file and started adding images in landscape with ¼ inch center border for stitching.
Printed the pages, front and back.
Folded the signatures 4 sheets to a signature. 15 signatures in all.
Created a punching template.
Punched the stitching holes.
Set up the sewing frame with 3 thongs.
Measured and cut the thread and put in on a needle.
Sewed each signature to the thongs from front to back ending with the first signature on the top of the pile. Tied off the thread and cut off the excess.
The Steps in putting the book together.
Put the book spine up into a clamped press and glue on the spine support. Allow to dry.
Carefully cut slits close to the thongs and pull them through above the spine support.
Cut your book boards to size using the template and mark the holes for the thongs and head bands.
Cut the holes for the thongs and headbands.
Put the front and back boards on the book, pull the thongs from outside to the inside and the same for the thongs for the headbands.
Carefully glue in place on the inside of the bookboards. and allow to dry with wax paper to keep excess glue from sticking to the actual pages.
Pull the spine support down inside and glue to the inside of the bookboard, covering thongs and headbands.
Cut the leather cover to size and thin the edges, spine and especially the corners to keep bulk down when folding inside the book.
Glue the cover along the spine and cut a slit closely on either side of each headband, fold in the excess under the cover but above the endbands for extra support.
Glue front and back making sure to smooth any accidental folds, air bubbles or wrinkles, allow to dry.
Fold in each corner and make a mark to remove the excess, making sure that you have enough to cover the corner.
Glue the corners in place.
Glue and fold in all outer edges and put wax paper inside the covers to protect the pages. allow to dry.
Glue in End papers.
Now, I know this is not professional, I am not a professional bookbinder. The closest one can get to what I am is a feral book geek with a digital book hoard on bookbinding. I just wanted to make a pretty book.
Bibliography
Adam, P. (1903). Practical Bookbinding. London: Scott, Greenwood & co.; New York, D. Van Nostrand co.
Cockerell, D. (1904). Notes on Bookbinding. London: Royal Society of Arts/ W.H. Smith & Sons.
Cockerell, D. (1920). Bookbinding, and the care of books; a text-book for bookbinders and librarians. London, New York [etc.] : Sir I. Pitman & sons, ltd.
Department, S. C. (2015). Medieval & Early Modern Manuscripts. New Haven: Yale University Library.
Prideaux, S. T., & Duff, E. G.-1. (1893). A Historical Sketch of Bookbinding. London: Lawrence & Bullen.
Smith, F. R. (1937). Bookbinding. London: Pitman Publishing Corporation.
Vaughn, S. J. (1914). Printing and Bookbinding for Schools. Bloomington: Public school pub. co.
Wood, E., Strange, E. F.-1., Uzanne, O. 1.-1., Frykholm, S., Brochner, G., Khnopff, F. 1.-1., & Mourey, G. 1.-1. (1900). Modern book-bindings & their designers. New York and London: John Lane.
Zaehnsdorf, J. W.-1., CU-BANC, Z. (., & Allsopp, F. W. (1880). The Art of Bookbinding. London: G. Bell & sons.
Several years ago, I entered this Hunt Horn into an A&S challenge.
WHAT I USED: 1 COW HORN: CLEANED AND BOILED. 1 ROTARY GRINDING TOOL WITH BITS. 1 FINE BLADED HACKSAW. 1 SHARP KNIFE FOR SCRAPING. SAND PAPERS VARYING GRITS. EYE PROTECTION, FACE MASKS. ZIPLOC BAG AND WESSON OIL. BEESWAX FOR POLISHING
WHAT WAS USED HISTORICALLY: FOR ROYALTY: OLIPHANT (ELEPHANT IVORY). FOR NON-NOBILITY: COW, GOAT, SHEEP HORN. KNIVES, SAWS, AND CHISELS OF VARYING SIZES AND SHAPES
Staging a hunt in during the Middle Ages was quite often an elaborate and costly affair. For those Nobles who were serious about their hunting, having access to the game meant the continual maintenance of the resources needed. This never-ending process included a laundry list of chores. Fences had to be maintained and repaired to keep deer from straying and unwanted animals and people out of the hunting reserve. The Animals that assisted in the hunt had to be captured, raised and trained, housed, fed and kept in prime condition. Huntsmen and forest wardens employed year-round to ensure that the hunting grounds and the game animals were protected. Specialized equipment had to be procured. (Newman, 2001)
For my purposes, one particular piece of equipment stands alone in its importance. The Hunters Horn.
This Iconic piece of equipment is not just for making noise, it’s used for training the hounds, signaling the other hunters the whereabouts of the pack of dogs, the Hart, and the direction the Hart is going. Other signals were blown for the Kill, the Reward of the dogs, and the Return Home.
Before a hunt is scheduled, the Master of the hunt would send out his huntsmen and foresters to track the herd of deer in the Lord’s reserve. Each huntsman is awarded the esteem of carrying a hunter’s horn. This status symbol was worn to show his rank amongst the men employed within the Lord’s household or his lands.
While tracking the herd, the hunters would each track a hart and collect the fumets (pellets of poop) and pack them into the horn in layers of grass. When all of the huntsmen had gathered with the Master of the hunt, the health and condition of the Harts would then be garnered from the fumets (pellets of poop). When the healthiest specimen was chosen the hunt would then occur.
The Horn is mentioned and pictured in manuscripts teaching the art of the hunt (Gaston Phoebus),
The Macclesfield Psalter
Arthurian Romances (Gawain and the Green Knight)
Gawain and the Green Knight FIT III
XLVI
“There were a hundred choice huntsmen there, whose fame resounds, To their stations keepers strode; Huntsmen unleashed hounds; the forest overflowed with the strident bugle sounds”
and carved into Ivory Reliquaries (St Eustace Casket).
First I will say this, most of the extant horns are made of Ivory, called Oliphants and were gifts to High Nobility and Kings. The carving process for Ivory is different from carving horn in one aspect: you have to peel the hard outer layer in order to carve the ivory easily. Ivory grows from an inner pulp to form layers upon layers of hard outer Dentin. All Ivory bearing animals grow their tusks or teeth in this manner. This hard outer layer of dentin is the beaten, weathered and sharpened part, often scarred from battle or use as a tool by the animal. To carve the ivory you must first remove the harder outer layers of ivory to expose the newer cleaner layers underneath. Horn is softer and somewhat easier to carve, even though it grows the same way but of the same material as hair and nails rather than teeth.
This project started with a “Norse Drinking Horn” so all the cleaning the inside had been done by some other worthy artist long before the horn fell fortuitously into my hands.
The Tools for carving did not change until about 1900 with the creation of power -driven rotary tools. Those same rotary tools that I employed with my Dremel and carving bits. While doing a project the “period” way would be great, the time and effort and expense of buying tools and materials would be cost prohibitive, and in the case of attaining Elephant Ivory, ILLEGAL.
“Until about 1900 all ivory carvers used much the same tools; and ax, adz, or chisel for removing the outer bark, or rind from the tusk; a bucksaw or bow saw for cutting the trunk of the tusk into sections; a special tool called a float for paring the surface; and hand chisels, fretsaws, and gauges for actually carving the piece. The great change came with power driven rotary saws for cutting and peeling the ivory and with dental drills for carving it easily and quickly. These machine tools spread from Europe to Asia in the mid-20th century and are now in universal use for carving Ivory: Encyclopedia Britannica.”
Steps I used in making a signal horn.
These are steps that took the better part of a month to get done. This is Horn, made of the same stuff that are Grizzly’s claws, Eagles Talons, and beaks. When dry is hard and strong, and when sharpened deadly. The tools I used had to be used gently, because when friction is applied to the horn at high speed, it causes the horn to burn and in some instances of not paying attention, MELT. That particular smell is awful and takes days to air out of a space.
While working with the horn, I put on a facemask meant to prevent breathing in horn dust. Not once did I remove that horn during the process, I like being able to breathe. Eye protection is also something REQUIRED while working horn. Sanding the horn sends up a cloud of horn dust which can get into the eyes and do permanent damage. Just wear the stuff!
1. Creating the mouthpiece: To do this without cutting too much and ruining the horn for making a bugle I had to find the innermost spot in the horn, as I could not afford the modern tool, I used a length of clothes hanger looped into a caliper and marked the outside with an awl. With a sharpie pen, I then used two fingers to mark the spot to cut the tip off. I used a cutting disk to get as deep into the tip of the horn as I could, then finished with a fine blade in my hacksaw handle. Let me remind you that when not paying attention to how fast your rotary tools is going and pushing the cutting disk to hard through the material will cause it to overheat and melt, that smells really bad, for days.
2. Roughed in the middle section and negative space for straps and cross-hatching, using a sanding barrel for my rotary tool, going with the grain to keep the surface cleaner and easier
3. Roughed in the shape of the mouthpiece using a sanding barrel tip on the rotary tool. yes, following the grain of the horn.
4. Roughed in the shapes of the scalloped edge.
5. Created a decorative element using a round grinding tip on the rotary tool to create circles on scalloped edge, and down three sections of the horn.
6. Cut in the grooves for cross-hatching with a cutting disk on the rotary tool. This is when Eye protection is not a suggestion but REQUIRED. The cutting disk caused burning and melted bits of horn to fly as I slowly cut the lines. Facemask and eye protection saved me from a painful injury.
7. Deepened the strap sections and used a sharp knife to clean up the inside edges. I did not follow the grain and it took longer to clean up the sections, days even and I still did not get all of the cross-grain marks sanded out. Inspect the horn up close and you will see them all over it. Some are just too deep to get out without causing unsightly holes in the body of the horn.
8. Sanded and neatened the scalloped edges. Much simpler using a sanding block than just folded sandpaper.
9. Deepened the hole in the mouthpiece and shaped the inside of the mouthpiece. I had to switch between bits for this, the round ball bit was too big, so moved to an elongated and pointed bit.
10. Sanded the horn following the grain (Yes, there is a grain to horn just like wood) to take the rough patches and snag-worthy bits off. started with a coarse grit and worked my way to a fine grit.
11. Soak the horn in a Ziploc bag with Wesson oil for a few days. Why? It makes the horn softer and easier to scrape smooth, less dust goes flying as when you are using sandpaper. Sandpaper caused a thick layer of dust to settle on every surface of my workshop while scraping it after soaking in oil makes long dainty curls easier to clean up. scraping along the grain allows a better surface for polishing.
12. Burnished the horn with a nylon bone folder to add final polish to the horn and made beeswax paste to rub a matte finish to the horn. Shiny is nice, but finished is better.
Books:
1. The Ties that Bound; Hanawalt, Barbara A., 1986 Oxford University Press
2. Daily Life in the Middle Ages; Newman, Paul B., 2001McFarland & Company
As a white woman of northern European genetics, it is Very important that I go forward in this project with Respect, granting the indigenous peoples of India the dignity and voice so deserved in regards to their historical and modern arts. I definitely wanted to do some research into the whitework of India before just jumping in feet first.
Truth be told, there’s not much “out there” that isn’t thoroughly whitewashed, most books printed for the European market have Chikankari listed under the “shadow work” technique as if the closed herringbone stitch is the only stitch used. Knowing that there’s more to the technique, I found myself obsessed with the subject. Firstly, I had to purchase books from the UK online markets as many of the titles were not to be found in the US at any price, nor inter library loan. A few of those titles were written by a single author: who had the worst stitch diagrams, in the history of stitch diagrams! Then there was teaching the Google Algorithm how to find Indian Whitework Embroidery, Chikan Work, and Chikankari so that it would stop asking me “Are you sure you aren’t looking for Chicken Curry?” I went ahead and added Hindi in the language search so that Google would also stop asking me if I wanted English Whitework. I read college dissertations translated to English so that I could see for myself some of the history being rediscovered and decolonized.
For several months, there was much watching YouTube videos with the sound off because they don’t have subtitles, which was worth it just to get a sense of the stitches themselves. I watched the hands of the embroiderers many times for hours on end. Those with western equivalents were diagrammed by easily drawing them by hand. Am I a bit obsessive? Yes, but I am a visual learner, so I learn by seeing it done and if those hands drawing the stitch diagrams are my own, so much the better.
Let’s begin with some earlier references, shall we?
The indigenous peoples of India have been producing whitework embroidery, centuries before a succession of colonizing invaders left their marks and took credit for what was already there. Historians from those colonizing invaders has it that Indian whitework was introduced by the First Mughal Empire or taught by English women wanting cheaper Ayrshire work. You can’t have it both ways. So, after searching for months I found snippets here and there that when added together gave me a better picture of a more probable history. Embroidery has been a craft in India for far longer than modern history gives credit to.
Contained within the1500-1000 BCE Sanskrit Book of Hymns called the Rig-Veda is a hymn Raka, the Goddess of the Moon; A supplication that the needles of gold, copper or bronze not break, so that the work when finished may give the wearer reason for praise.
“With eulogy I call on Raka swift to hear may she, auspicious, hear us, and herself observe. With never-breaking needle may she sew her work, and give a hero son most wealthy, meet for praise.[1]
Inside caves carved and painted starting in the 5th- 3rd century BCE located in Ajanta are murals showing whitework embroidery on textiles worn by religious and secular figures.[2]. These caves were rediscovered by a British soldier, who was out hunting tigers in 1819. [3] Unlike Mohenjo Daro, these caves were not looted by the British Museum and so the paintings and statuary halls are intact in situ.
A Greek diplomat of 3rd century BCE by the name of Megasthenes mentions the use of flowered muslins by Indians. He visited India sometime between circa 302BCE and 288BCE. As well as being an ambassador of Seleucus Nicator I, He was a self-styled Historian and Indian Ethnographer. While in the court of Chandragupta Maurya, Megasthenes compiled information about India in a book Indika, which is now a lost work and only survives in Fragmentary quotes used by contemporary writers in their books.
Megasthenes Quote:
“In contrast to the general simplicity of their style, they love finery and ornament. Their robes are worked in gold, and ornamented with precious stones, and they wear also flowered garments made of the finest muslin. Some have attendants walking behind hold up umbrellas over them: for they have a high regard for beauty, and avail them of every device to improve their looks.[4]
More Ajanta Cave Art
Ajanta Cave 1, hall, left wall. Kalyanakarin, EPISODES 9, 10, 12. Episode 9 (centre): ‘In the palace, the king is hearing from the princess with utter amazement of the restoration of Klyanakarin’s eyesight.’ Episode 10 (left of centre): In the queen’s palace, the princess is telling her mother of the happening.’ Episode 12 (right): ‘Kalyanakarin is leaving his father-in-law’s palace in a splendid procession, to return to his father’s kingdom.’ (#41, Schlingloff 2013, vol. I, 191-92)
Chandraketugarh
Archologists have uncovered hundreds of 2nd Century BCE Plaques from Chandraketugarh, which show the fashions in superbly fashioned Terracotta. Many of which show clear evidence of fine woven garments wrapped, draped and seamed as well as embroidered in floral motives. Many molds have been found for the production of such plaques.[5]
Embroidery Described in Poetry
The 6th century CE poet Banabhatta in the court of Harshavardhana wrote and autobiographic and biographic poem in Sanskrit in which whitework embroidery is mentioned. Translated in 1895 the romantic autobiography tells the tale of the King, himself and the daily life of the people and goddesses he met. When Harshavardhana met the goddess Lakshmi, the poet Bana wrote this:
“Out of a dazzling white silken robe, embroidered with hundreds of diverse flowers and birds, and gently rippled by the motion of the breeze, her form rose up as from an ocean’s waters”.[6]
Folk Stories that show the Heart of the matter
In Indian folk stories, there is a story of a traveler who taught Chikan to a peasant in return for drinking water. The traveler was so impressed with the generosity, humility and kindness as well as the peasant’s hospitality that they taught them Chikan so that they might never be poor again.
Noor Jahan
The most popular and somewhat factually checkable story is that of Noor Jahan, the twentieth and last wife of Mughal Emperor Jahangir, who introduced Persian art in India, specifically in Oudh in the 17th century.[7] Although the Mughal Empire did influence the artists and embroiderers of India during their time (1526-1857), giving Indian Whitework Embroidery it’s modern name Chikankari, which gained it’s GI (geographical indicator )registration in 2008,[8] , they did not teach whitework embroidery to the indigenous peoples of India, nor, did the husband hunting Victorian Englishwomen who traveled to India.
What it is and Where it is going
Indian Whitework started as a white-on-white embroidery form, just like all whitework embroidery around the world. The favored fabrics were muslin or Mulmul (the modern muslin used in quilting would be correctly called Calico and is too thick for this technique) as it was suited to the warm, slightly humid climate. The influence of Mughal architecture gave the embroiderers the iconic Floral Bhuti and open latticework for inspiration. After the downfall of the Mughal Empire, Chikankari artisans spread all over India, but Lucknow remained the main center, with Awadh a close second. The Other two places named in the manufacture of Chikankari are Delhi and Mumbai.
Chikankari has survived the loss of Royal Patronage, suffered deeply at the hands of colonial commercialization, lost its way sometimes in mediocrity, and yet stayed alive. Chikankari is a tribute to the skill and will of craftspeople who have handed down this technique from one generation to another. Today, the 300+-year-old art form has a firm presence in the Indian and global fashion arena. Stitches: Due to the variety of stitching styles involved in Chikankari, it is claimed to be one of its kind hand embroidery which is impossible to imitate in any other part of the world. Chikan embroidery is said to have forty stitches, to which they have given delightfully fanciful names: double-star earring, cowrie shell, peacock feather eye.[9] I have only delved deep enough to find twenty-two. The rest of the stitches when taken into perspective are in fact combinations of the other twenty-two, named for the different flowers, bangle bracelets, earrings and other shapes found in nature.
Modern Chikan embroidery has several steps from starting and completion.
A. 1. Cutting the cloth. Done by men.
B. 2. Sewing the garment. If sewn by women it’s destined for Chikan work.
C. 3. Stamping the cloth. Done by men.
D. 4. Embroidering. Done by many women, each proficient in either a single stitch or decorative element often passed from hand to hand in the same workshop. Most embroiderers of Chikan know only one form of work that employs, typically, no more than five stitches, and commonly only one sketchily executed. The main forms of work are Bakhia work, Murri work, Jaali work, Phanda work, and Tepchi work. [10]
E. 5. Washing and Starching.
And once finished it goes to the shop or patron who ordered the work.
Stitch Encyclopedia
Ulti Bakhia- Shadow work done on the backside utilizing closed herringbone stitch.
Sidha Bakhia- Shadow work done from the Front side, utilizing the double back stitch. Note: The difference between the closed herringbone and the double back stitch is not technical, but visual; depending entirely on the side of the cloth that is visible.
Tepchi- Running stitch. Tepchi work is often done in such a fine running stitch as to look part of the woven fabric it’s embroidered on.
Pechni- wrapped running stitch.
Siddaur-Jaali- Use a rather coarse needle and quite fine thread to emphasize the tiny holes that are characteristic of this stitch.
It is used to make the openwork filigree trellis that is so iconic to Chikan work, with one exception. The Embroiderer starts stitching the bottom row and does not repeat the steps, but continues stitching right to left until the end of the row. Then turn the work and continue to fill the shape from right to left, making sure to tug the thread to create evenly spaced holes, using an awl if needed.
Hathkati Jaali: a single line of openwork similar to insertion used inside leaves stems and flowers. Its western equivalent is the so-called Belgian Stitch, which is worked in curved or straight lines similar to insertion stitch. It consists of a series of back stitches drawn very tight over a certain number of threads of the material.[11]
Phanda – Seed stitches utilized to create millet seeds of varied sizes. Can use just the seed stitch or vary the layering of the seed stitch to imitate the different sizes of the millet. Often used as a filling in large flowers or paisleys. The Phanda is often mistaken for the French-knot.
Dhariya Phanda: Oval shaped seed stitches along stems in thick thread to form Coriander Seeds.
Chikna Phanda: See Tuppa: 6-layer seed stitch worked in padded satin stitch for a really raised effect, used as the center of combination Kharan Phool and Keel.
Kacha Phanda/ Dhari Phanda: seed stitch of 2 stitches also used in combination of Meharki.
Ghas Patti- Leaves worked in two different fishbone stitches.
Maang Patti-Leaves worked in fly stitch.
Dhoom Patti- Leaves worked with twice layered open herringbone stitched on the front side of the fabric. Start at one end and work the open herringbone stitch then return to the starting point and fill in the open areas with another layer of open herringbone stitch to close it in.
Balda- A very fine and narrow satin stitch worked over running stitches.
Murri- Rice shaped seed stitches utilizing tiny detached chain stitch covered with short whip stitches covering the first stitches, starting at the thick end.
Sada Murri- Knotted back stitch/knotted running stitch. Created by working the coral stitch tightly packed over a running stitch.
Mundi Murri- larger murri stitch performed with a tightly packed satin stitch over a thick running stitch to produce thicker flower pistils or petals.
Hool- Fine detached eyelets; often surrounded by other stitches making it the hub of a wheel.
Kaaj- Buttonhole/Blanket stitch mainly used to create larger circular patterns.
Gitti- Buttonhole eyelet. Used at the centers of flowers, or as the hub of a wheel decoration.
Joda- Buttonhole Stitched leaves.It is worked with the points on the inside of the leaves giving the leaves a smooth outside line.
Rahet/Banarsi- Stem stitch performed either with fine thread from the front of the fabric or in 6 strands of thick thread from the back forming a solid line on the front, giving a thicker shadow from underneath.
Janjira/Zanjeera- Narrow chain stitch used as an outline often combined with pechni or thick lines of Tepchi. Janjira is often worked with silver or gilt threads to give sparkle.
Khatau- White on white needle turned appliqué. It is used to provide different layers of opacity.
Tuppa- Straight parallel often padded satin stitch filling for the center of Keel.
Turpai- Hand Stitched Seams using a fine thread.
Embroidery stitches without Western Equivalents.
Kangan-
Stitched using 3 strands of thread, it creates a slice of pie around the chikna phanda.
Combinations
I feel I must apologize for the crudeness of my drawings, they will eventually be replaced by pictures of the embroidered samples.
Chameli Phool: Jasmine Flower
Stitches: variation 1: Keel and Dhari phanda.
Variation 2: Keel and Mundi Murri
Keel:
Stitches: Chikna Phanda with Kangan The keel is often combined with several other stitches to create different forms or by itself as an overall ornament.
Bara Kangan: Bangle Bracelet.
Stitches: Center Keel, then Hathkati Jaali and another layer of Kangan, finally large Dhari phanda with stems.
Kaori: Conch
Stitches:
A. Flat: Side sepals in fishbone stitch, center of Hathkati Jaali.
B. Embossed: Side sepals in padded satin stitch, center of Hathkati Jaali.
Bijli: Earring:
Stitches: Hool, padded satin stitch, mundi murri: Kangan stitch or Dhari phanda can also be used.
Meharki:
Stitches: Center Chikna Phanda with Sada Murri and Dhari Phanda on outer ring.
Bulbul Chashm: Nightingale’s Eye
Stitches: small Hool at the center surrounded by large Phanda with stems.
Peepal Patta: Holy Pepal Leaf.
Ficus Religiosa: Sacred Fig or Ashvattha tree in India and Nepal. The sacred fig is considered to have a religious significance in three major religions that originated on the Indian subcontinent, Hinduism, Buddhism, and Jainism. Hindu and Jain ascetics consider the species to be sacred and often meditate under it. This is the tree under which Gautama Buddha is believed to attained enlightenment. The leaf is usually filled in with other floral motifs. (Wikipedia, n.d.)
These fantastic designs and stitches were embroidered upon a translucent cotton fabric with a weave so fine that it was described as “Woven Air” by Roman author Petronius in the First century CE, the soft and delicate muslin was revered, gifted and worn by Indian royalty since the time of the Indus valley civilization. Among the few places that produced fine muslin in undivided India, Machlipatnam (Andhra Pradesh), Jagatsingpur (Odisha) and Dhaka (Undivided Bengal) were renowned for the gossamer, feather-light and translucent cotton weave. The Arni muslin for the city of Machlipatnam (earlier called Masulipatname, hence perhaps the name “Muslin” although many accord the name to the city of Mosul in Iraq.) The scholar Pliny (CE 23-79) Lamented over the emptying of the treasure (over 500 million sesterces of gold bullion each year) for ‘venti’ or ‘nebula’ from the Indian Gangetic plains.
The closest equivalent is the mulmul sold to Europe and America as cotton voile.
A jumbled Mess of Pictures from my creative Process
I finally finished a pair of cordiform manuscripts. I had not meant to take upwards to tens of years to get them done, or to write up my documentation, which is an ever evolving mess. But both books are finally bound, even if never finished. There is plenty of precedence to manuscripts being bound but never actually finished through history or becoming property after the death of the original patron commission, La Belle Heures of le Duke de Berry comes to mind, so my not finishing the books but binding them anyways is just fine. The first group of pictures is of my unfinished bestiary, just the shiniest.
The second group here is the larger of the two manuscripts.
Both Books side by side.
What is Cordiform?
(cor·di·form adjective heart-shaped.) Why heart shaped? Well, in the Middle Ages, the heart was seen as the seat of the soul. When it was first envisioned it was usually a scroll pictured within the heart. On this scroll was written the whole of the person’s identity and history. All the good, all the bad was no longer hidden from view. It has been painted as an actual heart in the hands of a hopeful lover offering himself up to his lady, or a lady to her lover, and more recently as a heart shaped book held in hand. Really, it’s supposed to be a romantic thing, symbolizing true love, devotion.
Cordiform or Heart shaped books have been around since the 15th century, although finding actual books from that period is rare, but not so rare as to be impossible:
Volume in the shape of a heart. – 151 ff. – 175×100mm. – Red Morocco(goatskin) binding with the arms and cipher of Philippe de Bethune
Description : Hours for the use of Amiens (Hours of the Virgin
The little book of hours of Amiens Nicolas Blairie, carefully written on a thin Ruling rose, but modestly decorated with some original illuminations in ink (folio 29), has the curious shape of an almond when it is closed. When it opens, the two halves of the almond bloom to fit the contours of a heart, concrete evocation of the heart of the person praying the prayer that opens.
Created sometime between 1401 and 1500 CE, the manuscript was collected and re-bound into its current Red Morocco binding with its arms and cipher of Philippe de Bethune, a diplomat to Rome and an Art Collector.[1]
This heart-shaped songbook – the Chansonnier Cordiform, also known as the Chansonnier de Jean de Montchenu, consists of seventy-two parchment folios, in a heart shaped leather binding that opens to a double heart shape. (Bibliotech Nationale France, n.d.) [1]
The Heart Book, Denmark 1550’s, regarded as the oldest Danish ballad manuscript. It is a collection of 83 love ballads compiled in the beginning of the 1550’s in the circle of the Court of King Christian III. (Heart Book Denmark 1550, n.d.) [1]
In the Middle Ages, the heart was seen as the seat of the soul. When it was first envisioned it was usually a scroll pictured within the heart. On this scroll was written the whole of the person’s identity and history. All the good, all the bad was no longer hidden from view. It has been painted as an actual heart in the hands of a hopeful lover offering himself up to his lady, or a lady to her lover, and more recently (the 15th century) as a heart shaped book held in hand.
Young man with a Heart shaped book
The heart-shaped book this sitter holds is probably a prayer book; he is depicted before a view of the church of Sainte Gudule in Brussels, where a mass is performed by a priest in the background. The man’s identity is unknown, but he may have been a member of a confraternity or guild with a particular devotion to Saint Augustine, whose symbolic attribute was a heart surmounted by a flame. It is possible this formed the right wing of a devotional diptych; as such, the shape of the book would echo the open form of two joined, arch-shaped panels. (MET, n.d.)[1]
The hl. Hieronymus and the hl. Catharina sit on a sod bank that is shielded from the landscape behind by a rose hedge. Jerome is accompanied by his symbol animal, the lion, from whose paw he has pulled a thorn. At Catherine’s feet lies a smoldering, broken wooden wheel, and beside her leans a long sword, both symbols of her martyrdom. The king’s daughter Catharina was a role model for rich, courtly women, and as such she is also depicted here. She has a high-shaven forehead, in the fashion of the time, and is presented in an equally fashionable fur-lined silk surcoat. The entire scene is framed by a gilded arcade with tracery. In the background is a wide landscape with some late Gothic buildings. (Saints Gerome and Catherina, n.d.)
Adam, P. (1903). Practical Bookbinding. London: Scott, Greenwood & co.; New York, D. Van Nostrand co.
Cockerell, D. (1904). Notes on Bookbinding. London: Royal Society of Arts/ W.H. Smith & Sons.
Cockerell, D. (1920). Bookbinding, and the care of books; a text-book for bookbinders and librarians. London, New York [etc.] : Sir I. Pitman & sons, ltd.
Department, S. C. (2015). Medieval & Early Modern Manuscripts. New Haven: Yale University Library.
Prideaux, S. T., & Duff, E. G.-1. (1893). A Historical Sketch of Bookbinding. London: Lawrence & Bullen.
Vaughn, S. J. (1914). Printing and Bookbinding for Schools. Bloomington: Public school pub. co.
Wood, E., Strange, E. F.-1., Uzanne, O. 1.-1., Frykholm, S., Brochner, G., Khnopff, F. 1.-1., & Mourey, G. 1.-1. (1900). Modern book-bindings & their designers. New York and London: John Lane.
Zaehnsdorf, J. W.-1., CU-BANC, Z. (., & Allsopp, F. W. (1880). The Art of Bookbinding. London: G. Bell & sons.
Belts
or girdles have been used by mankind for centuries, millennia even. Whether it
was twisted rope, braided leather or studded with precious metals and gems it
has the purpose of being the single most utilized accessory by men or women
since the need to hold up a skirt or pair of pants. They come in a variety of
thicknesses and materials that nearly boggles the mind. Archeological digs have
discovered them as far away as China, and as close to home as the peat bogs of
Ireland and ship burials in the Norse Countries. They have been represented in
carved marble, early portraiture, miniatures in manuscripts and tomb effigies.
They have evolved from pure utility of the peasant and middle classes to the
almost useless bling of the upper-class in the middle ages.
When doing
research for this item I wanted to make sure that it was within the period for my persona and the SCA. I have found
many pictures supporting the 15th-century
use of this belt, but few actually in the 14th century. I kept entering search
criteria ” 14th-century girdle
belt” and it would bring up pictures of one type being the long,
decorated buckled style. This simple round the hips with hooks and chain was
pictured in 15th-century illuminations
but not 14th. I knew it had been in use in the 14th century but was having
difficulty finding it under the search criteria. That is until I went to La Cotte Simple and read her lovely article
“Building a 1480 English Lady’s Outfit” and she had the correct name
for the girdle. Demysent. With that one word,
I was able to find at least 1 picture supporting the notion that it was worn in
the 14th century, and it was in the same museum as the Well of Moses in Dijon
France. The Retable de la Crucifixion carved in 1390 by Jacques de Baerze. That Wonderful Sculptor of wood carved
a side panel full of Saints and one of them is a lovely lady wearing the Demysent
(Picture1a).
So,
this one style was worn in three centuries, 14th, 15th and 16th. This one style
of the belt can be used to accessorize
three centuries of garb and not be out of place.
Where
I found my inspiration:
The style of the
belt that I wanted was to be found in a manuscript of plays written in
1400-1500 Item 12148 The comedies of Terence: folio 66r. It is not said at the
website of the BnF Gallica as to which play this picture belongs but it is her
belt which she holds in her hands that I really had the hot’s for. and the
illuminator did a really good job showing the clasp at the end of the belt, for
lo, it is a hook.
Housed
in the National Museum of Antiquities Leiden is
a lovely fragment of a studded leather belt with fittings. It’s got pretty bits
nailed to it in a flower pattern, which is a center stud surrounded by six more
flanked by a stud on either side and another stud between each flower set. The
metal belt mount at the end shows that it may have been an add-on from a larger belt as it isn’t the same
width of the belt and has two loops but
no tongue and the mount is made to be used with a buckle that has a tongue.
The buckle is not what drew me to
it, the studs and their pattern are.
On making my belt:
I chose not to go with a flower pattern, though it’s
pretty, because of costs. I used turquoise sparkle rivets because by the time
the Church in Rome finally allowed anyone not of the clergy, mainly Bishops, to
wear “Turkey Stone” it had reached English shores in the 14th
century. Nickel rivets to emulate the studs
and chose instead of making metal mounts to use leather to hold the pouch
hanger and “D” rings at each end. Why, because metal work requires
skills I have yet to learn safely. when cutting the metal sheeting for the
mounts I could not control my hands and cut myself when I got distracted. This
is Not to say that I won’t try to make my own mounts at another time, but for now, the leather wrapped around the
“D” Rings at each end will be just fine and look just as
“peri-Oid” as any other modern made belt.
Materials, tools, resources/links
I
tend to work with scraps and left-over’s for my persona’s belongings to keep
the cost low. Living with a leather crafter has an advantage that I sometimes
shamefully take advantage of: This is not one of them. To make this belt I am
dipping into his business supplies and therefore will be paying for them, once
done, so that his inventory will not suddenly become short.
Here is the basic supply list and the cost of the materials:
Turquoise sparkle Rivet: 14=$3.15 (because I like even
numbers and have left the center back rivet as nickel)
Nickel D Rings 3/4 inch: 3=$0.43
307 D Solid Brass Nickel Rivet: 88=$5.60
3/4 inch wide 54 inches
Black Bull hide Strap: $2.00
Mounts, S Hooks and Chain: To be researched and made at a
later date.
Materials: $ 11.18 Time: 1.5 hours at $15 dollars per hour.
This information is important should I decide to start making them for sale.
Leather Strap: Made using a large
leather strap cutter while cutting bulk lengths of straps for belt making and
other leatherworking projects. The
leather itself is cut from a large bull hide purchased from Weaver Leather.
Hole
Punch: I used a standard hole punch and mallet to put the holes for the
decorative rivets measuring between each center hold of the design the width of
my left palm. The design was then punched around the center holes the length of
the belt blank. The rivets were then set in the holes and the backs put on with
a set and the mallet. When setting the rivets I started with the turquoise
rivets first as they are domed and would need extra care in setting, so a hunk
of leather was placed on the anvil to protect the stones. I left the leather on
the anvil when setting the non-stone
bearing rivets to allow a dimple to form, while not a practice in the period that I know of, it looks pretty in my
opinion.
To
form the purse hanger I used a length of half inch wide polished leather strap
and a “d” ring, held in place by two nickel rivet.
The
Belt at each end is set with a “D” Ring so it can be worn with a
ribbon until I can find the proper belt mounts and hooks for it, which can be found online, or I make them
myself.
Sparkle Rivets and nickel silver dented rivets on Buffalo textured black leather strap
*Trigger Warning: This article has some harsh views on the Church in Rome. It is not written to offend anyone of an extreme devotion to the Church of Christ in any of its current incarnations.
The purpose of
this article is to show how a woman in the middle ages would have healed the
bruises of the people in her household. What tools, herbs, and supplies she would have used and what kind of
education she might have had if she were of a status higher than that of a
peasant, say a merchant or tradesman’s, a daughter.
I wrote this
article for any person who would use the same methods to create a bruise salve
for those in their households, those in Martialate, fighters, light, heavy and
other’s of those types of activities..or just about anyone that needs a salve
for pain and bruising.
Even though the
lack of education for lesser classes,(A myth that has been debunked in England
by the Peasants Revolt of 1381) would have made it hard for a peasant to have
the education needed for advanced herbal medicine., a medieval woman could
indeed have used the tools and herbs listed to make a bruise salve, because
medieval woman of any class would have
known what herbs of the field to us in a bruise salve, even if they learned it
from a local Herb Wife or Midwife. The education level of certain higher
classes encouraged the lady of the house to run a healing still room or
scullery for her household.
Background:
My Persona
Mevanou verch Rhys
Yriskynit, or Mevanou daughter of Rhys the Tailor; born to Proswetel verch Brethoc and Reys ap Madoc Seis in the year of
Our Lord 1441 in the few years before the start of what we now call The War of
the Roses on the 24th day of March. Her Saint on that day would be Saint
Gwuinear of the Springs. Her Mother had
been trained in the verbal traditions of healing and midwifery. Her father born
of the English speaker for the village of his birth sent Reys via monk to
London to be the apprentice to a Sutor(shoemaker) but was turned away when
there was no room for another apprentice. The monk quickly found him a place as
an apprentice to a Tailor shop instead. Maddoc Seis was only too happy to find his
youngest son out of dangers and predations of his elder siblings, who in
typical Welsh fashion killed each other off. Mevanou was taught to read, write,
do simple sums and all of the skills in using, preserving and healing available
to her mother. She was taught by both parents the joys of sewing, embroidery
and how to tend to a household.
I have found this recipe on a site called Stephen’s Florigilium[1], It’s called Bruise Cream. The recipe is a favorite among the fighters heavy or otherwise in the Society for Creative Anachronism. In this collection of messages each person listed their favorite recipe for the cream and I noticed that they all had some of the same ingredients, so I combined those in the lists that I knew would be helpful for bruising, and I simplified it down to the more basic recipe with amounts of herbs that would make just 2 cups of the herbal oil, which could then allow me to make a simple salve. I have been using this recipe for several years and finally decided to write a paper. which I then cleaned up for an article here.
In order to know if the herbs in my recipe were also used in the time period of my persona by her counterparts I then did research as to whether or not a woman of middle class would have had the knowledge either handed down to her by another woman, her mother or the local herb-wife or even the local Abbess in a Nunnery.
What follows is my
discovery.
Every person who
has been unlucky enough to fall off the swing set at a school playground has
had an encounter with a bruise, or scuffed knee. While it healed we marveled at
the colors of that bruise as it healed and wondered what was really happening
and disappointed when it was fully healed as our badge of courage faded. Well,
for those who know how a bruise happens but not what a bruise actually is, here
is a lovely explanation.
Forgive me, but I
am going to use the modern terminology to keep it simple.
A bruise also called a contusion, is a type of
relatively minor hematoma of tissue in which capillaries and sometimes venules
are damaged by trauma, allowing blood to seep into the surrounding interstitial
tissues. Bruises can involve capillaries at the level of skin, subcutaneous
tissue, muscle, or bone. A bruise may be named by the length of its diameter as
a petechia (less than 3 mm), purpura (3 mm to 1 cm) or ecchymosis (1 to 3 cm),
although these terms can also refer to internal bleeding not caused by trauma.
As a type of
hematoma, a bruise is always caused by internal bleeding into the interstitial
tissues, usually initiated by blunt trauma(falling off the swing set), which
causes damage through physical compression and deceleration forces. Trauma
sufficient to cause bruising can occur from a wide variety of situations
including accidents, falls, and surgeries, the pounding one receives with the
duct tape covered rattan sword from one’s opponent in the lists. Disease states
such as insufficient or malfunctioning platelets, other coagulation
deficiencies, or vascular disorders, such as venous blockage associated with
severe allergies can lead to the formation of bruises in situations in which they
would not normally occur and with only minimal trauma. If the trauma is
sufficient to break the skin and allow blood to escape the interstitial
tissues, the injury is not a bruise but instead,
a different variety of hemorrhage called bleeding, although such injuries may
be accompanied by bruising elsewhere.
Bruises often
induce pain, but small bruises are not normally dangerous alone. Sometimes
bruises can be serious, leading to other more life-threatening forms of
hematoma, such as when associated with serious injuries, including fractures
and more severe internal bleeding. The likelihood and severity of bruising depend on many factors, including type and
healthiness of affected tissues. Minor bruises may be easily recognized in
people with light skin color by characteristic blue or purple appearance
(idiomatically described as “black and blue”) in the days following
the injury. There, now you know what a bruise is.
Bruises go through
a rainbow of color changes as the body begins to heal itself. The rainbow of
color changes means that your body is
breaking down the red blood cells that collect under the skin. As the red blood
cells break down, they eventually get flushed away by the body’s natural
process. These red blood cells cause the bluish, purplish, reddish, or blackish
marks that are typical of a bruise. That’s where black-and-blue marks got their
name – from their color under the skin. You can pretty much guess the age of a
bruise just by looking at its color:
When you first get a bruise, its reddish as the blood
appears under the skin.
Within 1 or 2 days, the hemoglobin (an iron-containing
substance that carries oxygen) in the blood changes and your bruise turns
bluish-purple or even blackish.
After 5 to 10 days, the bruise turns greenish or yellowish.
Then, after 10 or 14 days, it turns yellowish-brown or
light brown.
It usually takes
2-4 weeks for bruises to disappear, depending on
the person and how severe the injury is. Bruises can last from just days to
months. [i]
Women in Medieval Medicine: Conflicting
Attitudes
Like the lepers
and lunatics with whom they were sometimes categorized, women occupied an
ambivalent position in the eyes of the medieval Church and the medical
profession alike. On the positive side, female saints; headed by the Virgin
herself, were venerated for their miraculous healing powers; housewives were
expected, as a matter of course, to supervise everything touching the health
and welfare of their families; and all the larger hospitals and almshouses
employed women to care for the sick, albeit often in mental hospitals. On the
Negative side: although contemporary literature abounds with examples of
fictional heroines noted for their medical skills, the authorities were in
practice increasingly hostile towards those women who overstepped the bounds of
their amateur or domestic role by setting themselves up as empirics of various
kinds. Mistrusted by the ecclesiastical establishment, whose fears found
expression in a series of legal measures designed to curb, if not completely
suppress their activities, women nevertheless continued their freelance
practices that were more often than not the inherited businesses from husbands
or fathers. The Church, unable to completely curb these women set out to vilify
them with rumors that these wise women were practicing the black arts. A bit
more, in the medieval Church’s mind,
women were so far inferior as to inherit their souls as many as 20 days later
than boys while in the womb. Women had to work three times as hard to be taken
seriously and often would be punished for trying to clean the slate and show
that we were not inferior. This has changed little in the years since AD 380
when the Christian religion was made the official state religion of the Roman Empire by Emperor Constantine I.
As said before
women were expected to care for the sick and infirm with the preparations of
herbal remedies. In the Roman period, the
women of the family treated the illnesses of ordinary folk, using methods and
remedies handed down from mother to daughter for many generations. This
practice continued throughout the middle ages with the same remedies being
passed from villager to villager all through Europe.
The recipes used were the same regardless of whether you were pauper or Pope.
These were often written in commonplace books available to any who could read
and afford them. Most would often learn the recipes from the wise woman before
them, be that their lady mother or a nunnery if they had the money to be
accepted.
A woman of the middle classes would have learned
to read and write under the hand of her mother or nurse, especially if she were
the child of a tradesman[ii].
While young she would have been made sure to be able to do basic if not minimal
mathematics in order to assist her husband in the running of his business,
which due to the lifespan of women she would most likely have taken over the
running of it after his death leaves her a widow. Remember, that in the middle ages men still
thought of women as their functions..wife, mother, housekeeper, servant etc.
Her education would have been such to enable her to do her one womanly job in
creating and raising the next generation. Remember that includes caring for the
entire household and their health and well being, so knowledge of herbs for healing
would have been part of it.
The Herbals and the People that wrote them
Many of the
medieval herbals and health manuscripts were written by people who were putting
their own thoughts onto paper or copying what had been written by others many
centuries before them. Some of those writer’s thoughts had nothing to do with
what those herbs were actually used for or were proven to be useful for in
later centuries. Others were putting their religious dogma into the mix with
the original wording of text being replaced with the chants and prayers of
their faith.
Take heed when
looking for a cure for some of the earlier diseases before the coming of
Christianity, it’s likely you will not find the original text as it will have
been changed to a church-approved prayer.
To get to an earlier text you will need to be lucky enough to find much earlier
manuscripts, and I wish you much luck. The world of medicine and healing went
from a golden age of depression being seen as an illness that could be treated
with herbs and therapy(Egyptian papyri) to depression being a madness that was
the work of Satan and God who let the demons into your mind(Hildegard von
Bingen). Also, a lot of works were lost when
the first council of Nicaea convened and decided the fate of the doctrine of
faith; a great many manuscripts became anathema and were destroyed. Those that
were not destroyed were hidden and lost.
More and more as the Church of Rome took control everything written and
believed in; from medicine, women’s rights and who believed or did not were
examined and became blasphemy if it did not tow the company line. While many a
Christian doctor believed that the shite of a white animal was pure enough to
be included in medicines and cures, those not of the Christian faith frowned and
continued with medicines that actually worked, but were considered barbarous by
pious Christians. Some manuscripts that
were believed to be written by women were often deliberately rumored to have
been written by men to either discredit them or make them acceptable in the
eyes of the medical schools and its bevy of boys club practitioners. Anything
to do with the healing of women was left to women and was taboo to study or
write about.Mostly because the Church in
Rome was against anything that would lift up women in the eyes of mankind, and
because women were considered dirty and the origin of Original Sin…so long as
the church controlled how women were viewed, educated, married off and
subjugated; We would not find equality…funny, today we are still having that
issue.
The Red Book of Hergest
The First
manuscript I looked at was the Red Book of Hergest and its section of medicine
compiled in the late 13th century by order of The Prince of South Wales Rhys
Gryg, who ordered his physician Rhiwallon to compile his medical knowledge in
Welsh for others to make use of the information both then and during the
centuries that followed. Rhiwallon lived at Myddfai, a tiny village in
Mid-Wales. This little village was the center of herbal healing in Wales, and
little has changed the centuries that have passed. Indeed even today the Elders
of Wales prefer the herbal healers to the modern medical practitioners because they never gave up the
Herbal traditions or even came to see it as an alternate
form of medicine. Myddfai to the non-native
Welsh became a legendary place, where the
Fair folk gave the magic of medicinal knowledge to one man and his bloodline.
This tradition was orally passed down from generation to generation in the form
of rhymes and songs until Rhys Gryg had that knowledge compiled, but Rhiwallon
being a man forgot to compile the knowledge of the wise women in the villages,
thus leaving a very large gap for generations later to work on filling. The
book had little in it to help me, other than to point me to earlier works and
to show that the Welsh had a healing tradition of some merit. Rhiwallon did not
cover the common herbs, nor bruising in the Red Book of Hergest, however his
long descendant Jon Jones, physician of Myddfai and last lineal descendant of
the family left behind his book of medicine in his own handwriting and in Welsh
at a time when the English were generally
how one communicated when educated in medicine. It is His book that I found a remedy for bruising that had a recipe for a
salve for “any kind of wounded integument. On Page 331, #176 of the
English Translation from Welsh; One
should know that the Integumentary System is the Skin. While not exactly the
same recipe that I have been using it at least shows that healers used not just
one herb good for bruising(a simple) they used several herbs together to make a
powerful salve to heal a bruise or wound right well.
After some thought, I followed my nose to the works of the
Anglo Saxons…They too were of the groups of people that had migrated eventually
to the lovely British Isles, just as the ancestors of the Welsh did in the
first of many Celtic Migrations. It’s a walk backward
in time and publication, but it was worth the trip back in time. The History
Channel likes to show the Angles and the Saxons as Hairy, Unwashed Barbarians
as they like to portray them as Dirty Warriors. Which is NOT true. They enjoyed
the Arts, Music and Herbal healing as well as educating themselves. Many of the
Migrations that came to the British Isles were well educated, with different
parts of their society being equal in standing, even the slaves had status, and
Women, when the Christian monks and missionaries came to the Isles they readily
found that women had equal standing..well, doncha
know that had to go…
Bald and his Leech book
Written in the
early 10th century in England
under the direction of one Bald, who, if he were not a personal friend of King
Alfred’s, had at any rate access to the king’s correspondence; for one chapter
consists of prescriptions sent by Helias, Patriarch of Jerusalem, to the king. We learn the names of the first owner and scribe from
lines in Latin verse at the end of the second part of the MS.
“Bald is the owner
of this book, which he ordered Cild to
write, Earnestly I pray here all men, in the name of Christ, That no
treacherous person take this book from me, Neither by force nor by theft nor by
any false statement. Why? Because the richest treasure is not so dear to me as
my dear books which the Grace of Christ attends.”
The109 leaves of
this book are written in a large, bold hand and one or two of the initial
letters are very faintly illuminated. The Leech Book of Bald was as evidence
shows, the manual of a Saxon doctor or leech, and he refers to two other
doctors—Dun and Oxa by name—who had given him prescriptions.
The position of
the leech in those days would have been very difficult, for he was subjected to
the obviously inequitable competition of the higher clergy, many of whom
enjoyed a reputation for working “miraculous” cures. The leech being so inferior in position, it is not
surprising that his medical knowledge did not advance on scientific lines.
The treatments of
many ailments are described within its pages; from being elf shot to flying venoms. The Anglo-Saxons had
a love of herbs and there are many in that book used then, that is still in use today, among them: Arnica
(Wolfsbane), Wood Betony, Vervain,
Mugwort, Plantain, Yarrow, Comfrey, Calendula, and
Juniper.
The recipes and
treatments are written in Old English (Anglo Saxon), and translations are few
and far between, especially descriptions and meanings of the words. There is a
movement to translate all Old English Texts so that the newer generations will
be able to see how their ancestors thought, treated and healed ailments. As it happens, while searching the interwebs
searching for a translation I found one in
Rev. Oswald Cockayne, who did the work and his translations of the Old English
Anglo Saxon manuscripts were published as Leechdoms, Worcunning and Starcraft
of Early England in three Volumes. Volume II contains the Leechbook of Bald
part I, II, and III. Also contained within is the Herbarium Apuleii, translated
from the Lingua Romaic to Anglo Saxon and finally to English… Thank the
Anglo-Saxons for being so thirsty for knowledge, without them, the English as a
nation would not have been so Educated.
Bald was working
with recipes and folk medicine drawn from the countryside around him, passed on
from mother to daughter, father, and son,
borrowed from the king’s physicians. He
had gathered the recipes and treatments, and
all evidence points out that this manuscript was the culmination of his
knowledge so that he would have it on hand and not need to worry about
forgetting any of it in my opinion; since I too have my notebooks written
nearly the same way while collecting recipes. This one for coughs, that one for
skin ailments, another for my persona’s herbal knowledge.
With regards to
the way in which Anglo-Saxons used their drugs, it should be said that they mostly
employed simples(single herbs as ingredients) in infusions or powders; though there were quite a few containing often
a great number of herbs, are uncomplicated and very different from the formulae
of Galen. Each of the herbs in this recipe is
covered in the Leechbooks and can be grown in an English Garden save for
Arnica. Arnica also is known as Wolf’s
Bane, is a Continental Herb and though is cultivated throughout northern Europe
has not been introduced to England of the Anglo Saxons save by trade, as it is
almost impossible to grow it anyplace that does not have alpine meadows or is too acidic in soil content. It
may be that at one time English soil was not so acidic and Arnica could have
been grown there, but scientific data of the range of habitat suggest that it
may not have been grown there at all.
The Anglo-Saxon
pharmacy in comparison to those taught in the schools of such higher learning,
such as Salerno can be considered of a lower state of medicinal practice. Herbs
were used as watery infusions and decoctions, or made up with ale and milk in
draughts, or as confections made with honey,
or mixed with butter or lard as an ointment. At the heart of it all, I find
that I prefer this lower state to the often dangerous formulae into which a
great many heavy metals and other poisons which have been shown to be far more
dangerous in the hands of uneducated snake oil salesmen of later centuries. Throughout the Leechbooks the
herbs in this recipe were used either together or as simples to help with pain,
bruising, and leprous diseases of the skin, so it’s not impossible that they
would never have been used together, just harder to find evidence of.
The Leech book is
rare in that it contains instructions for plastic surgery; the recipe, in
particular, prescribes surgery for a harelip[iii].
Amazing isn’t it that in the 10th century there was a way to
surgically alter a debilitating birth defect?
The Process
Herbal infusions
have been made and drunk throughout history – both for their medicinal
properties and culinary attributes. Our breakfast tea is, after all, simply an
infusion of an herb in water. Herbal infusions can consist of just one
individual herb or can be made of two or
more herbs blended together.
Infusing an herb
in oil allows the active fat-soluble
constituents to be passed into the oil. Hot infused[iv]
oils are slowly, simmered for a couple of hours, whilst cold infused oils are
heated by the sun over several weeks. Both types of oil infusion can be used
externally as a massage oil or added to creams
and medicaments as in a salve.
Bald seemed to
prefer the use of either lard or butter[v]
as the base for all of his salves, but in looking at how fast butter goes
rancid it would seem a large waste of materials to continually make the salves
needed to cover the many ailments, but then again, those remedies were used
pretty quickly and did not need to be kept longer than needed.
My Process is much
the same as that instructed in the Leechbook of Bald, I took the herbs and
pounded them together in a Mortar with a pestle, This took quite a few hours due to my mortar
being a smaller one of marble, (I then quit using the mortar and pestle and
cheated by using an electric coffee grinder, ground is ground after all.); then
added them to the pot of oils/fats and macerated them for a few hours, keeping
careful watch to make sure that I did not burn the house down with a grease
fire. When I got to be too nervous, I switched to a crock pot for the better
control factor. The need for complete control of heat and time allows me to put
all of the ingredients into the crockpot
and leave it covered for the amount of time needed and not leave me with the
worry of burning down the house or burning the herbs in the oil and therefore
making the infusion useless. When the allotted time was done I removed the pot
from the heat and allowed it to cool before straining out the herbs in a fine
muslin cloth. That was rather fun, the oil was still rather warm as I squeezed
the bag of herbs to get all the oil out. My hands had never been so soft and my
osteoarthritis quit complaining about a
bit, so It was all the proof I needed as to whether or not it would work.
The Herbs
Achillea
Millefolium – Yarrow
Its name is
derived from the Greek hero Achilles, and during the Trojan, wars were reputedly
used to treat wounds. According to the many herbalists of that time, Yarrow is
somewhat warm and dry and has a discreet
and subtle power of healing wounds. If a person is
wounded by a blow (bruised), let the wound be washed with wine. Then gently tie
warm yarrow, cooked moderately in water and with the water squeezed out, over
the bandaged placed over the wound. It will draw out the infection from the
wound and the wound will heal. Today yarrow is valued mainly for treating colds
and influenza, and also for its effectiveness in treating problems of the
circulatory, digestive and urinary systems, and inflamed joints.
Arnica
Montana –
Arnica
Arnica can be
found in many medieval herbals to cure the fires of overexertion and even for stoking the fires of sexual love,
according to Hildegard of Bingen. “Arnica is very warm and has a poisonous heat
in it. When a man or a woman burns with desire, if that man or woman’s flesh
touches the greenness of arnica, they will burn with love for whoever is afterward
touched with the same herb. The person will be so incensed with love, almost
infatuated, that he or she will become a fool” In Modern Usage, however, Homeopathic Arnica is a perfect
fit for all kinds of childhood bumps, bruises and contusions, and many
occupational and sports injuries. As a general rule, homeopathic Arnica is a
prime candidate for any accident or injury that results in physical trauma
consisting of bruising, tissue damage, broken blood vessels, black and blue
skin discoloration and swelling. It is most specific to blunt forms of trauma,
especially to soft tissues. Arnica can also be of benefit in strains, sprains
and muscle injuries.[2] It
comes as a little white pill approved by the FDA for internal use..for
herbalists who prefer it as a topical ointment it comes in a little tube of
cream. Do NOT use this on broken skin. It causes irritation to mucous membranes and the skin on your body is
the biggest one. (if one uses the recipe below, and prefers to remove Arnica
from the recipe, the resulting oil will still be just as efficacious as if it
were included. Just remember to double the Calendula.)
Artemisia
vulgaris – Mugwort
Related to
wormwood, this herb is highly regarded medicinally in both East and West. It
was planted along roadsides by Roman soldiers, who put sprigs of it in their
sandals for their aching feet on long journeys. Used medicinally in compresses
by many cultures for its properties in treating bruises and bites it is
included in my bruise juice also for its antibiotic properties to ward off
infection.
Calendula
officinalis – Pot Marigold
These golden
flowers have been a favorite among the herbalists for centuries. It has been
recommended for everything from gastritis to inflammations of all kinds. Hildegard
used Calendula for crusty scalp by pounding it in a mortar with bacon fat and
smearing it on the scalp so that the crustiness falls off after a few days of
use. Calendula is very useful for cuts and scrapes, mild sunburn and dry skin
conditions.
Hypericum
perforatum – St. John’s
Wort
Old herbals often
refer to tutsan (H. androsaemum), from
the French toutsain or heal-all, which
was also used to treat injuries and inflammations. I use this herb for joint
pain, inflammation and fighter’s elbow. One word of caution: use of this herb
has been known to make the user sensitive to sunlight, so please use
precautions when out in the sunlight.
Juniperus
communis – Juniper
Long associated
with ritual cleansing, juniper was burned in temples as part of regular
purification rites and in homes to ward off the plague. Called Savin or
Juniperus Savin, Imported from Rome, it
was in the gardens when the Anglo-Saxons invaded and took over[3]. Several
Medicinal papyri have survived dating back as far as 1550 BC in which contains
Juniper berries. Now many herbalists use the berries for their help for
inflamed joints, muscle pain, and gouty joints. oh, and don’t forget its very
tasty inclusion in the recipe for a good gin.
Symphytum
officinale – Comfrey
A country name for
comfrey was knitbone, a reminder of its traditional use in healing fractures.
The herb contains Allantoin, which encourages bone, cartilage, and muscle cells
to grow. This recipe contains comfrey to do just that; encourage the healing of
damaged muscles, and joints.
The Tools of the Medieval Kitchen
One simply cannot
think of a kitchen without seeing the modern kitchen; full of modern
appliances, knives, spoons, pots, and
pans. The medieval kitchen would have been a tad different…not by much..there
would have been none of the modern appliances such as stove and
refrigerator..food storage would have been simpler than even the pantry. In
most larger medieval homes there were different spaces used for the different
functions of preparing food or even medicines. The Scullery was used for food
storage and preparation and the kitchen with its fireplace where the pots and
pans would be used to cook the food. Also in the scullery were the herbs
hanging in bunches to dry for later use in culinary and medicine. There would
have been shelves for jars of food sealed with waxed linen and twine and the
same for the different herbs and spices(in those houses that could afford
spices, a locked cupboard would have been built to keep servants from the temptation to steal the valuable commodities.)
There were Pots
and pans for stews, soups, and frying and
sautéing as with any household we can walk into today, most were made of thick
clay with three or four feet on the bottom to keep the pot out of the coals of
the fire. the biggest would hang from an iron hook for larger stews or roasts.
The chief tools of the kitchen that I am concerned with would have been found
in an apothecary shop. The chief tools used in every kitchen and most
apothecaries were:
knives and shears(scissors)
mortar & pestle
strainer, sieve, and/or colander (to filter liquids
or foods ground in the mortar)
cloths for filtering almond milk and cleaning
surfaces, scouring sand, and tubs for washing.
weighing scales,
heat source (fireplace with iron hooks for pots.)
clay jars for storage.
My kitchen has
those things, in modern terms all the kitchen cutlery and scissors, tiny mortar
and pestle, washcloths, straining cloths,
strainer, wire sieve, Sink, scales, electric stove, crock pot and ball canning
jars for storage of salves. I get most of my herbs from apothecary shops in
town and online. They come in separate packages weighed out to my
specifications and labeled so that I need only put them in jars for later use.
When you go to the apothecary in your area, remember to mention that you need
them in separate and labeled bags, not jumbled together hastily in a paper
lunch-bag, it happened to me once..and in hindsight,
I should have refused the lot and demanded that they do my order again. oh
well, there’s always next time.
The Results
What I got was a
lovely all-purpose itchy owie oil that I
could then turn into a salve or cream. I
tried it on myself first, (remember that part above about straining it?) thinking that if it works for my
bruises it would work for anyone; then when friends found that I had been
making bruise juice(the oil) I was offered up things in trade, now truthfully,
those people asking for it were heavy fighters who at the end of the day on the
field wanted something to make the ouch go away and I happily obliged. Don’t
tell them, but I would have happily given it away for free, but in the one
instance, I needed that tailors dummy really badly. All of the herbs work well
together, in the oil base and those who use it are only too happy to take it
off my hands when I make it. If it didn’t work, no one would want it.
Conclusion
Would my persona
have used the tools and herbs to make the oil and the salve? Yes, she would
have.
She would have
heated the fats in a cooking pot(clay being the usual material) to make them
liquid and added the herbs to make the salves and strained them through scraps
of cloth or just left the herbs in the fats as it cooled. The cloth would have
been linen, made from the retted fibers of the plant commonly called flax, and
indeed she might have even used the scraps leftover from making her own clothes.
Truly, I myself have used the larger scraps of linen left over from making my
garb to make the straining sacks for herbal work.
After all of the
reading and researching, I do believe
that my persona would indeed have had the education and thus the use of the
very basic tools to keep her household healthy and safe from the superstitions
of the day, shite of a white animal indeed…
Please take note that most of my trips to Wikipedia
are in search of more questions to ask, and to take a peek at the bibliography
of the authors and their sources.
I did not use them as First line sources due to the
changeability of Wikipedia itself.
4 Tablespoons
Calendula flowers (if not using arnica double this)
4 Tablespoons
arnica flowers (Remember that this will irritate the broken skin)
4 Tablespoons
comfrey leaves
2 Tablespoons st Johns Wort
2 Tablespoons
mugwort
2 Tablespoons yarrow
2 cups olive oil
Using a coffee
grinder, grind all of the herbs together into a coarse powder and in a large
crock pot place all ingredients. Cook for 8 hours on low heat then let cool. Don’t
lift the lid, not even to stir it. Squeeze out the oil using muslin or linen
bags and bottle. Store in a cool, dark place. it should last up to a full
calendar year if properly cared for.
Use oil to massage
painful joints and bruises.
Bruise Cream
Instructions
8 Tablespoons
bruise juice
3 Tablespoons Shea
butter
3 Tablespoons
cocoa butter
2 Tablespoons beeswax
Heat all in a double boiler until beeswax, Shea butter, cocoa butter is fully melted. Pour into a mixing bowl and put a wire whisk blade on the mixer and wait 4 minutes to let the mixture cool. Then turn the mixer on and slowly bring up to high speed and fluff the balm into a good creamy consistency. Spoon into jars and let cool…use on bruises and painful joints. Good to make ahead of time for the fighting season; your heavies will love you for it! The rapier fighters will adore you too!!! Okay, don’t forget anyone that may have any physical activities during eventing season…even if it’s just getting up to refill the big mead bucket they call a flagon…
Bibliography
Books Consulted
“Hildegard’s Healing Plants
from Her Medieval Classic Physica” Translated by Bruce W. Hozeski, Beacon Press
2001
“The Medieval Health Handbook
tacuinum sanitatis”
translated and adapted by Oscar Ratti and Adele Wesbrook
from the original Italian edition Luisa Gogliati Arano, Tacuinum Sanitatis, Electa Editrice. 1976
“The Complete Medicinal
Herbal” Penelope Ody, DK Publishing 1993
“Medicine and Society in
later medieval England” Carole Rawcliffe, Sandpiper Books LTD, 1995
“Medicine before Science”
Roger French, Cambridge University Press 2003.
“The Greek Achievement”
Charles Freeman, Penguin Group Publishing 1999
“Greek and Roman Medicine”
Ian Dawson, Enchanted Lion Books, 2005
“The History of Medicine Vol.
1 Primitive and Archaic Medicine ” Henry E. Sigerist MD. Oxford University
Press 1977
“The Genesis of Science”
Stephen Bertman, Prometheus Books, 2010
“Herbals, their origin
and evolution”, Agnes Robertson Arber Cambridge at the University Press,
1912
“English medicine in the
Anglo-Saxon Times”, Joseph Frank Payne, Oxford at Clarendon Press, 1904
“History and Hygiene of
Linen.” Harry C. O’Neill, Overland Monthly Magazine, November 1902
PDF E-Books, Booklets and
Reports Consulted:
“Herbals: The Connection between Horticulture and Medicine”
Jules Janick, HortTechnology April–June 13(2): 229–238
“Medical journals in the Eastern Mediterranean Region”
Report of a conference Cairo,
Egypt, 7–9
October 2003
“Otology in Medical Papyri in Ancient Egypt” Albert
Mudry, MD, The Mediterranean Journal of Otology 2005
“An Interlinear Transliteration and English Translation of
Portions of
THE EBERS PAPYRUS
Possibly Having to Do With Diabetes Mellitus”,
Stephen Carpenter, Michel Rigaud, Mary Barile, Tracy J.
Priest, Luis Perez, John B. Ferguson, Bard College Annandale-on-Hudson NY 1998
“The Old Egyptian Medical Papyri”, Chauncey D. Leake
Vice-President, University
of Texas—Medical Branch Galveston
UNIVERSITY
OF KANSAS PRESS, LAWRENCE, KANSAS
– – – 1952
“The doctor in Ancient Egypt” J.F. Nunn
“HISTORY OF INGUINAL HERNIA REPAIR”.
R. Van Hee Institute of the History of Medicine and Natural
Sciences,
University of
Antwerp, Belgium.
Jurnalul de Chirurgie, Iaşi,
2011, Vol. 7, Nr. 3 [ISSN 1584 – 9341]
[A. BIBLIOGRAPHICAL DEMONSTRATION’ IN THE LIBRARY OF
THE FACULTY OF PHYsICIANs AND SURGEONS, GLASGOW,
JANUARY 12TH, 1893.].”
BY JAMES FINLAYSON, M.D.,
Physician to the Glasgow
Western Infirmary, and to the Royal
Hospital
for Sick Children, Glasgow; Honorary Librarian to the
Faculty of
Physicians and Surgeons, Glasgow, etc. page 748 The British
Medical Journal APRIL s, 1893..
Leechdoms, wortcunning,
and starcraft of early England.
Being a collection of documents, for the most part never before printed,
illustrating the history of science in this country before the Norman conquest
(1864) Cockayne, Thomas Oswald, 1807-1873 Vol. I, II, AND III
Purses,
Pouches, and Bags oh my! The things we put in them vary but they all have one
thing in common. They were made to hold our stuff. As far back as recorded
history goes, humanity has had a love for the purse. Today we collect purses
and bags and clutches like they will disappear in an instant if we don’t buy it
now. Back in the 14th century the ladies and gentlemen were NO Different.
Judging by how many extant alms purses have been found up and down the Atlantic
Seaboard of Northern Europe all the way down to the Egyptian Tombs, we have always craved stuff and bags to hold
that stuff…
Alms
Purses or Aumonieres were so named because of the Medieval tradition of giving
Alms or being generous to those in need. The Alms purses one finds these days
has been carefully curated and stored by museums and churches around the world.
They come in a variety of shapes and sizes, I looked and found that the largest
number of Alms purses are of the square or rectangular pouch type, usually
embroidered and embellished during the 14th century with an embroidery
technique that includes gold work couching and silk figure embroideries often
called Opus Anglicanum which translates to English Work. This English work was
well coveted throughout Medieval Europe as some of the finest needlework of the
time. Mostly due to the costly gold wrapped threads than the fine stitches in
silk. Look up ” 14th-century Alms
Purse” on the internet and you will get a large avalanche of pictures and
websites that celebrate the square or rectangular type. and then search for “14th-century
trapezoidal alms purse” and you might get a dozen. Most are found and
labeled as reliquary purses in church museums Or as donations to major museums.
Okay,
now to the meat of the dish.
I
have made many a pouch and purse. Some in linen, a few in leather; square, kidney-shaped and circular they have all come
and gone. The Trapezoidal Alms Purse, however,
I could not find a pattern for and it was frustrating.
The
Collections housing the purses I found for this project as inspiration were of
the usual listing style. Who once owned it, What it was made of, Its dimensions
and some photos of it front to back and each of its bits if not complete. The
problem is that so often these listings don’t give a full picture of its measurements.
Width and length..that’s it. They don’t give width at the top and center, which
would give a better Idea of actual measurements…This leaves one open to much
error in pattern making.
The
three extant pouches I used for designing the pattern and eventually making the
pouch come from two museums.
The First is
found online at the Belgian Art Links and Tools, it is the purse of John
of Brabant. The Second is housed in Paris, at the Cluny Museum – National Museum of the
Middle Ages: Chaplain of a Bar Countess (the lady on the griffin).
And
One Statue of the Prophet Isaiah (Claus Sluter 1395-1406)wearing the usual garb
of a 14th-century man: his belt has that
pouch hanging right there for all to see.
Take a closer
look at the statue of Isaiah as he was placed on the Moses Well. His pouch is
dome topped and trapezoidal and also a ring pouch. which is to say a pouch with
a ring for rigid support and a drawstring added for security. It does not have
buttons for closure just tassels for decoration. It may have been simpler for
the mason carving the statue to not have buttons. You can see that the inner
ring of support was carved, as a ridge just under the flap and his
belongings showing inside. I love this pouch that Isaiah wears. It shows how it
was hung from the belt with a strap and buckle, which many museums cannot show
as the strap has long been worn away or lost. I love buckles they’re so fun.
Fabrics
and Embellishment:
Mine:
Plum Linen shell, White Linen lining. Thread: Heavy Duty Coats and Clark
Mine:
Not embroidered. Hand Sewn with period stitches, bound with plum linen
binding.
Mine Differs in Fabrics and Embellishment because Silk and real gold are out of
my price range.
Original:
Silk shell and lining appliqued slips embroidered in the images of an angel and
a lady on a griffin.
Originals:
embellished
trim. Hand-knotted buttons.
How
it was made:
The
Pattern: From a picture and the information at the Cluny Museum of the Middle
Ages I drafted the pattern to be approximately the same size as the pouch
housed in the museum. I added 1/4 inch seam allowances to make adding the
binding easier for narrow trim or ribbon. I cut the pattern out of thin
cardboard recycled from inserts packaged with moving blankets, and a family
sized box of Frosted Flakes. They were
of the right size. I used chalk to trace around the pattern on the plum and
white linen and then cut them out. For
the Front shell and lining, I pinned and
sewed around the opening, clipped the curves and turned the seam. On the Plumb
Purse, using 15 gauge steel wire I coiled
a 2-foot length and fit it in place
between the front shell and lining and carefully backstitched to keep it in
place. I lay out the back with the lining on top and placed the front with the
shell facing outward and pinned the layers together. Using bias cut binding in
the plum from another scrap I bound the edges all the way around, making sure
to carefully cover the coil of wire completely. I pinned the flap layers and
bound them and placed it on top of the others making sure to keep the bottom of
the flap parallel to the bottom edge, and finished it with a ladder stitch. I
added a strap and buckle to allow easier hanging and removal from a belt or
belt hanger, and when I added the rivets I carefully used an awl to place the
holes so that I could later change it to a ribbon loop should I choose. You can
see proof of usage of a strap and buckle as pictured on the statue of Isaiah
The
Pictures from beginning to end are of the Blue Linen first then the Plumb
Linen. I got so caught up in sewing the plumb that I forgot to take photographs
as I made it. Many apologies.
Stitches:
Back
Stitch, Running Stitch, ladder stitch (when attaching the front flap)
Rip Rap War. That time of year where we in Atlantia fight over who owns a tiny little island in the James River Estuary. No one gets to visit said Island, but we fight over who owns it on a yearly basis…This Island is the now-decommissioned Fort Wool, located on a man made island called Rip Raps across the mouth of Hampton Roads Harbor from Fort Monroe, is also in Hampton.
This year was a Banner year at Rip Rap War. We had Three very very Talented Ladies Raised to the Order of the Laurel, and one very Chivalrous Man Knighted.
It was also the Barony of Marinus’s Birthday and on the Friday of the event they had a marvelous potluck. I made sweet pickled plums as my contribution to the food filled event. Someone made shepherds pie and it was to die for. Shout out to whomever they are, that stuff was the Bomb!
My contribution is an easy thing to make.
You’ll only Need:
2-3 pounds plums pitted and cut lengthwise into 1/4-1/2 inch wedge/slices.
2 1/2 cups granulated sugar/or 3 cups honey
1 1/2 cups white vinegar
1 tsp each Fennel, coriander and mint
=================================================
Pack the plum slices into jars.
In a sauce pan put vinegar, sugar and spices and bring to rolling boil. remove from heat, stir and let cool 5 minutes with lid on pan. Pour the liquid into the jars until at the max line or 1/4 inch from the rim. Put on lids and let cool 30 minutes. If water canning follow the directions on the package of jars and canning pot.
Place the jars in the fridge and keep at the back of the fridge for 1 whole week, turning the jars over every day. Don’t Shake The Jars! it bruises the fruit and makes them mushy.
Good for Hard Pears, Early Peaches and other stone fruits.
I have been a participant and enthusiast of the Society for Creative Anachronism for many many years, and in all this time have heard of finding the One Thing. Yeah, people used to mention finding that one extant item that has all the things on it. That mythical thing. The One Thing to prove all their favorite techniques were used within the time period espoused in the SCA.
We all have a quest to find that One Thing, but for us embroiderers there is at least one anomalous item that has almost all the things on it. It’s Not a dress. That One Thing or Criptid Extant Piece that according to many historians, back when the internet did not exist, could not possibly exist…because if they had not found it..nobody would…well…(yeah, I know…jerkiness does not become me..In my defense…It’s 330 am and the insomnia Fairy is visiting)
Thanks to the oh so lovely Internet and Tourists..Many Cathedrals have opened up websites that share those treasures in a grand gesture so that people will come and visit their treasures. And the tourists who visit those treasures have shared their photos of the visits and the exhibits. Good Gads..I wish I could travel.
Cuz the first place I so would visit is the Aachen Cathedral and it’s treasury, where textile geeks will find that Criptid Piece so craved.
Picture taken from the website listed at the bottom.
The Coronation Robe/Cappa Leonis is that Criptid Piece. Part of the Aachen Cathedral Treasure, this one Extant Item has all the Things.
Made in the 14th century…thats the 1300’s..it has appliqued gold roses, and couched decorative trees and vines and get this…tiny little birds made using tiny stuffed figures covered in detached button hole stitches..These birds are about the size of a us quarter. The all over design of this lovely Coronation Robe is little white and yellow flowers..of get this..French knots…of silk thread on scarlet silk velvet..with gold-work embroidery so well done it looks like woven gold bands appliqued as a grid border..I have always gotten told that French knots are not within period..Guess what ladies..in this one instance..this one item..there they are in all their knotty glory..French knots..I doubt they called them French Knots in the middle ages..but whatever they called them back then..this stitch has come a long way.. Oh and don’t forget them little birdies. Modern embroiderers call that technique “Stumpwork”, but whatever they were called in the middle ages, finding them on one garment and made before 1650 is literally a gift from the gods. Layers upon layers of appliqued braid-work, intertwining vine-work, stumpwork birds, Laid gold-work and ribbon, and all on the front band…Wow…and the bottom hem itself is a marvel. Embroidered with the figures of all the saints and apostles and clapper-less silver bells that ring softly as the robe is worn. That thing must have wowed the crowds in a coronation when it was first finished.
Going to be in Germany this year?
Go and see for yourself the Cappa Leonis Coronation Robe at: https://www.aachener-domschatz.de/neue-ausstellung-ab-15-september/ and don’t forget to share those pictures. So that those of us who cannot travel can see that marvelous coronation robe through your lenses.
They updated the site and it’s dated for September 21st..so ignore 15 September in the link…
Today being the day before Independence Day here in the USA I will post a lovely stitch for you to learn. It’s Historic and was used by Elizabethan Englanders to decorate everything they could get it sewn on. Mostly in metallic passing threads of gold and silver, sometimes it was done in silk threads as well. Don’t believe me? ask the V&A Museum about some of their coifs.


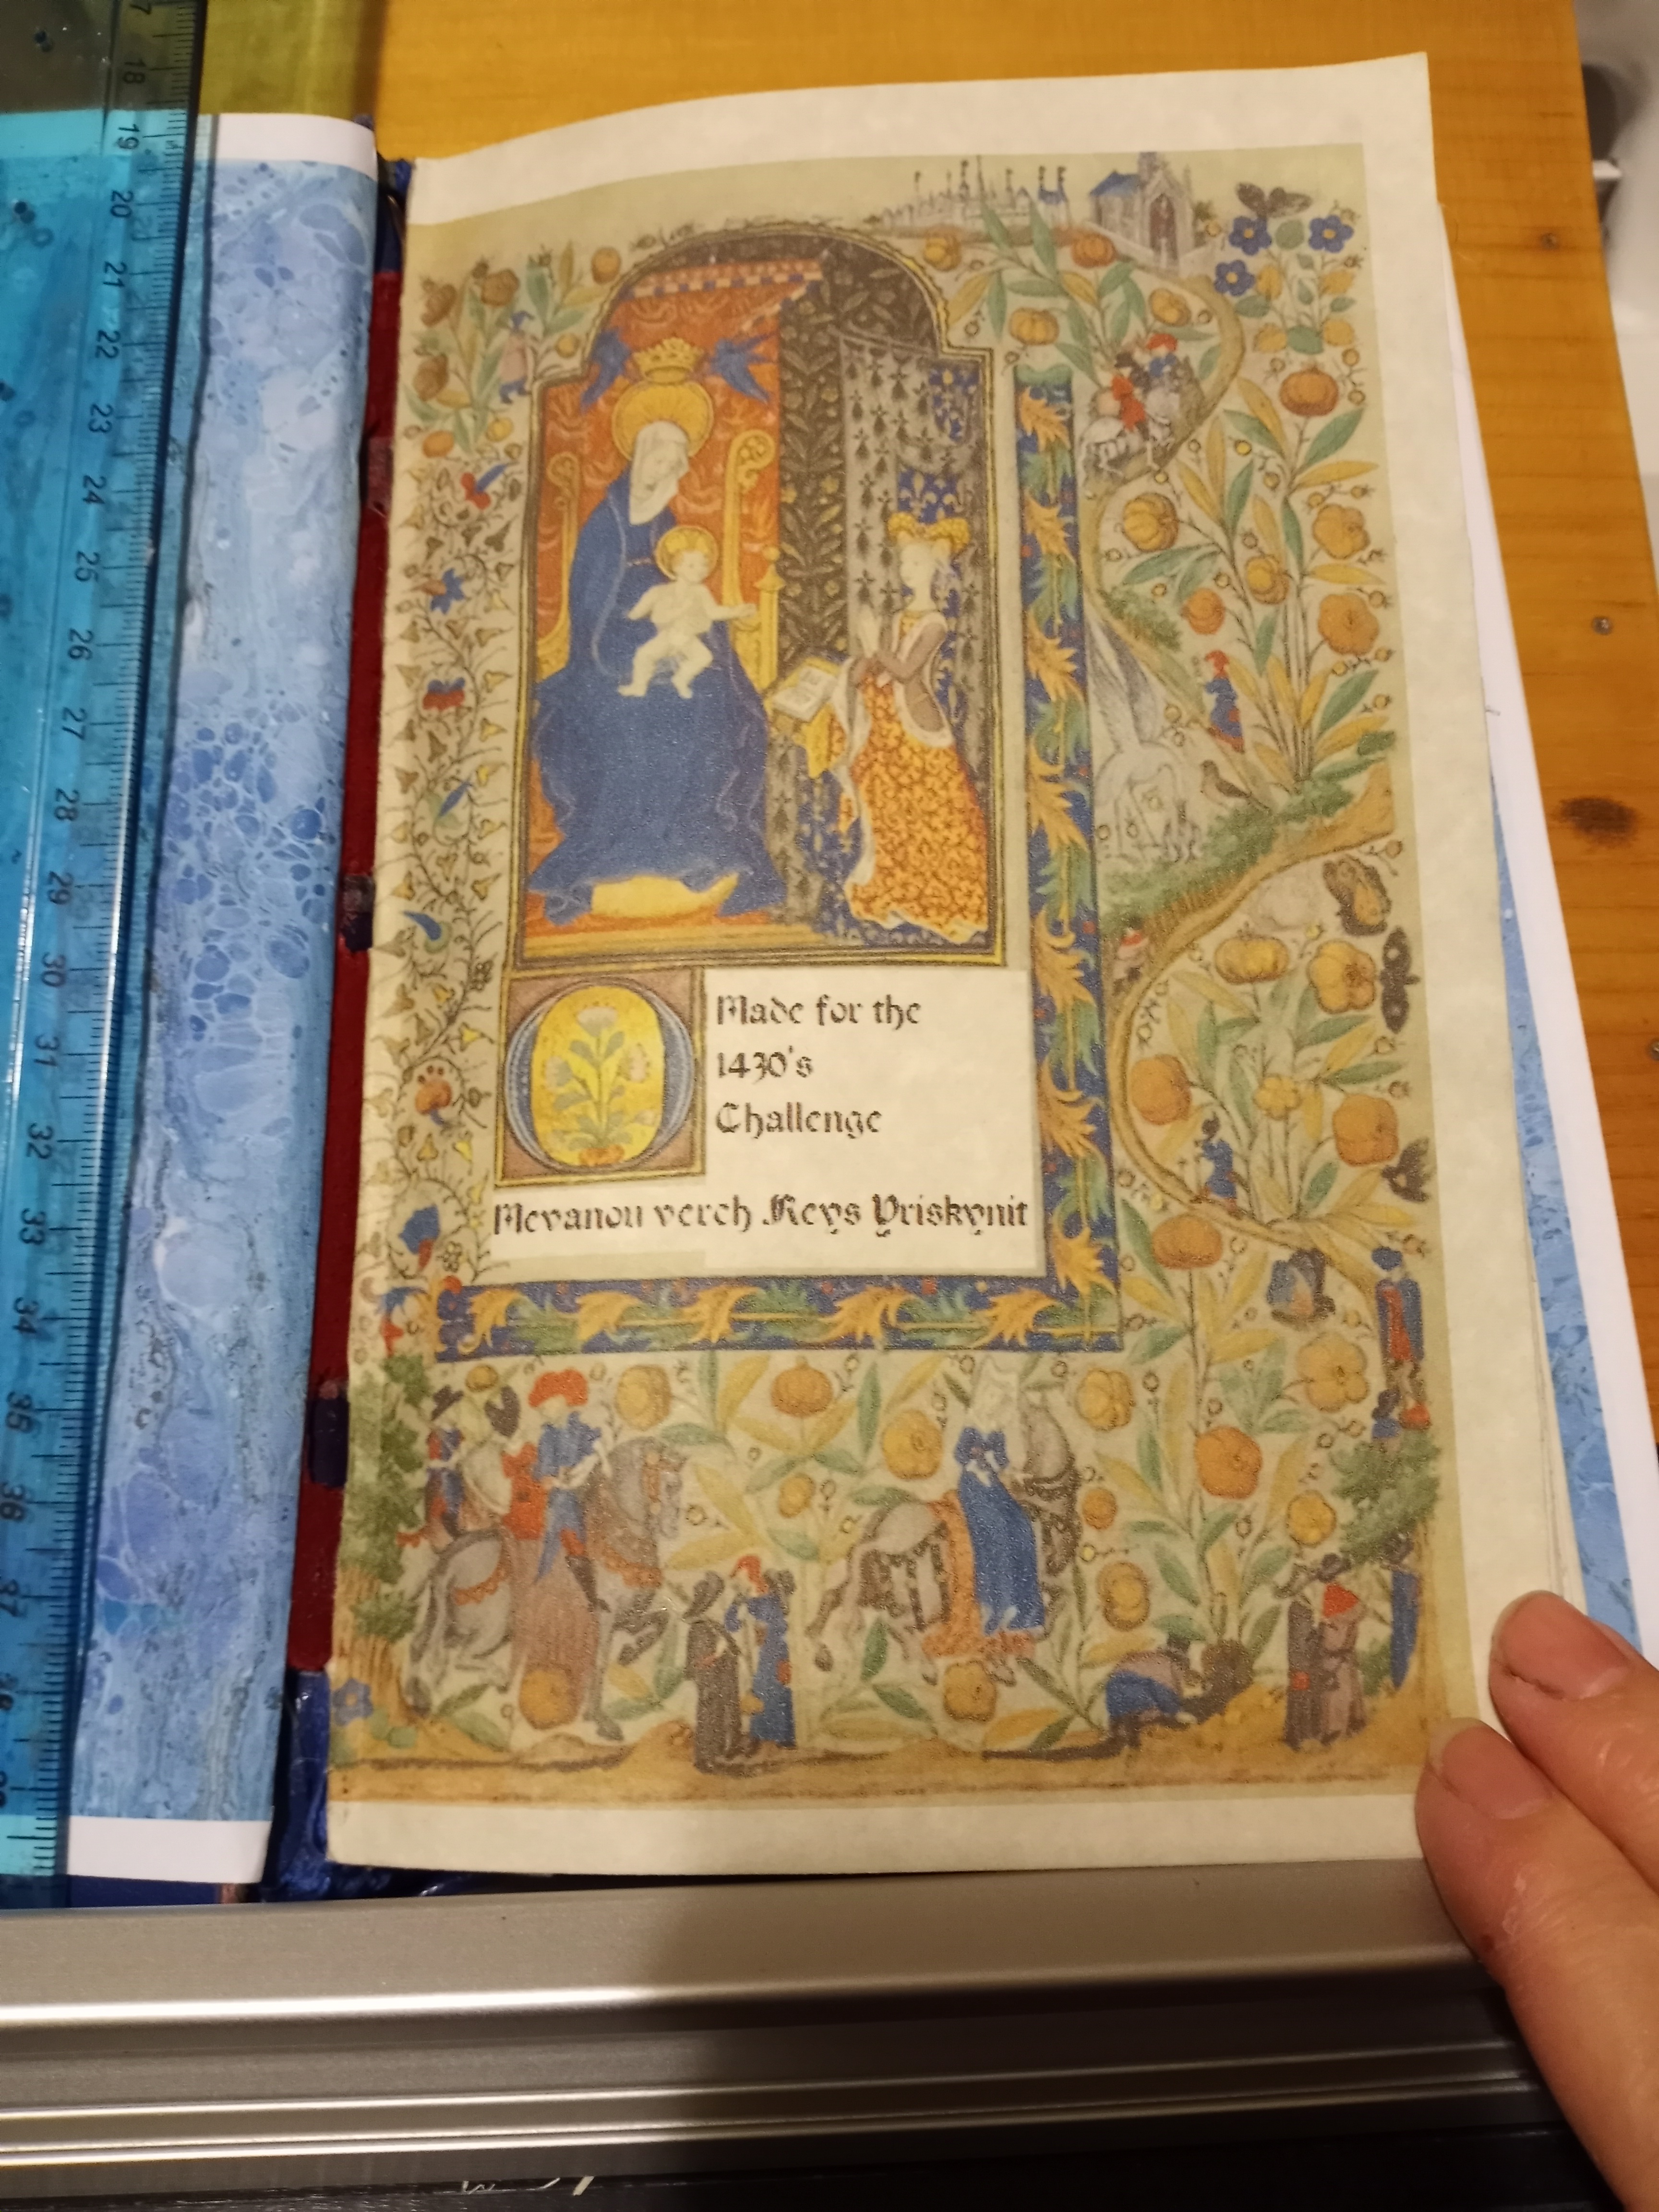
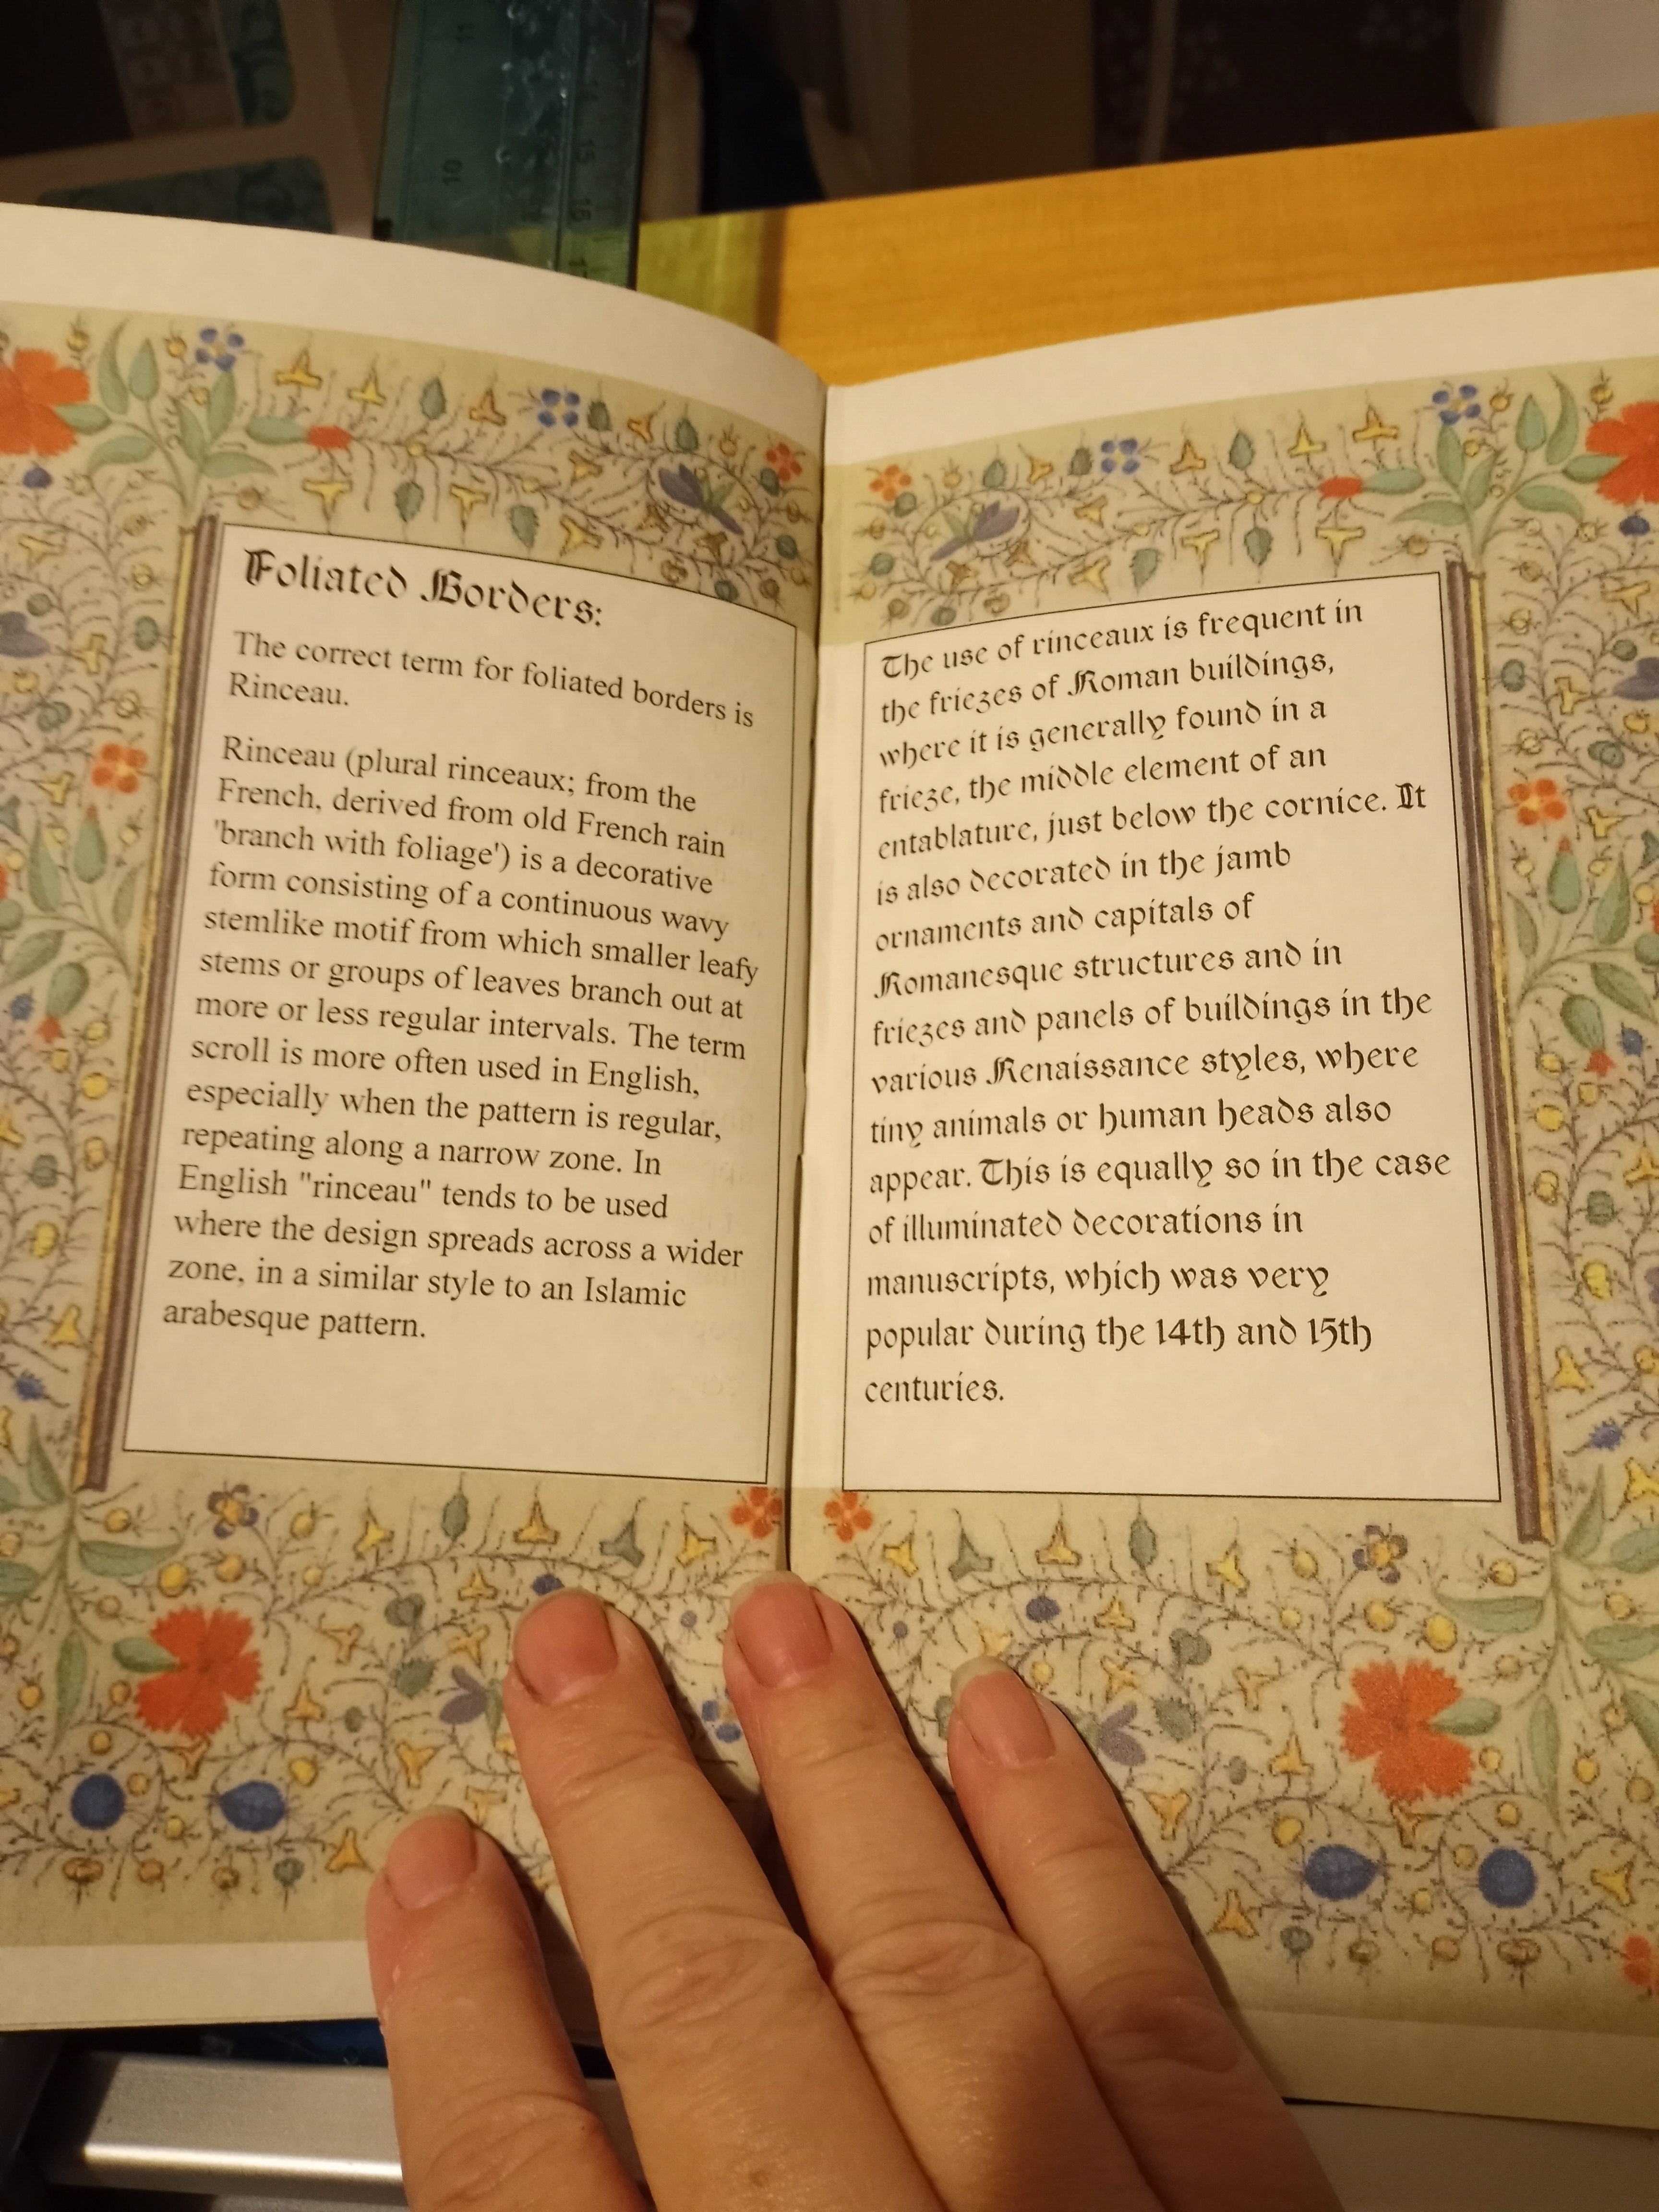


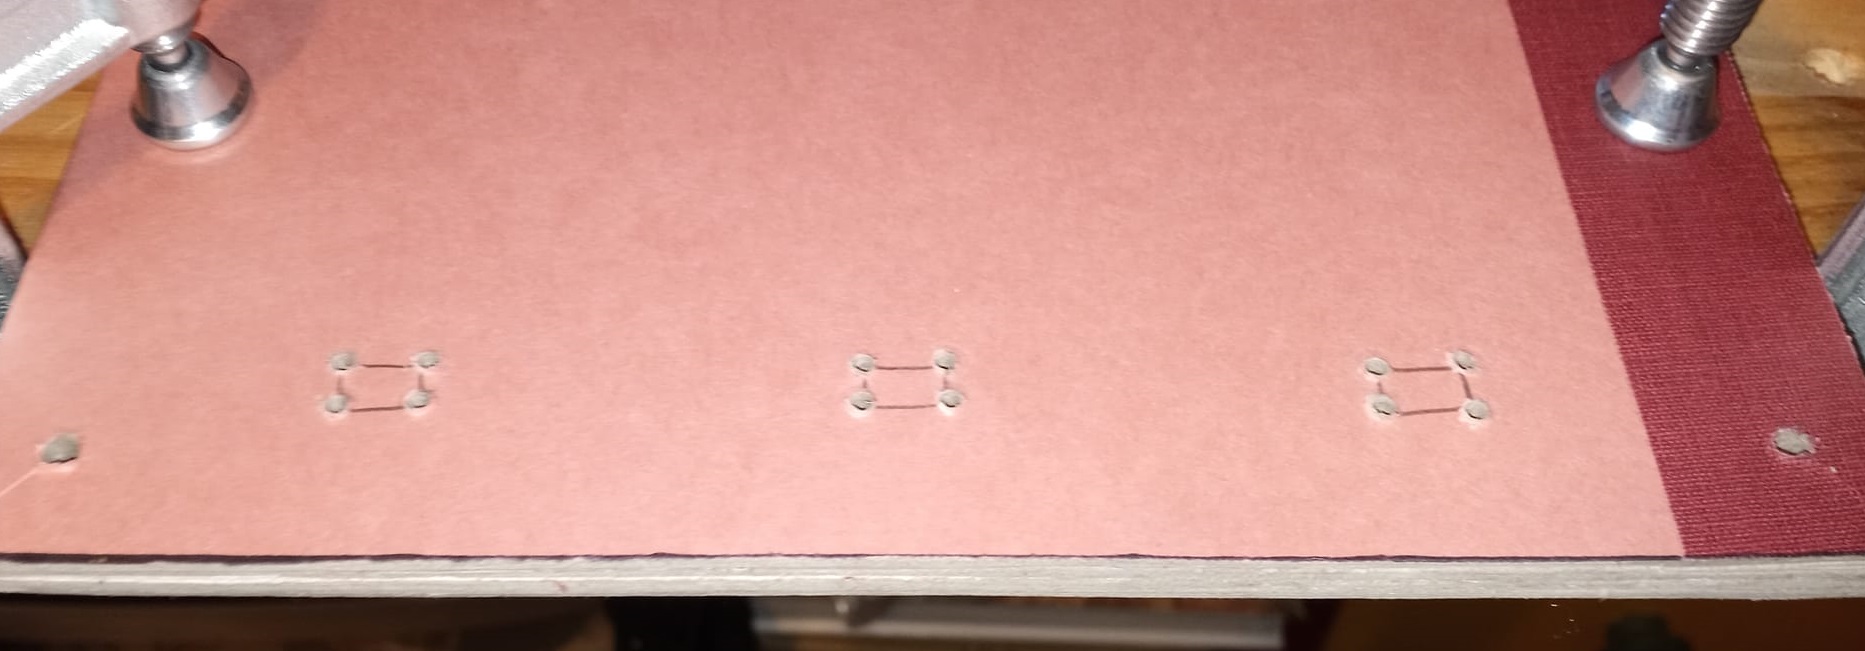

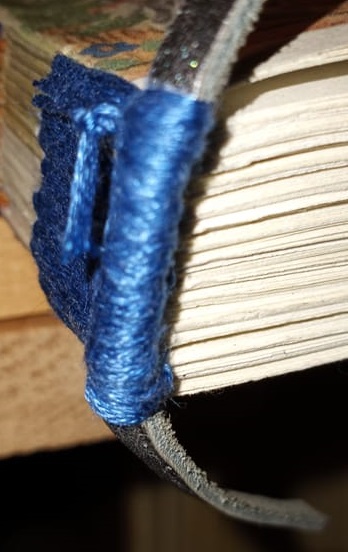
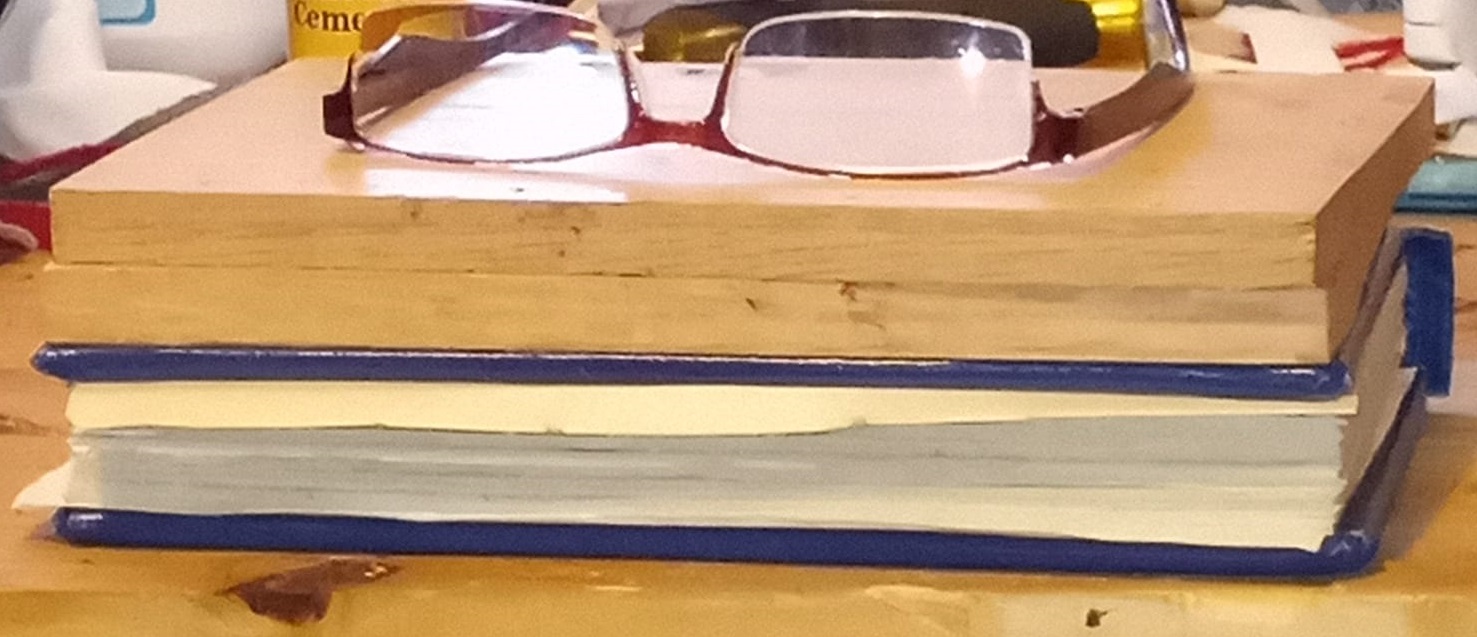

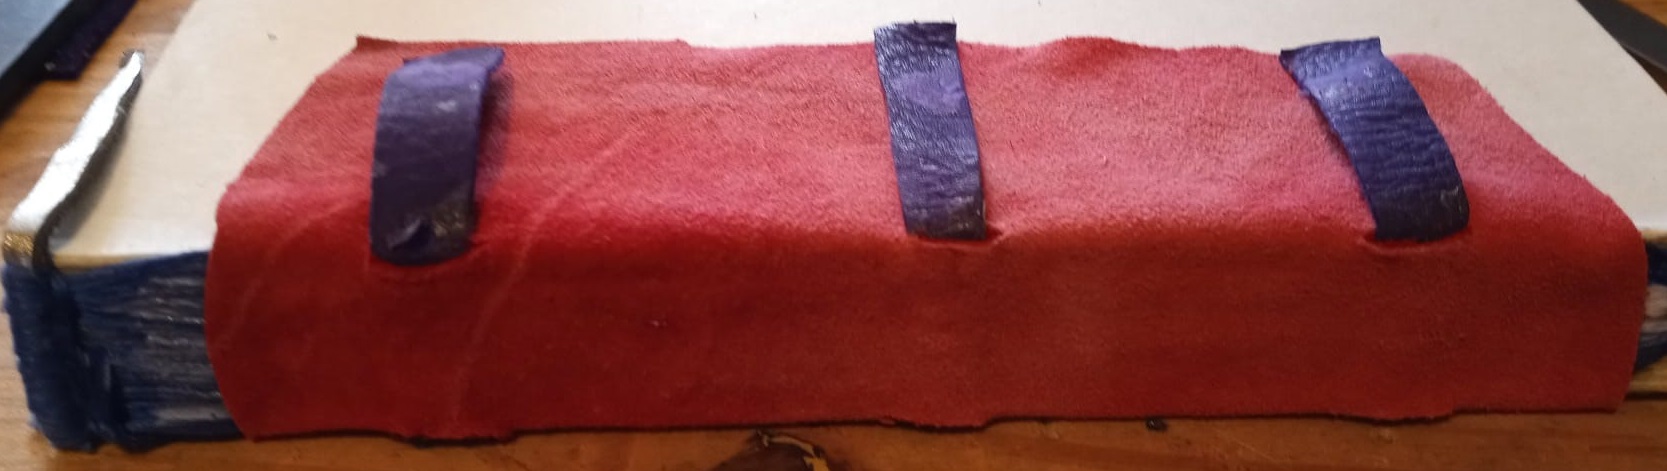


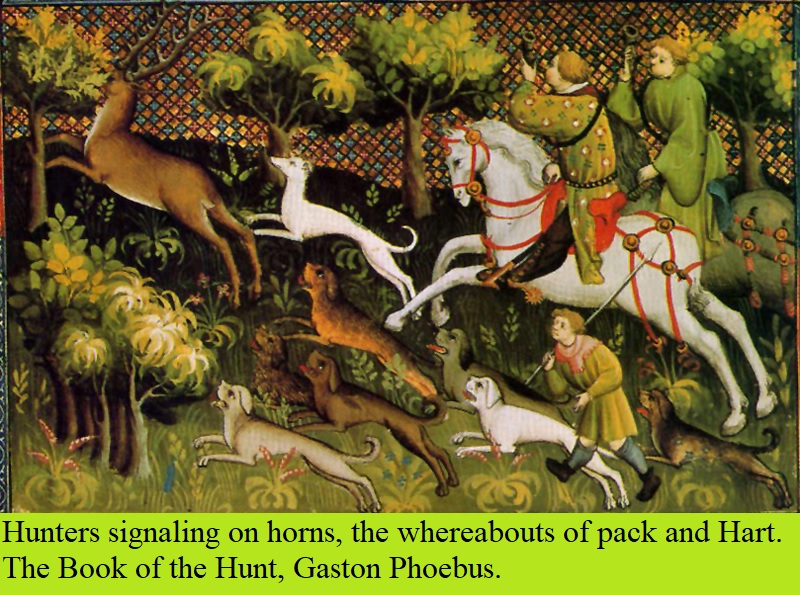
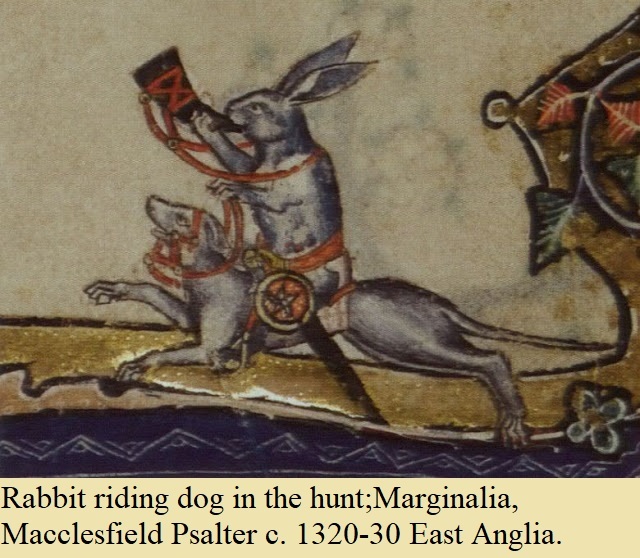


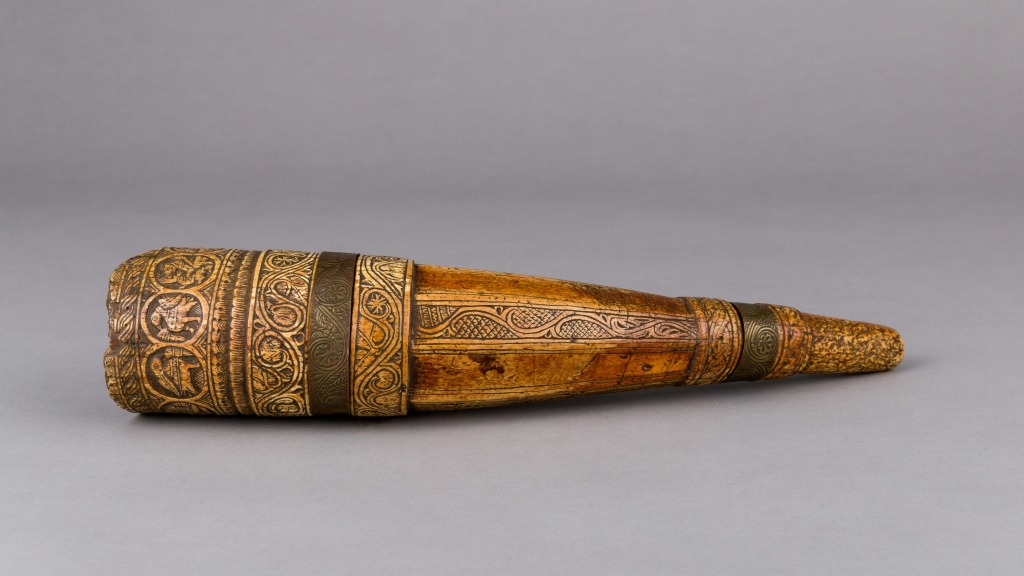
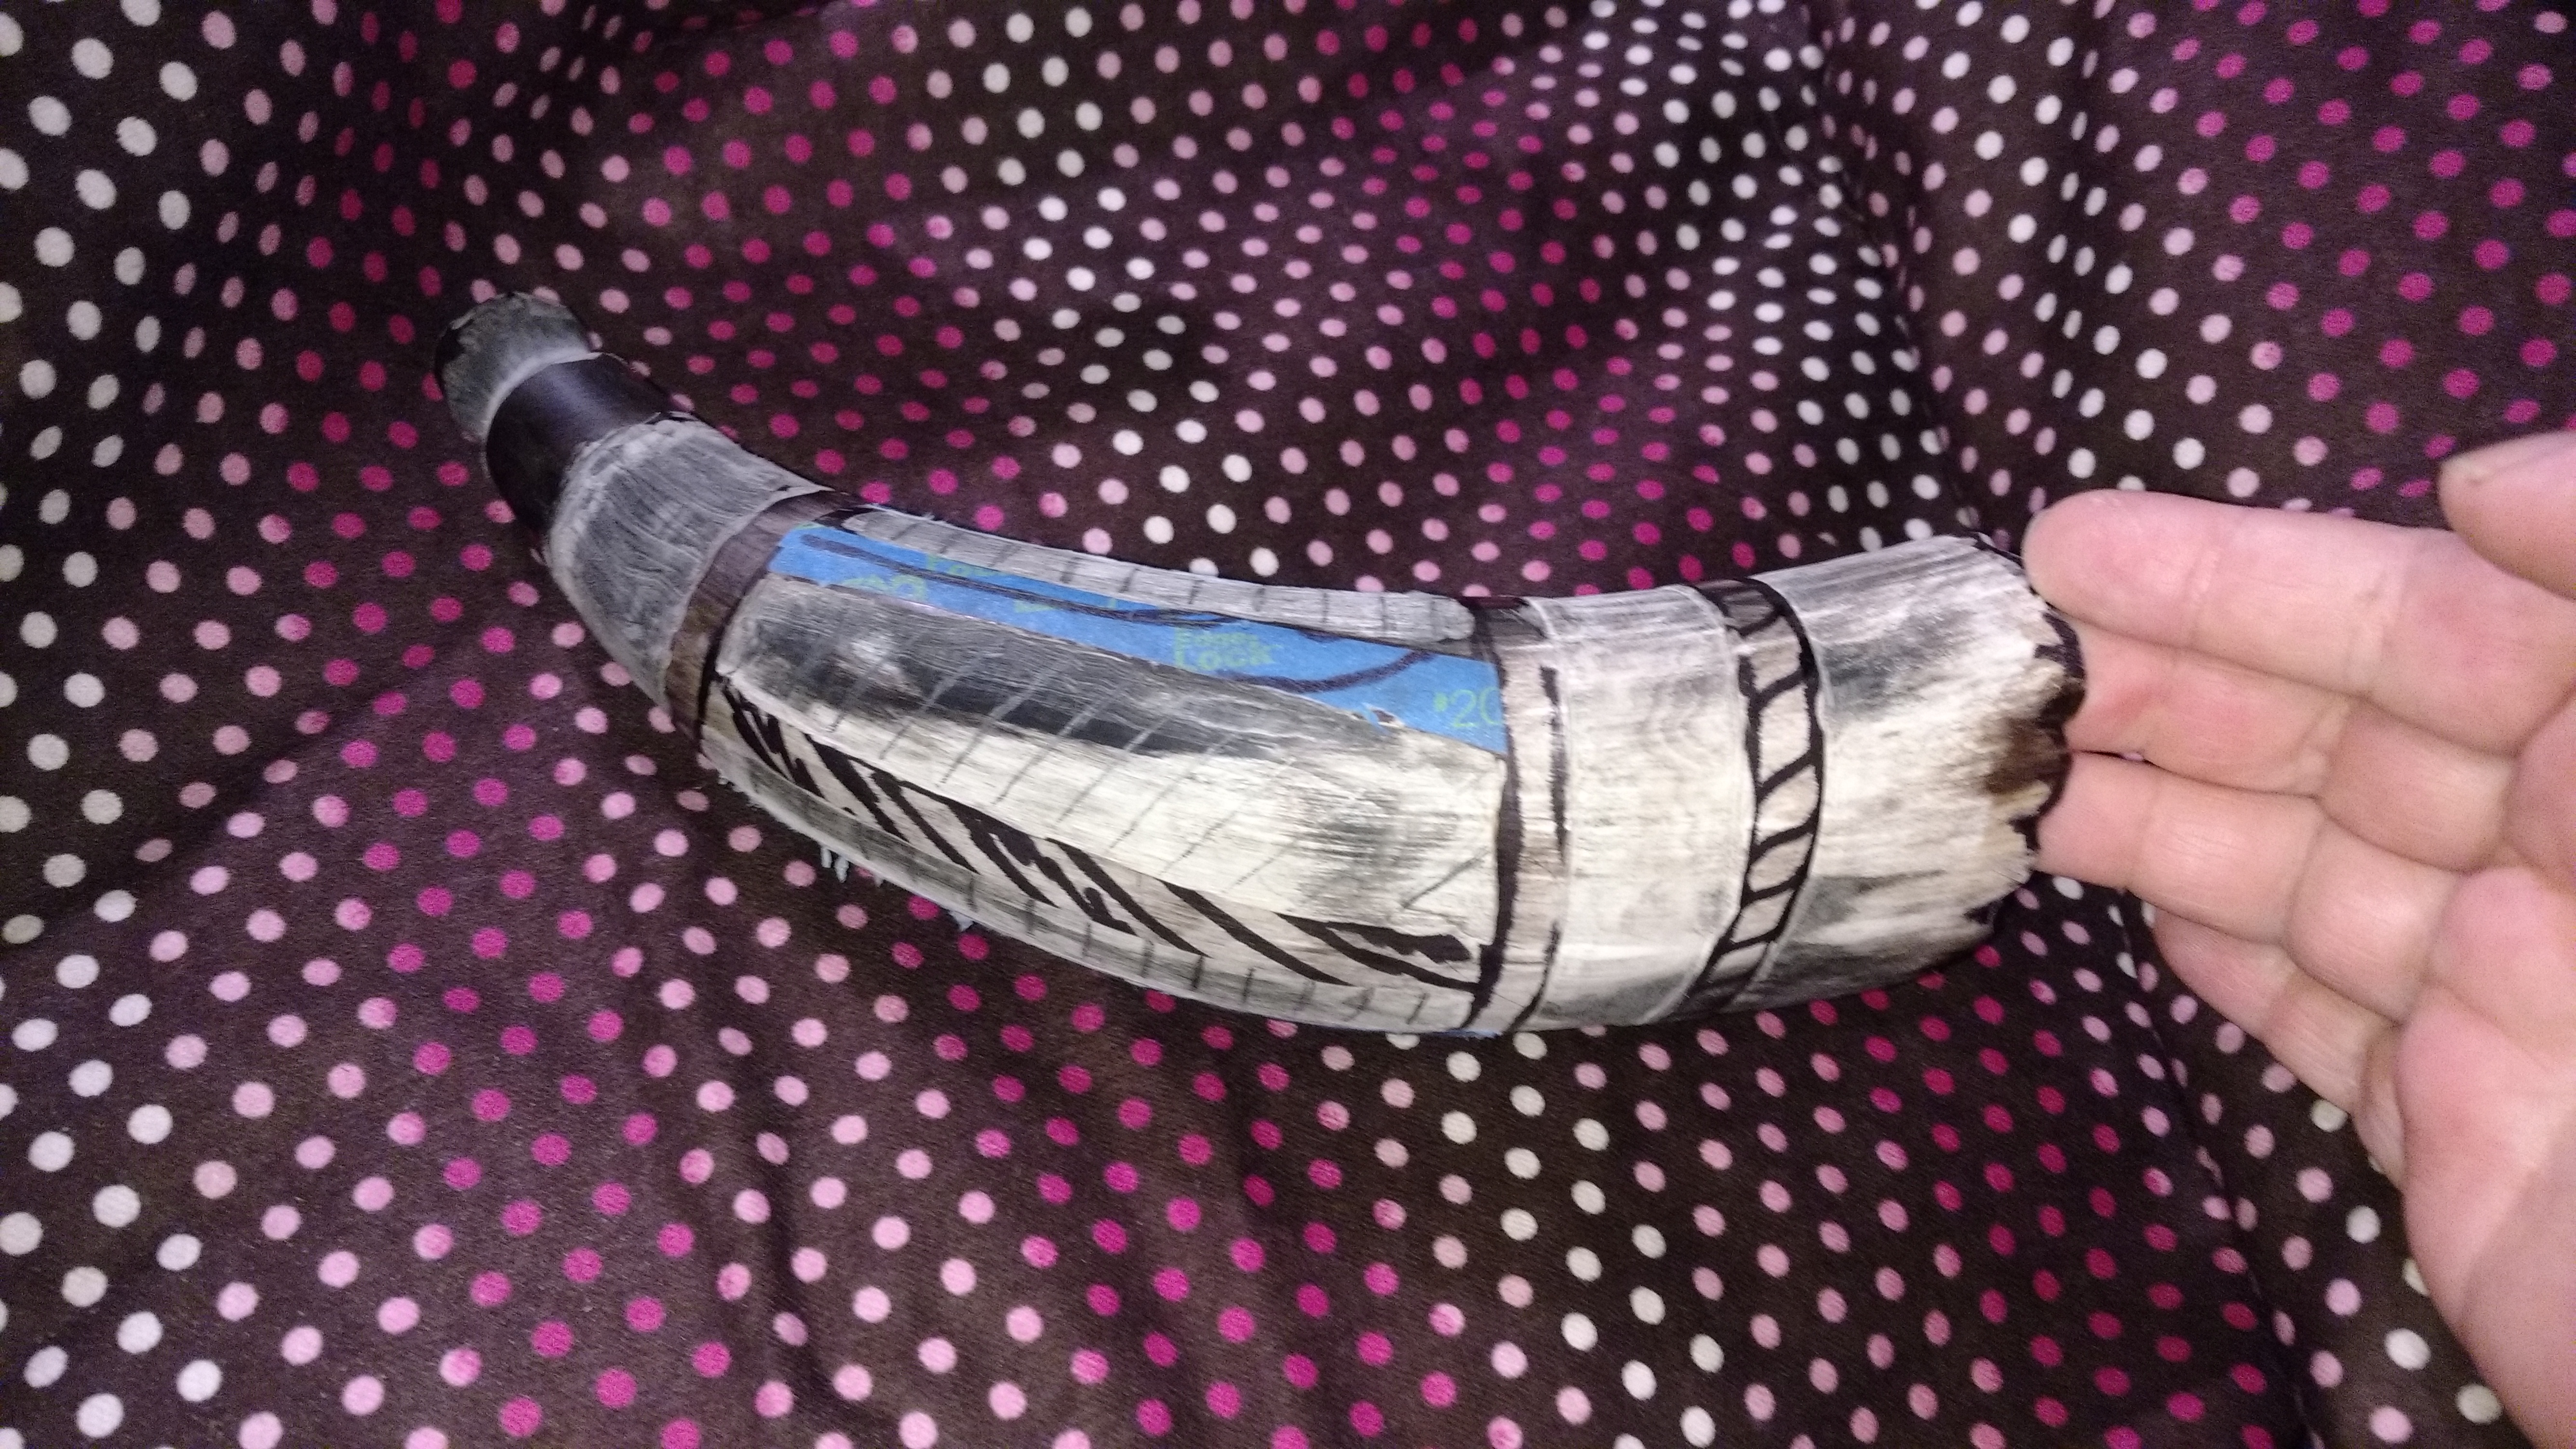
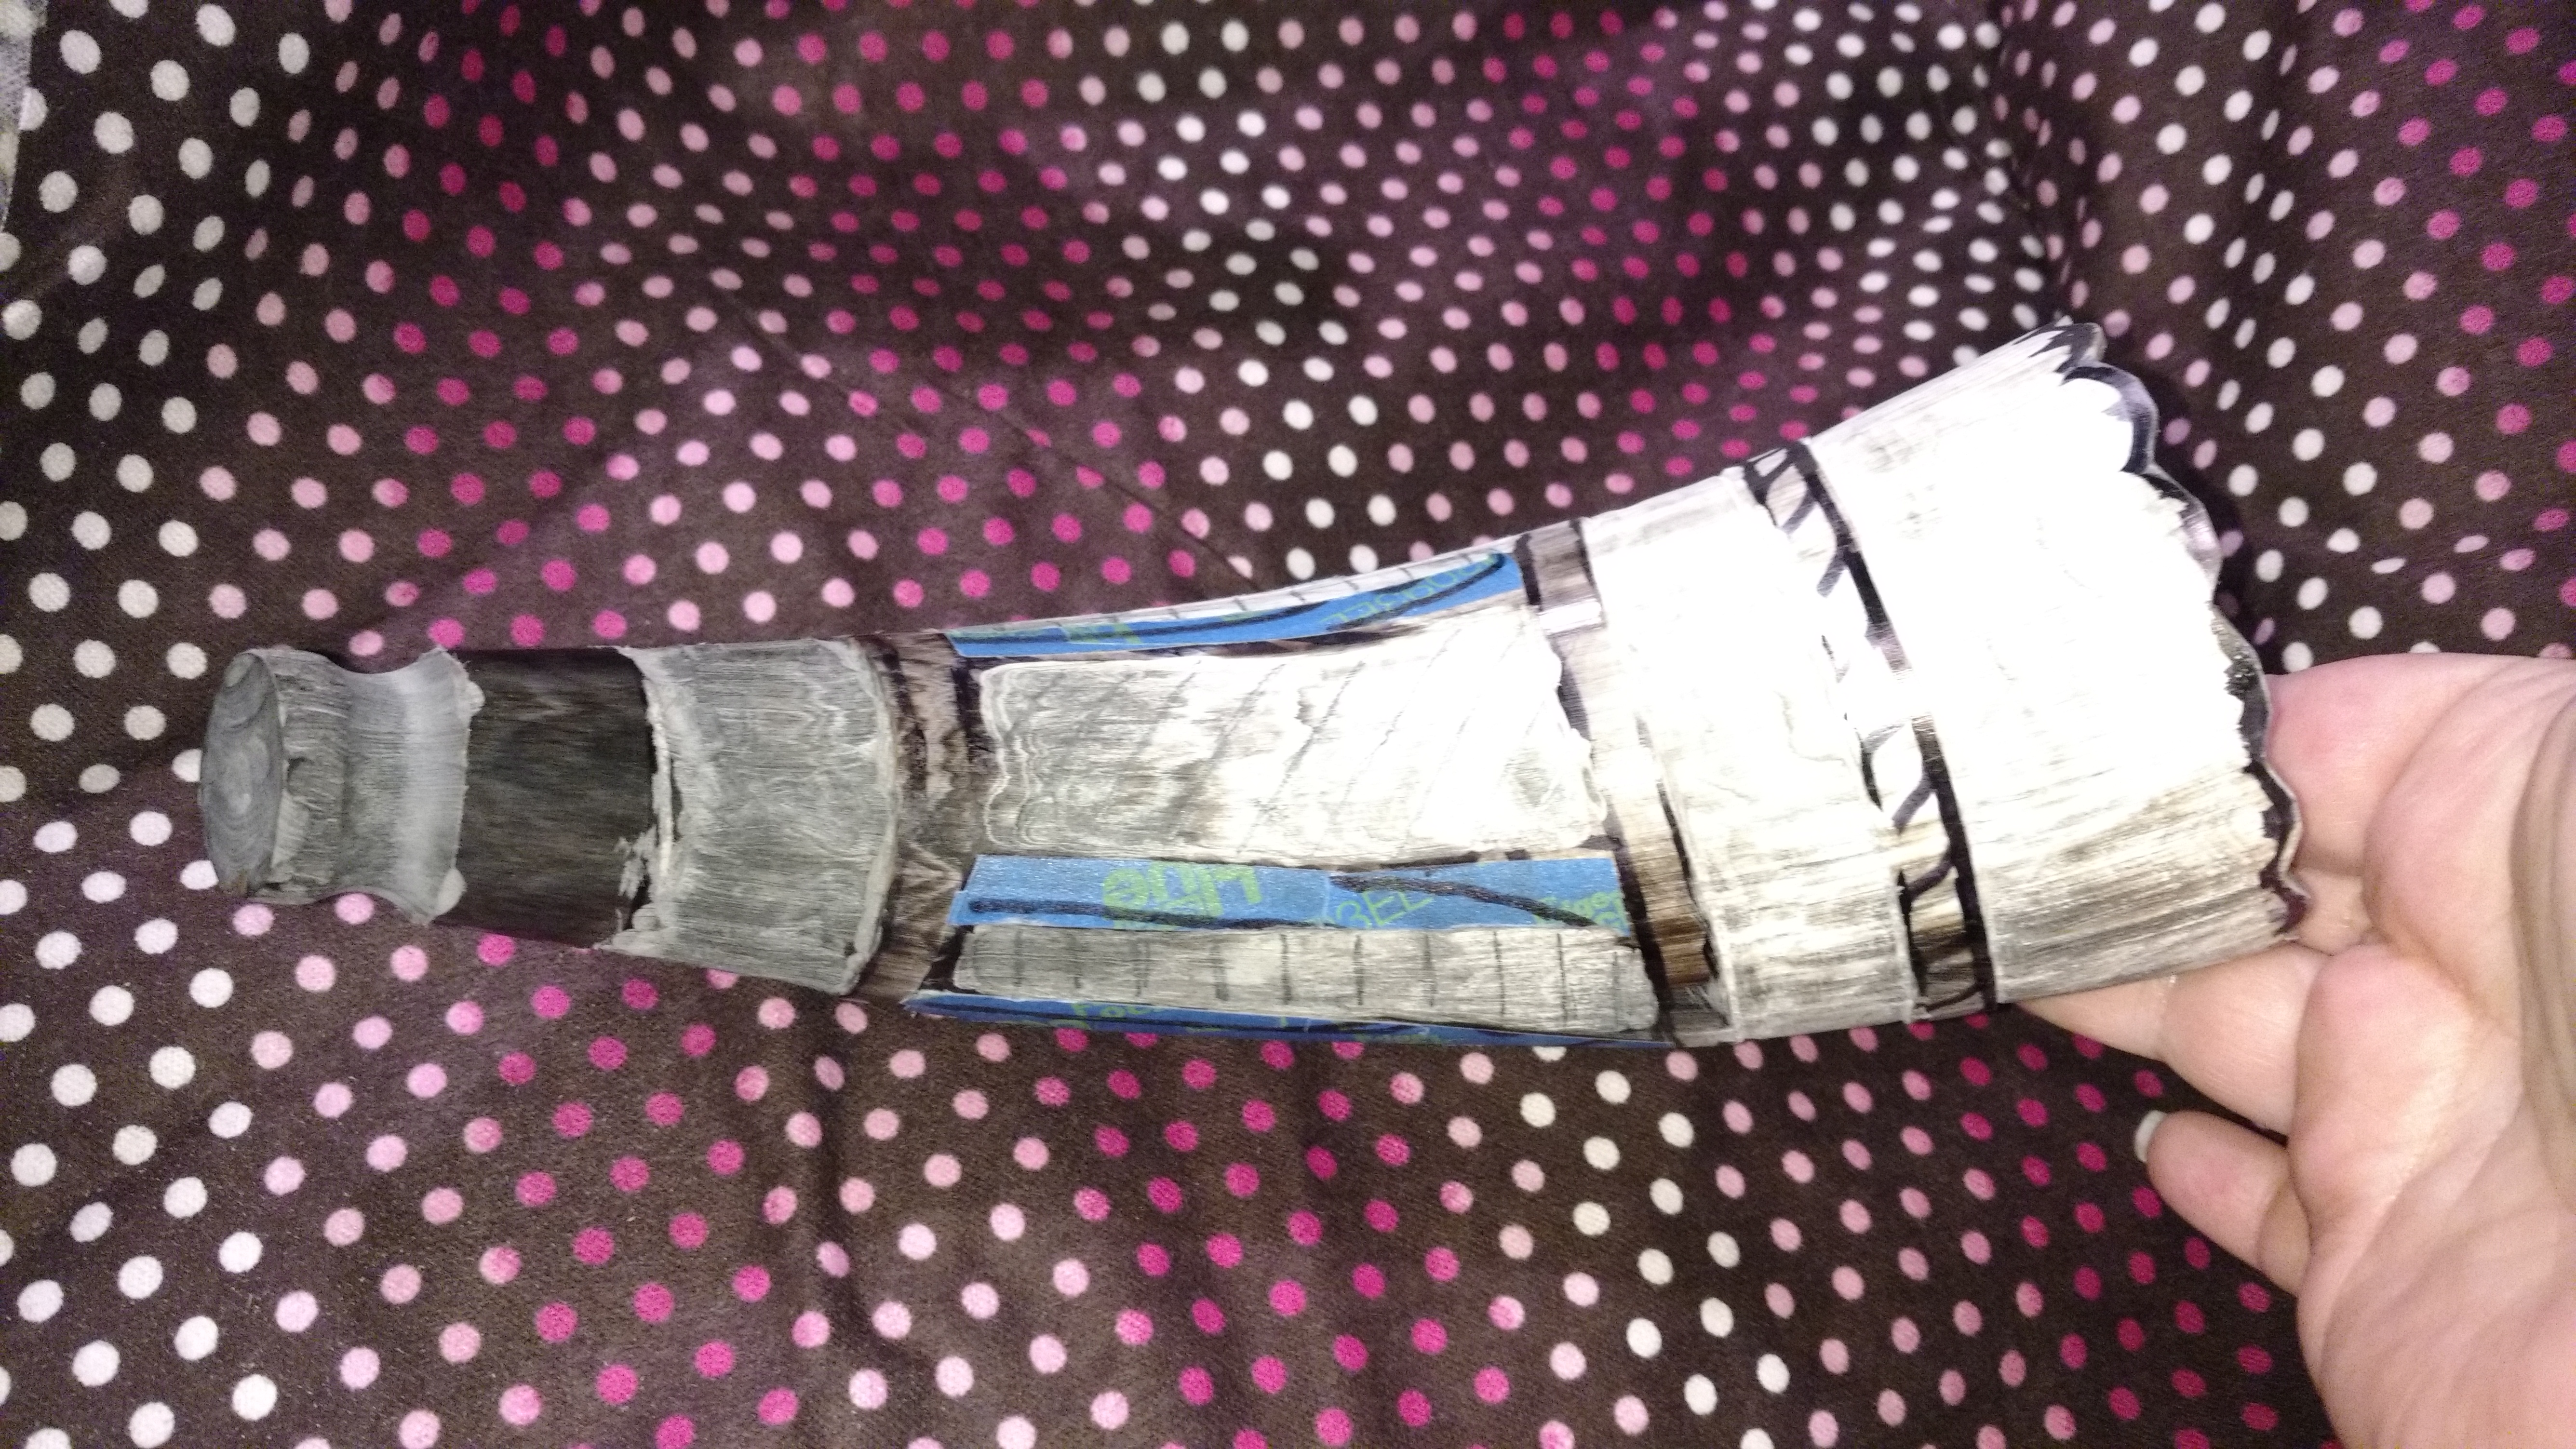
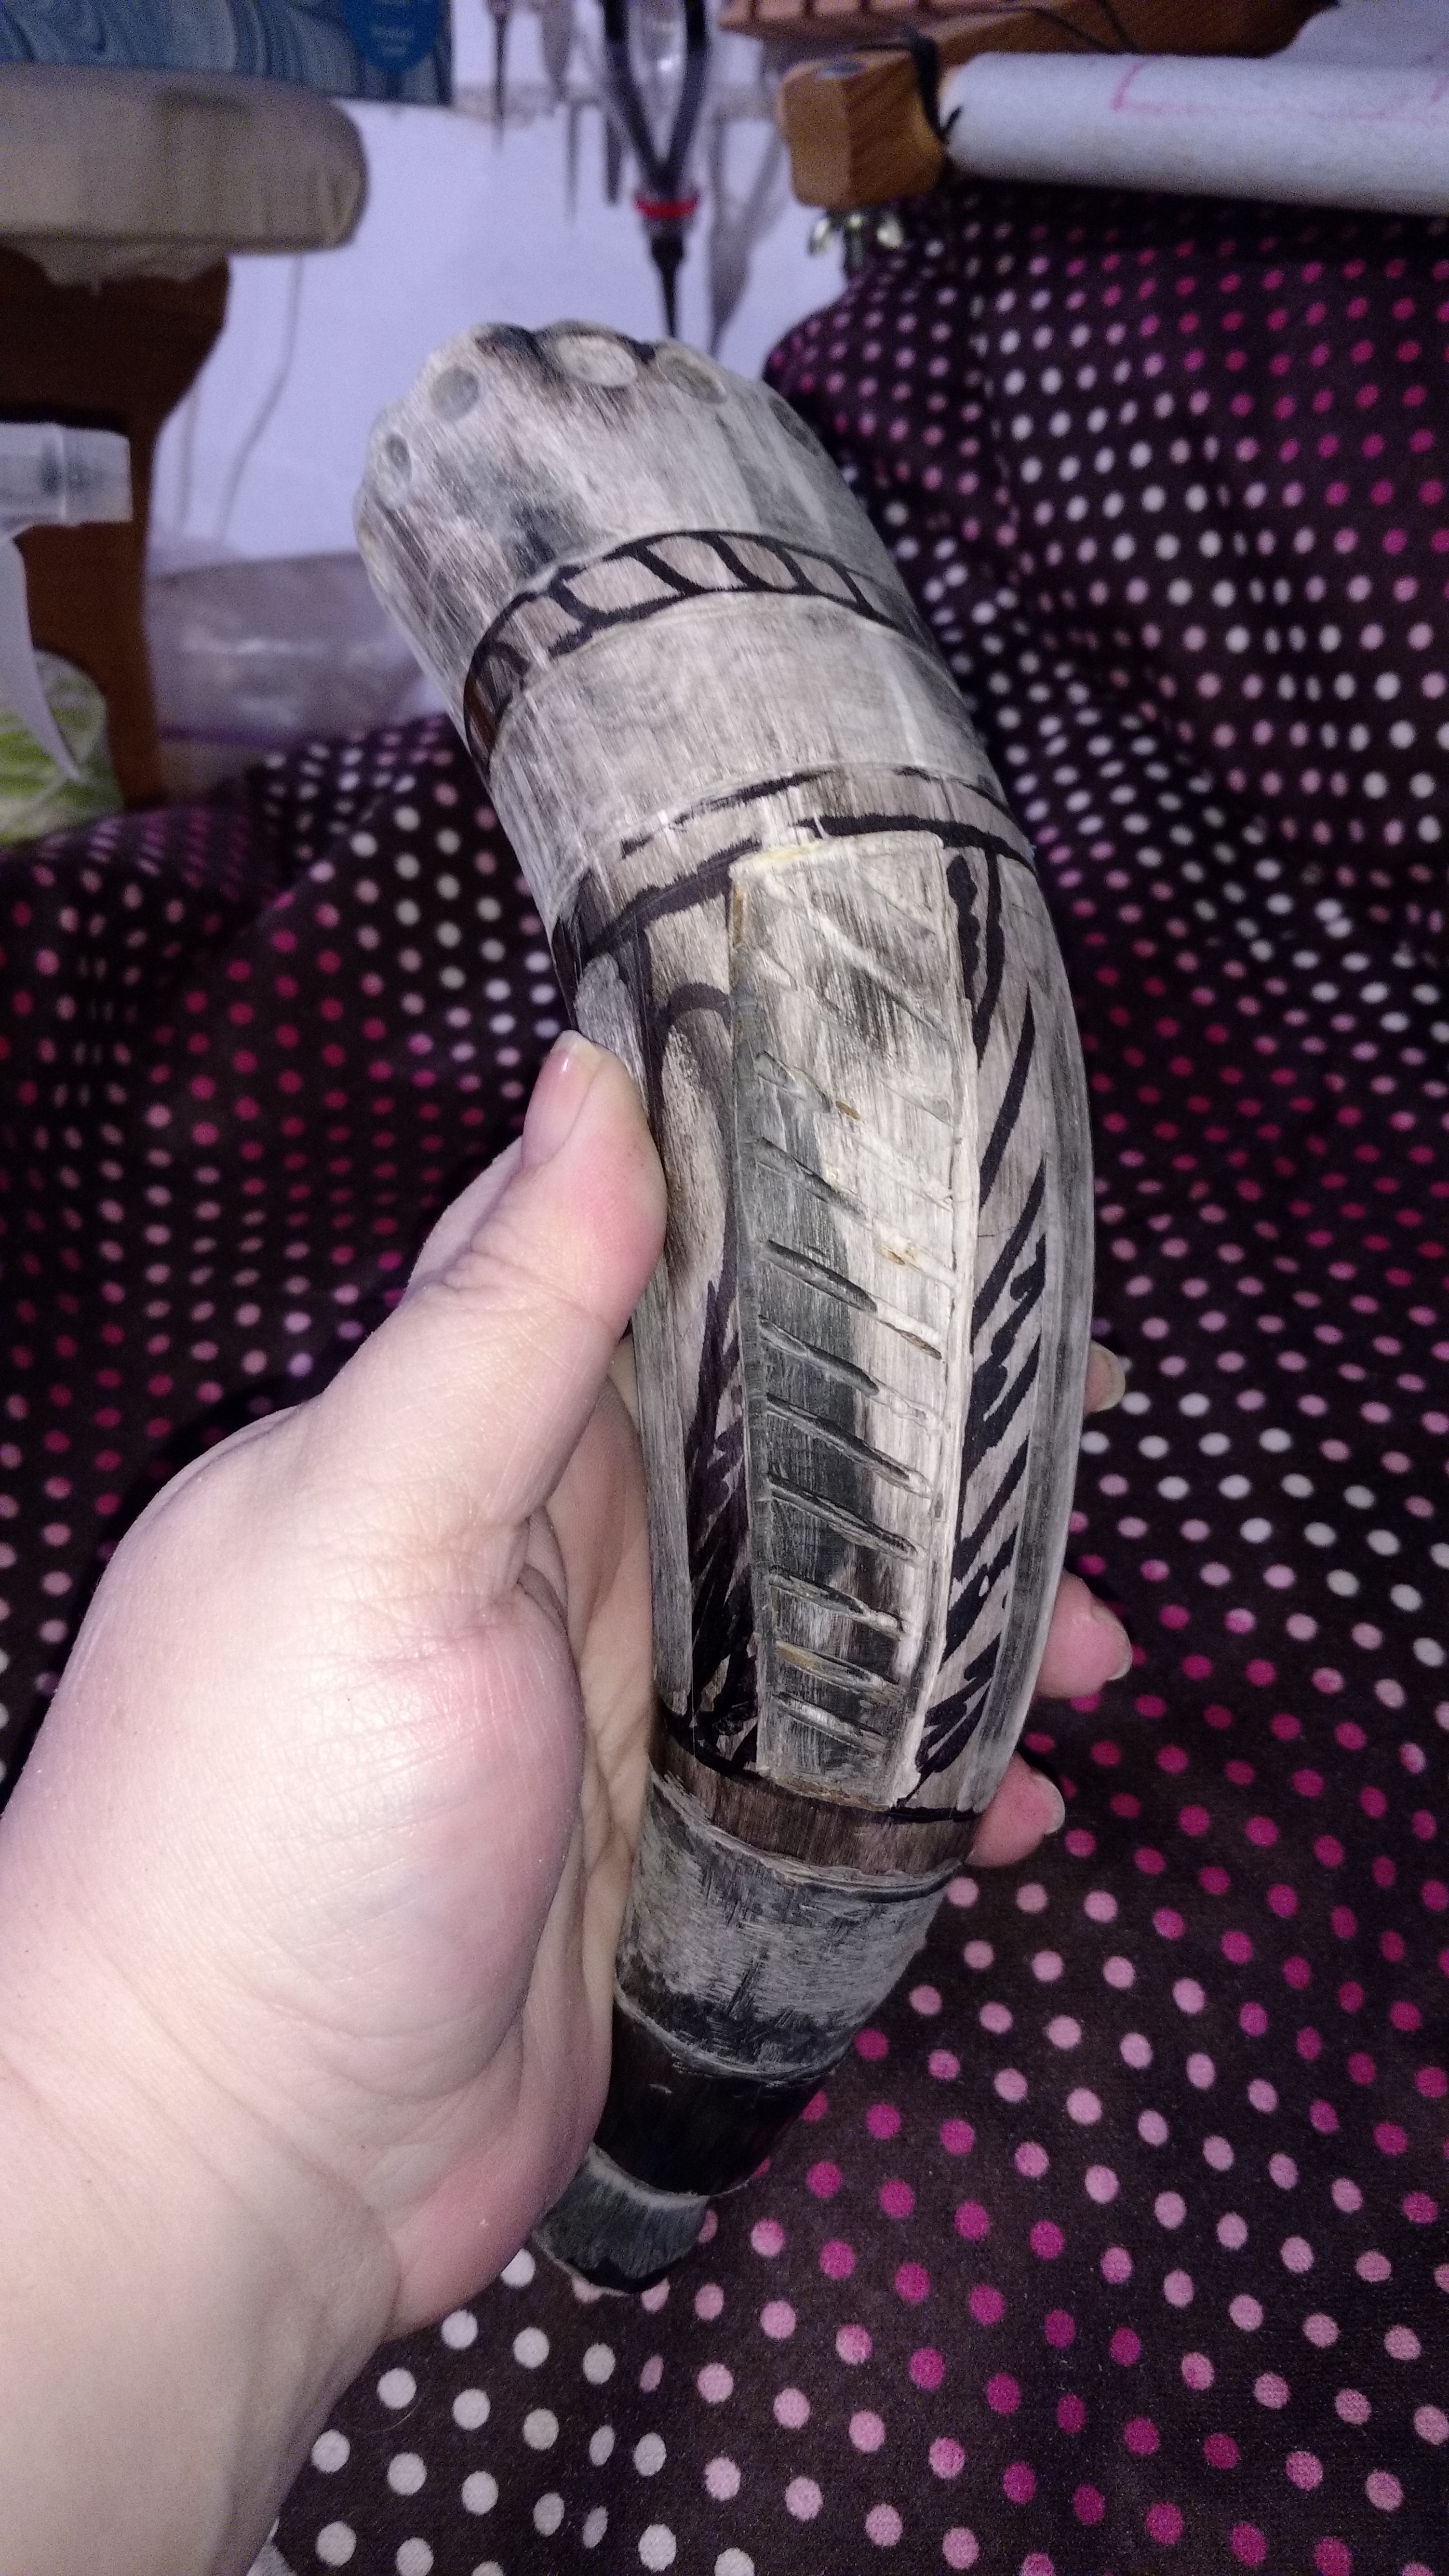

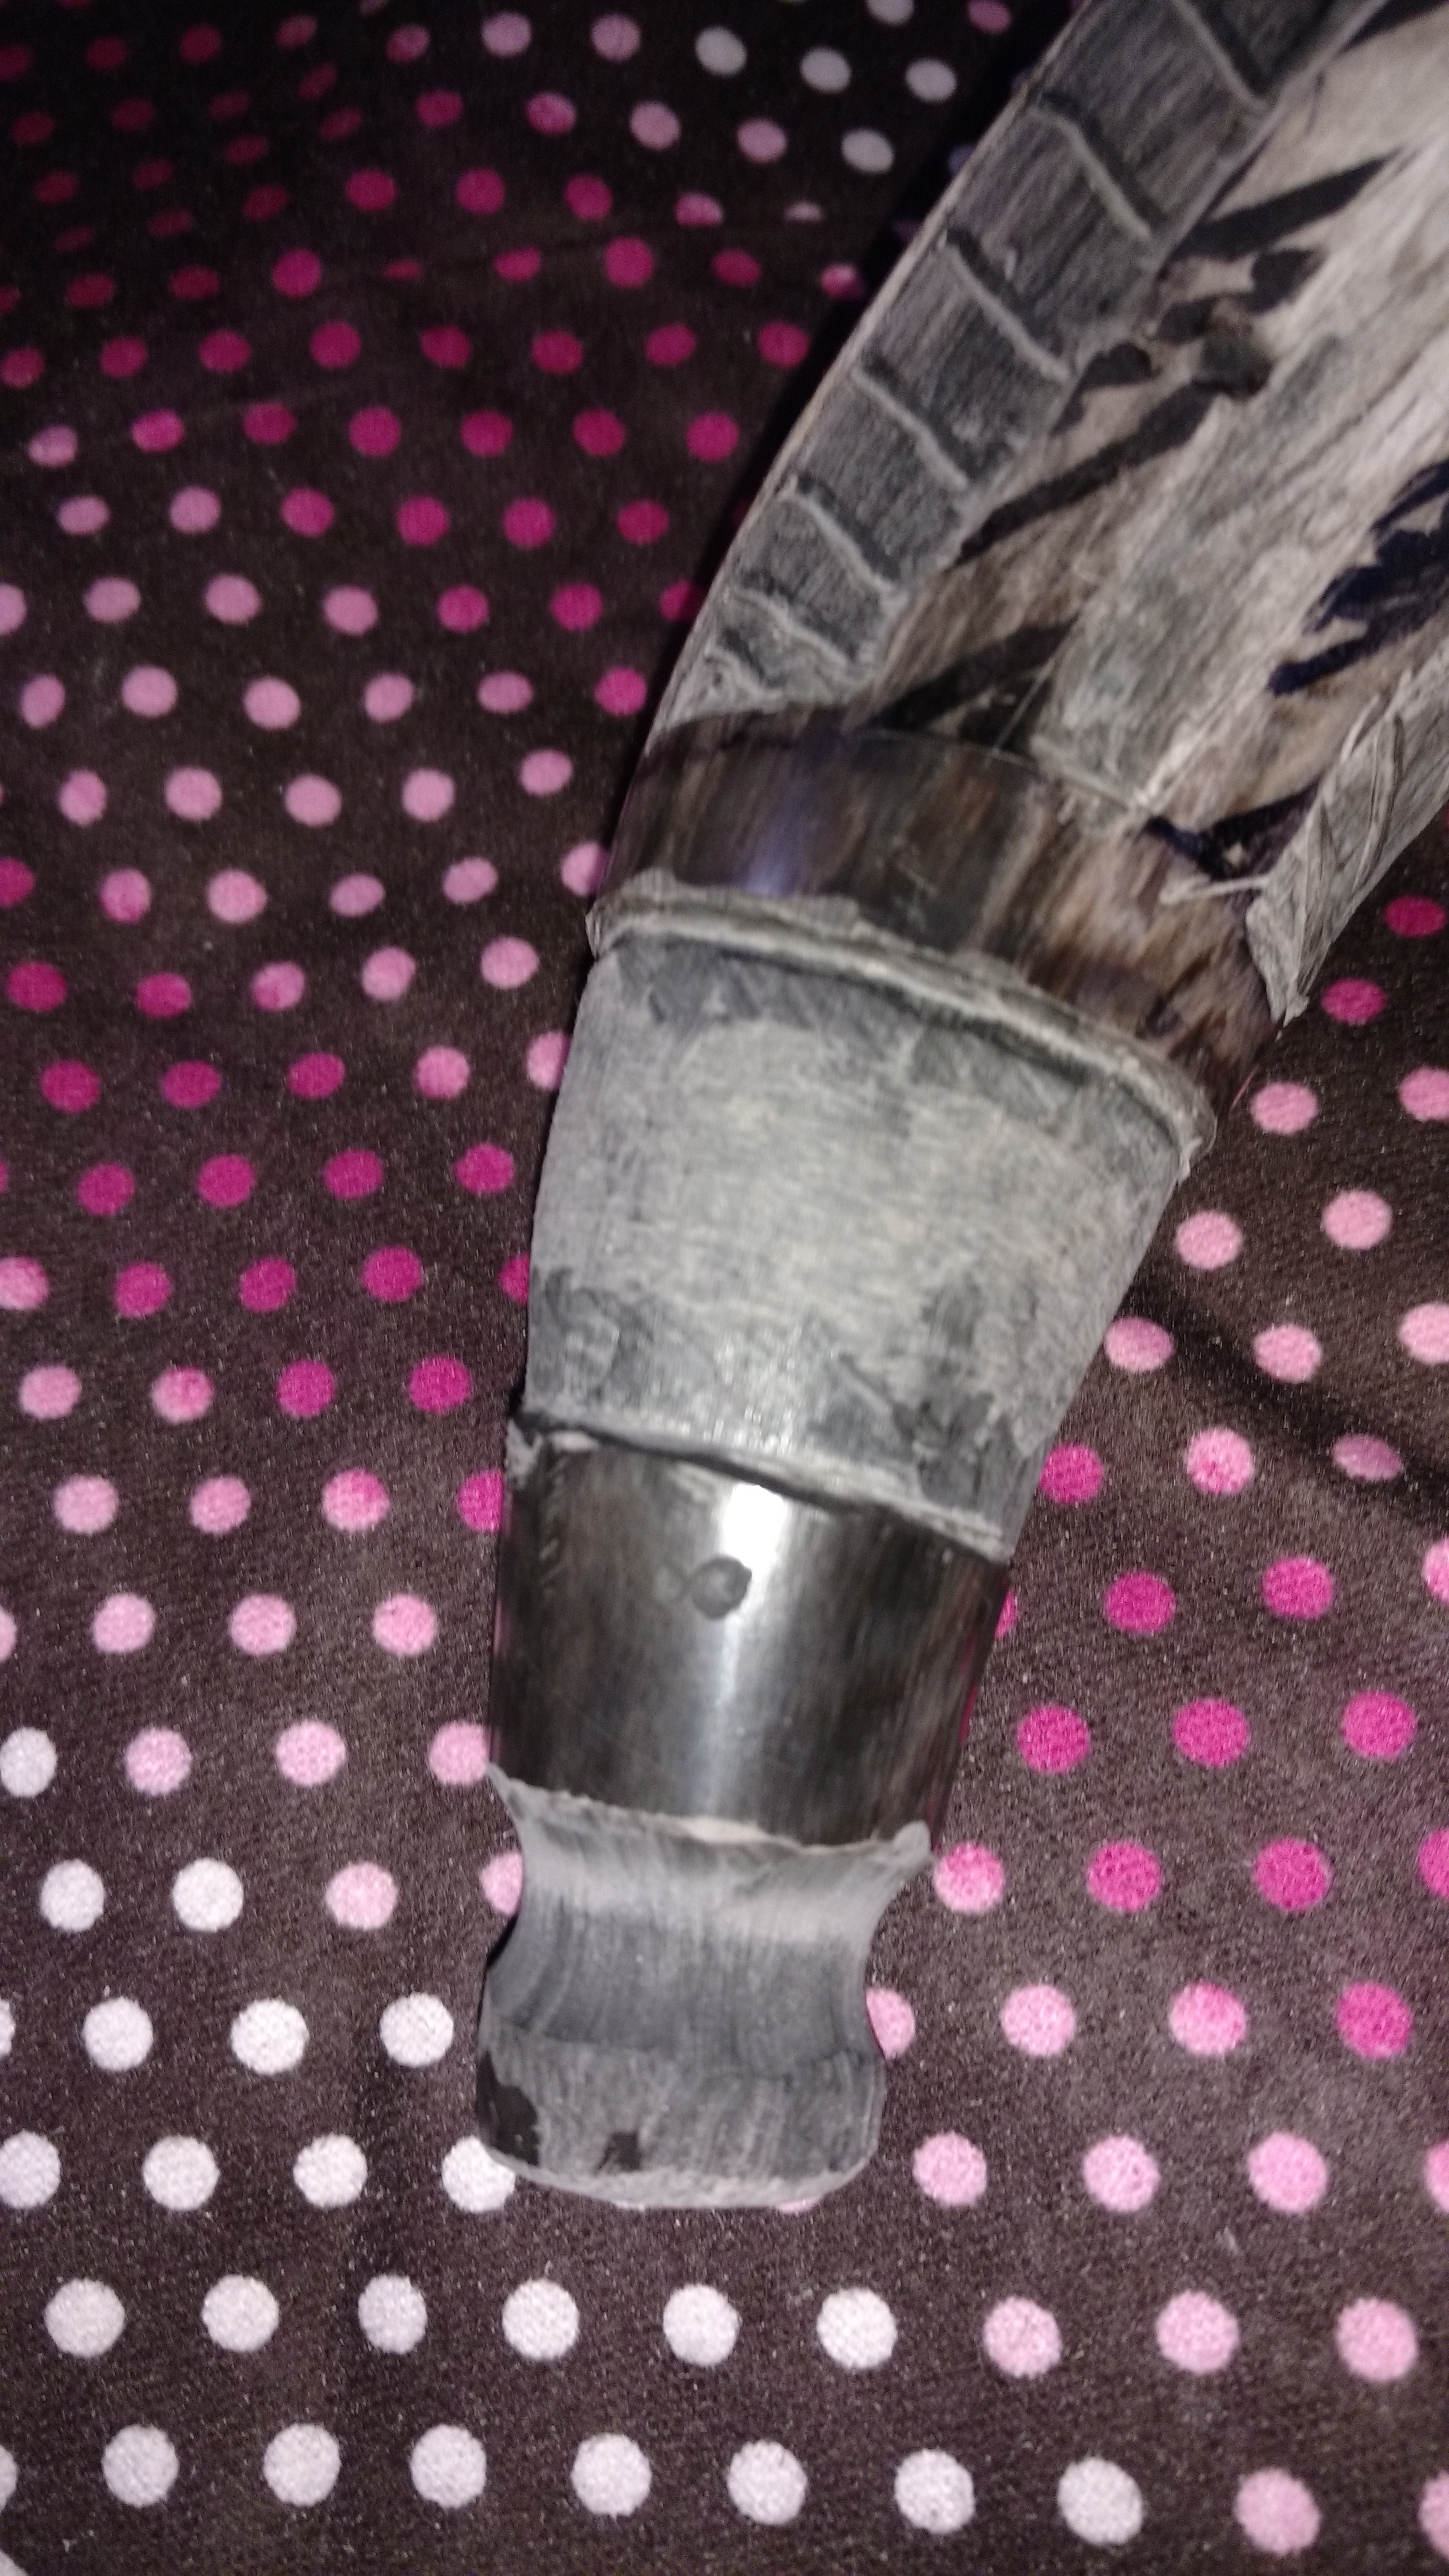
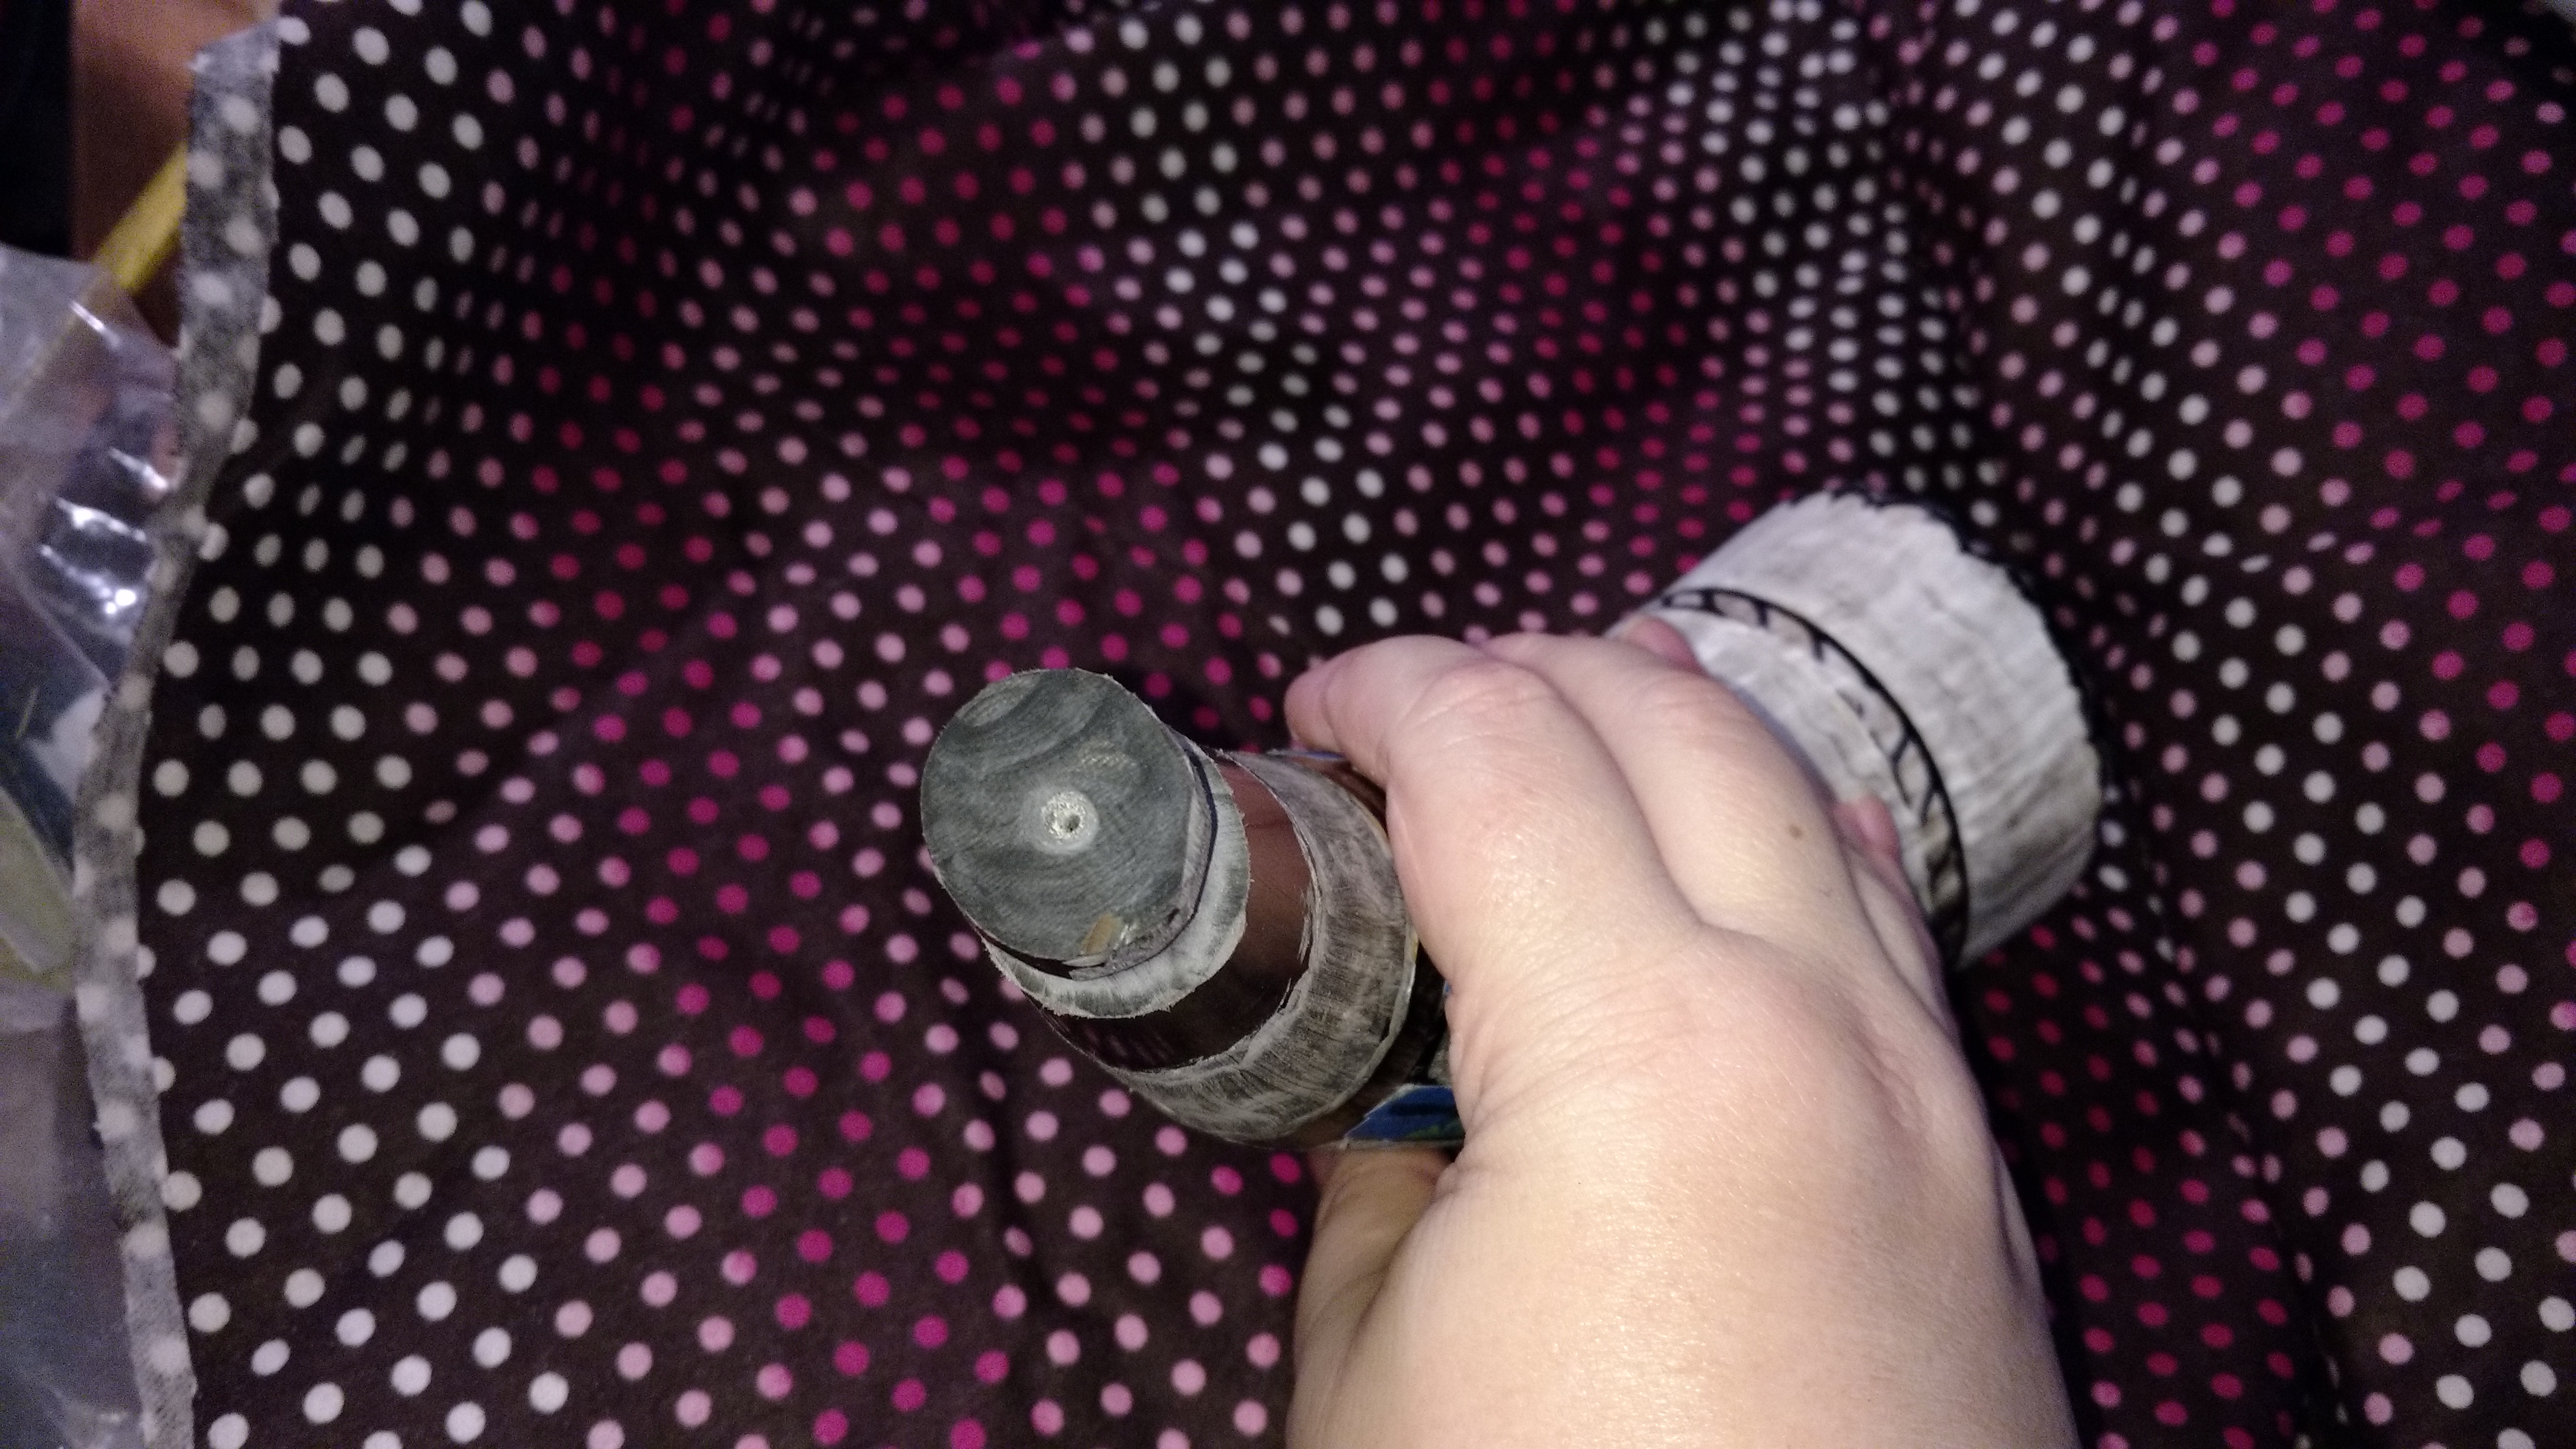
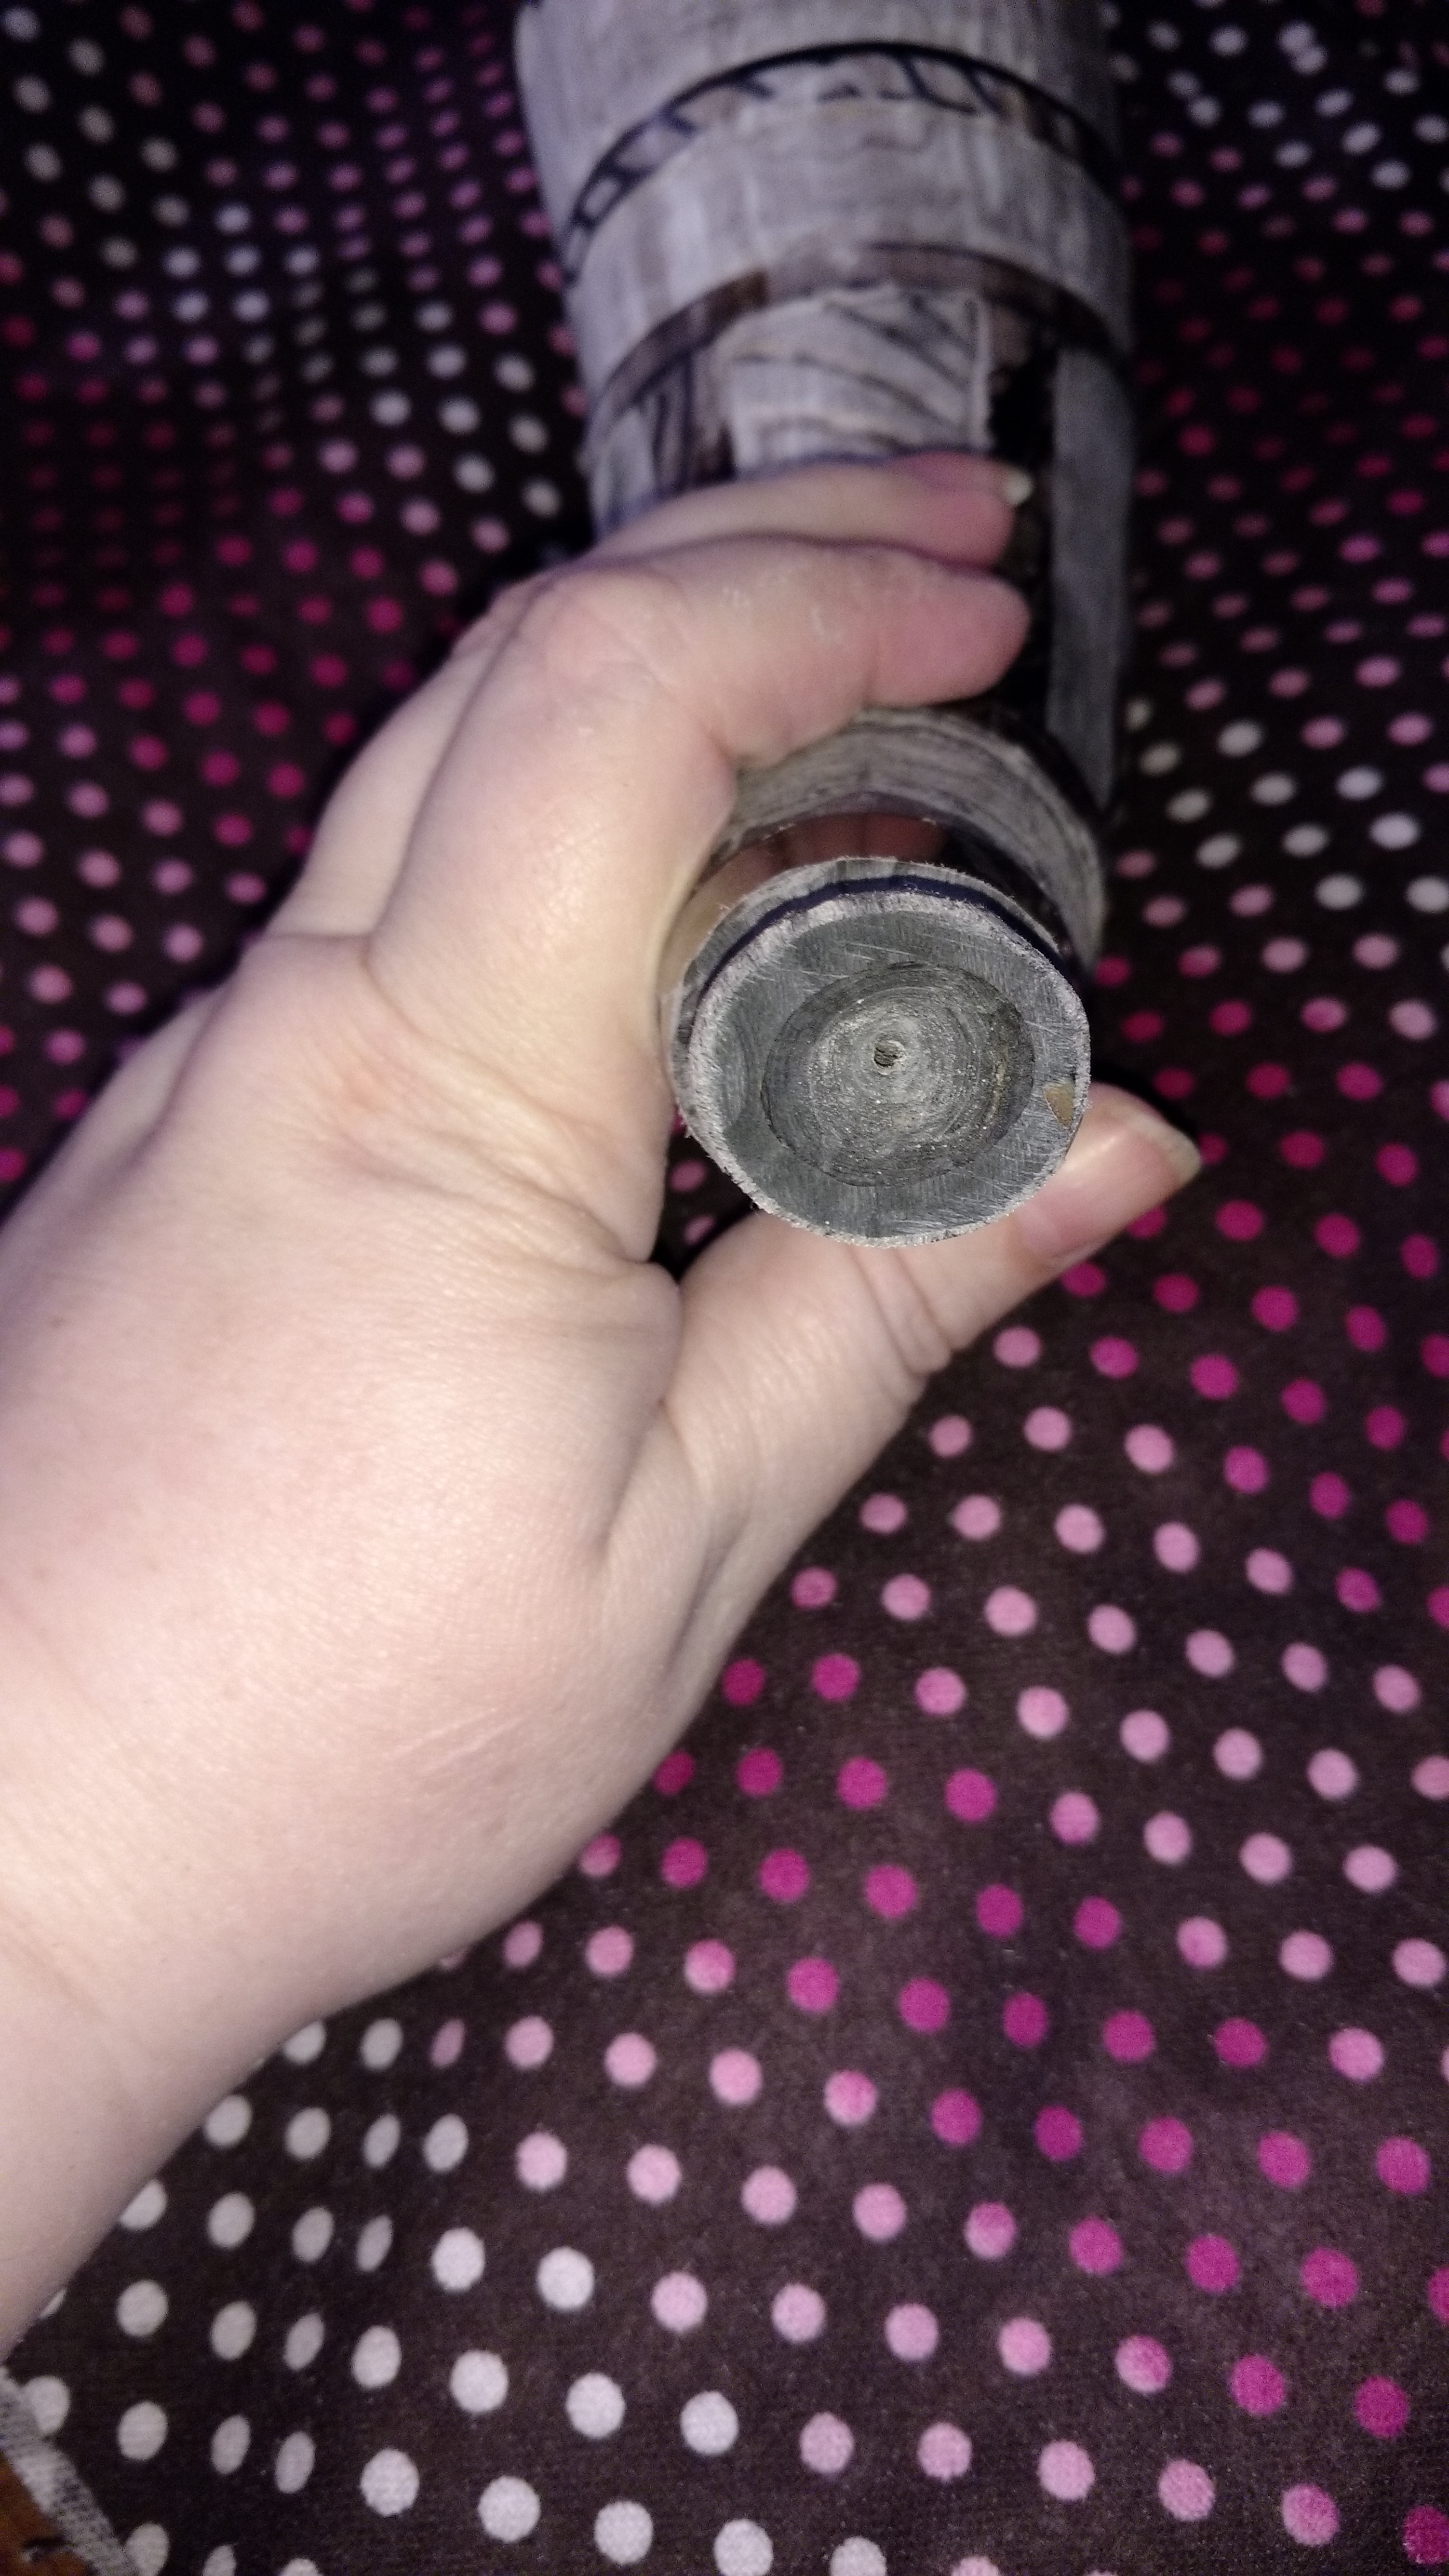
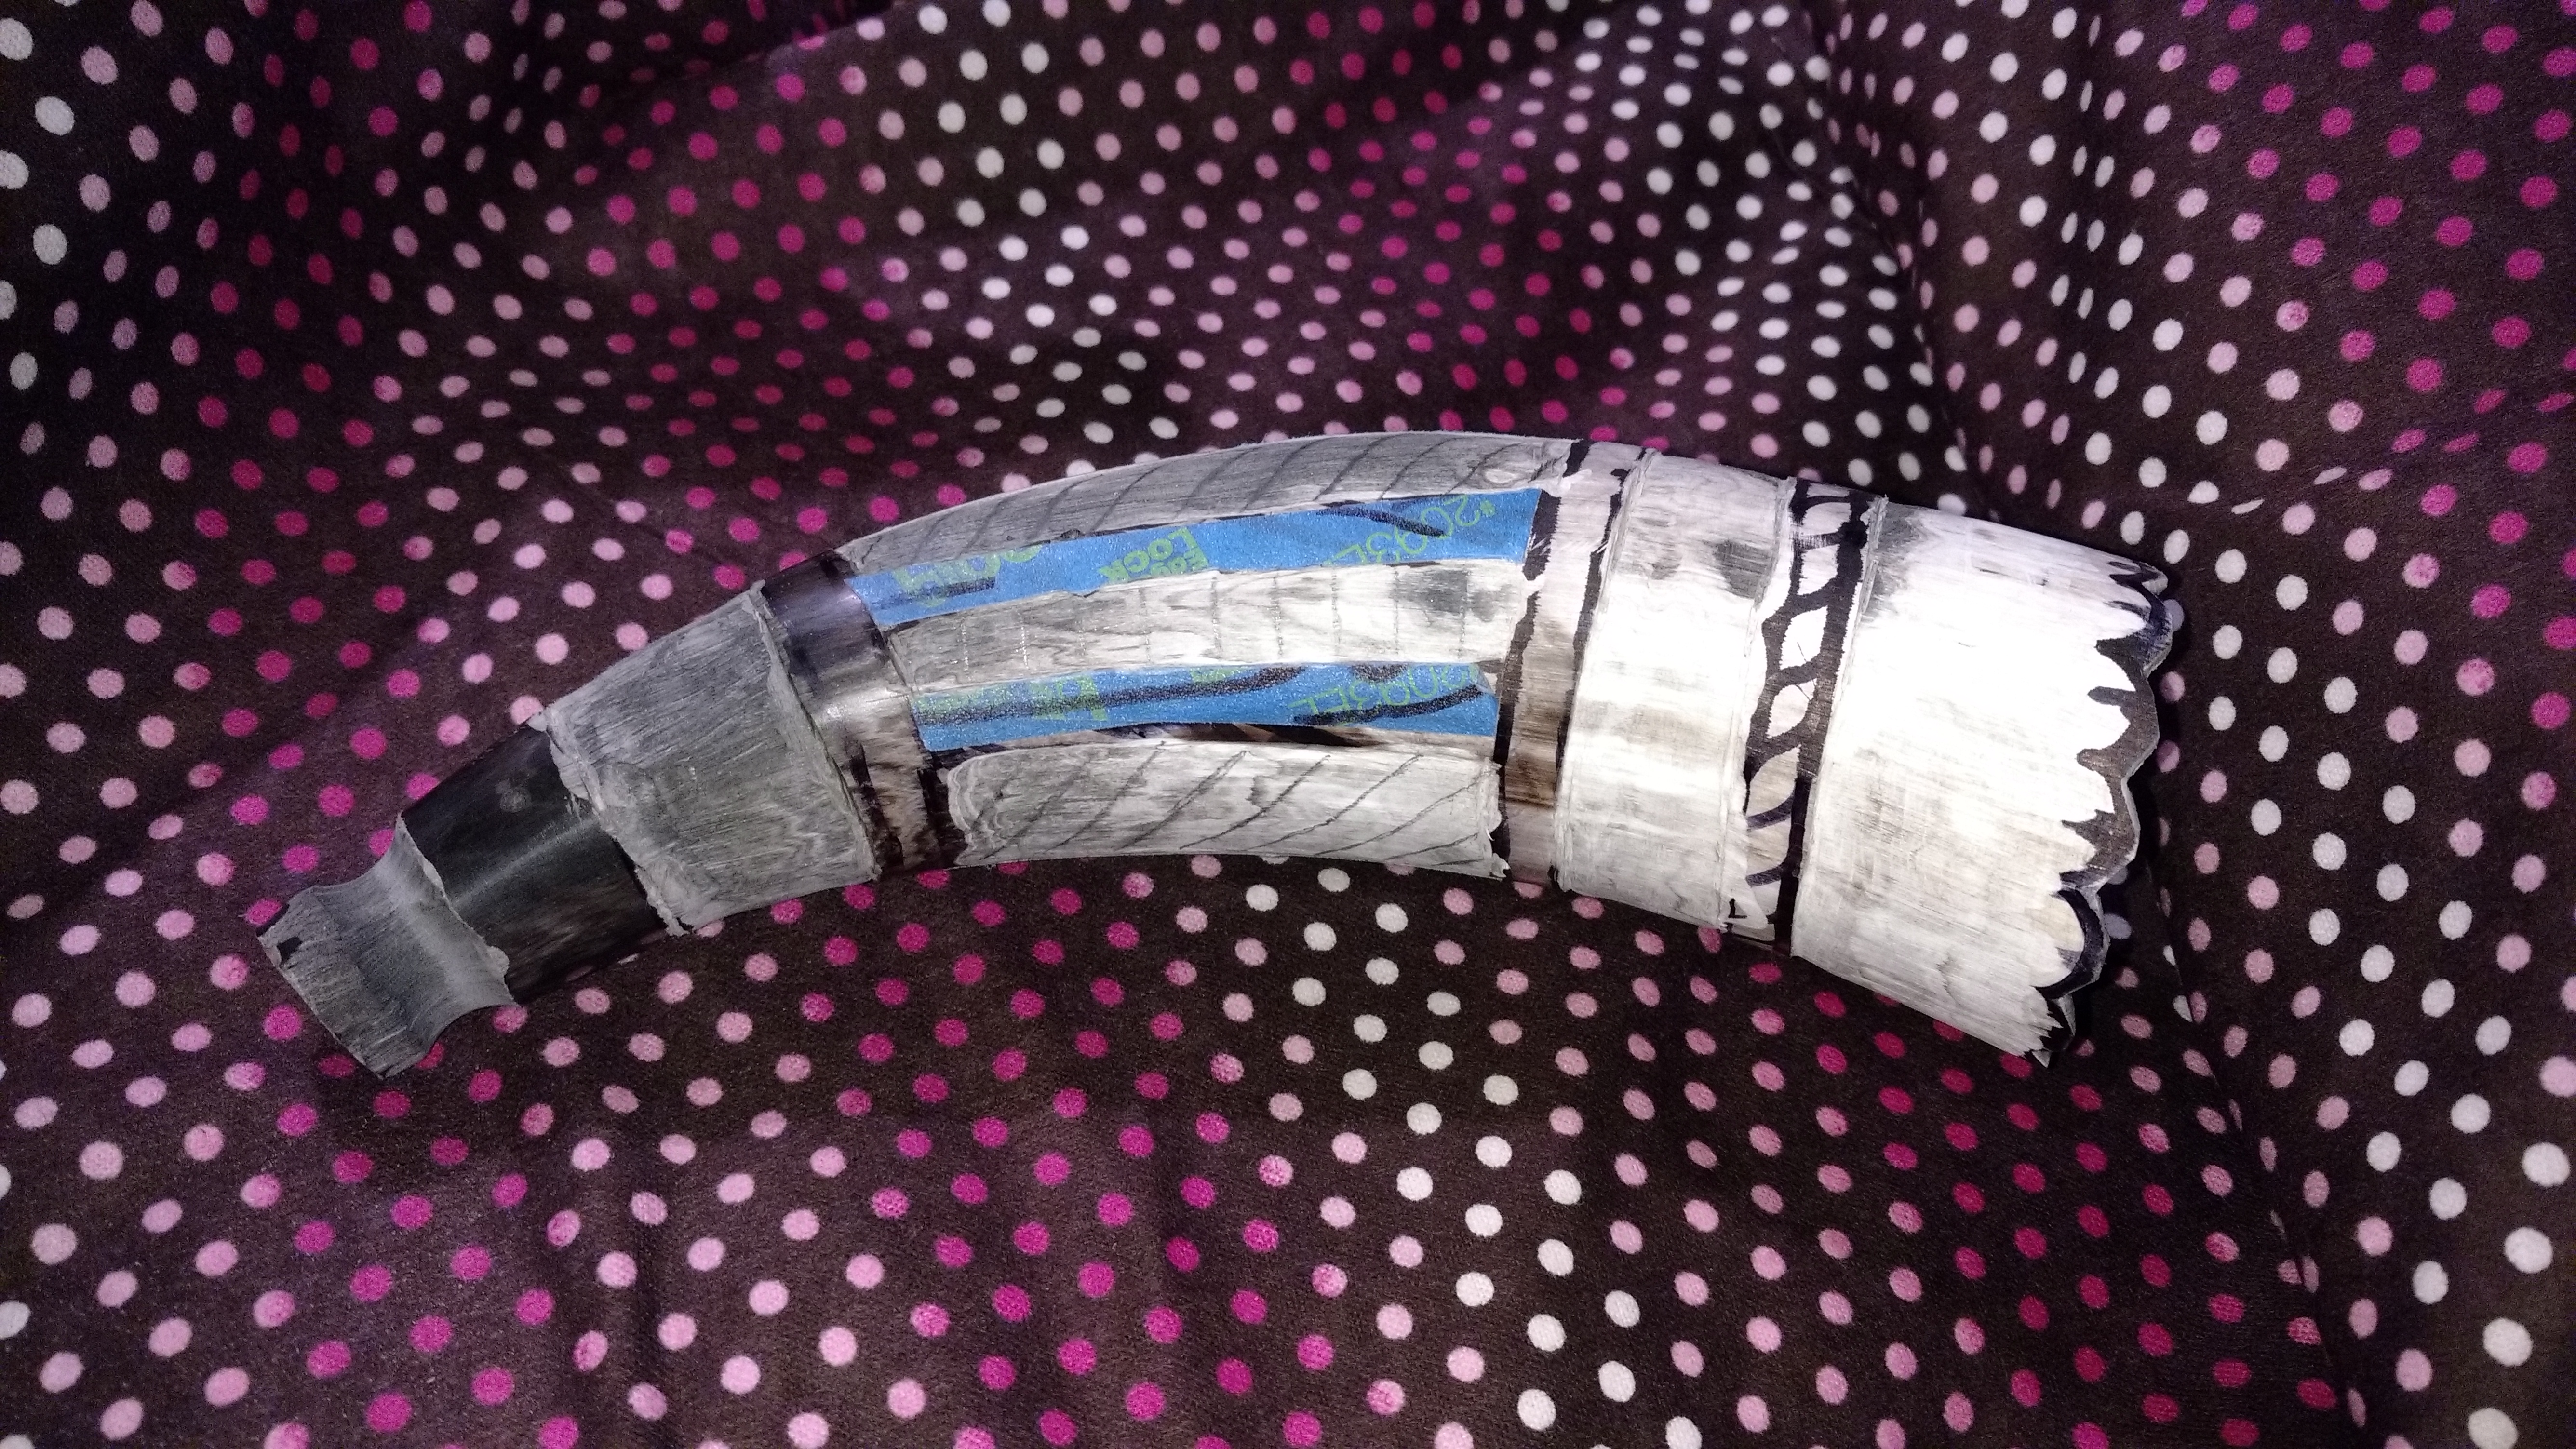
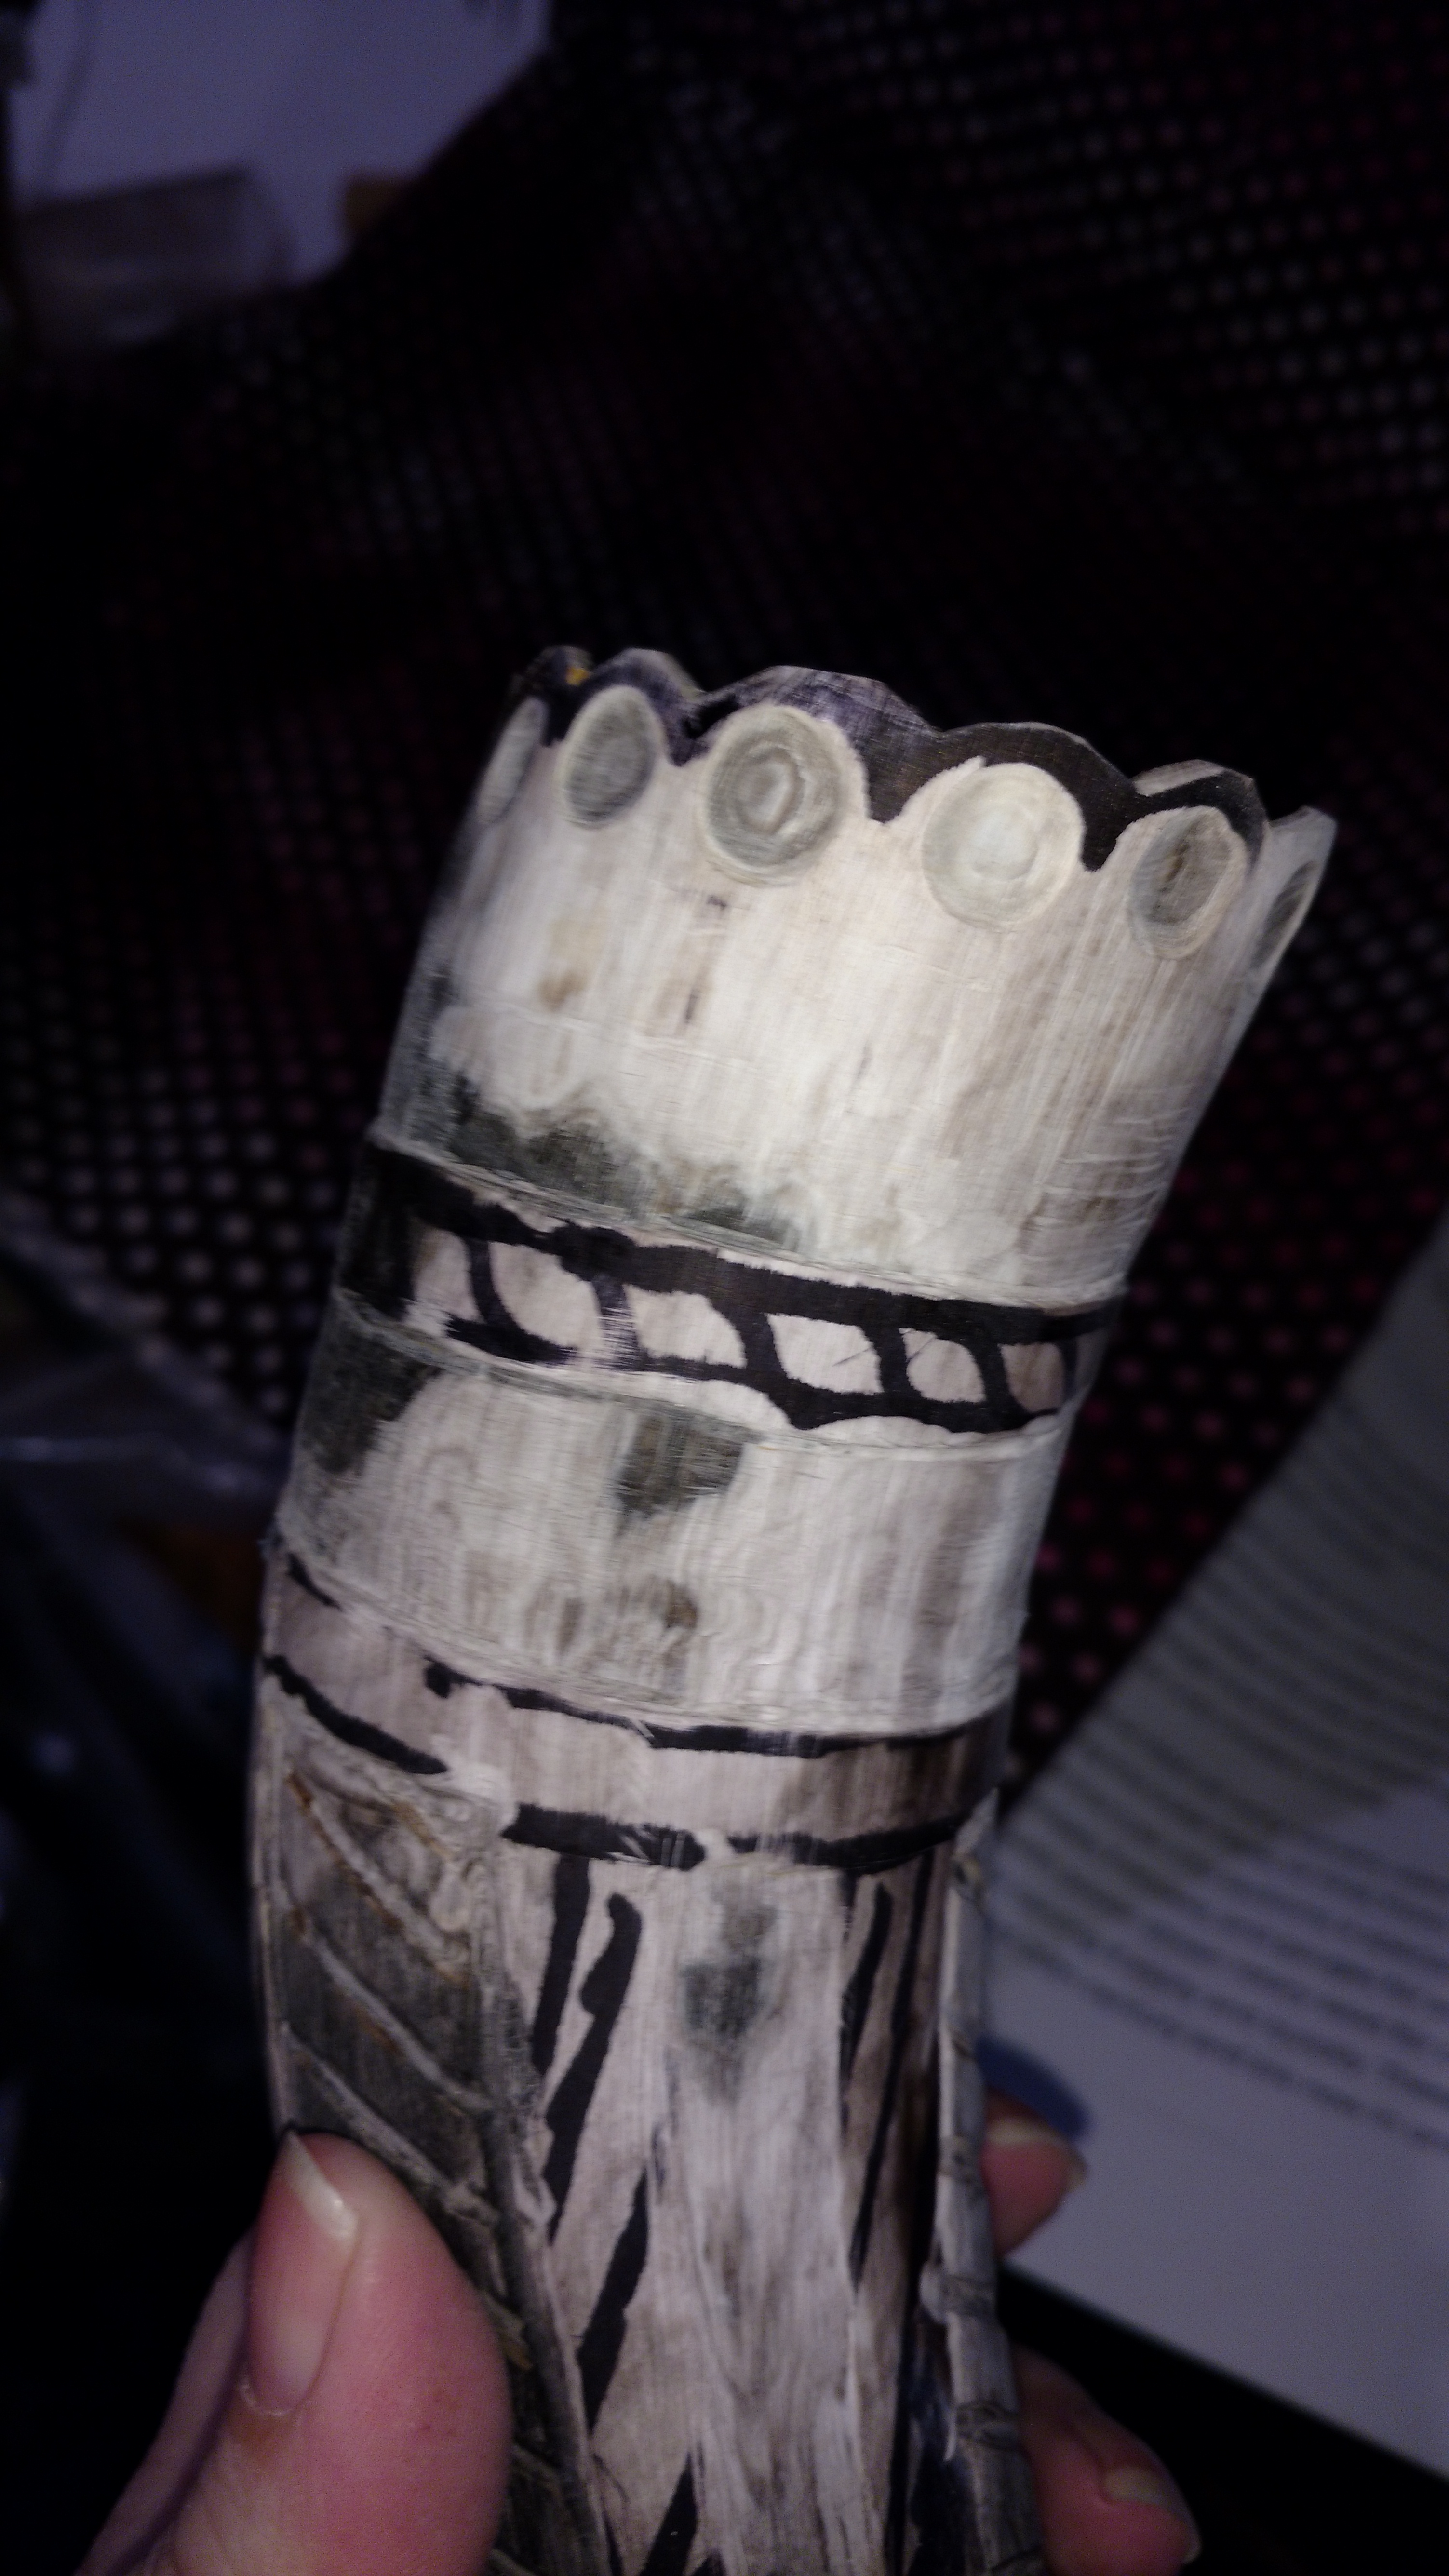


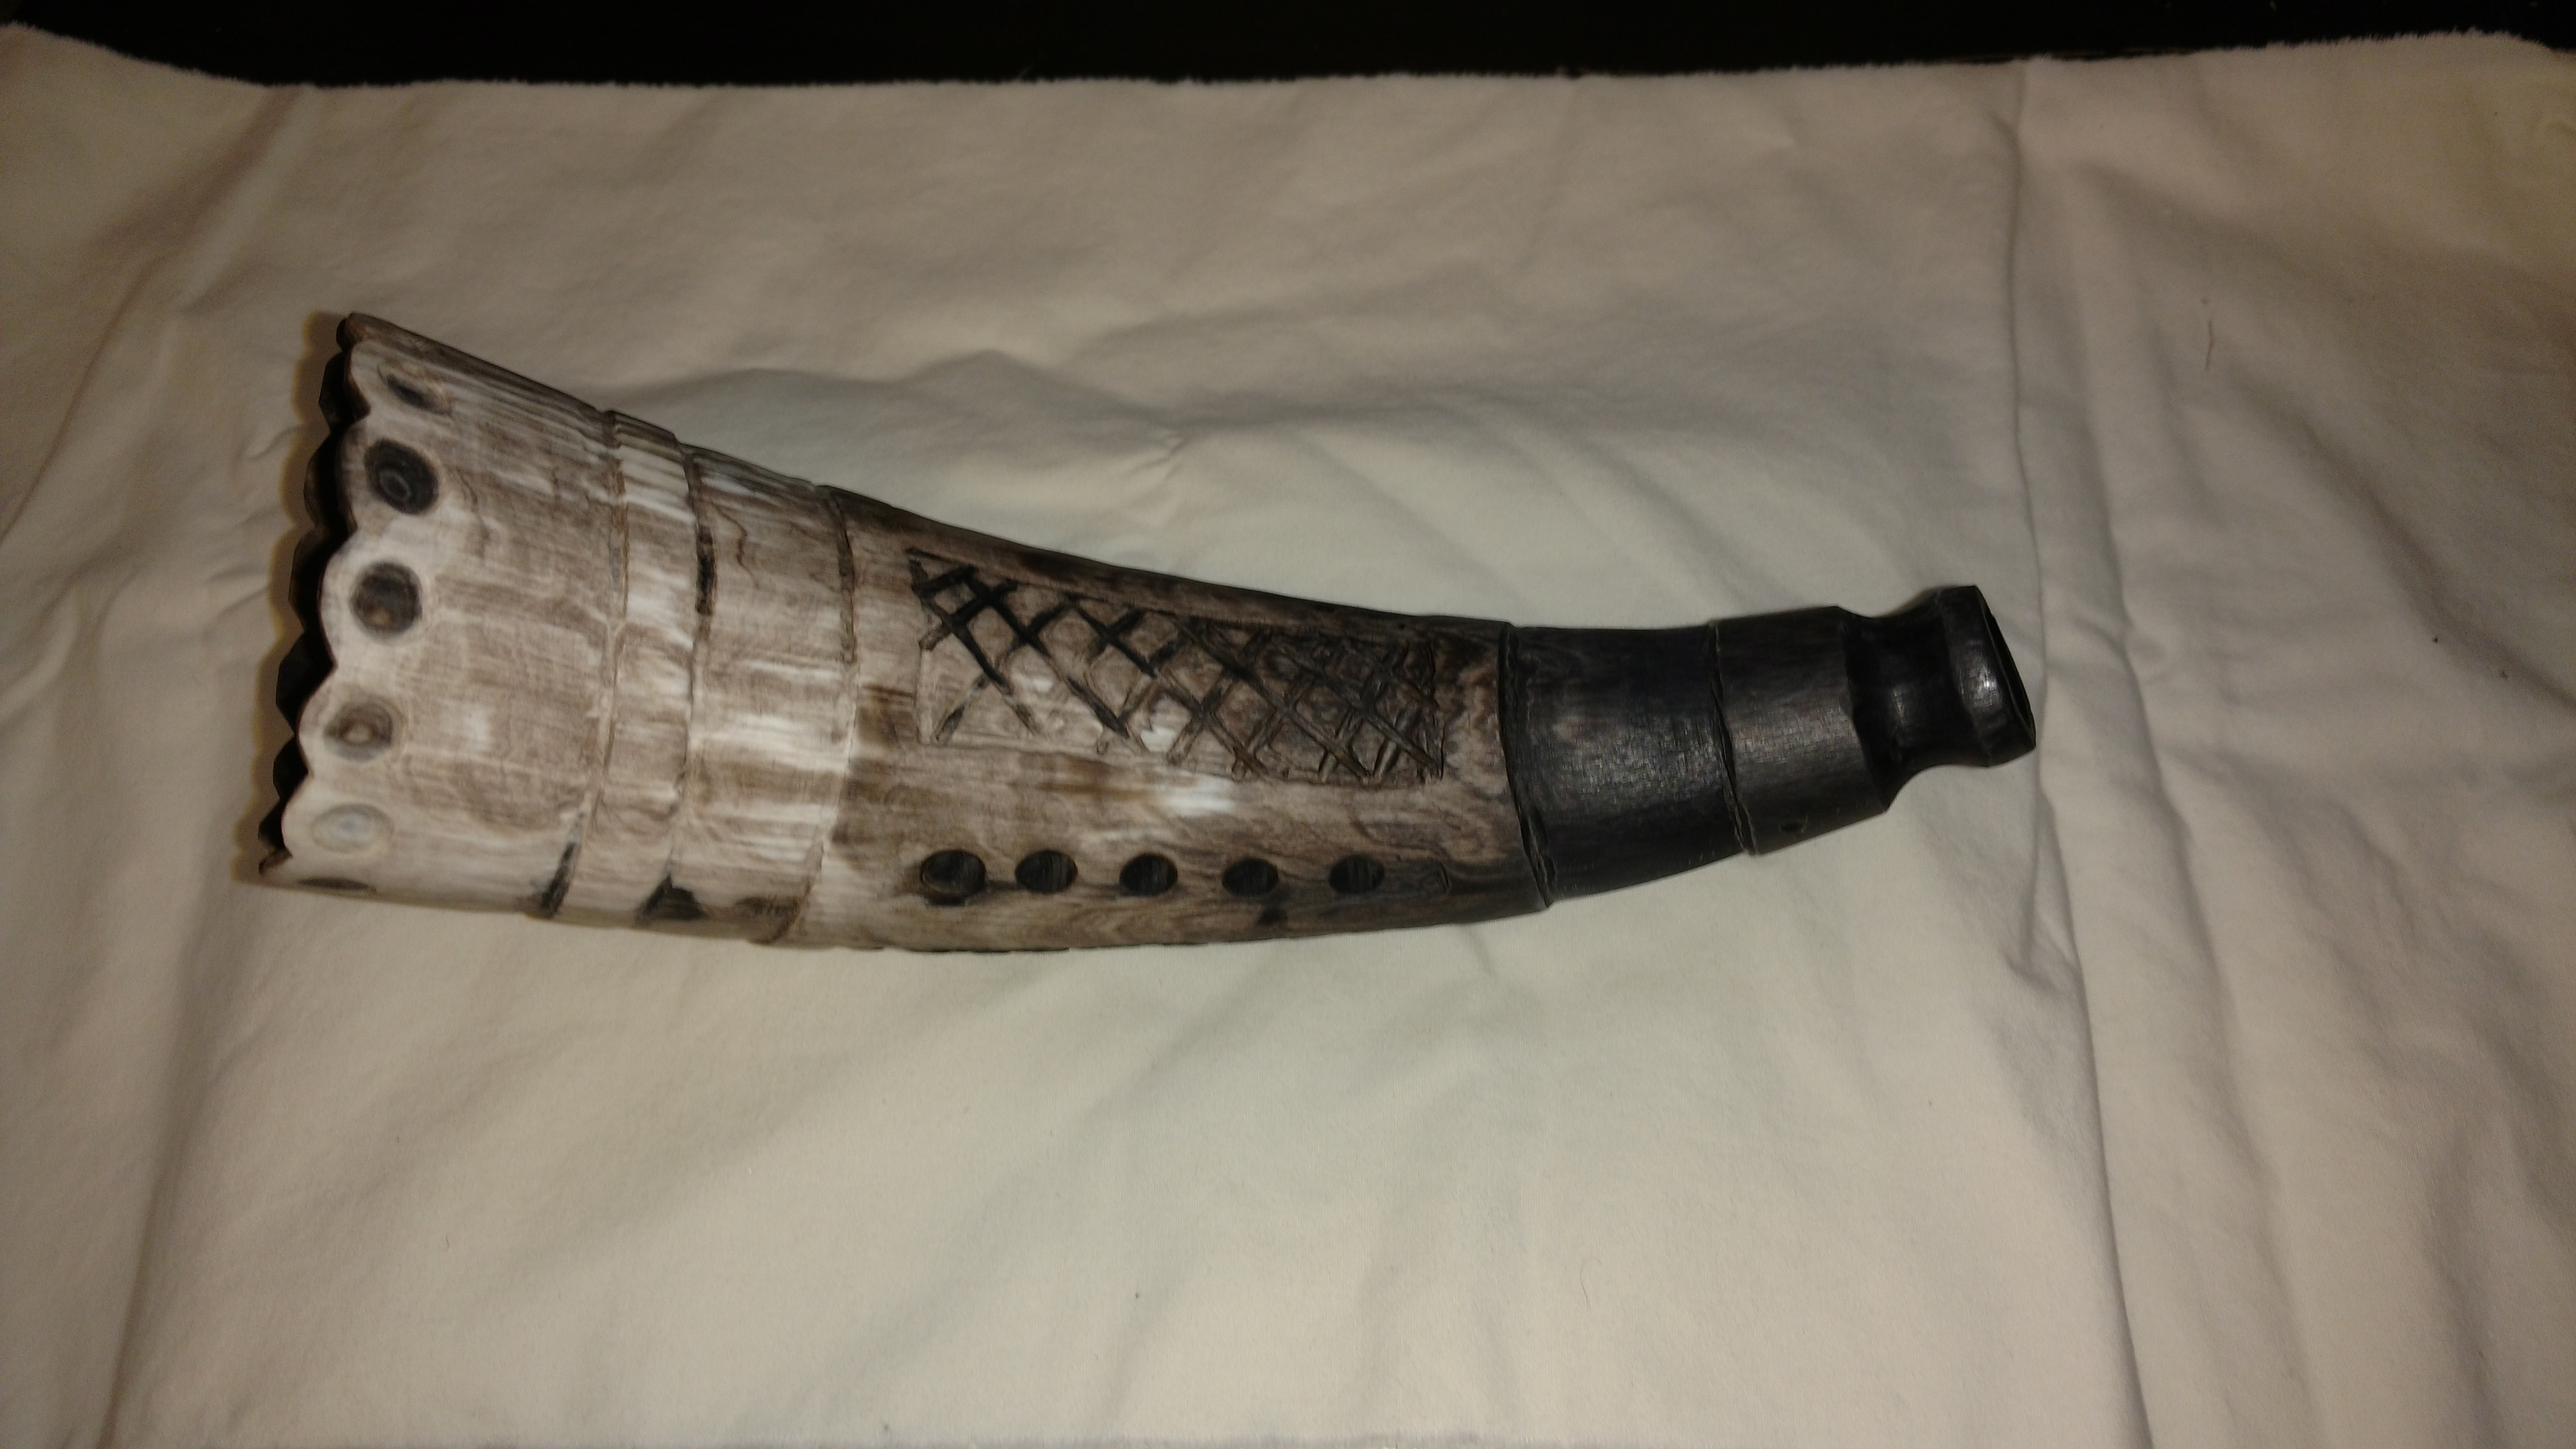

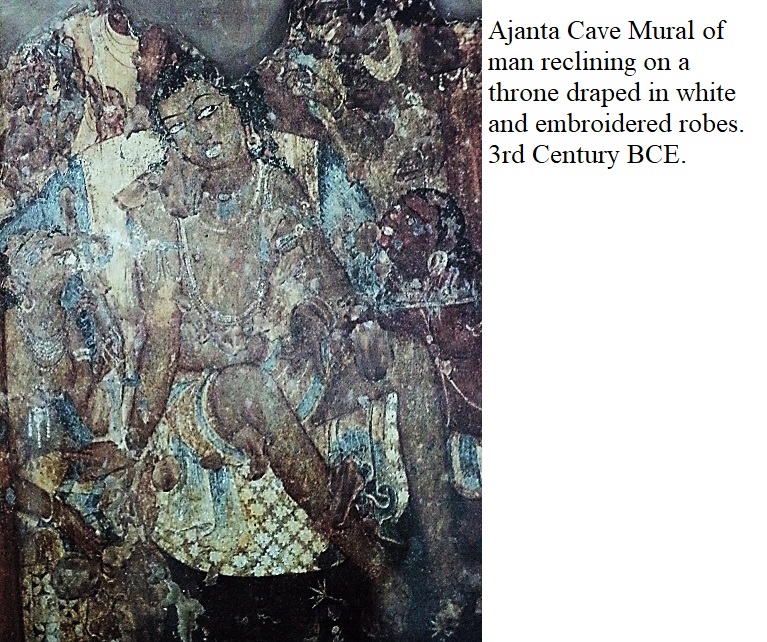
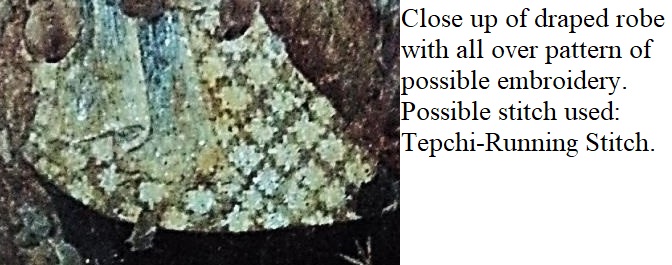
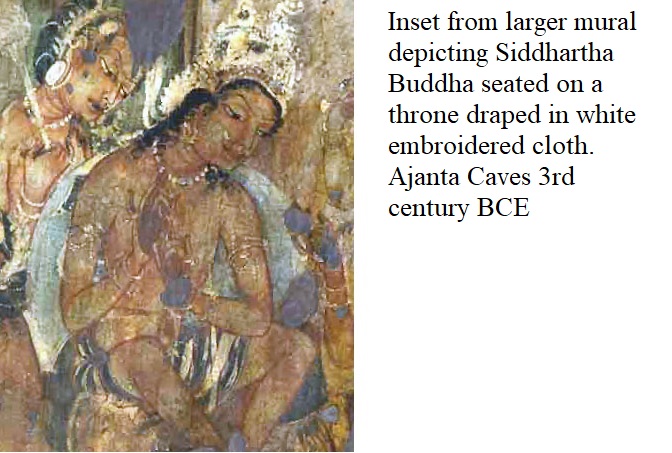


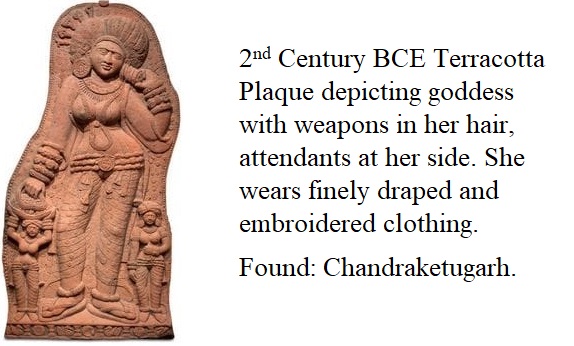
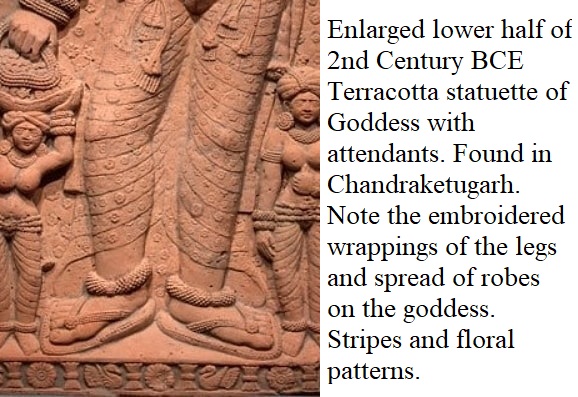


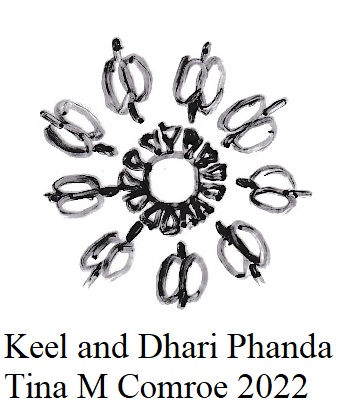

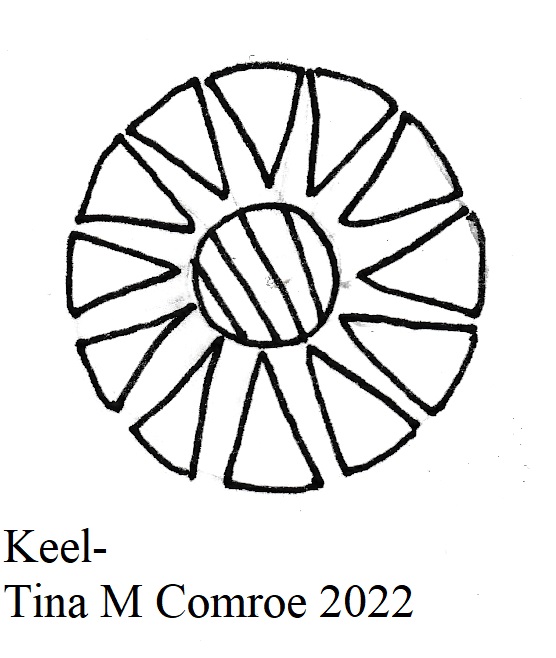

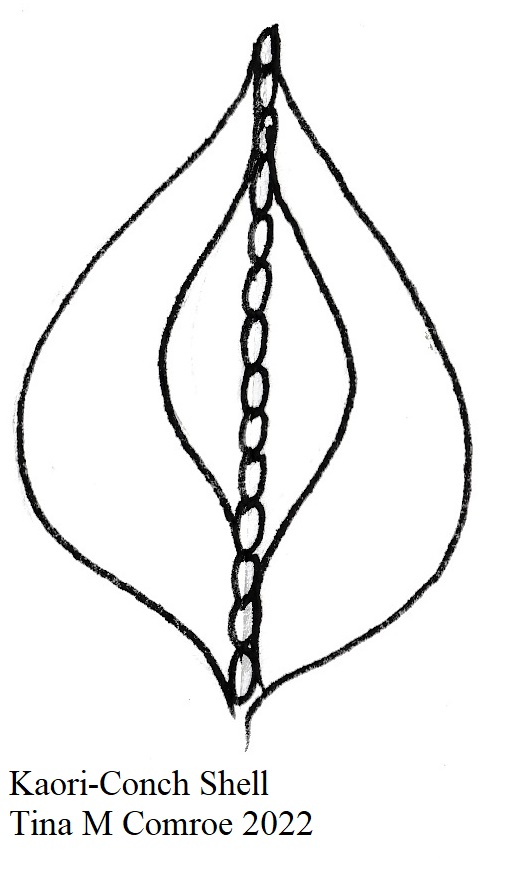
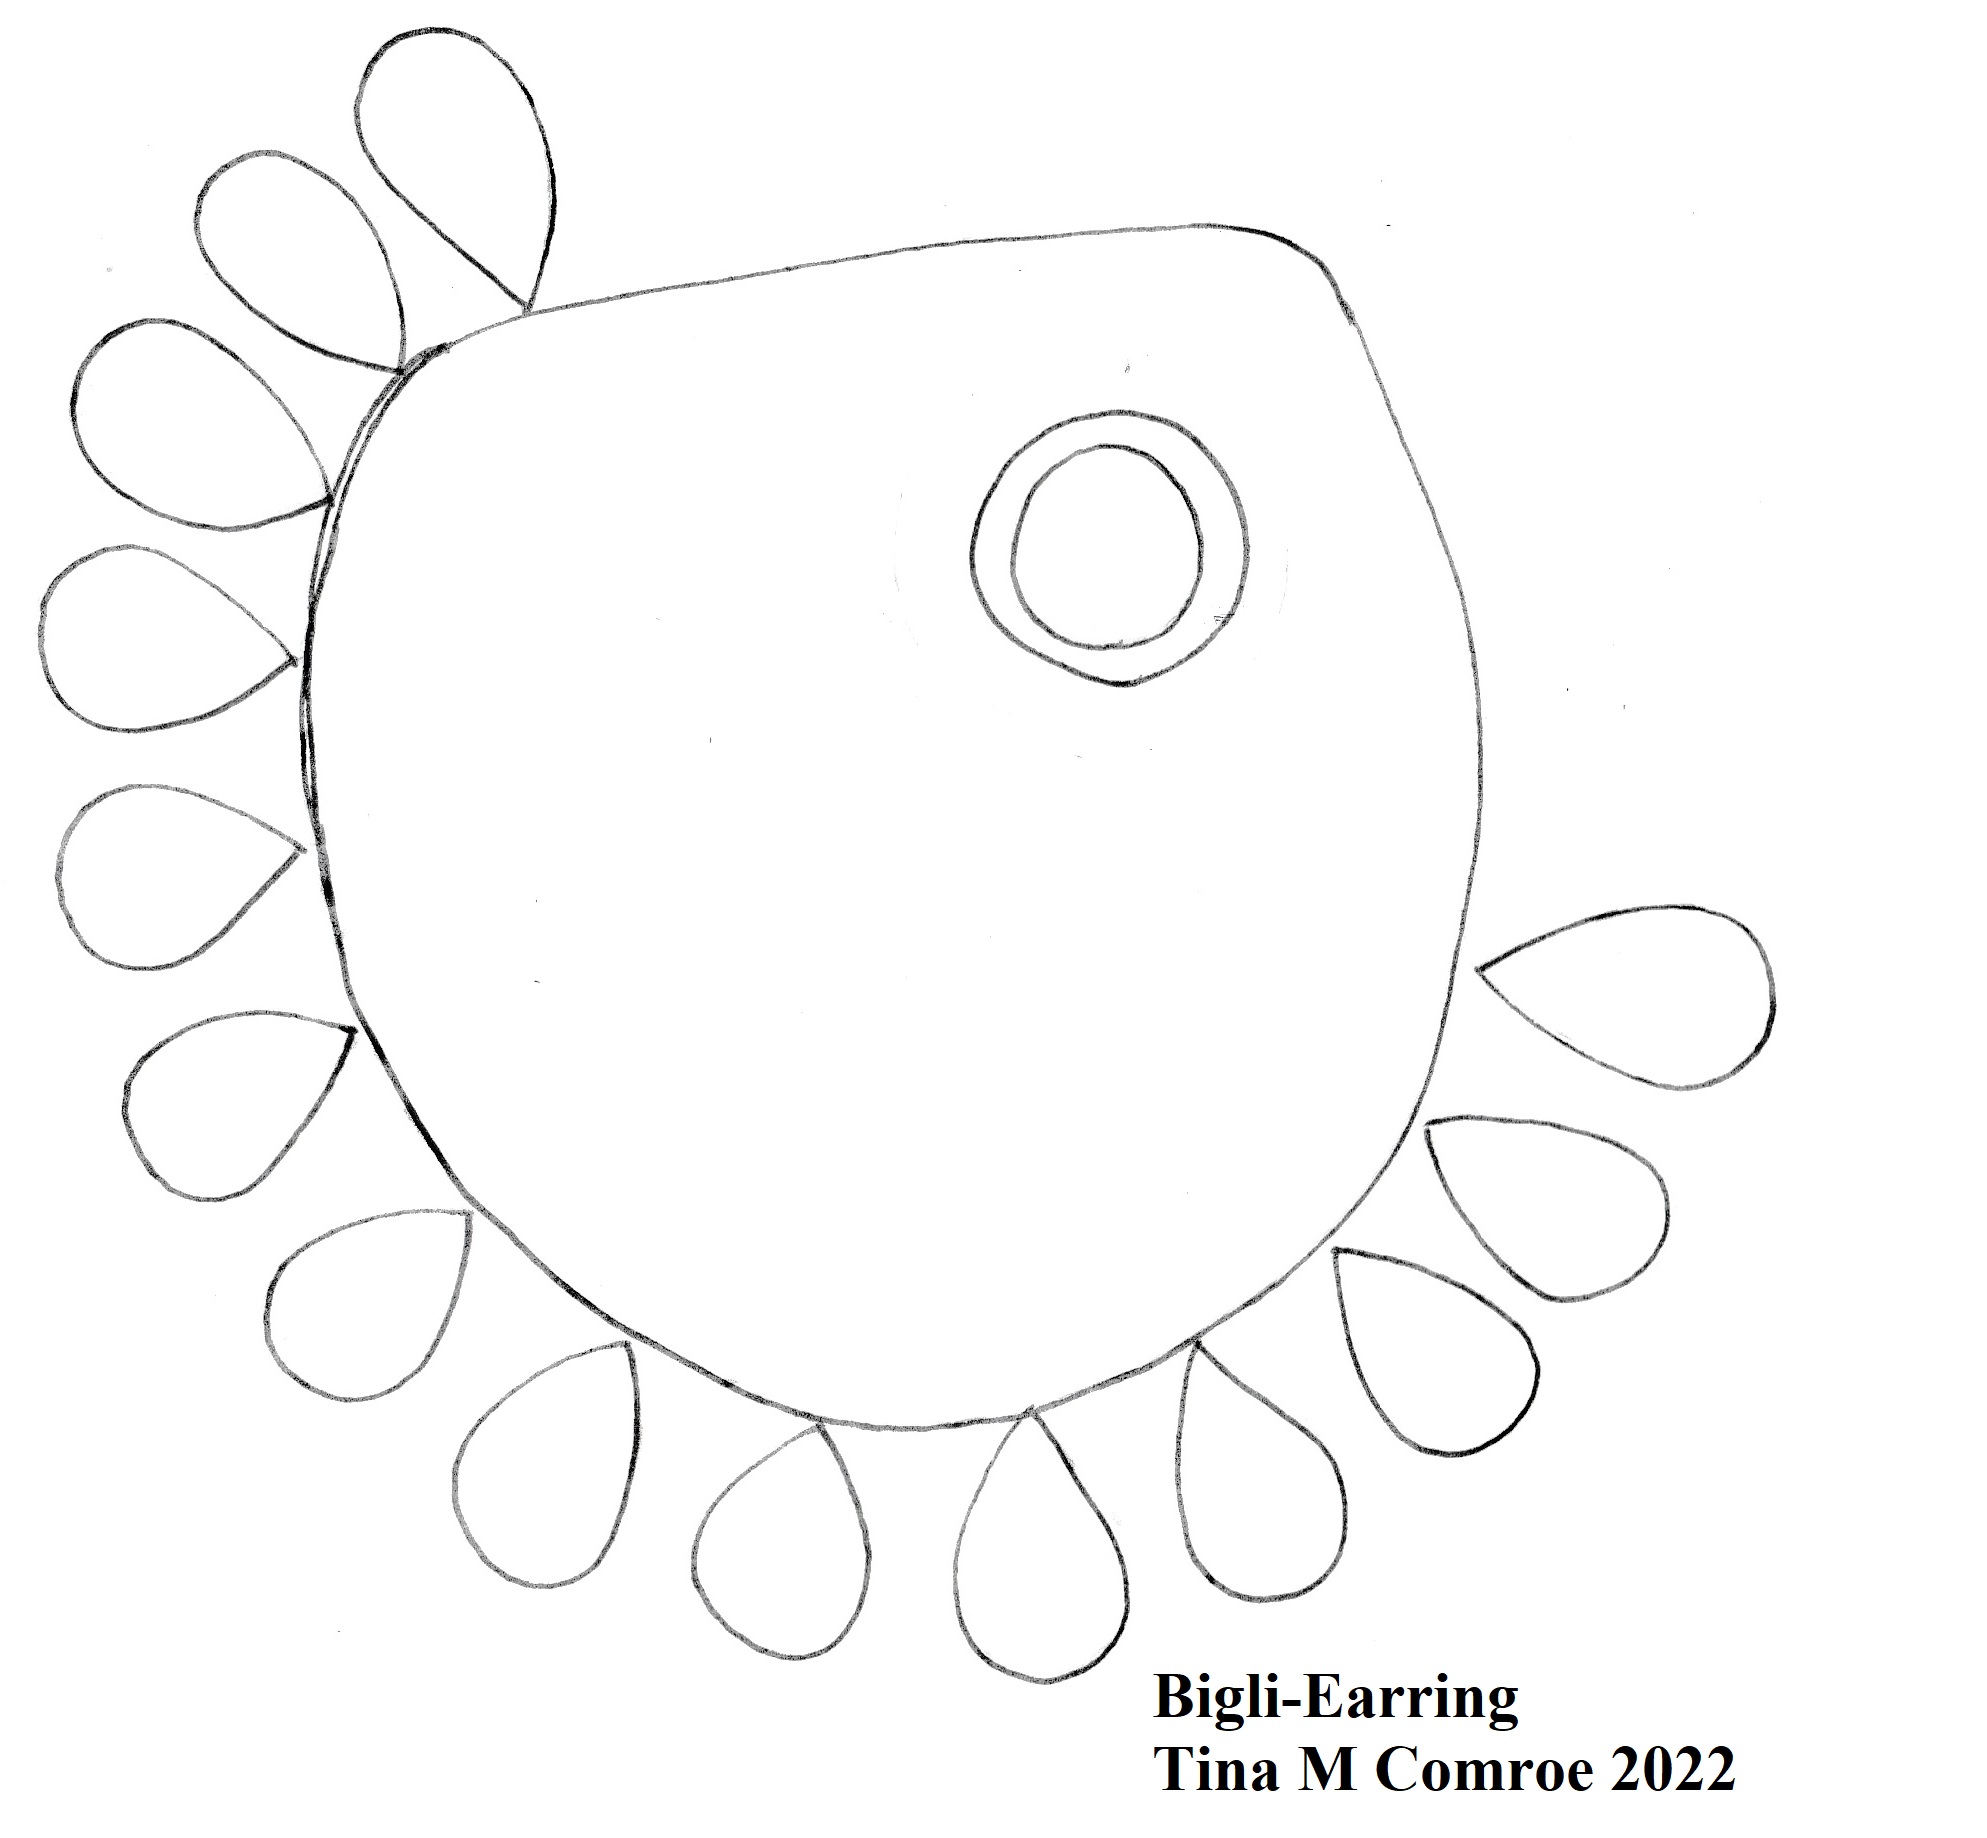
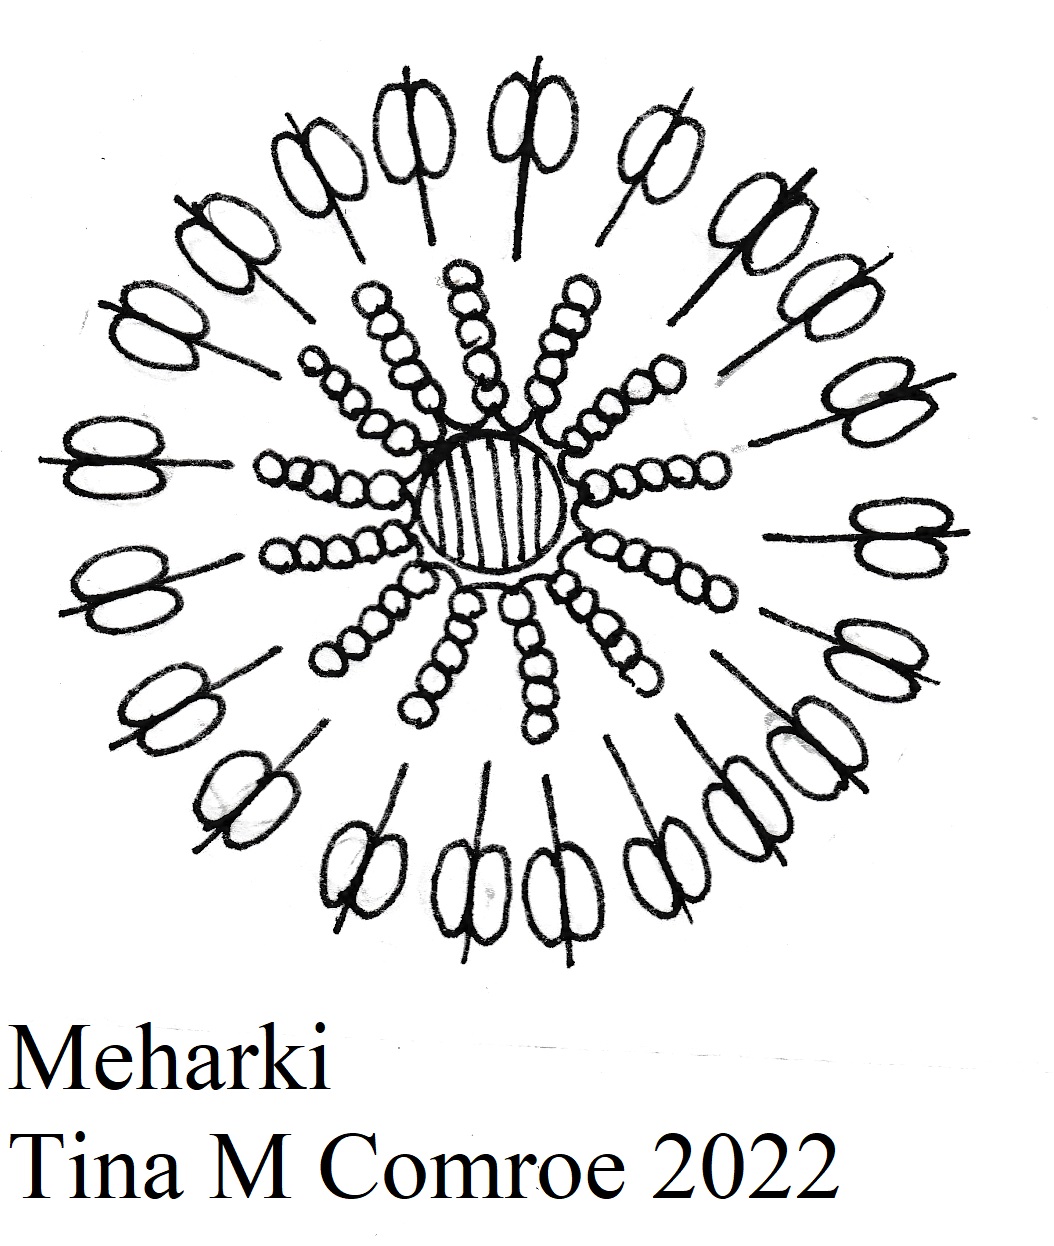
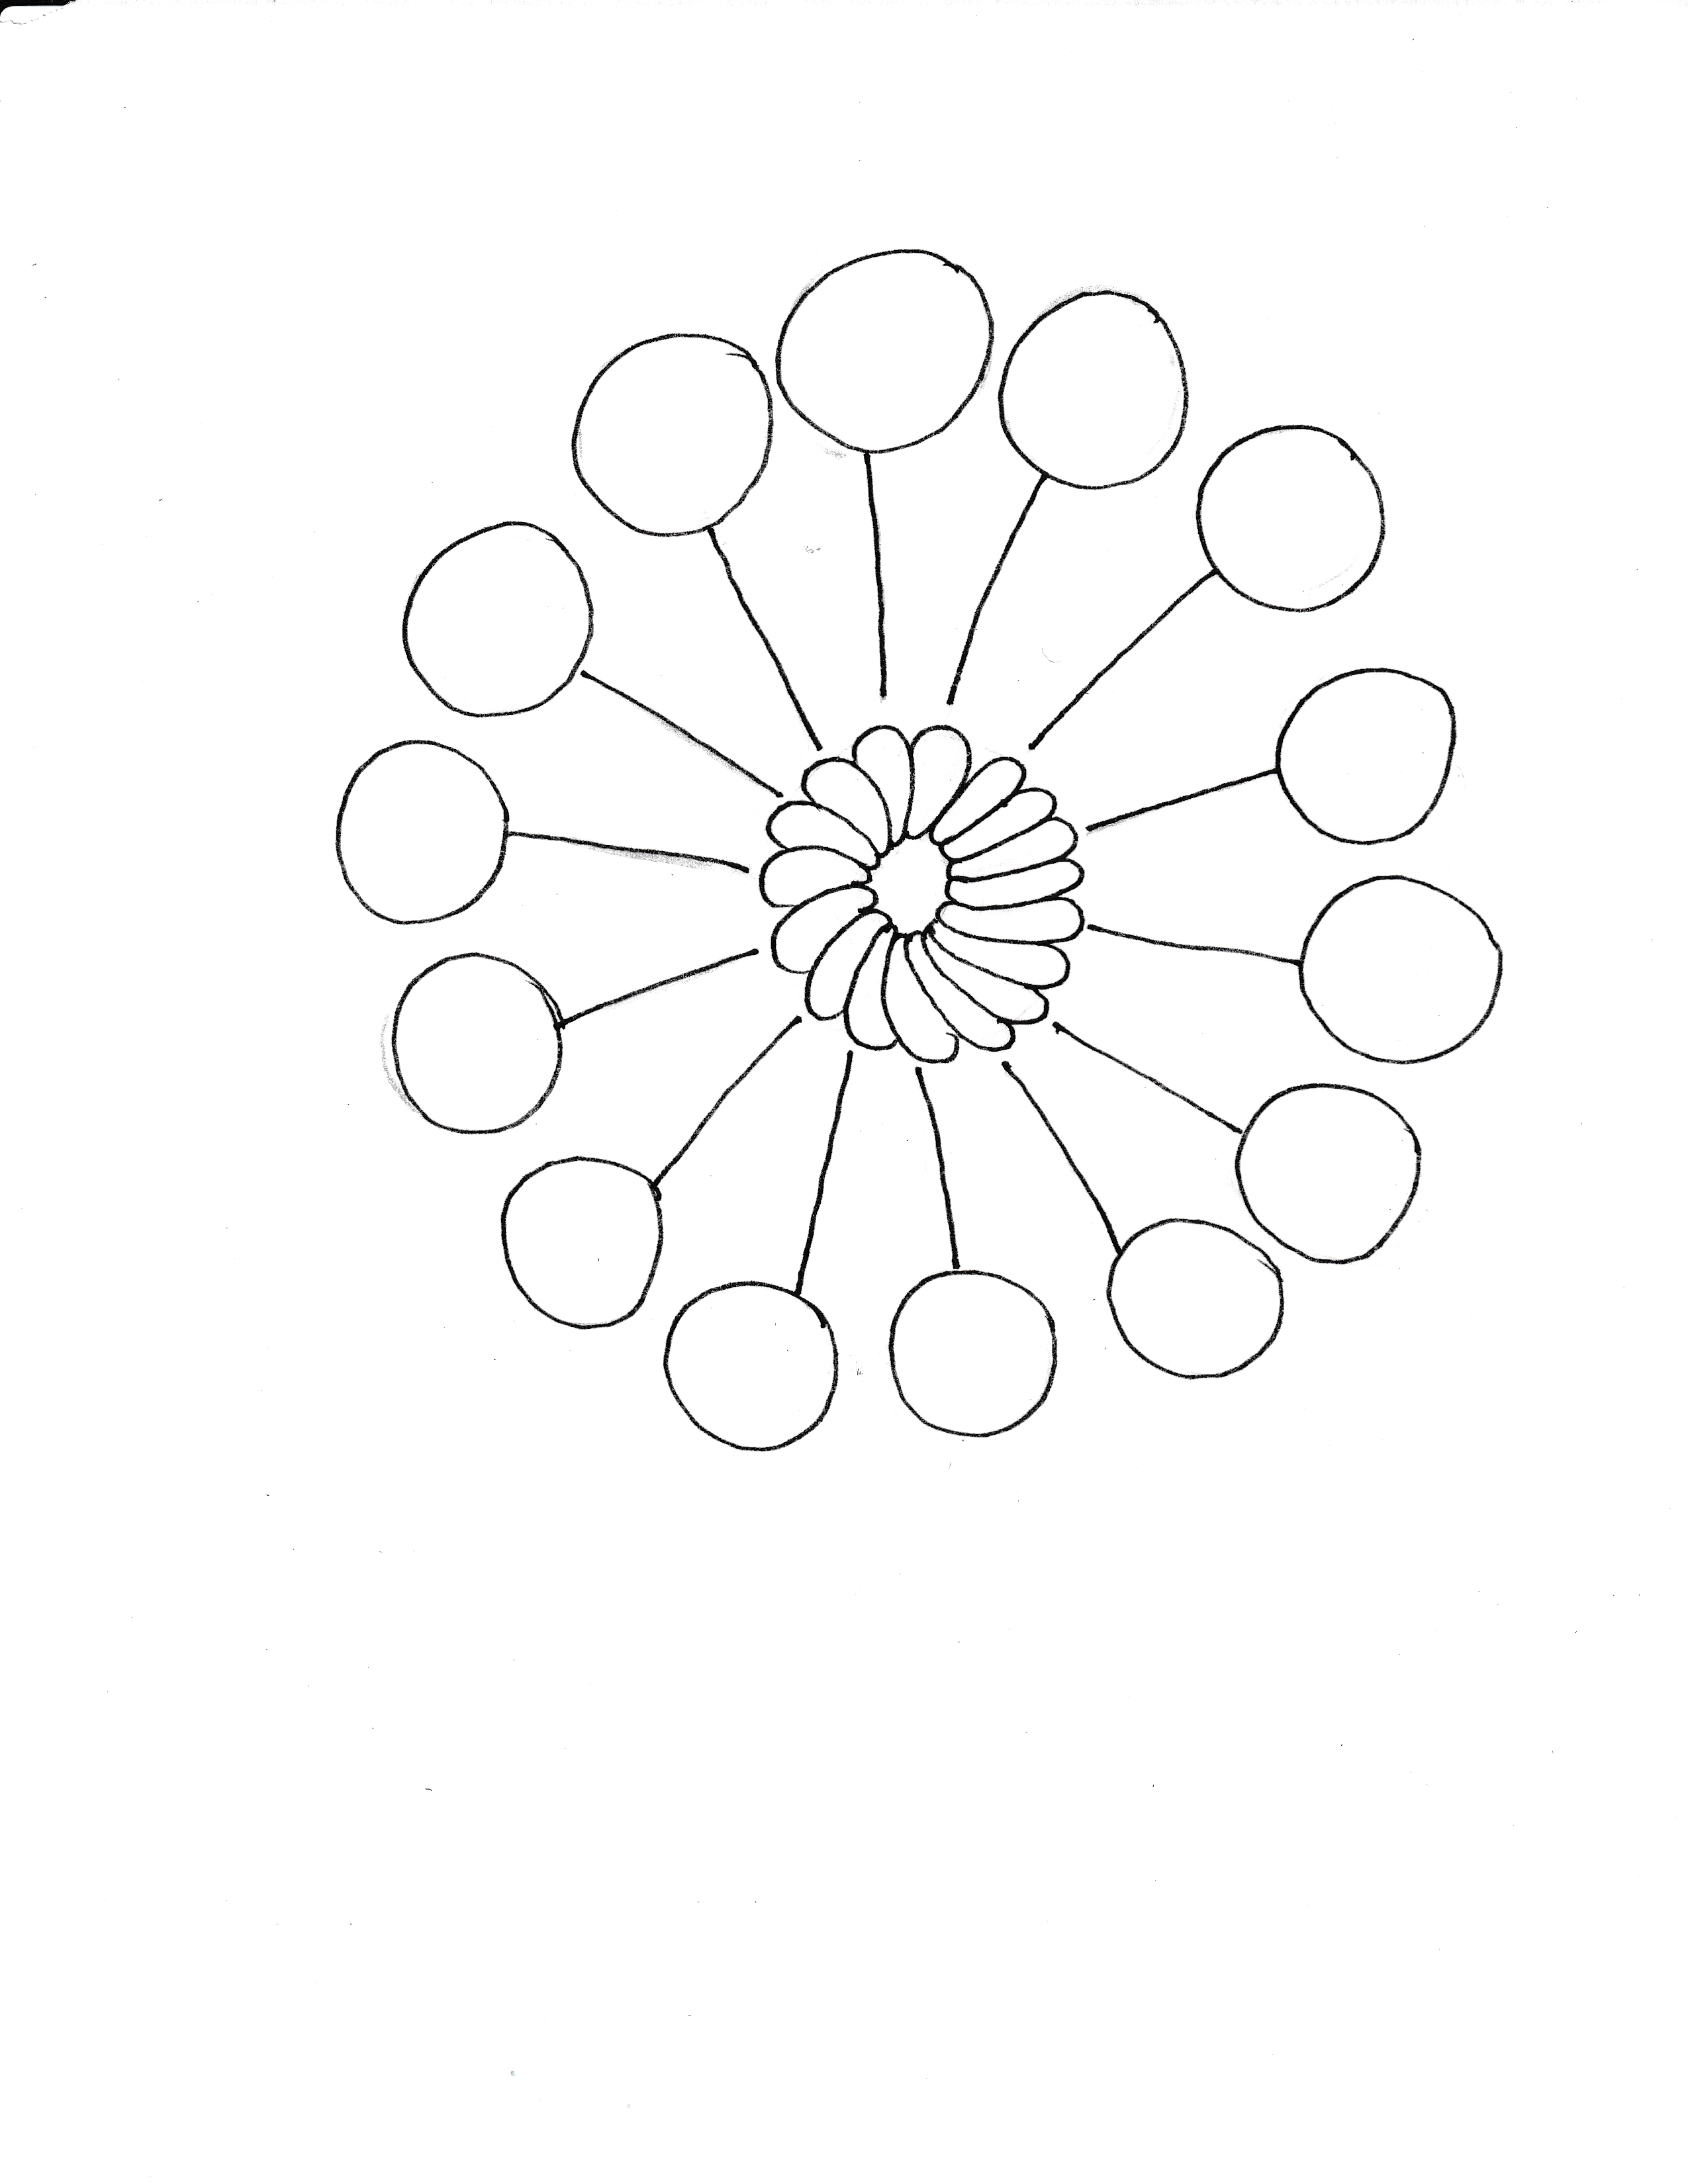
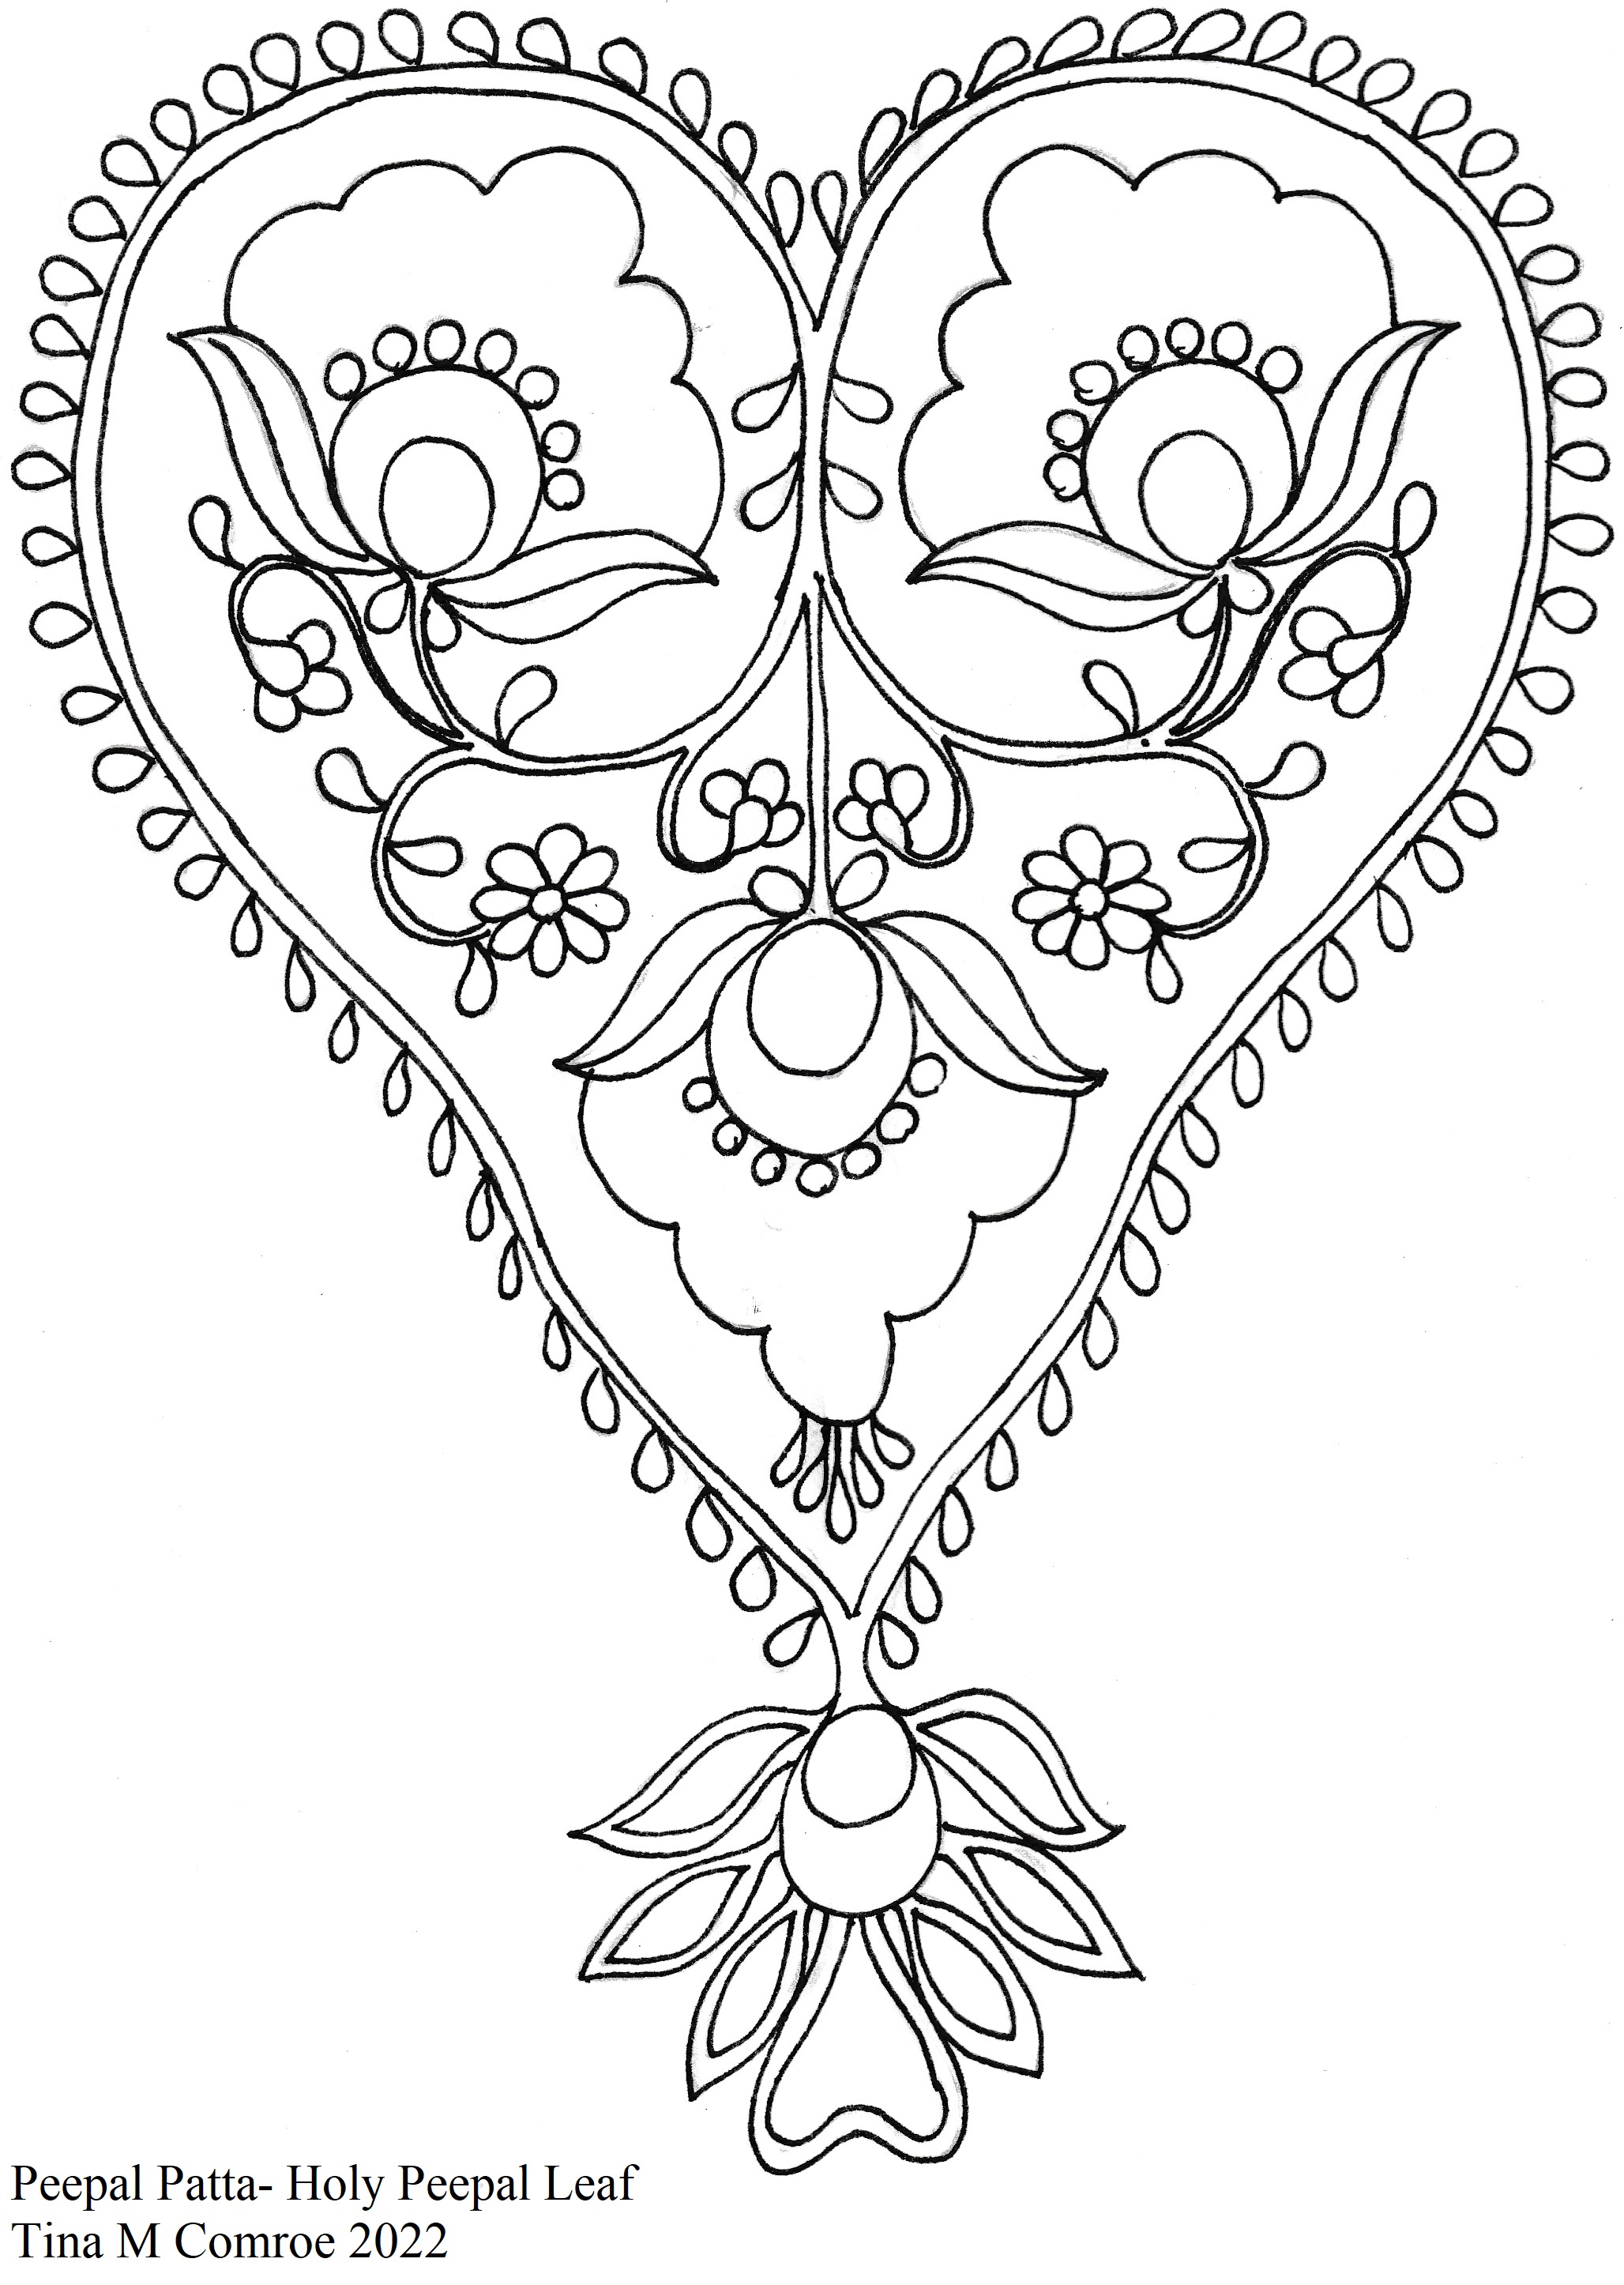


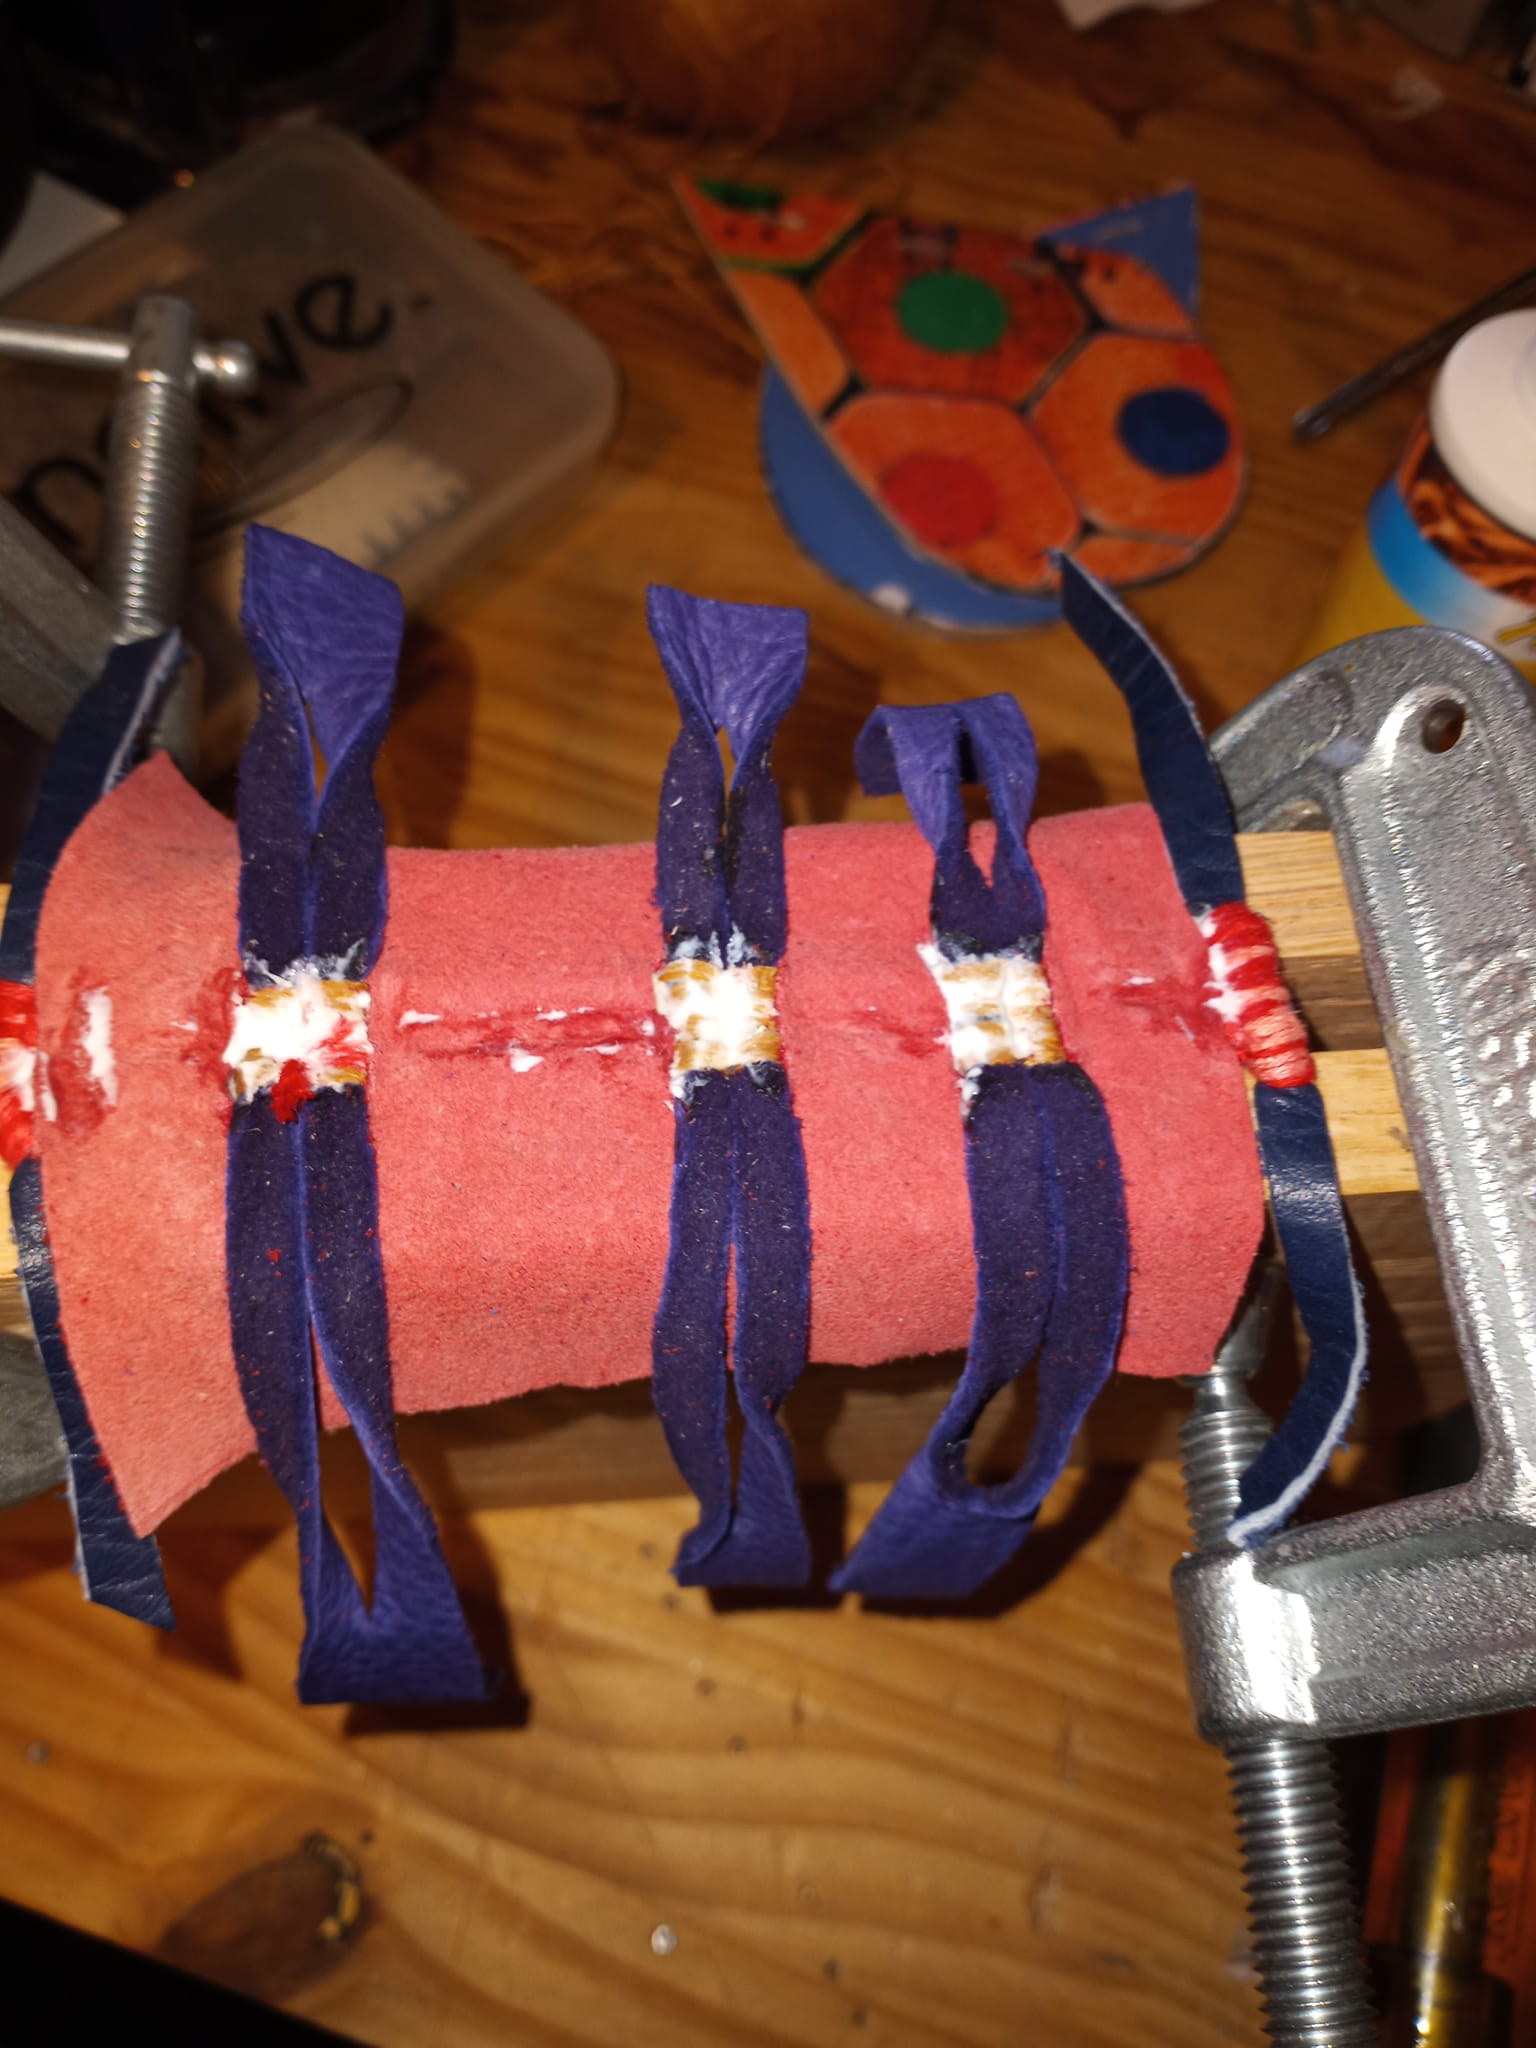
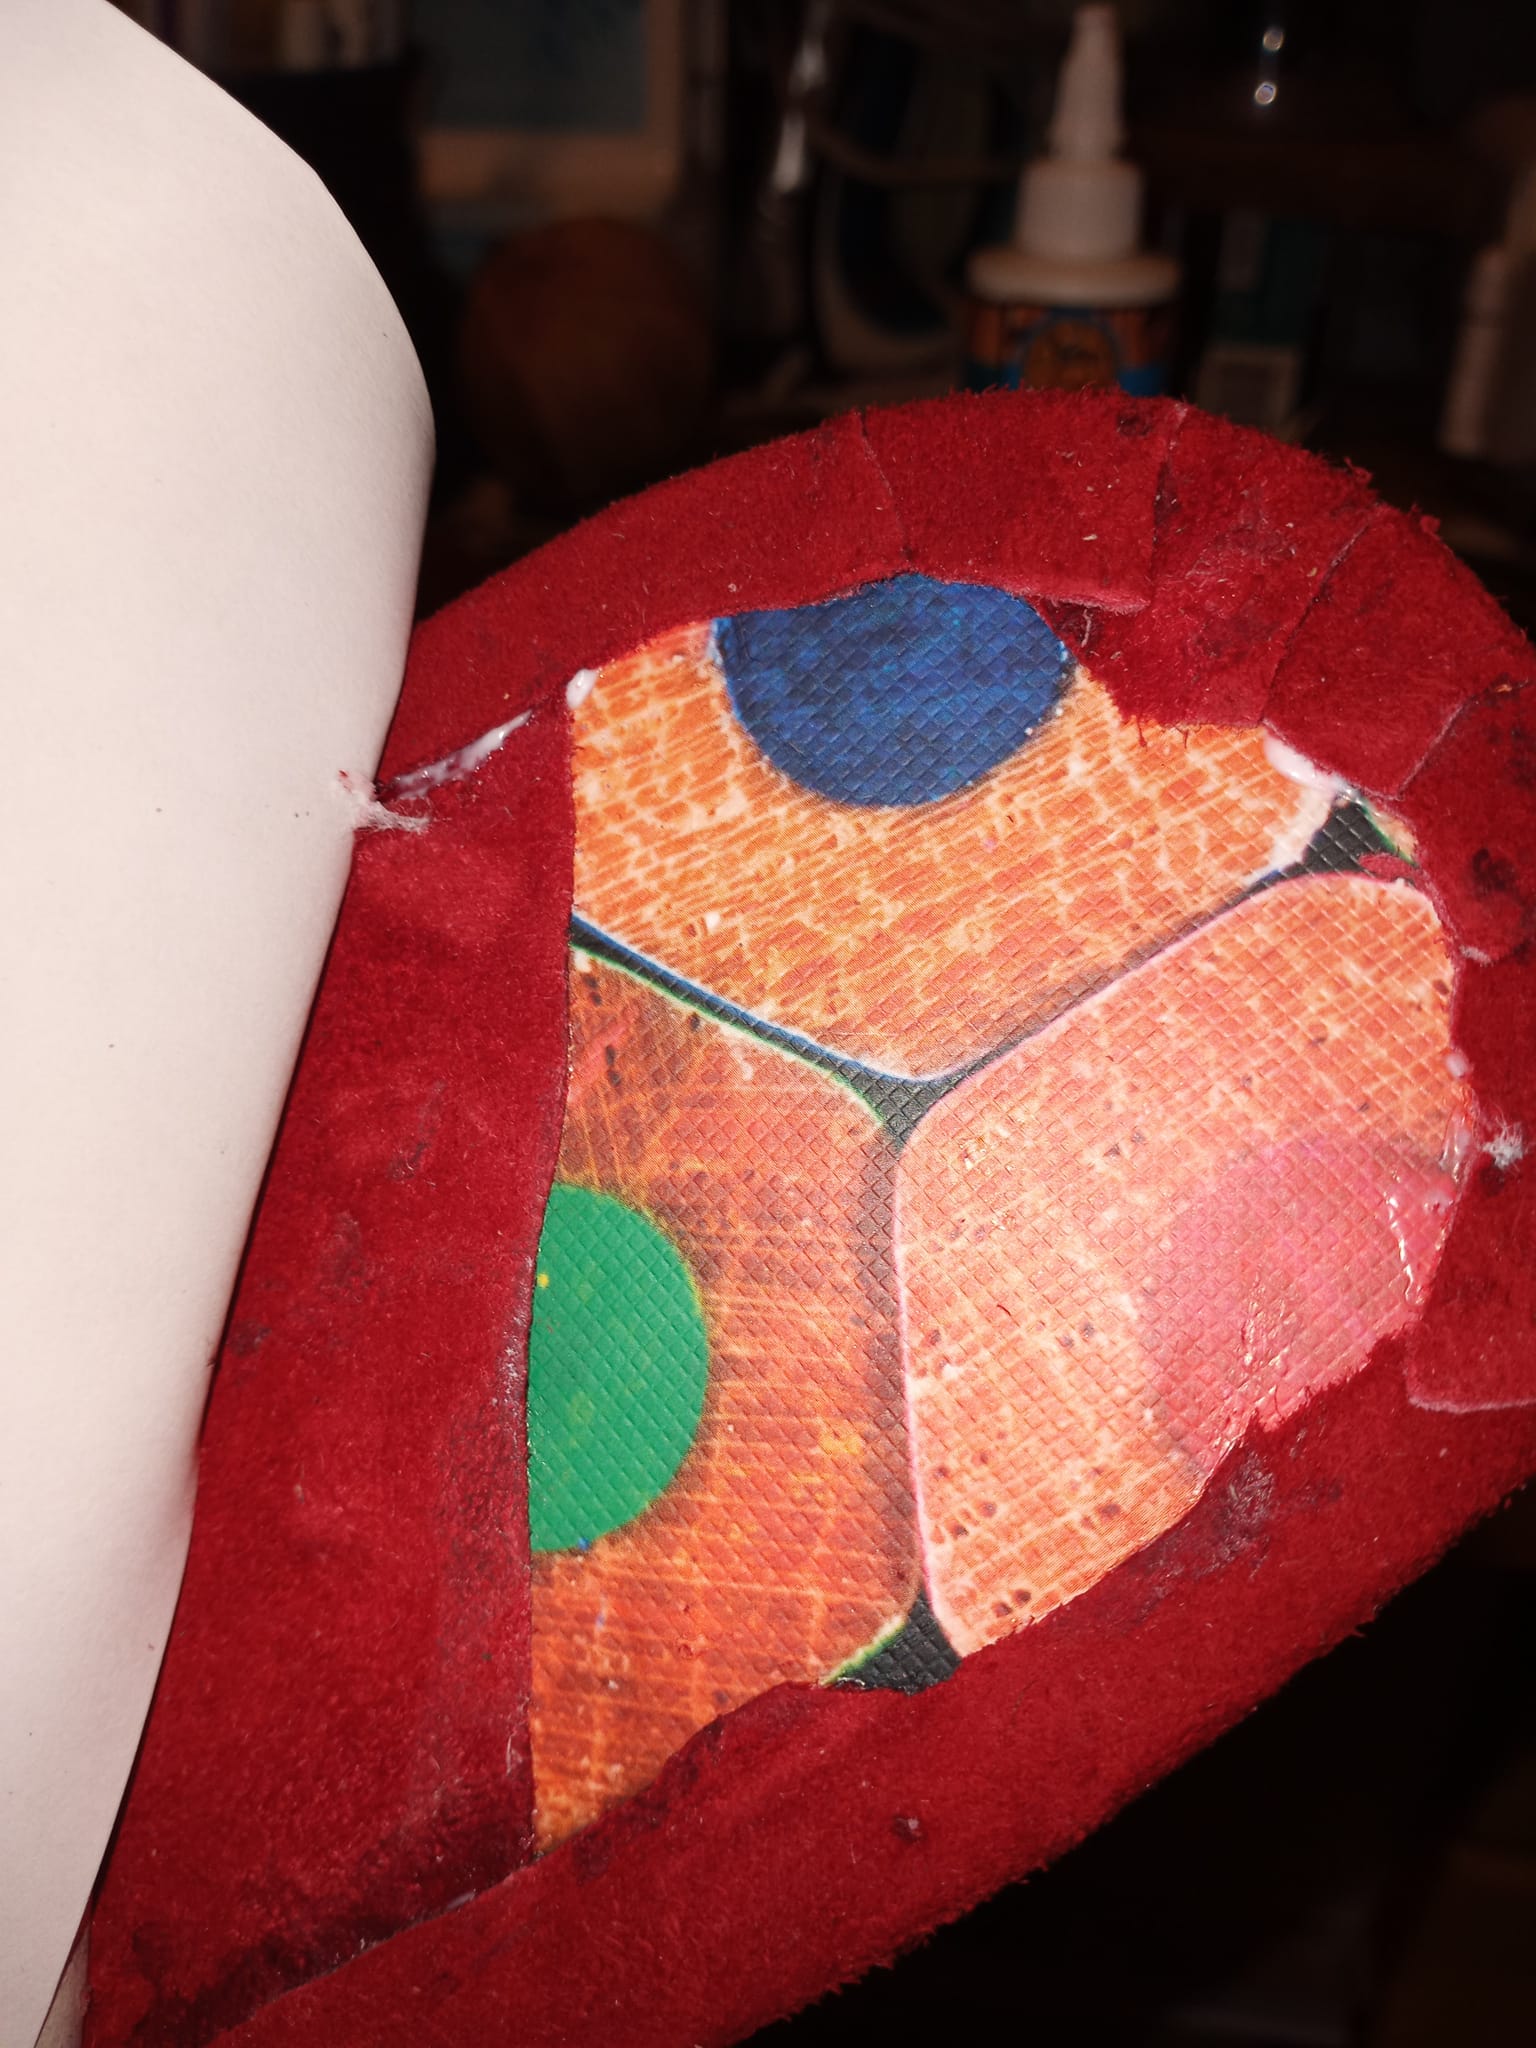
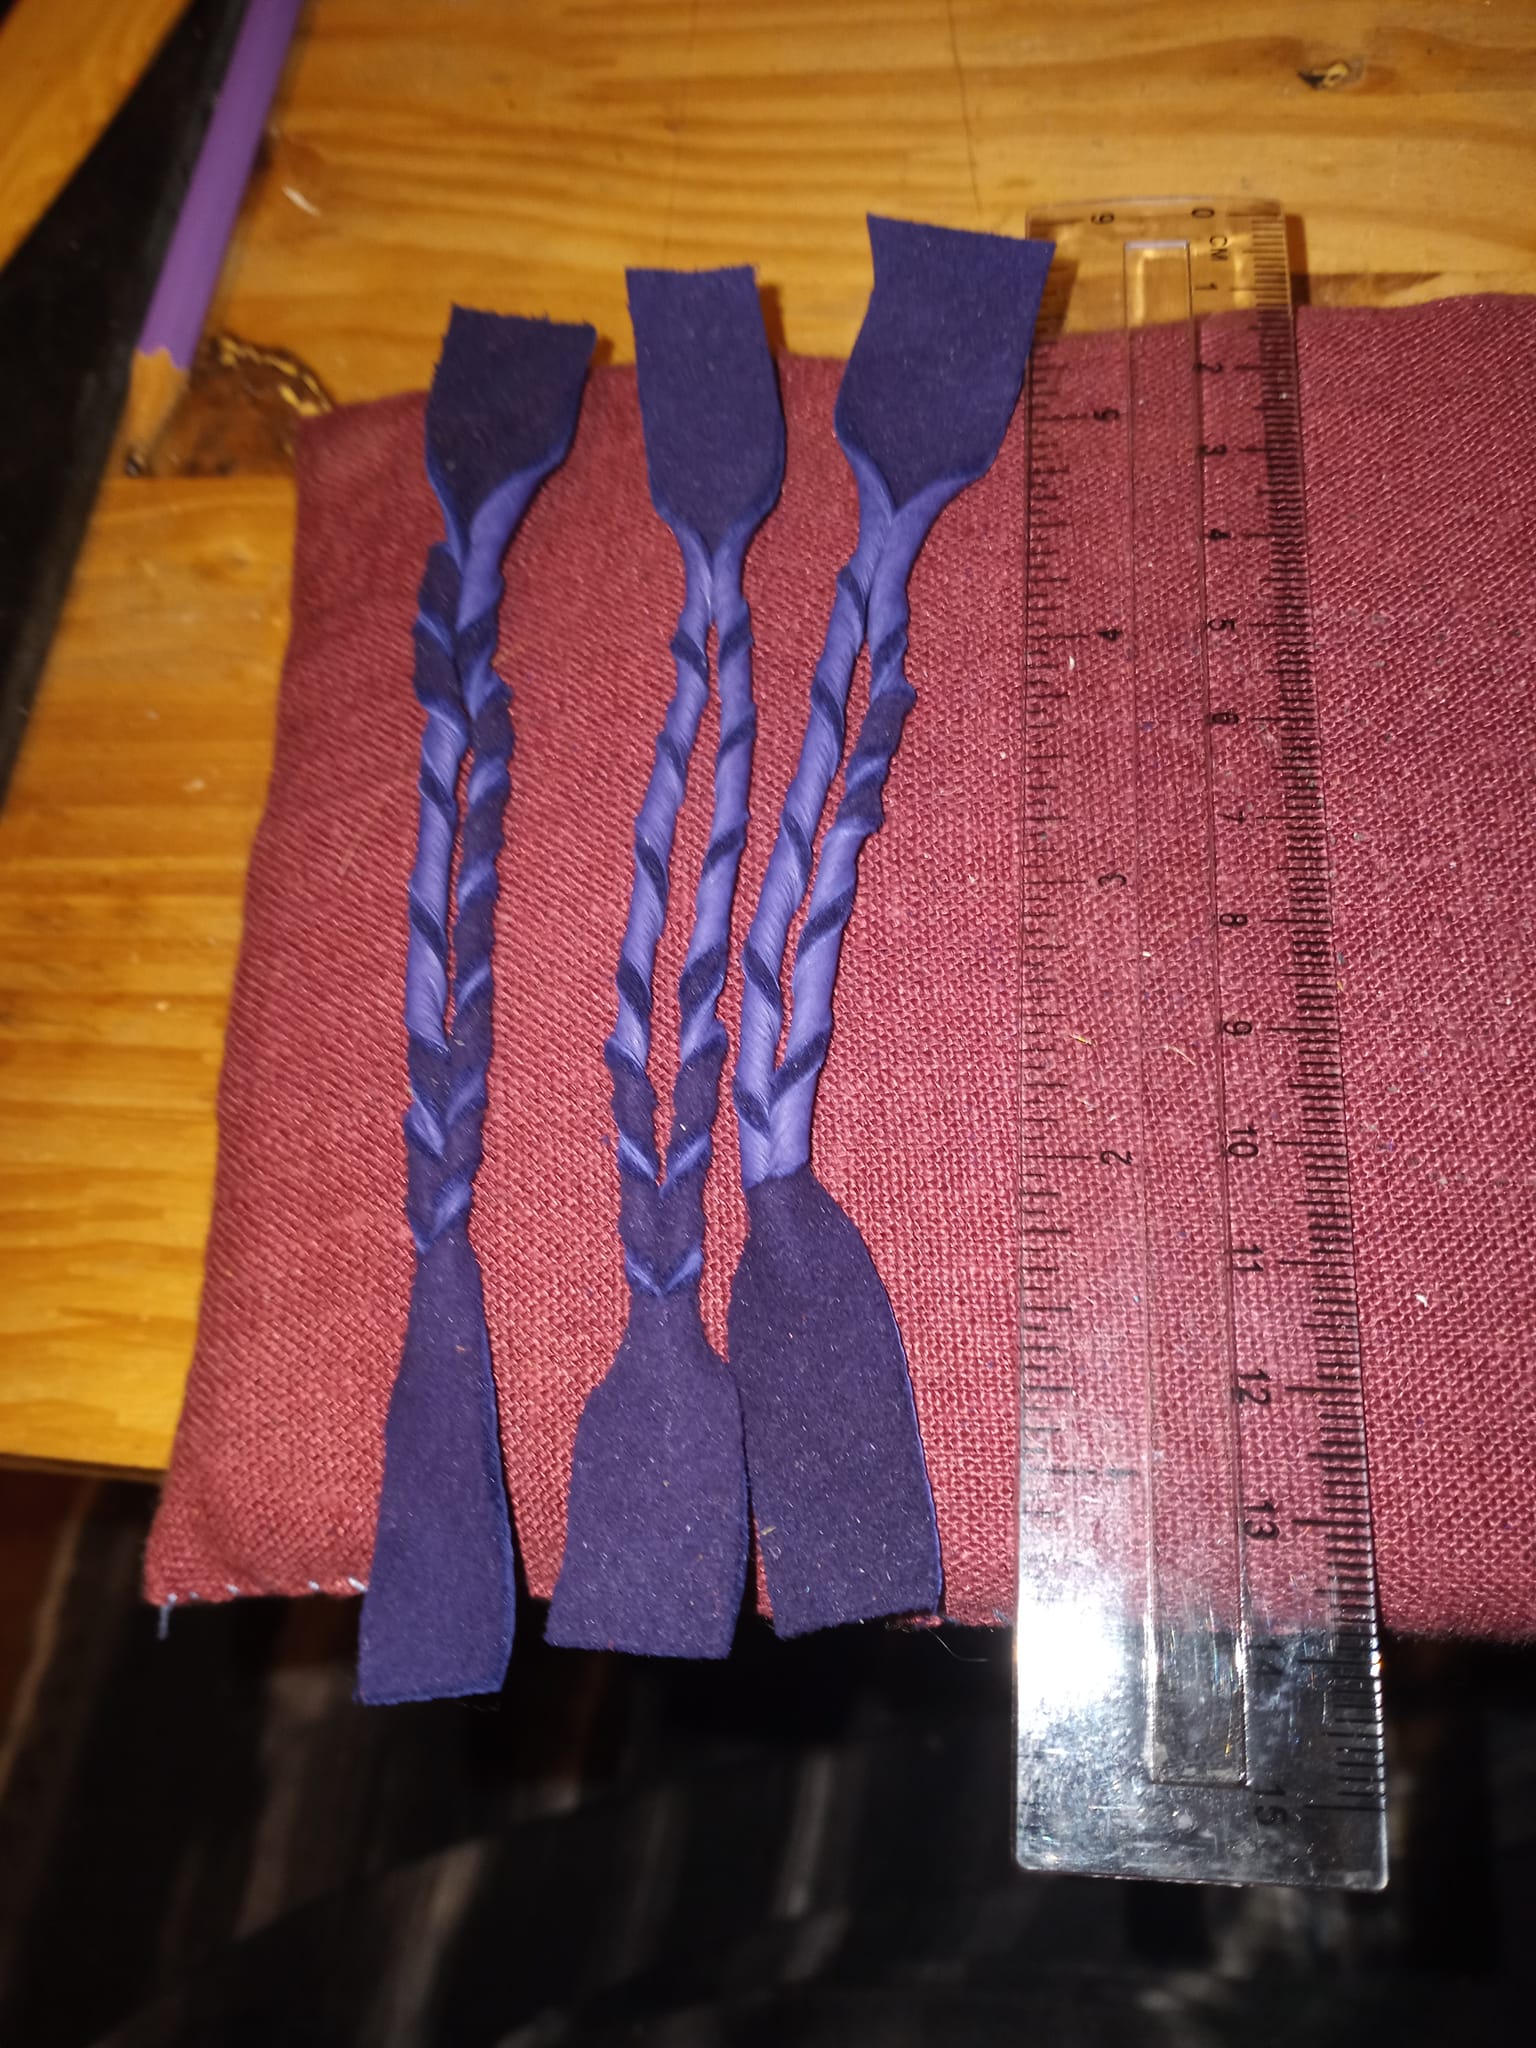

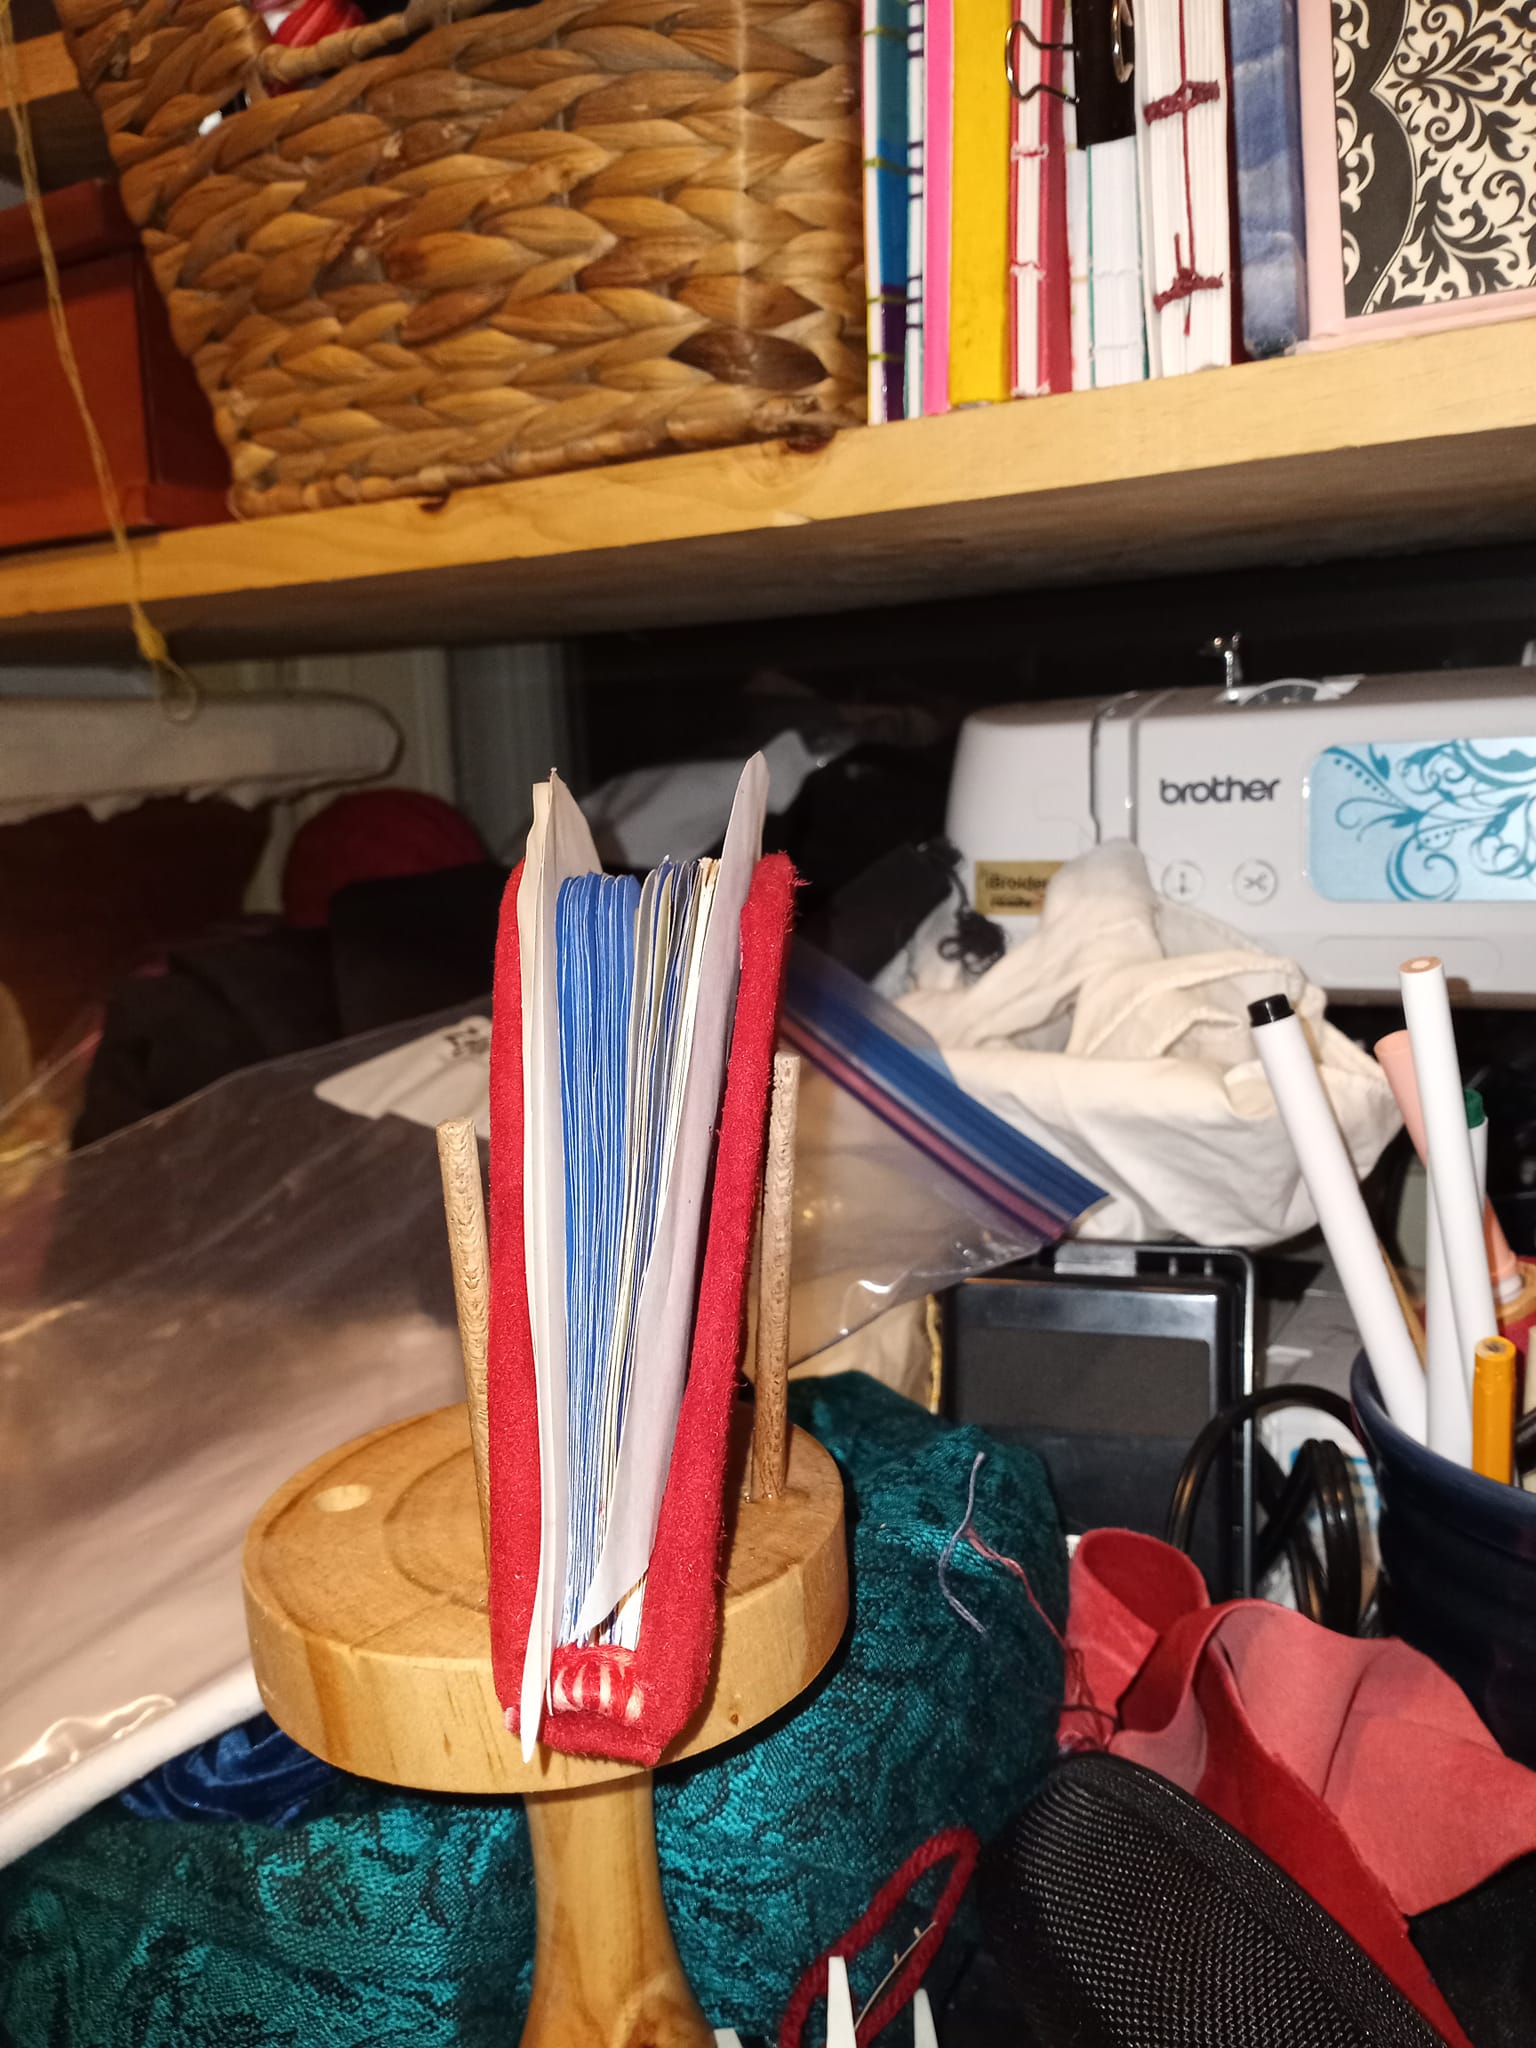
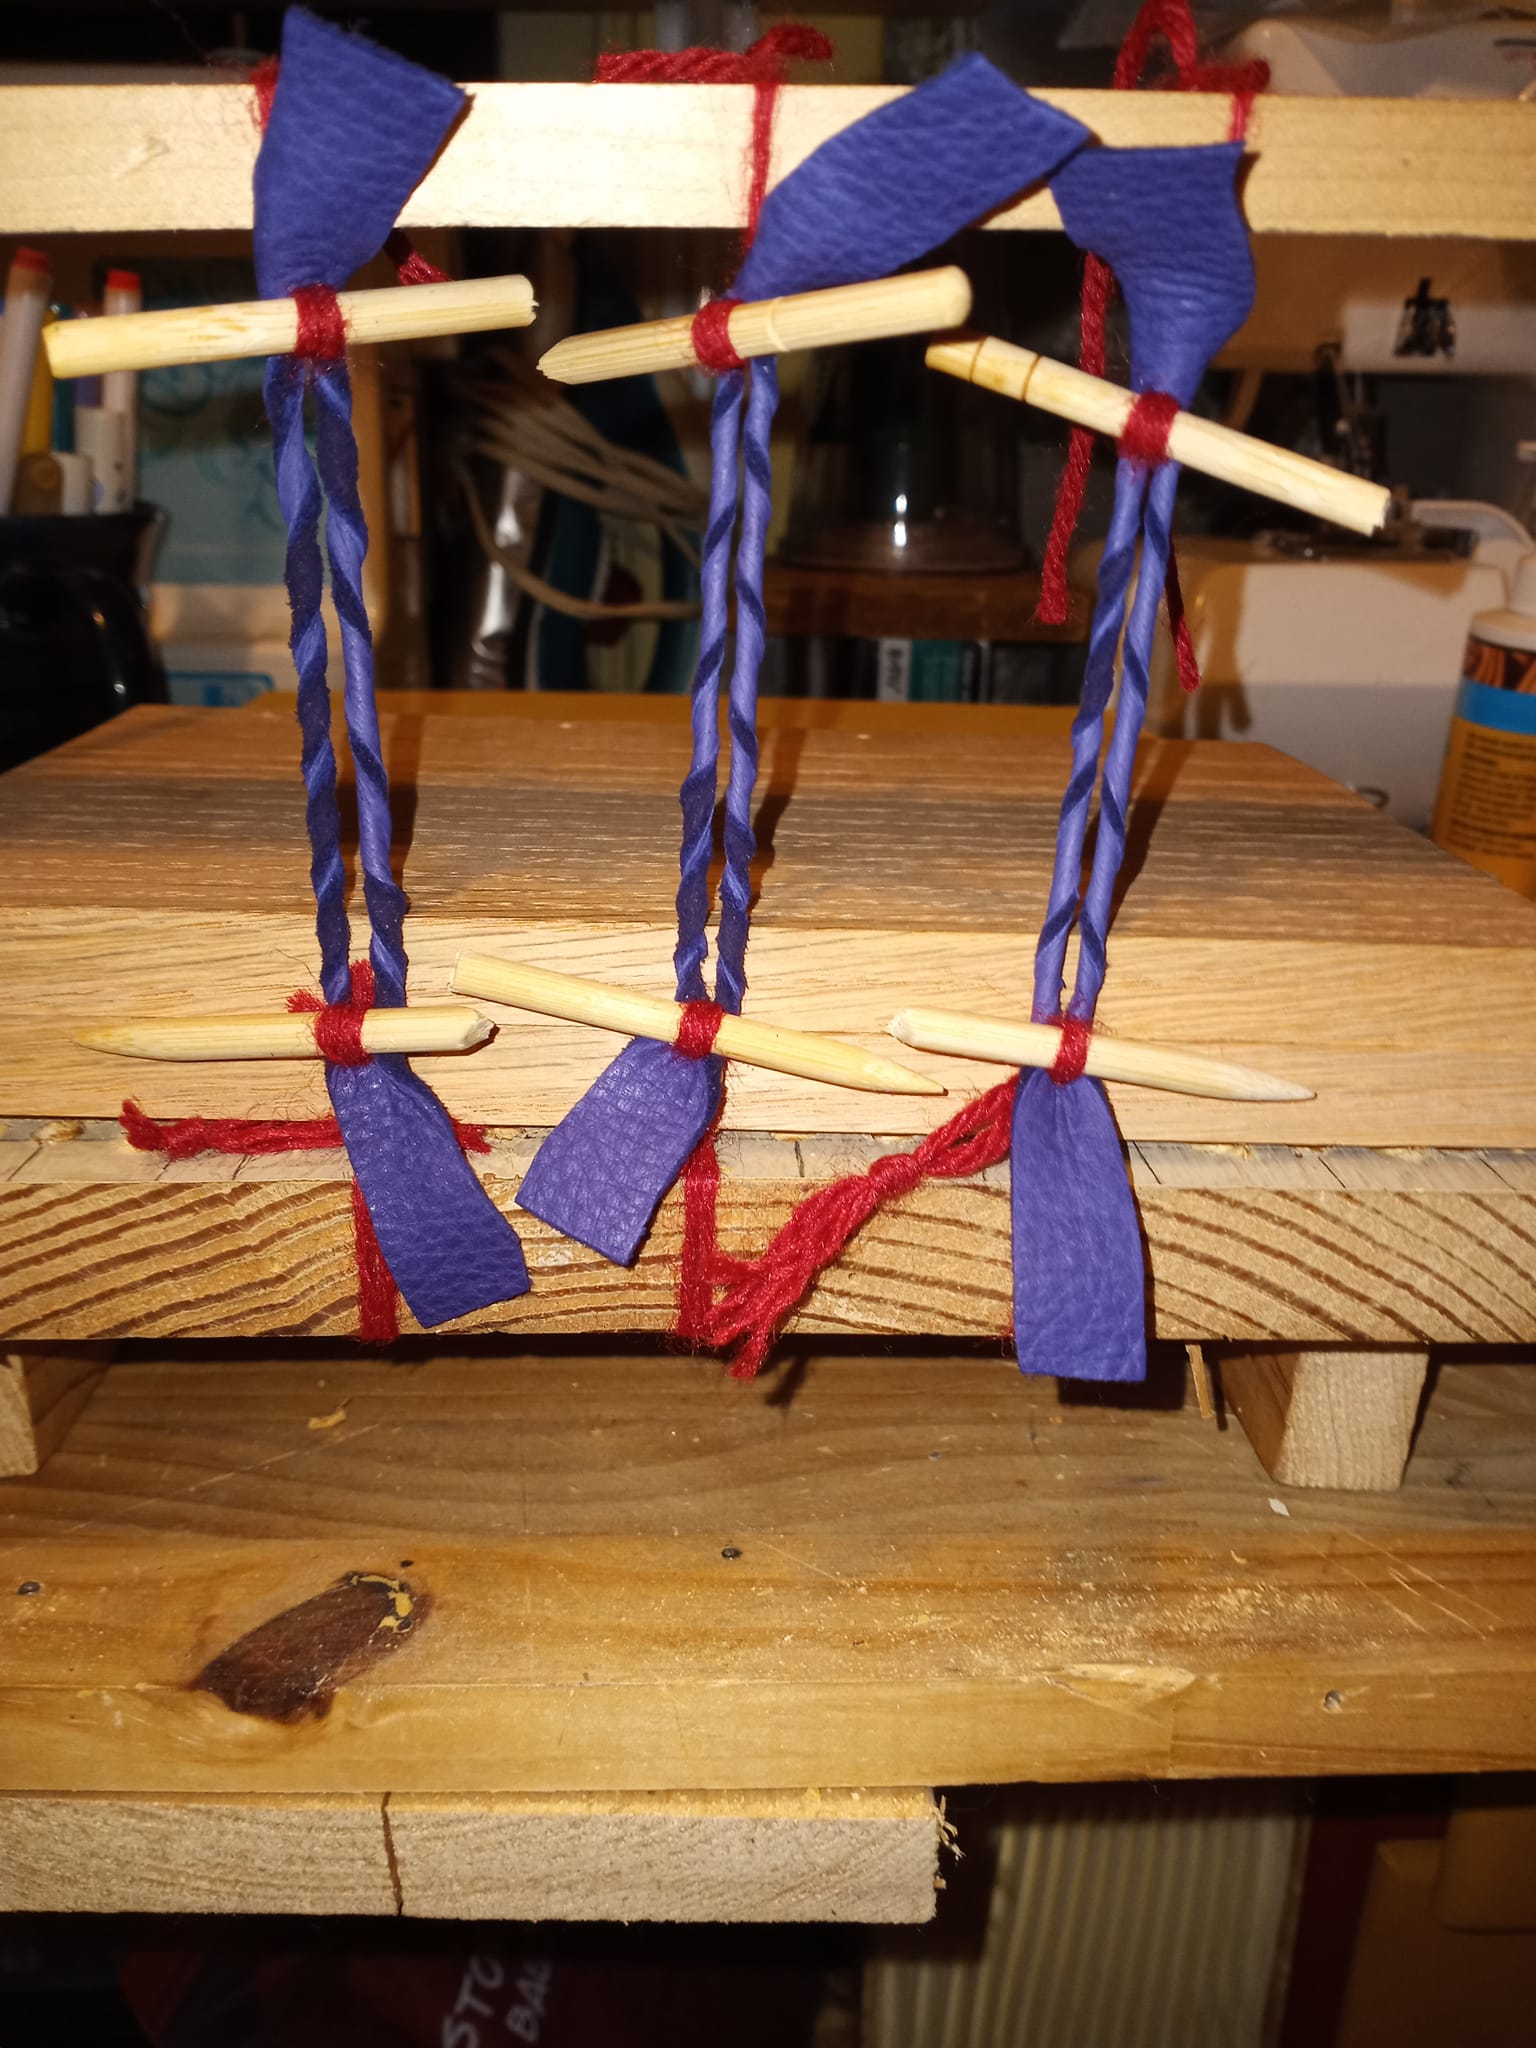


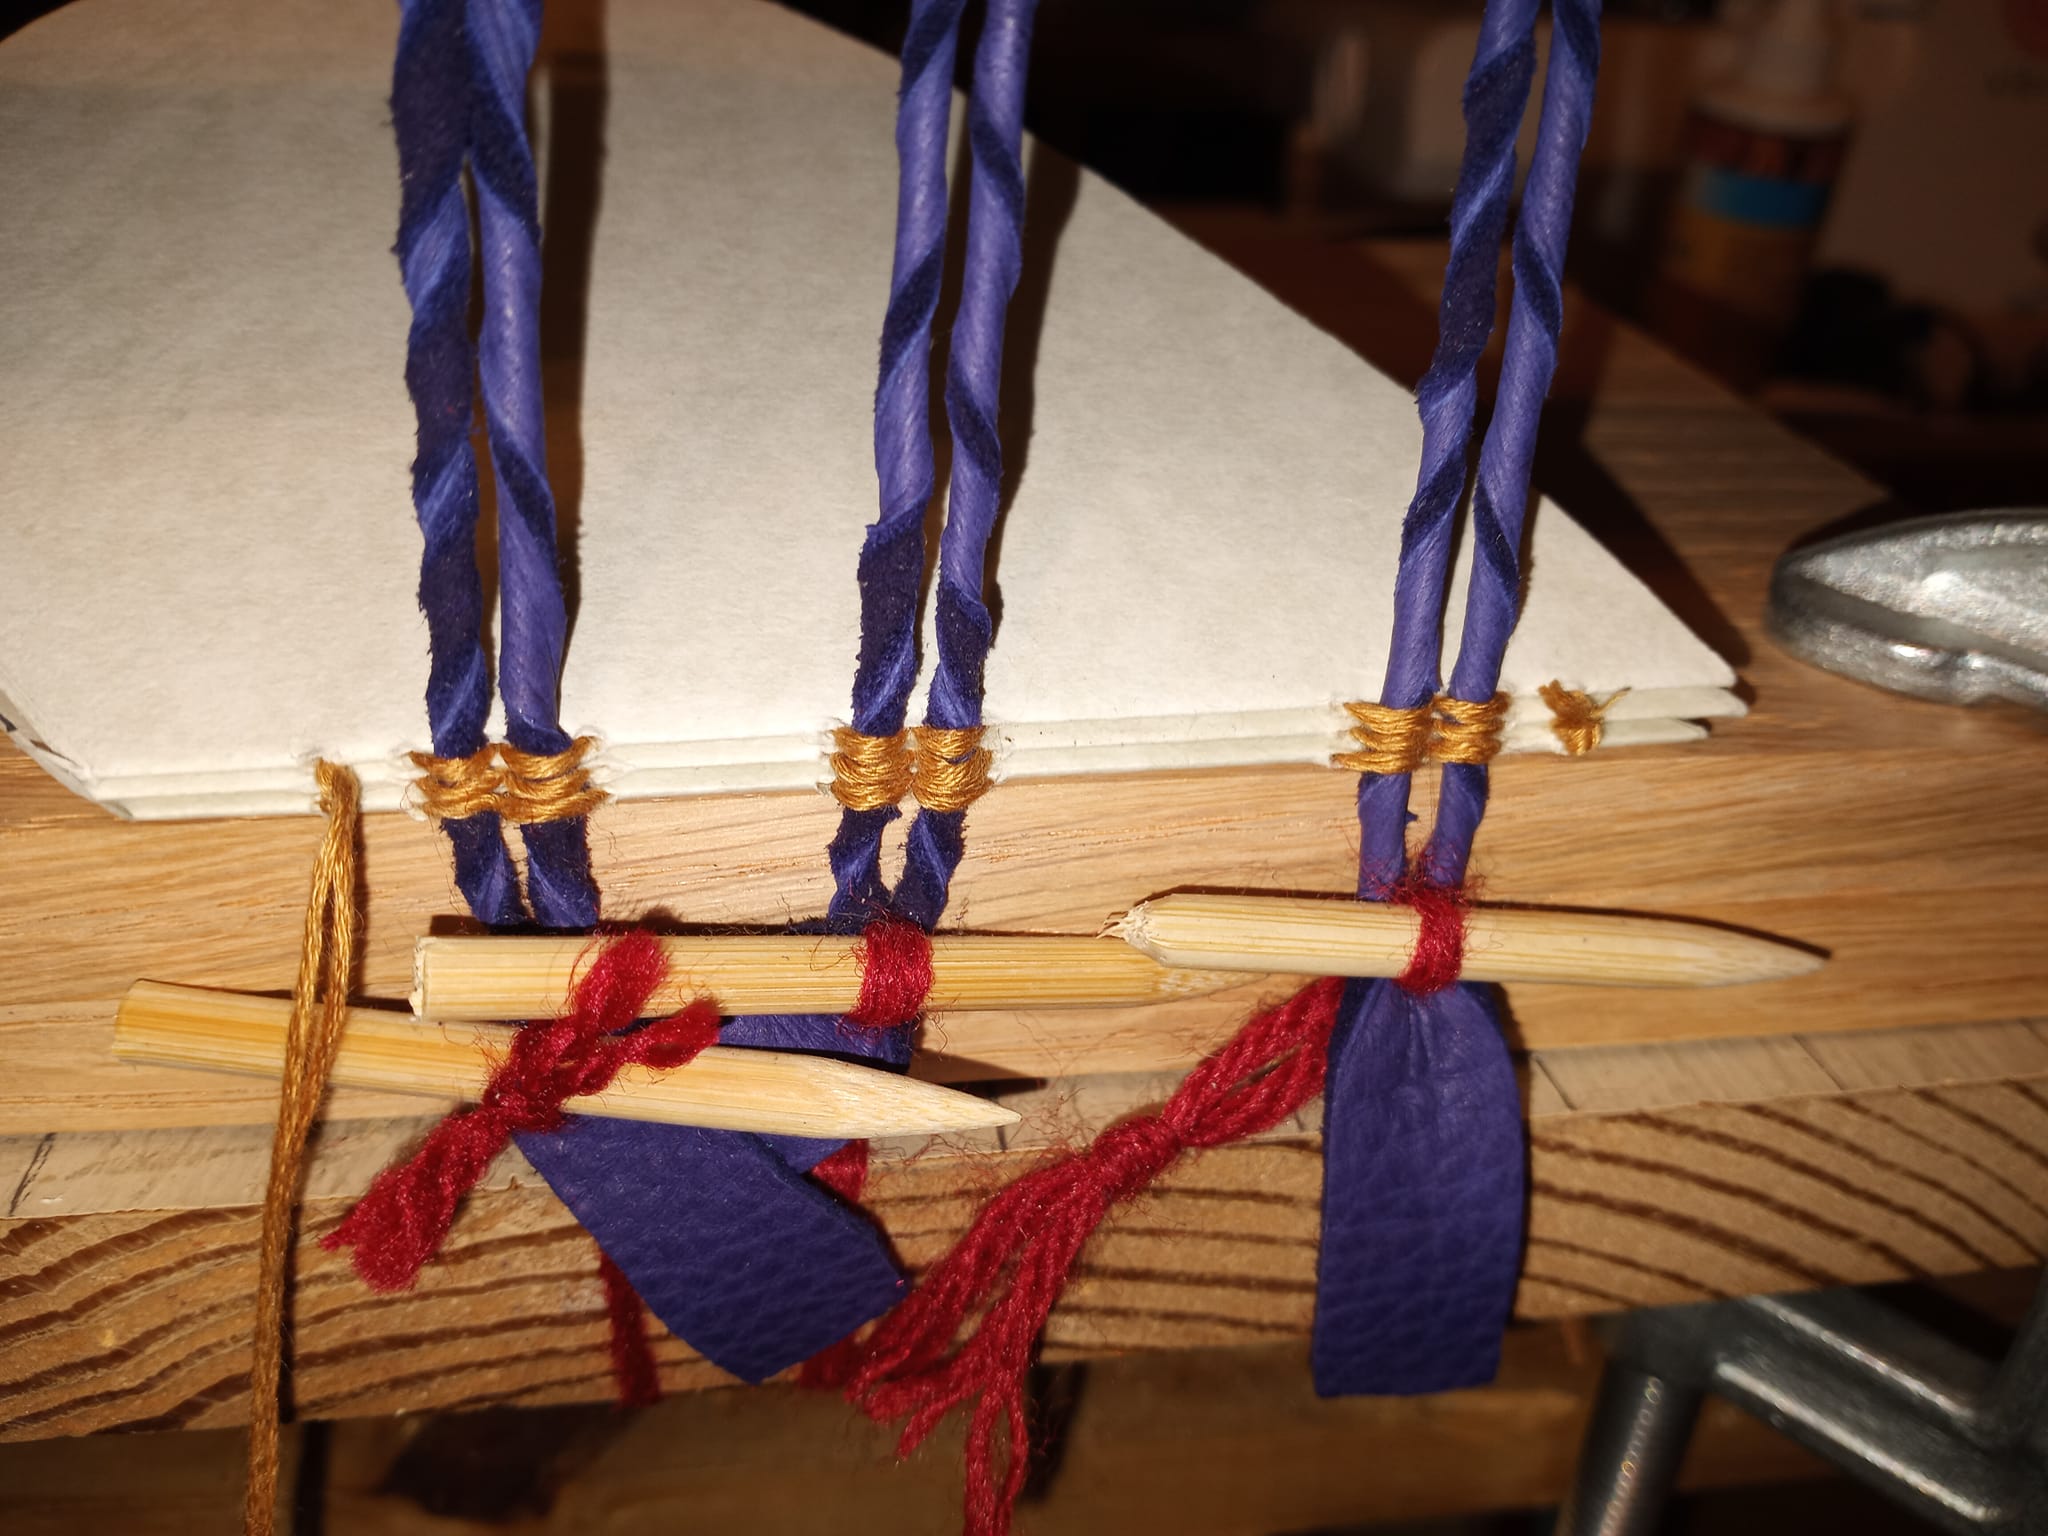
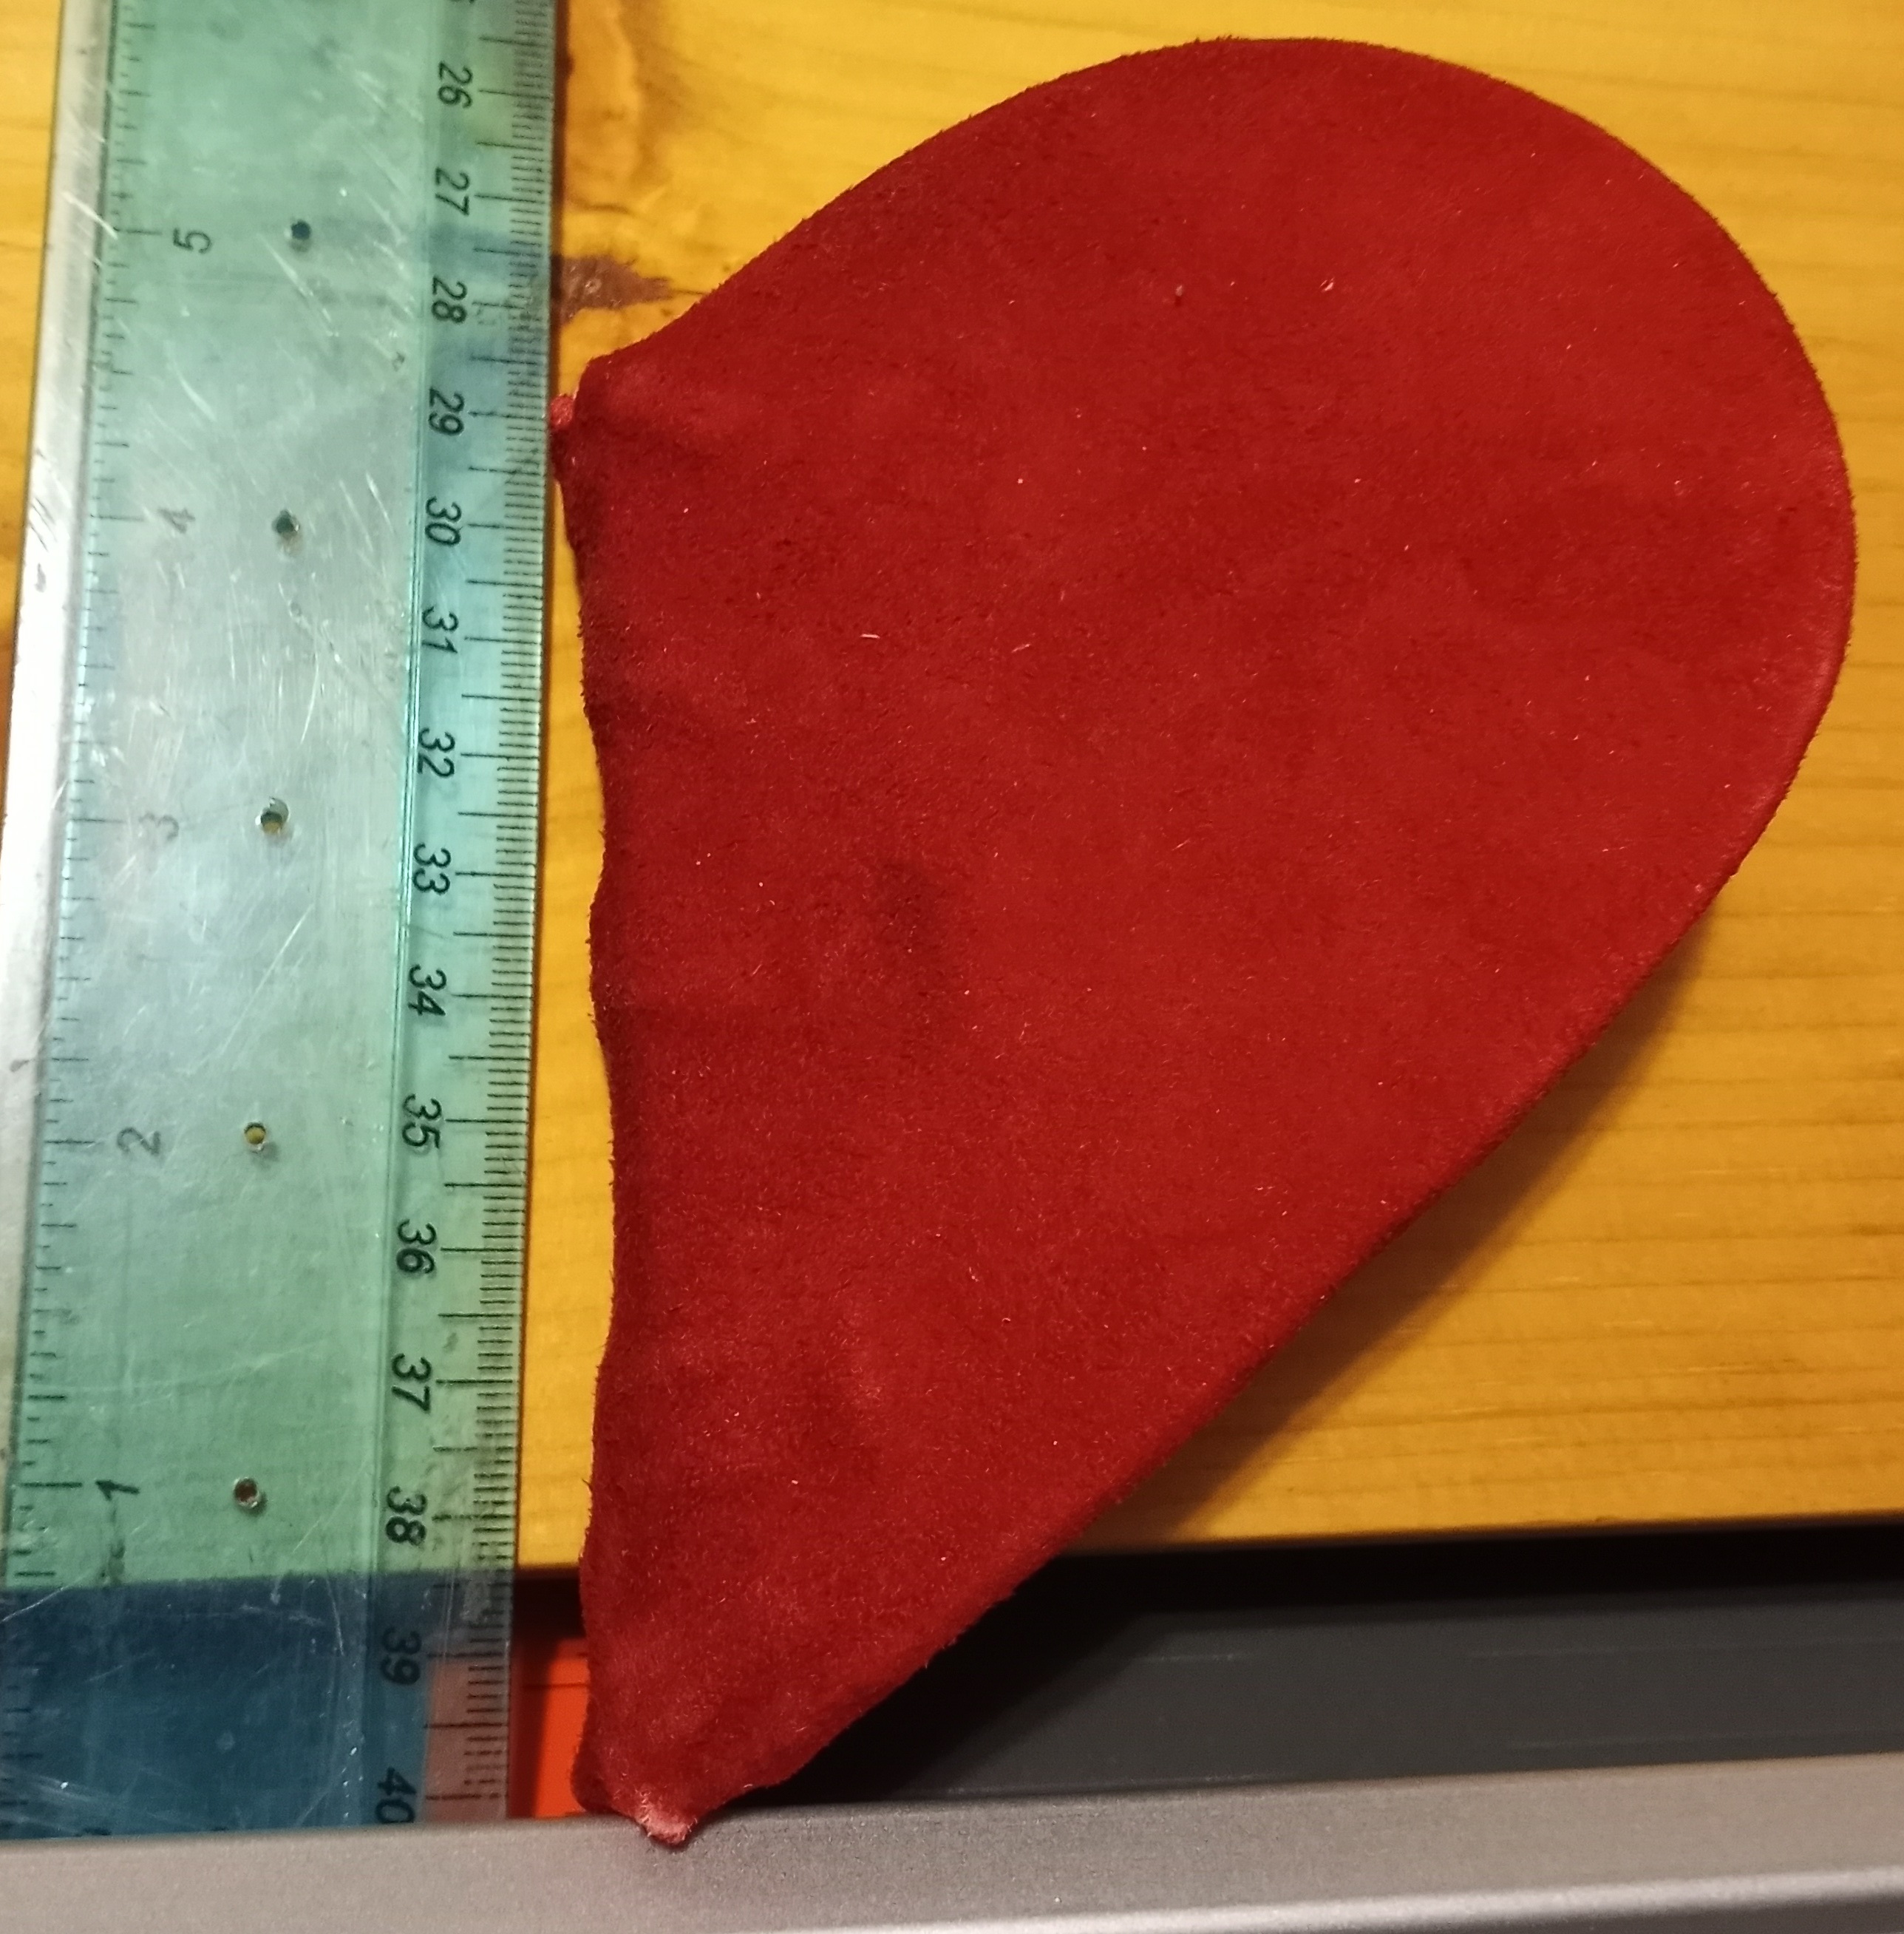

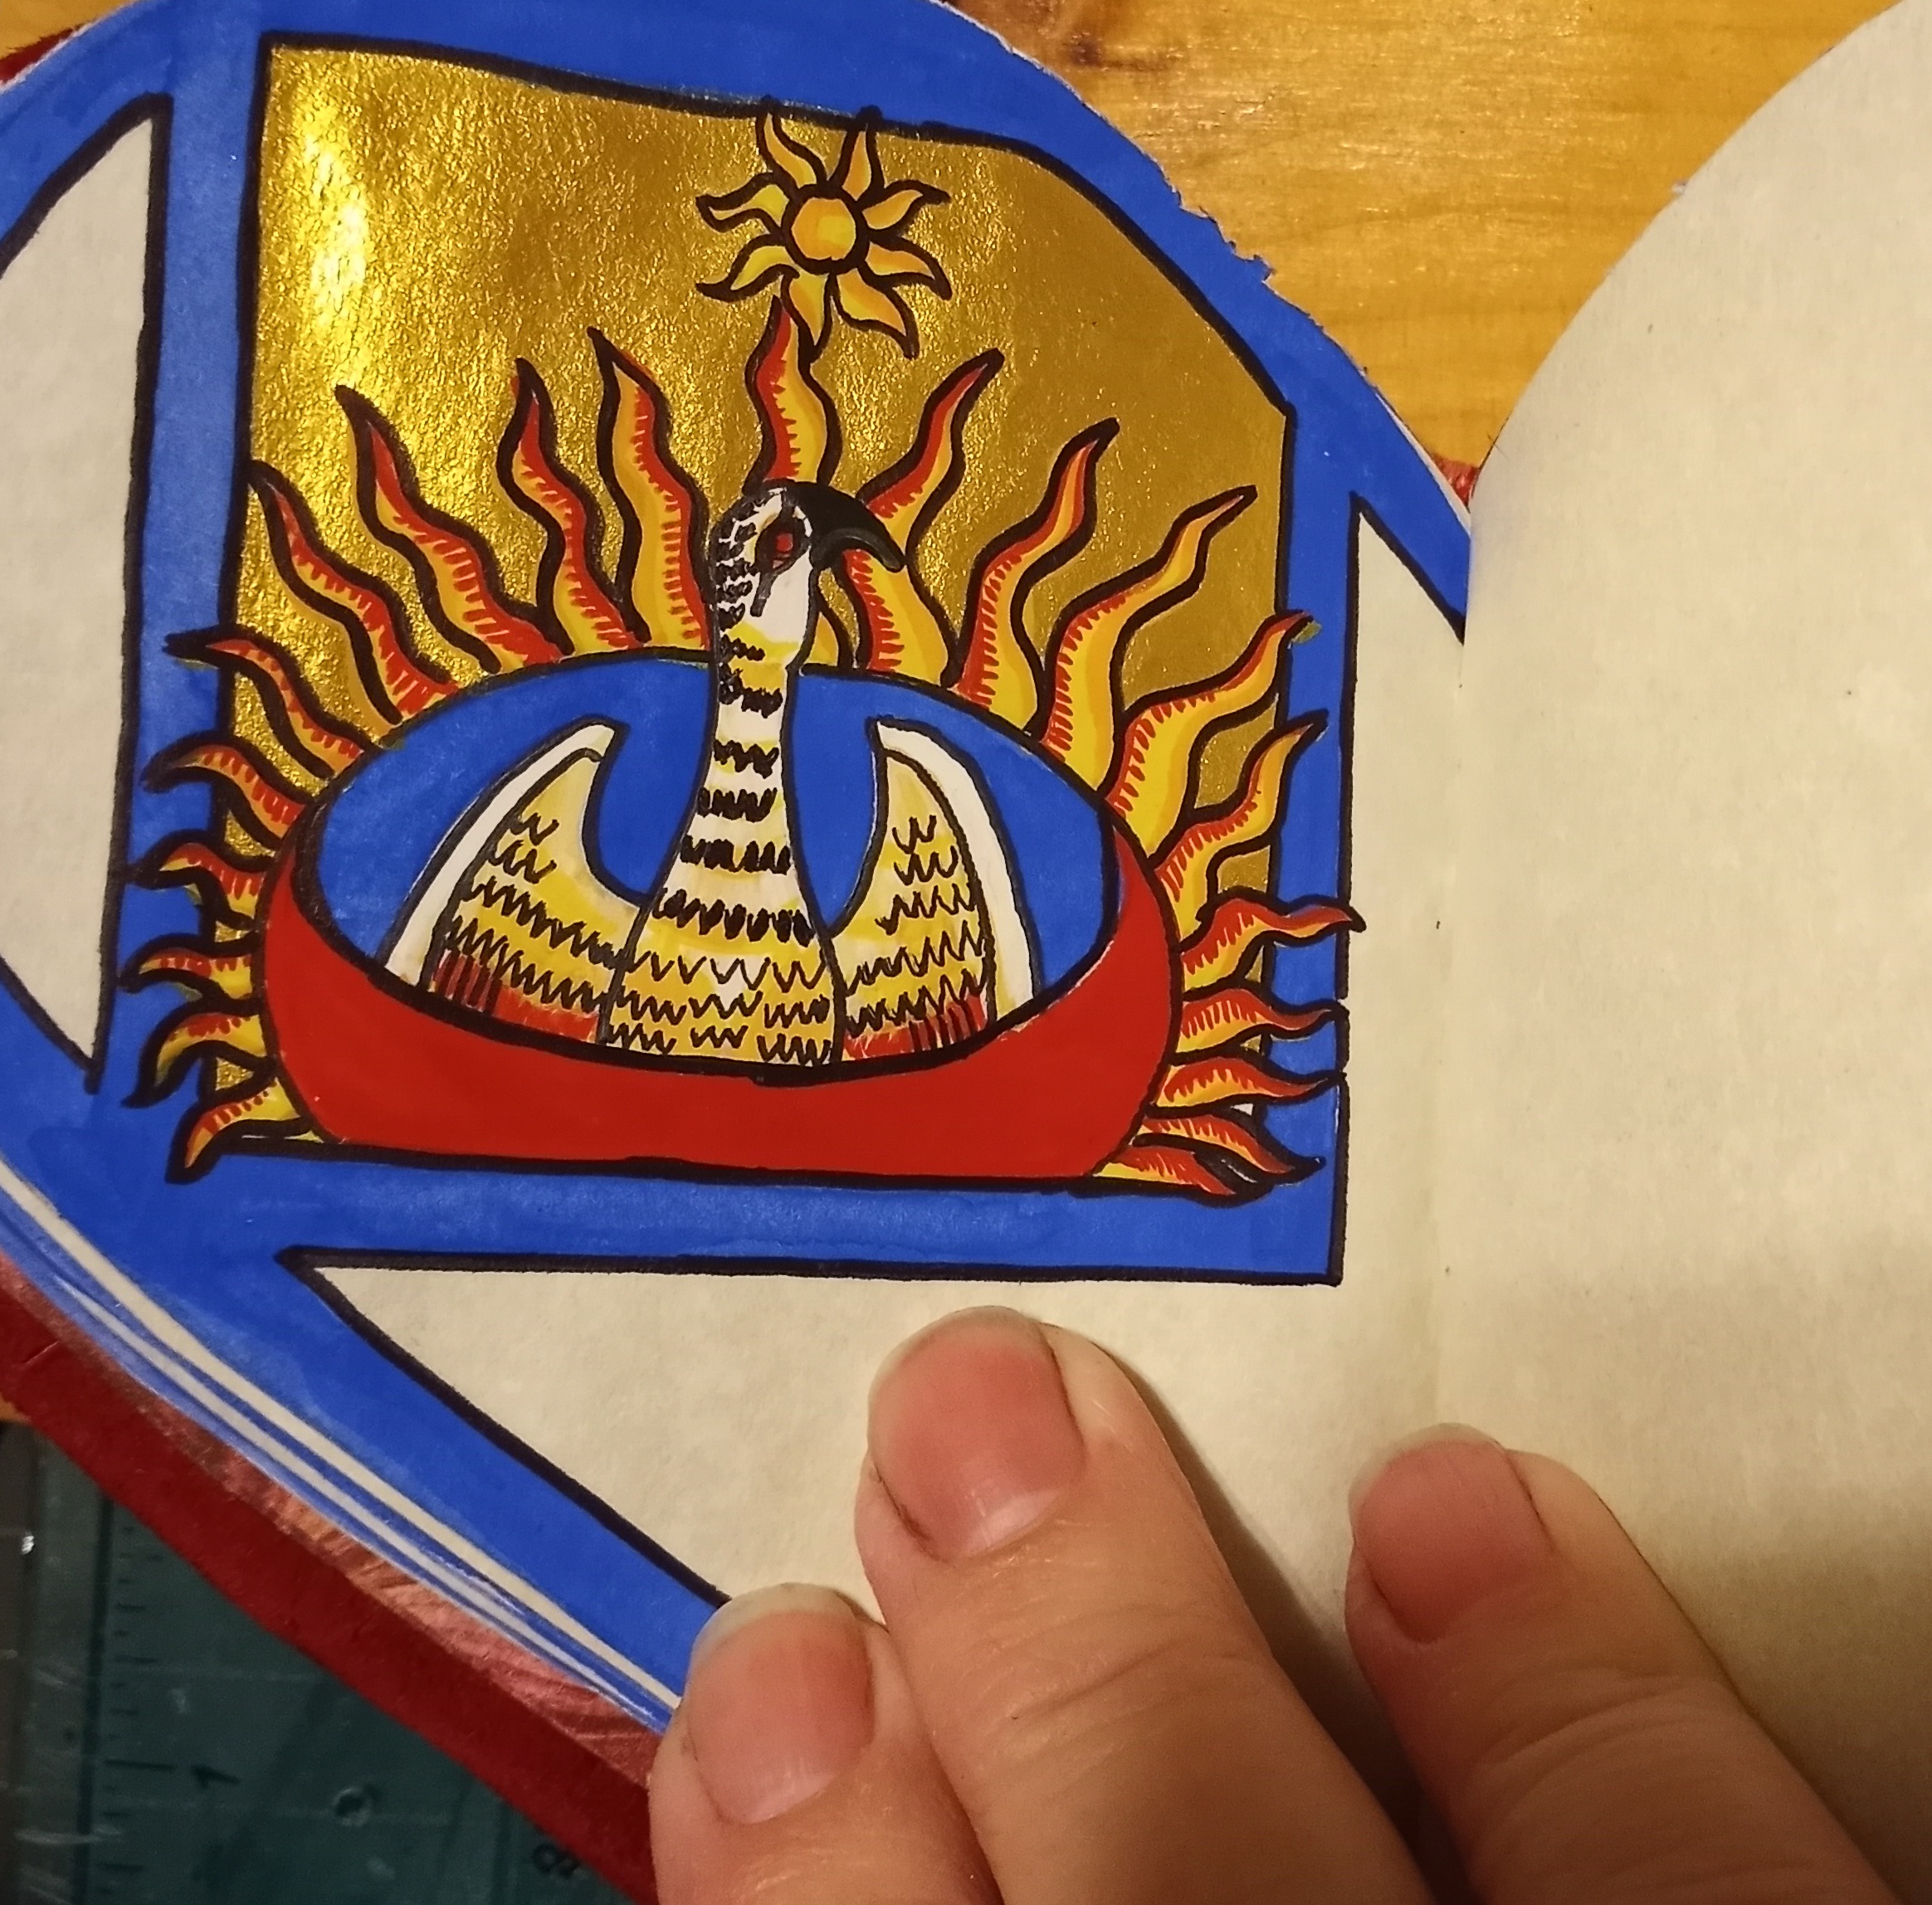
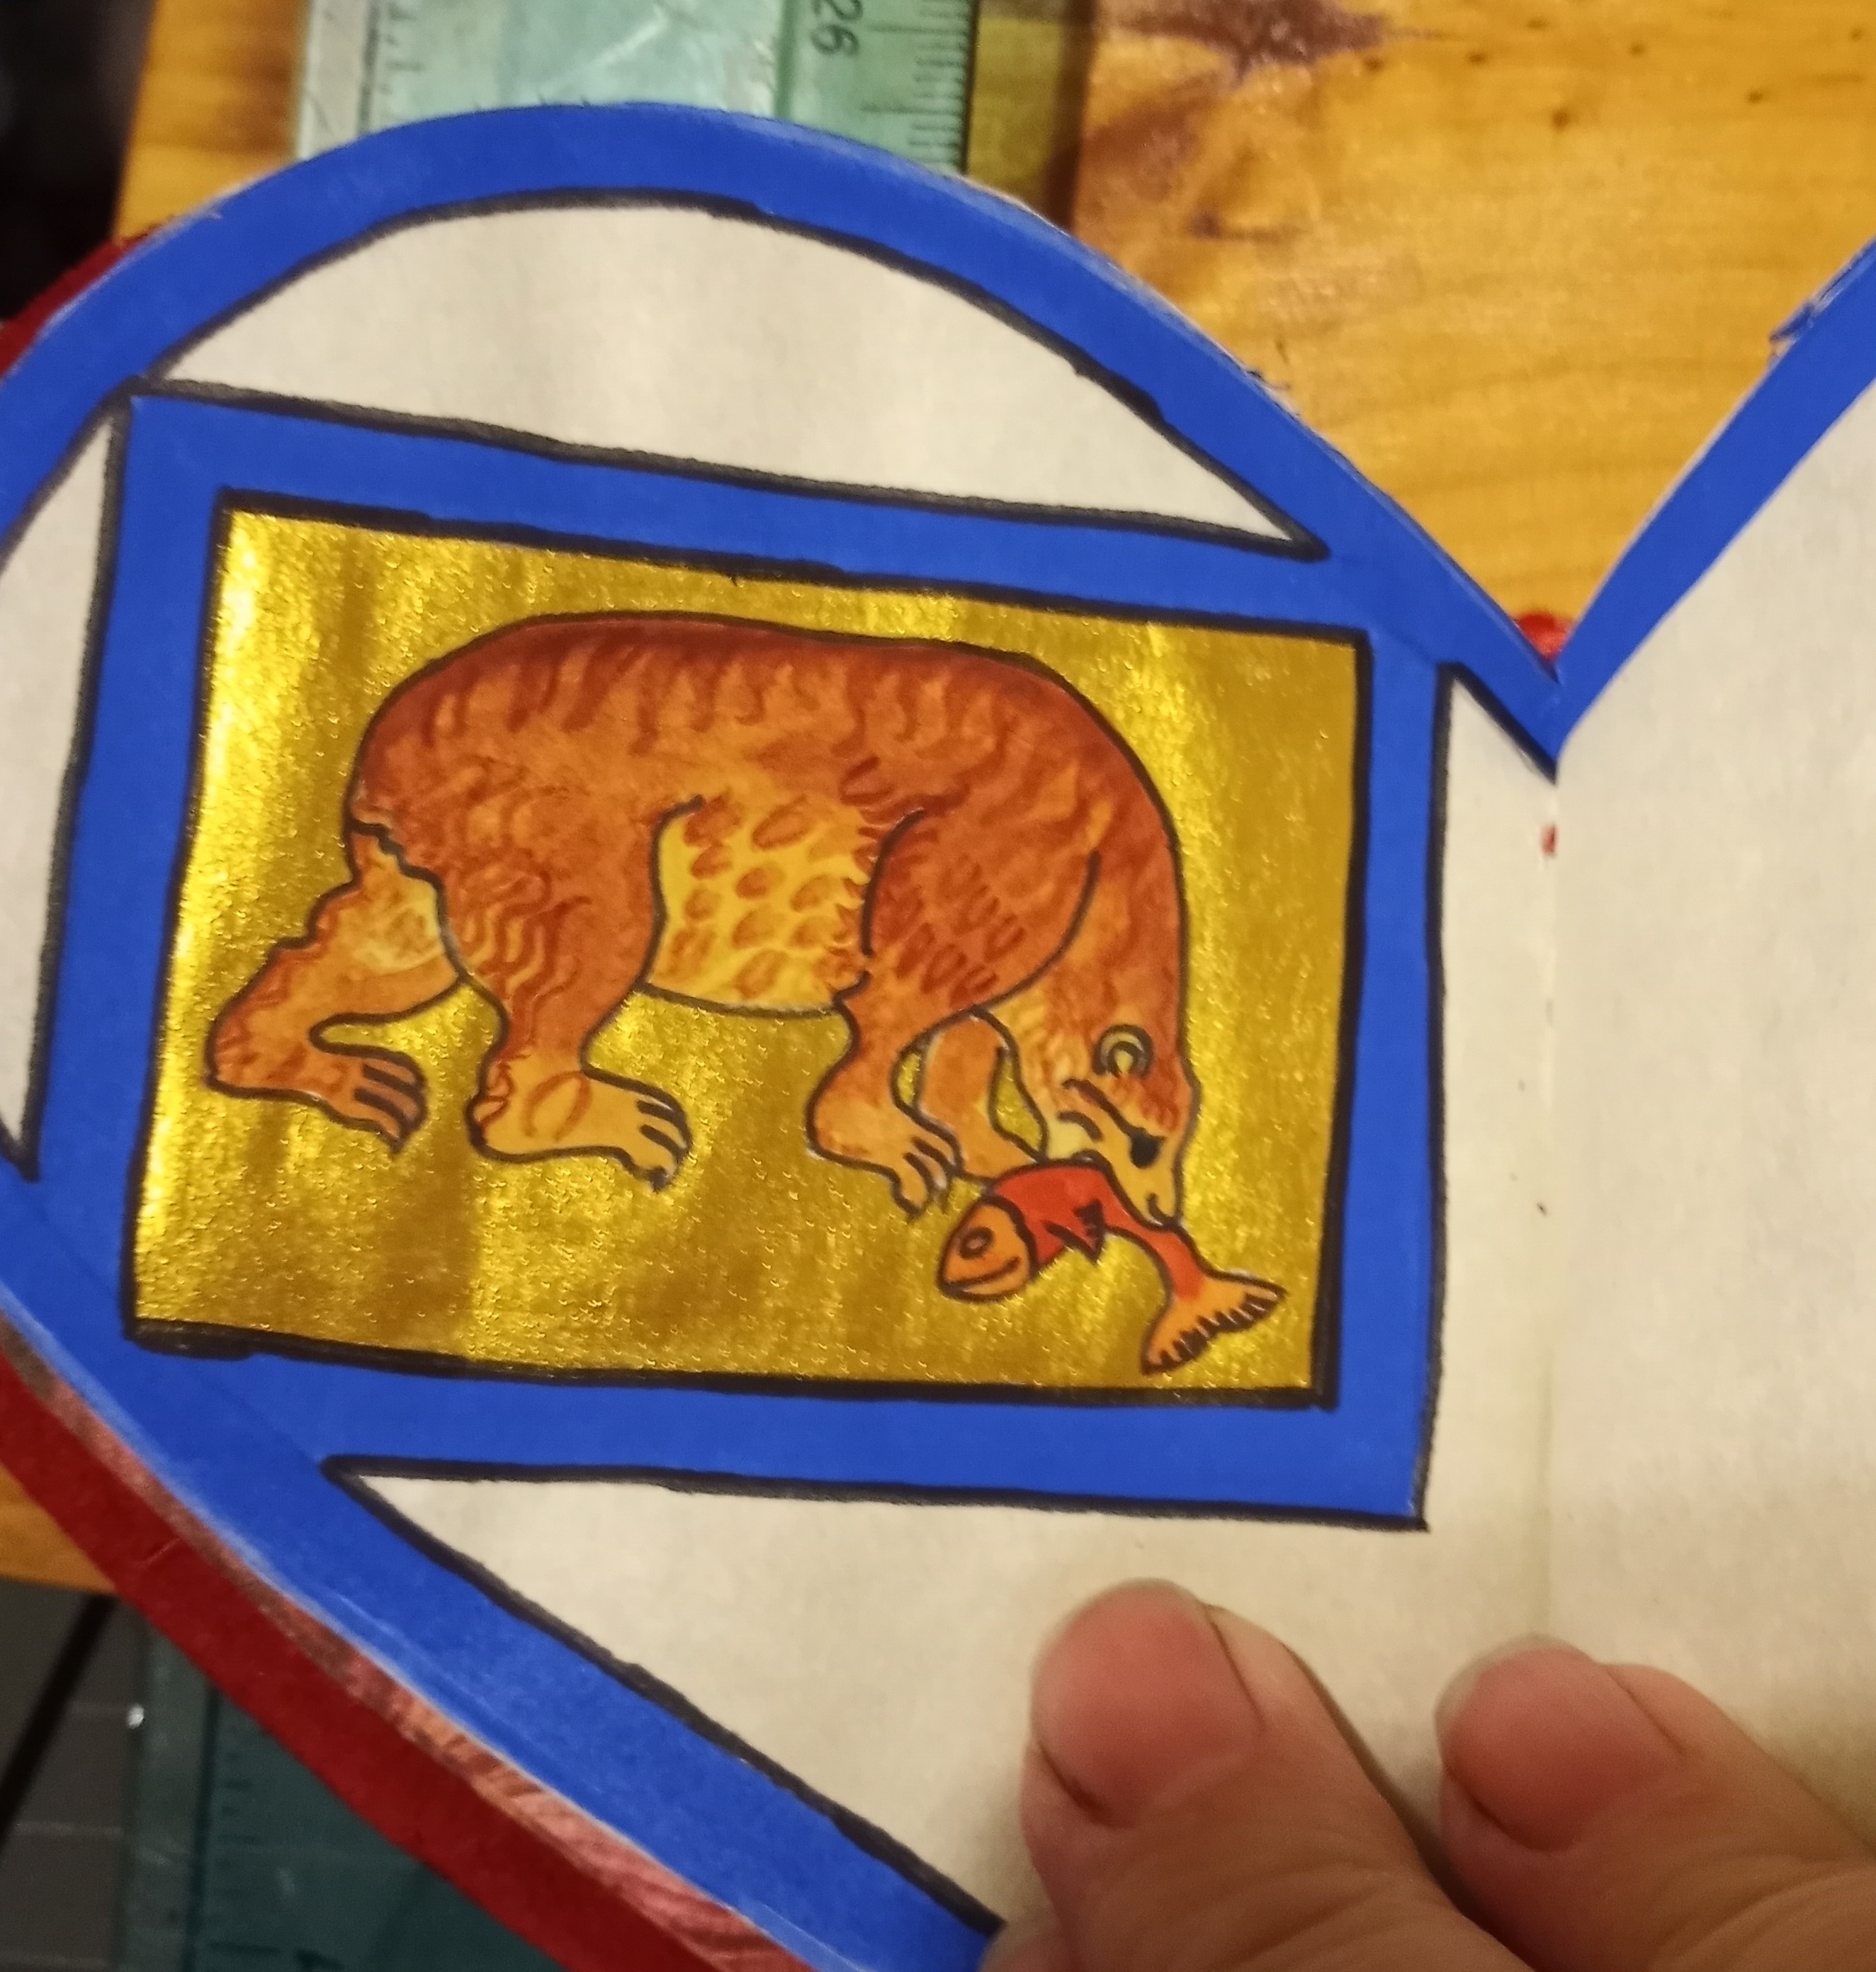
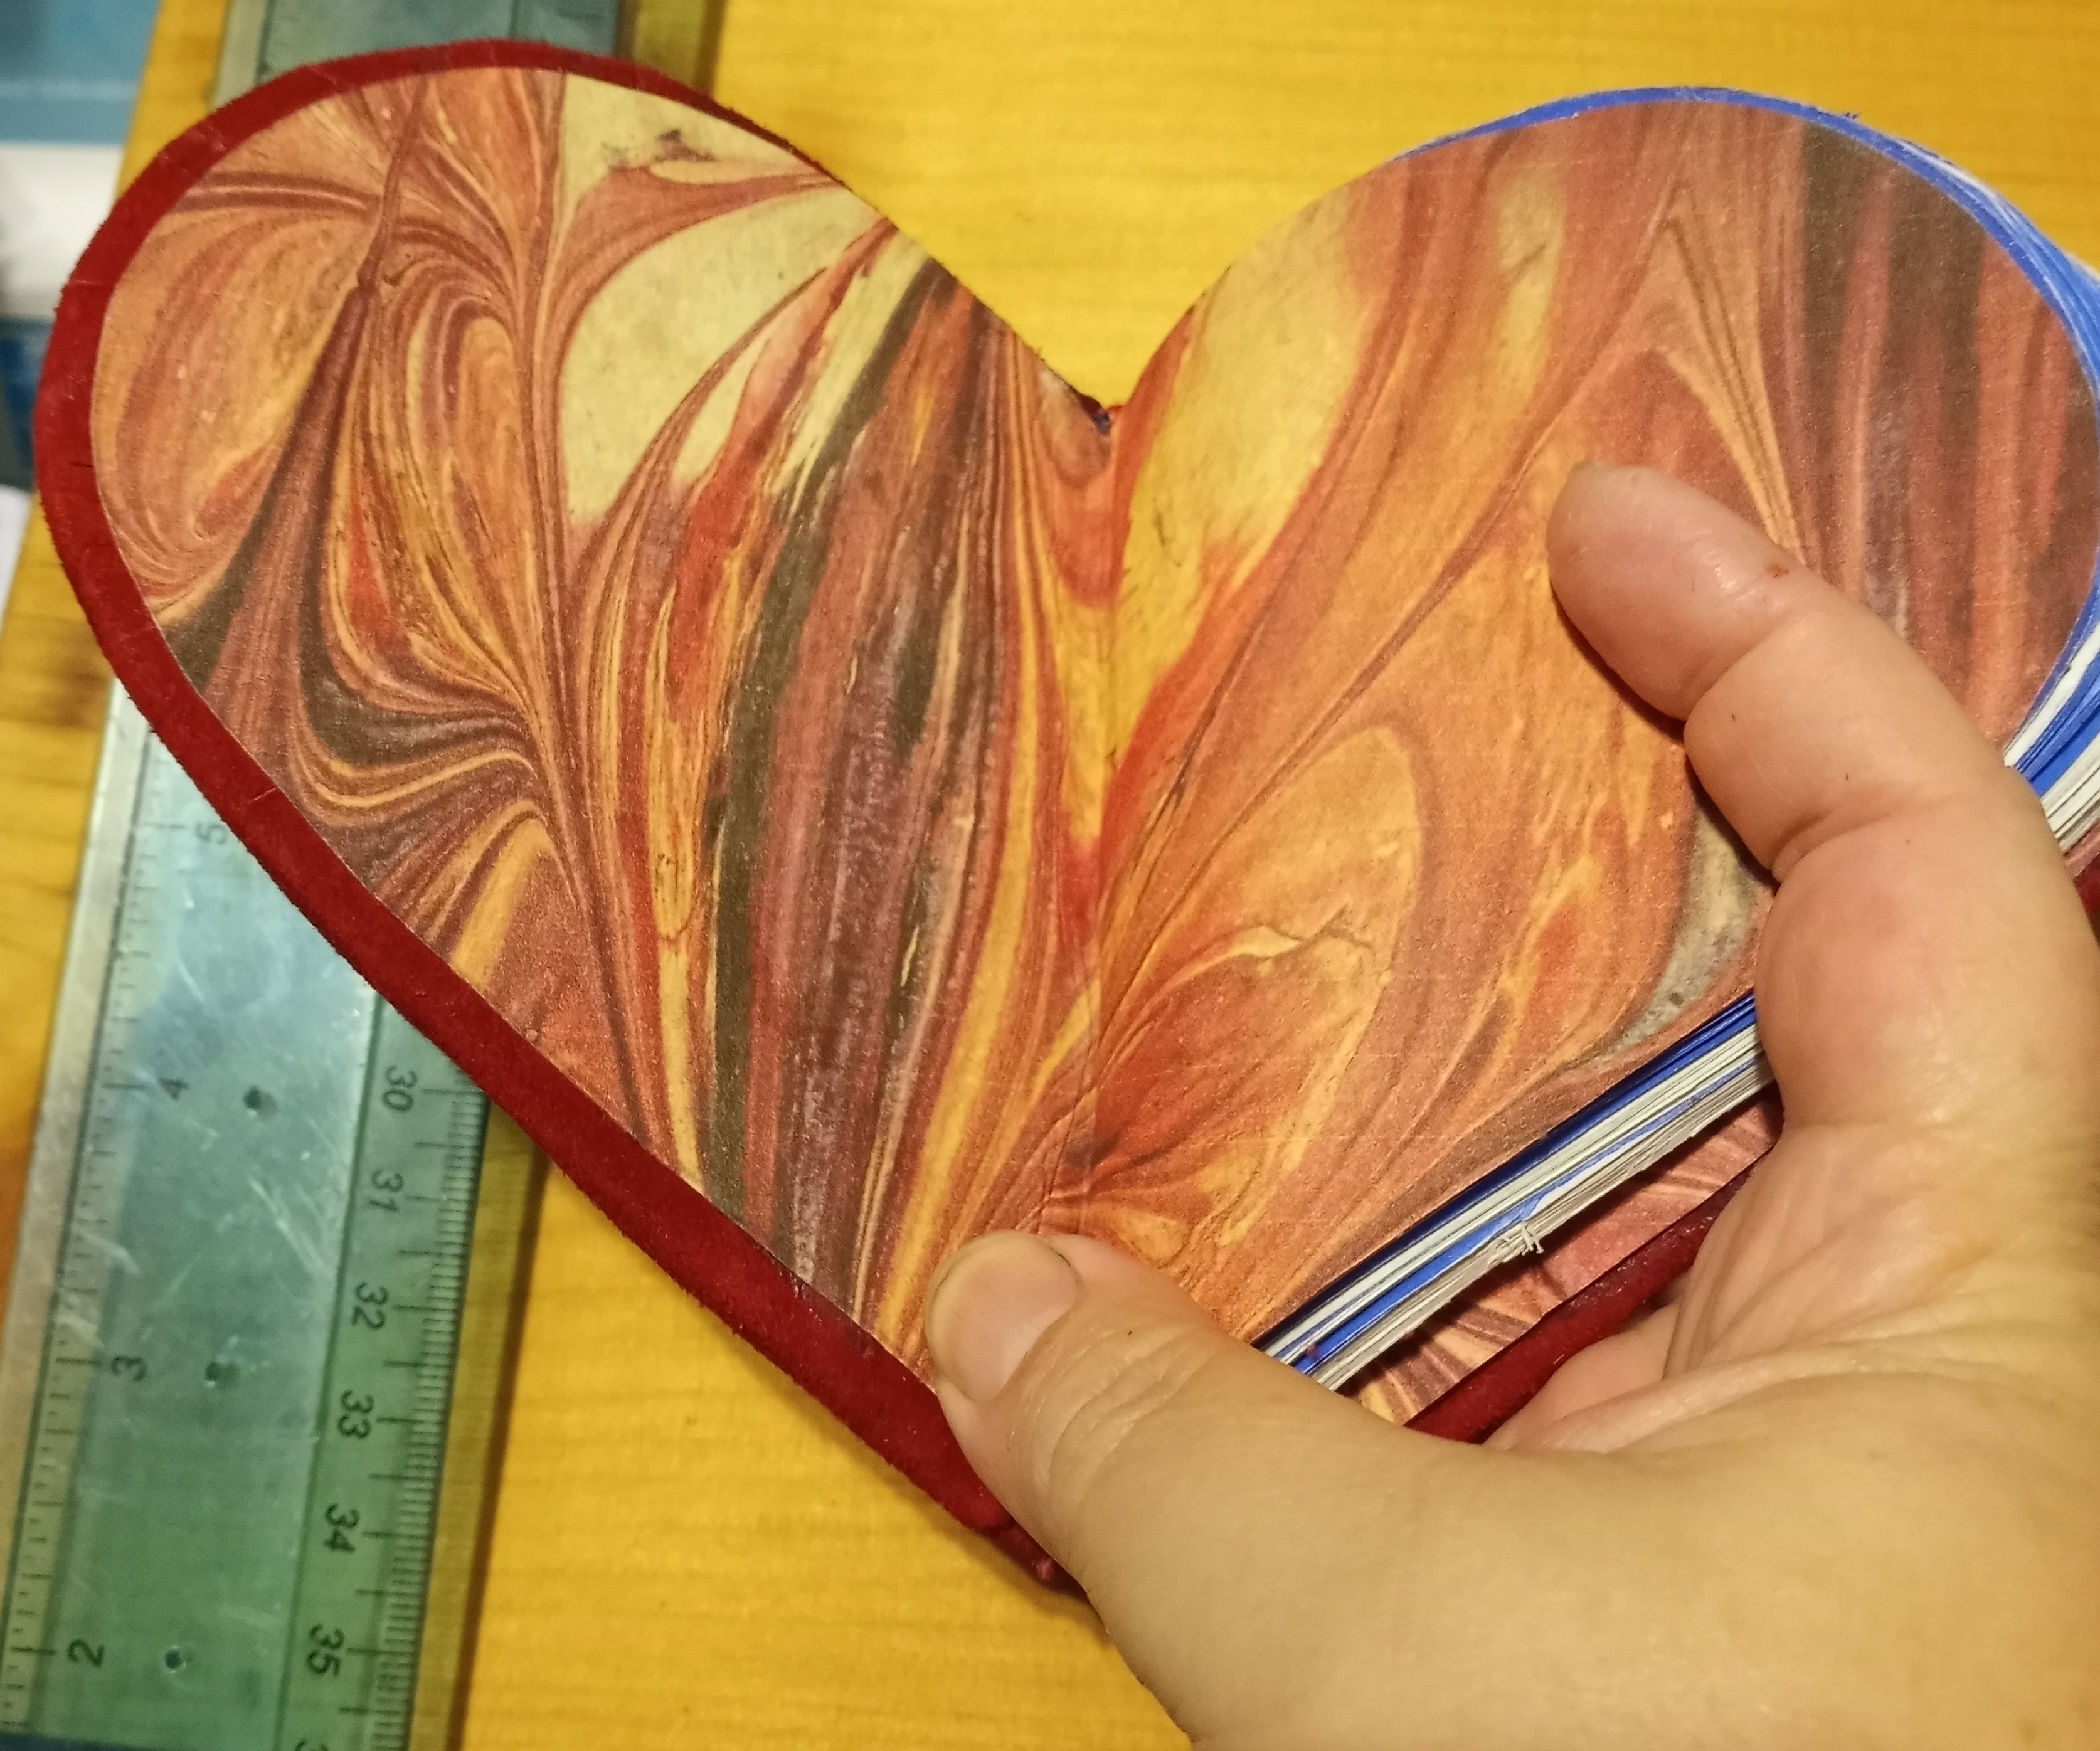
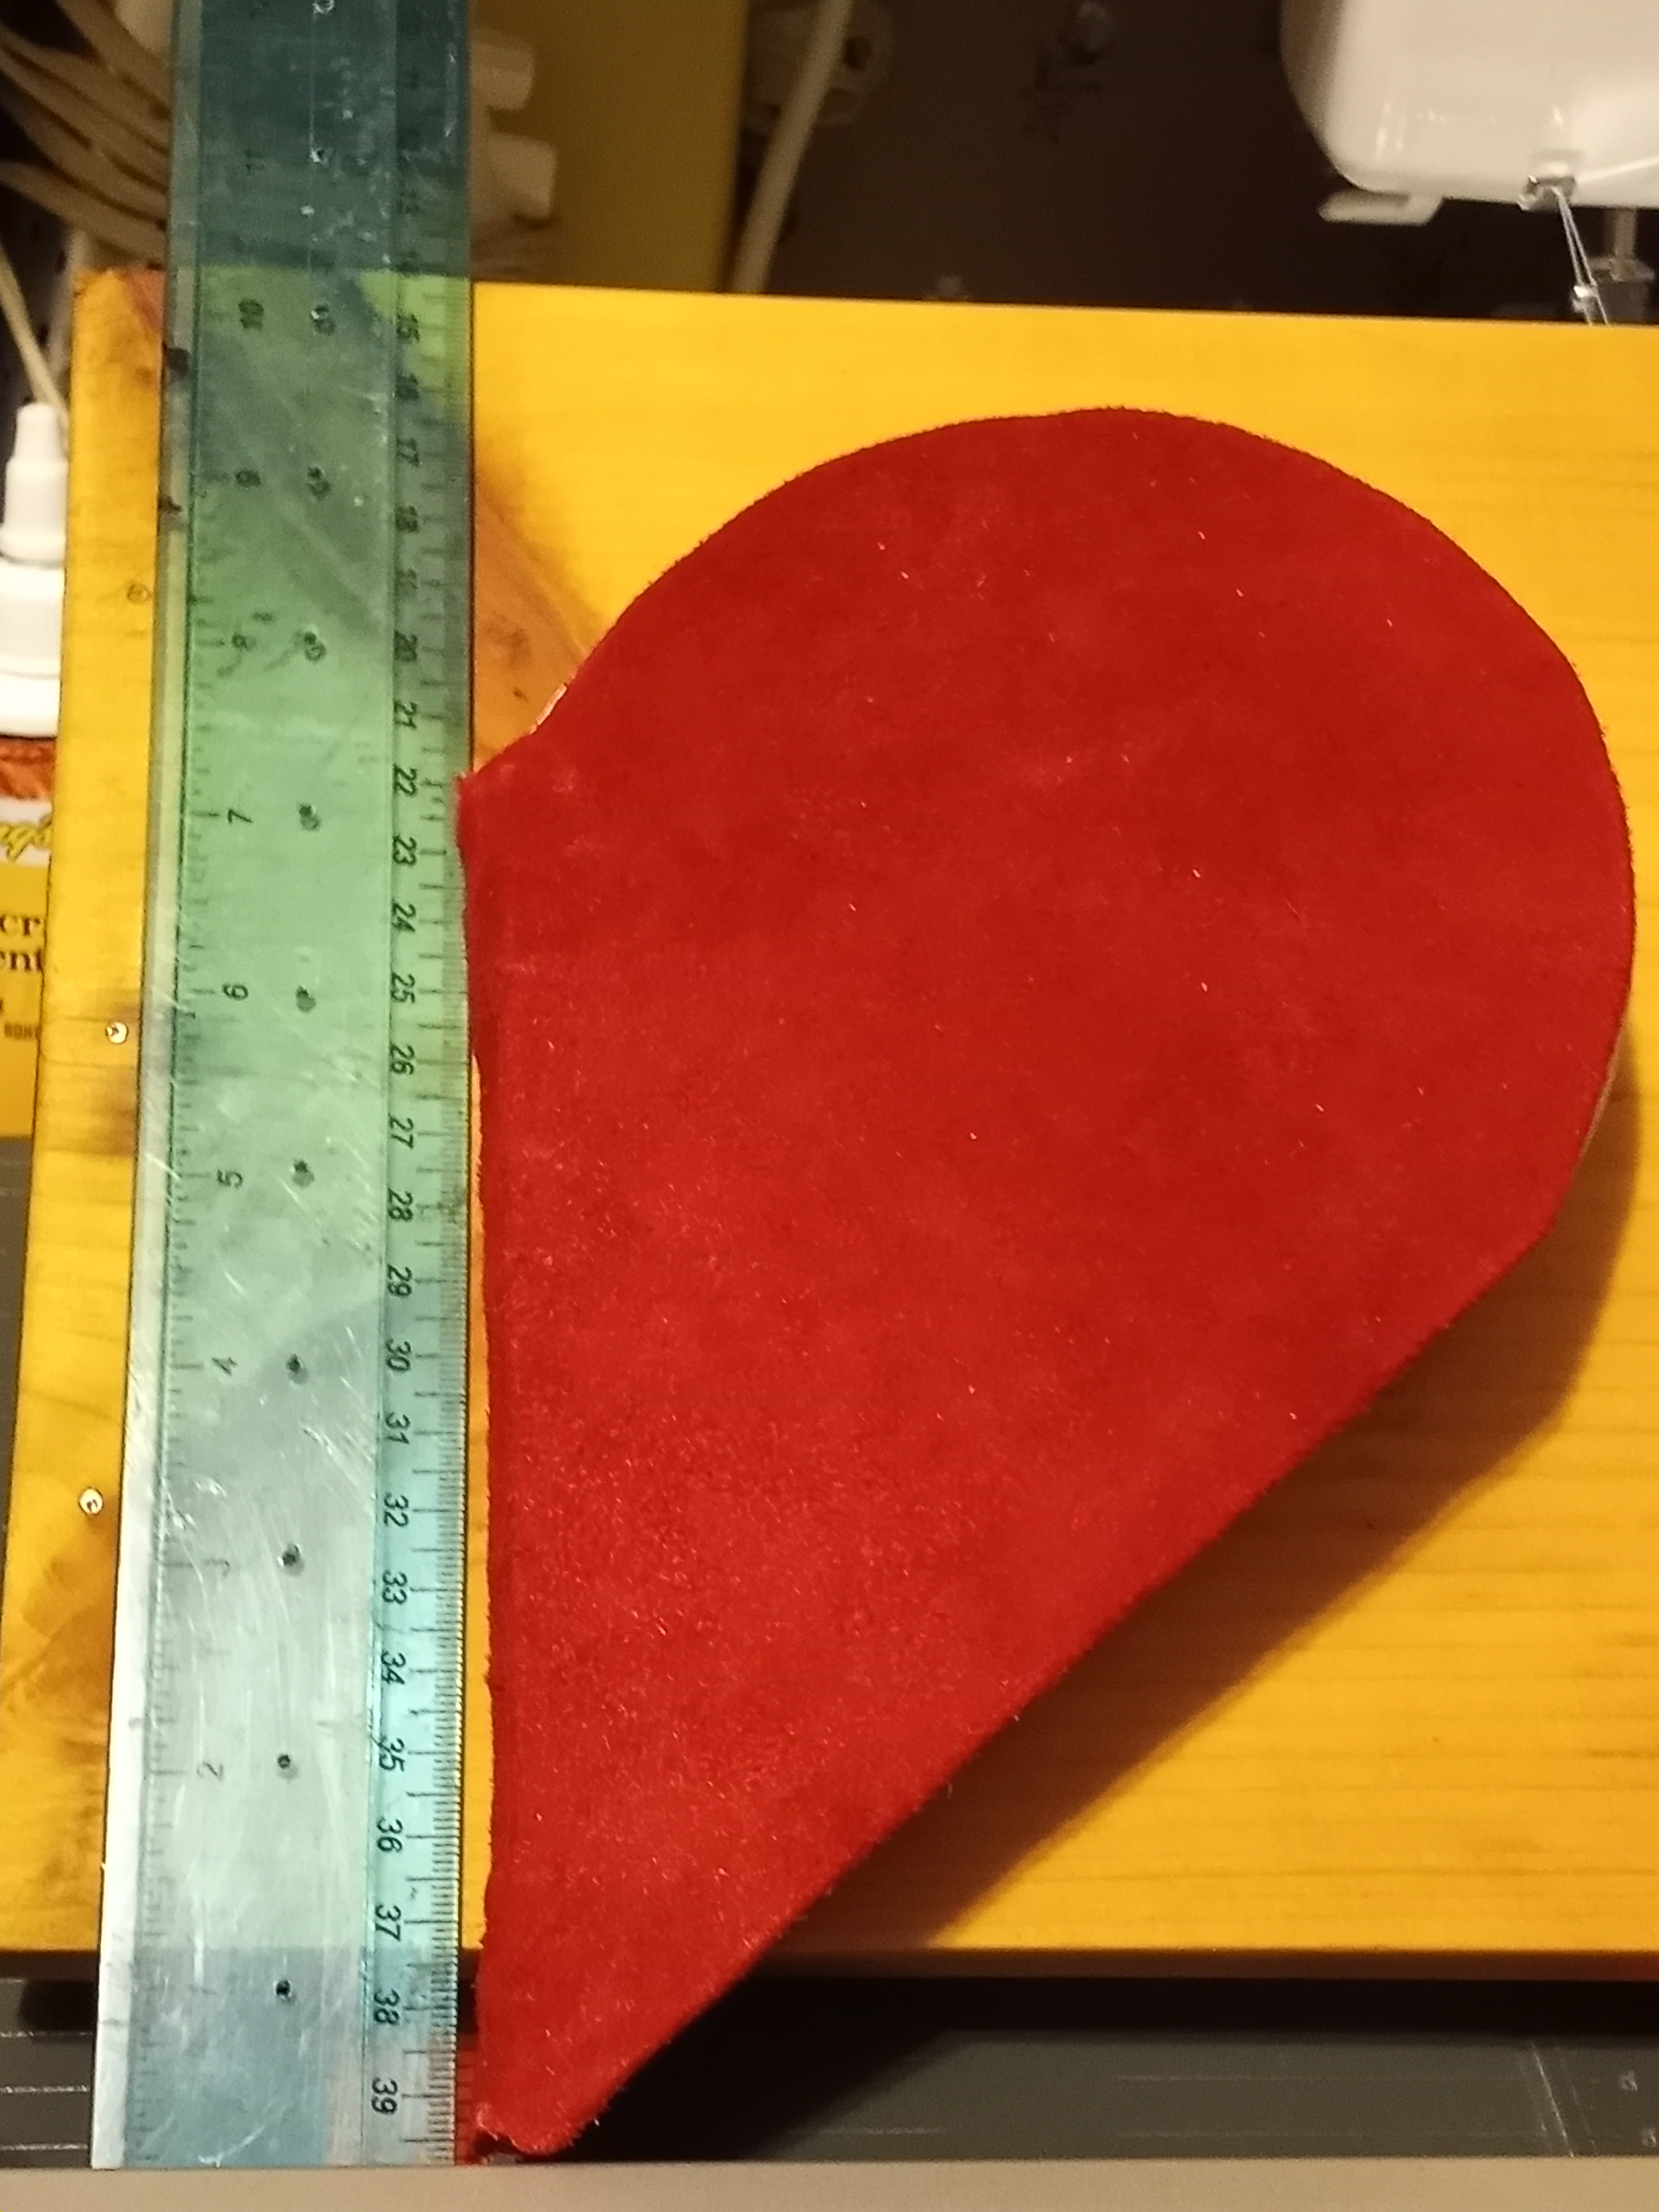


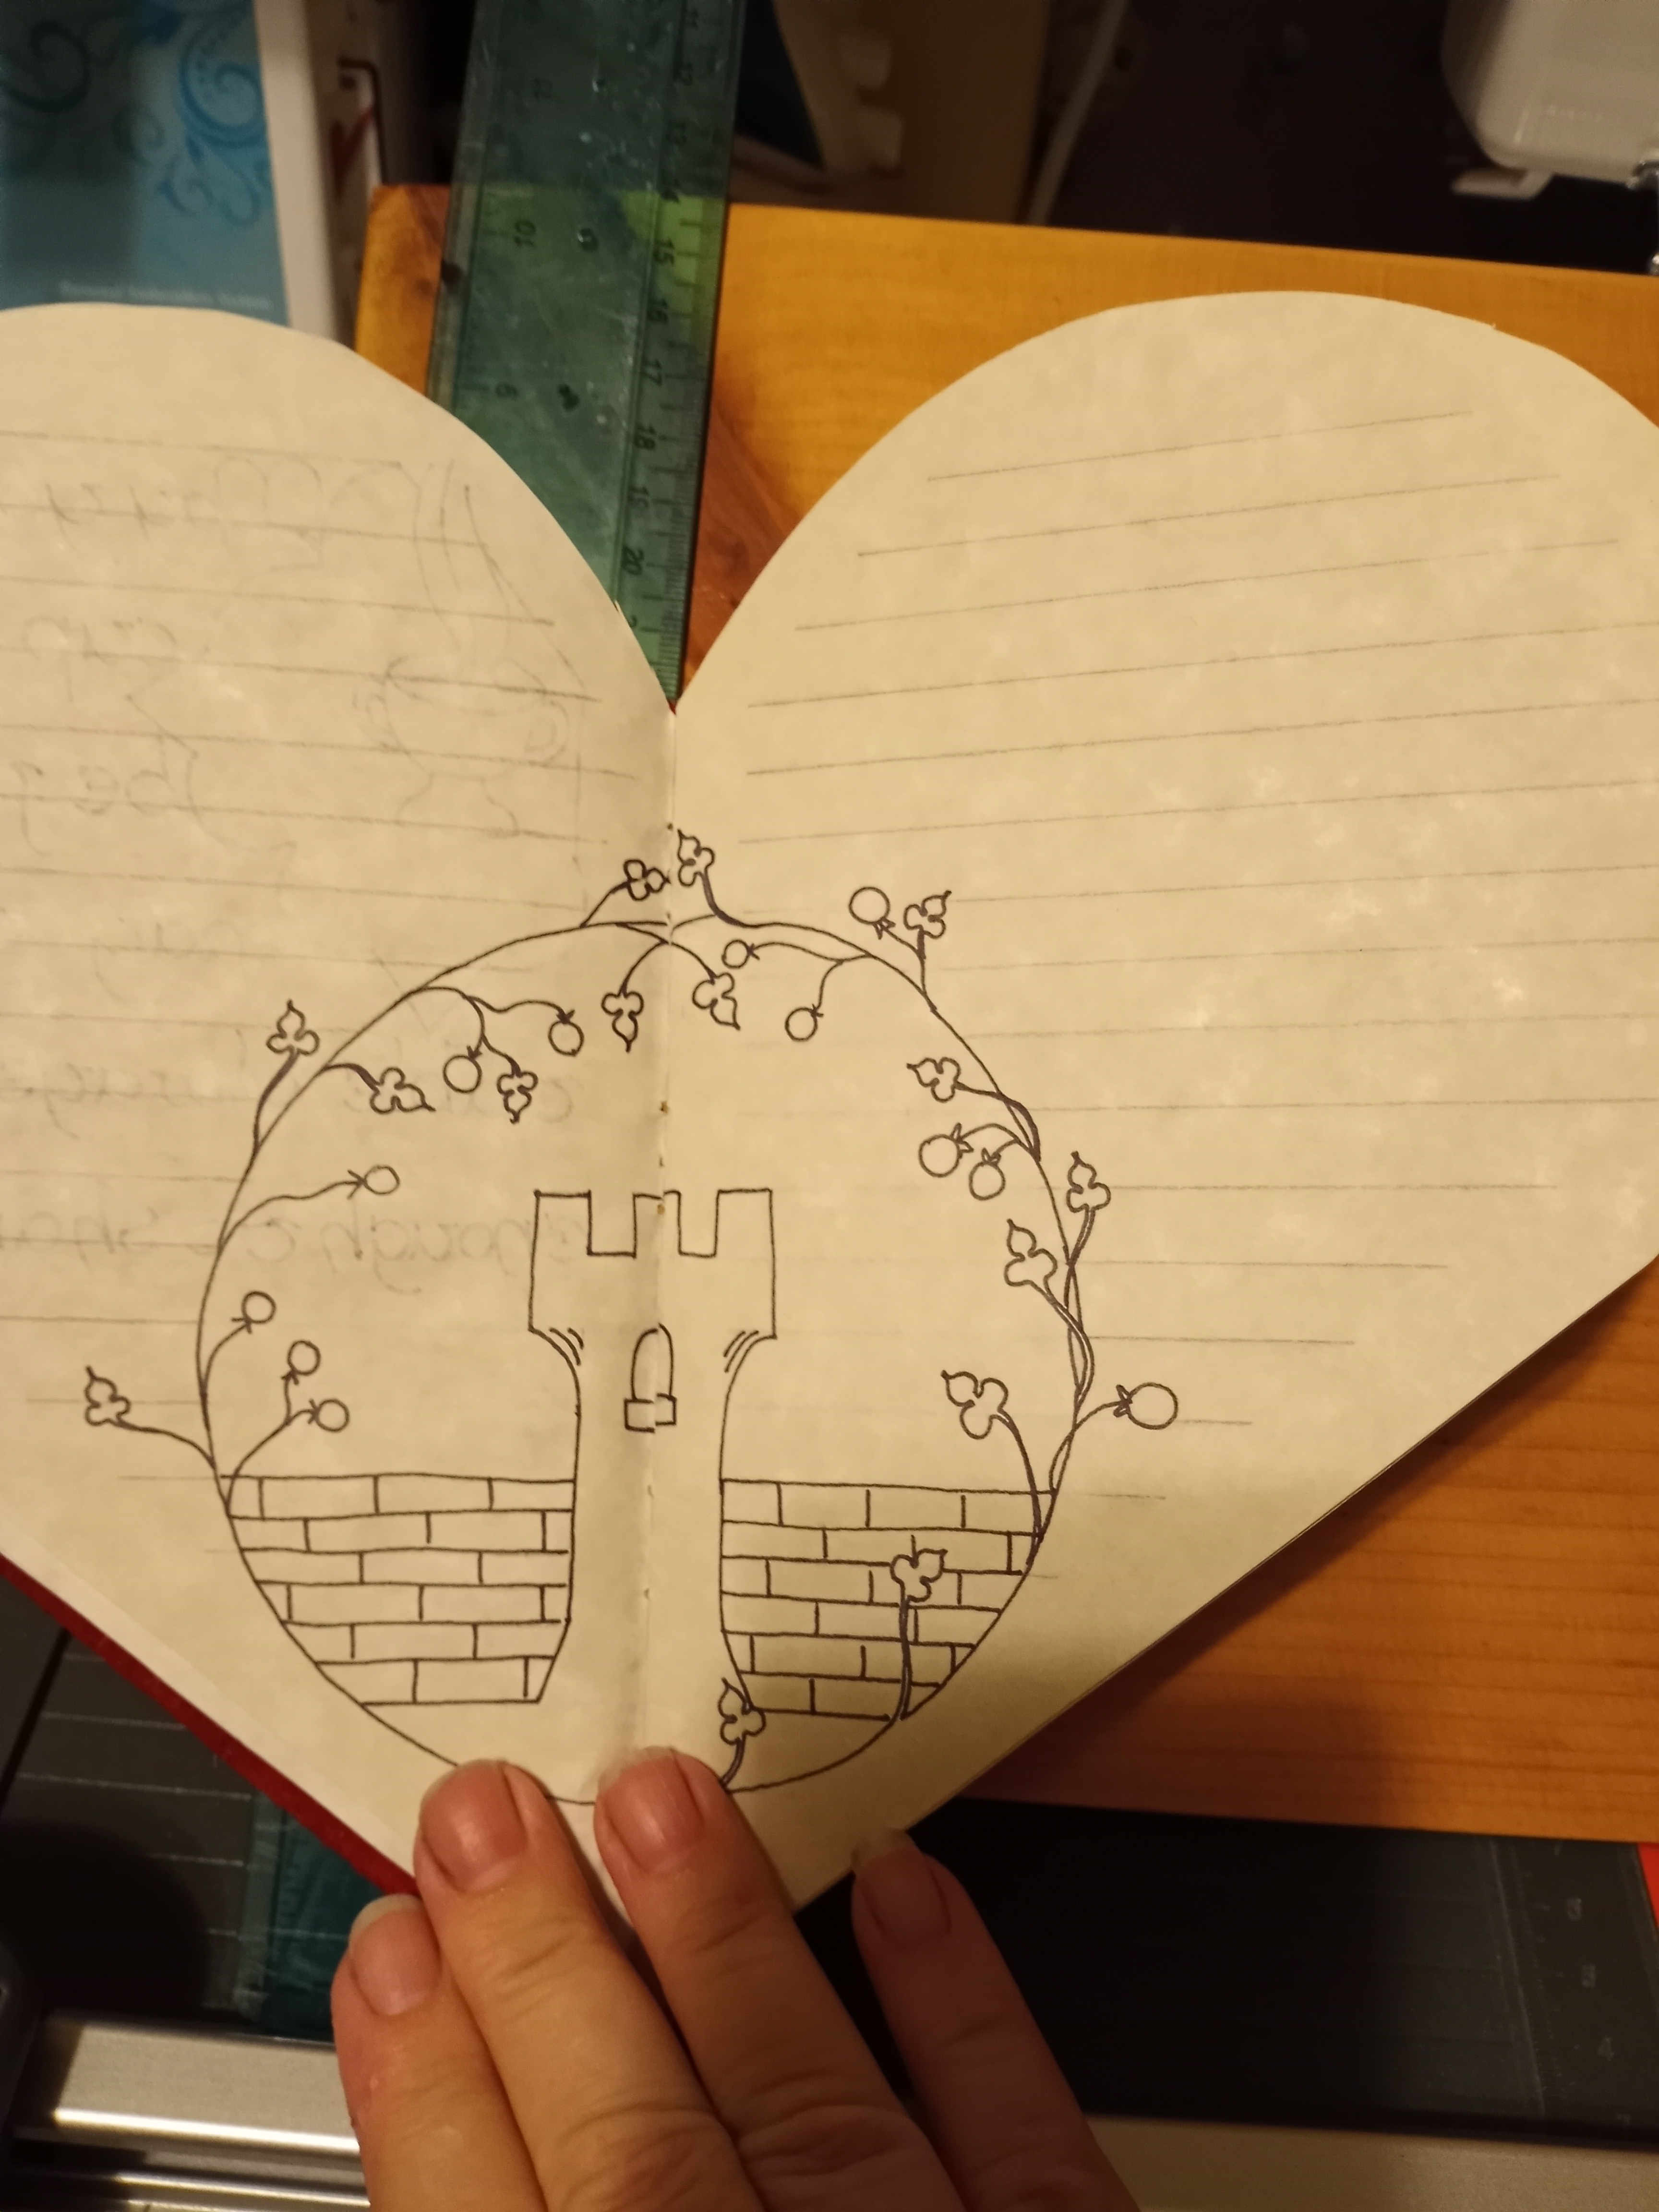


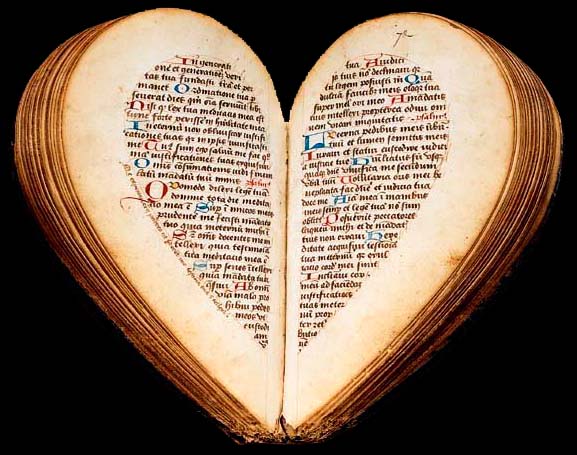

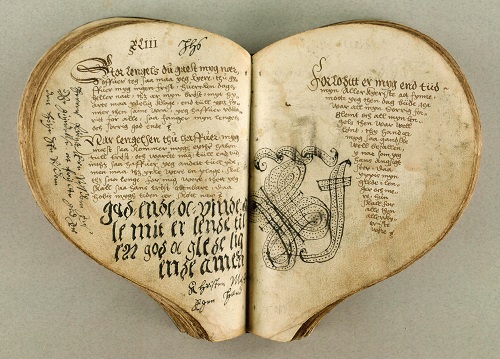
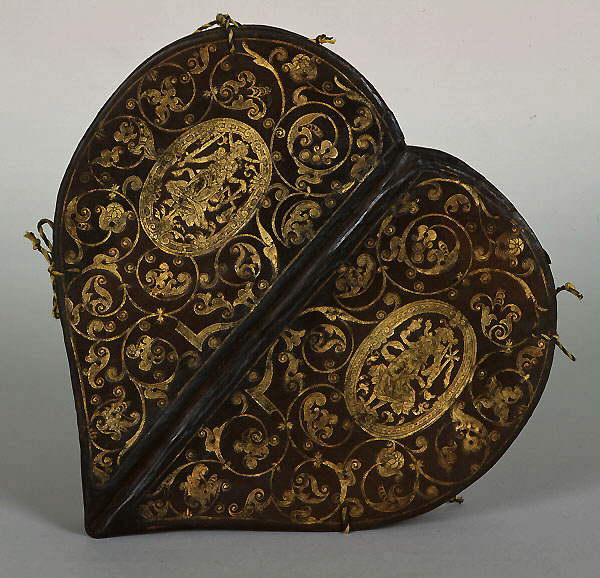


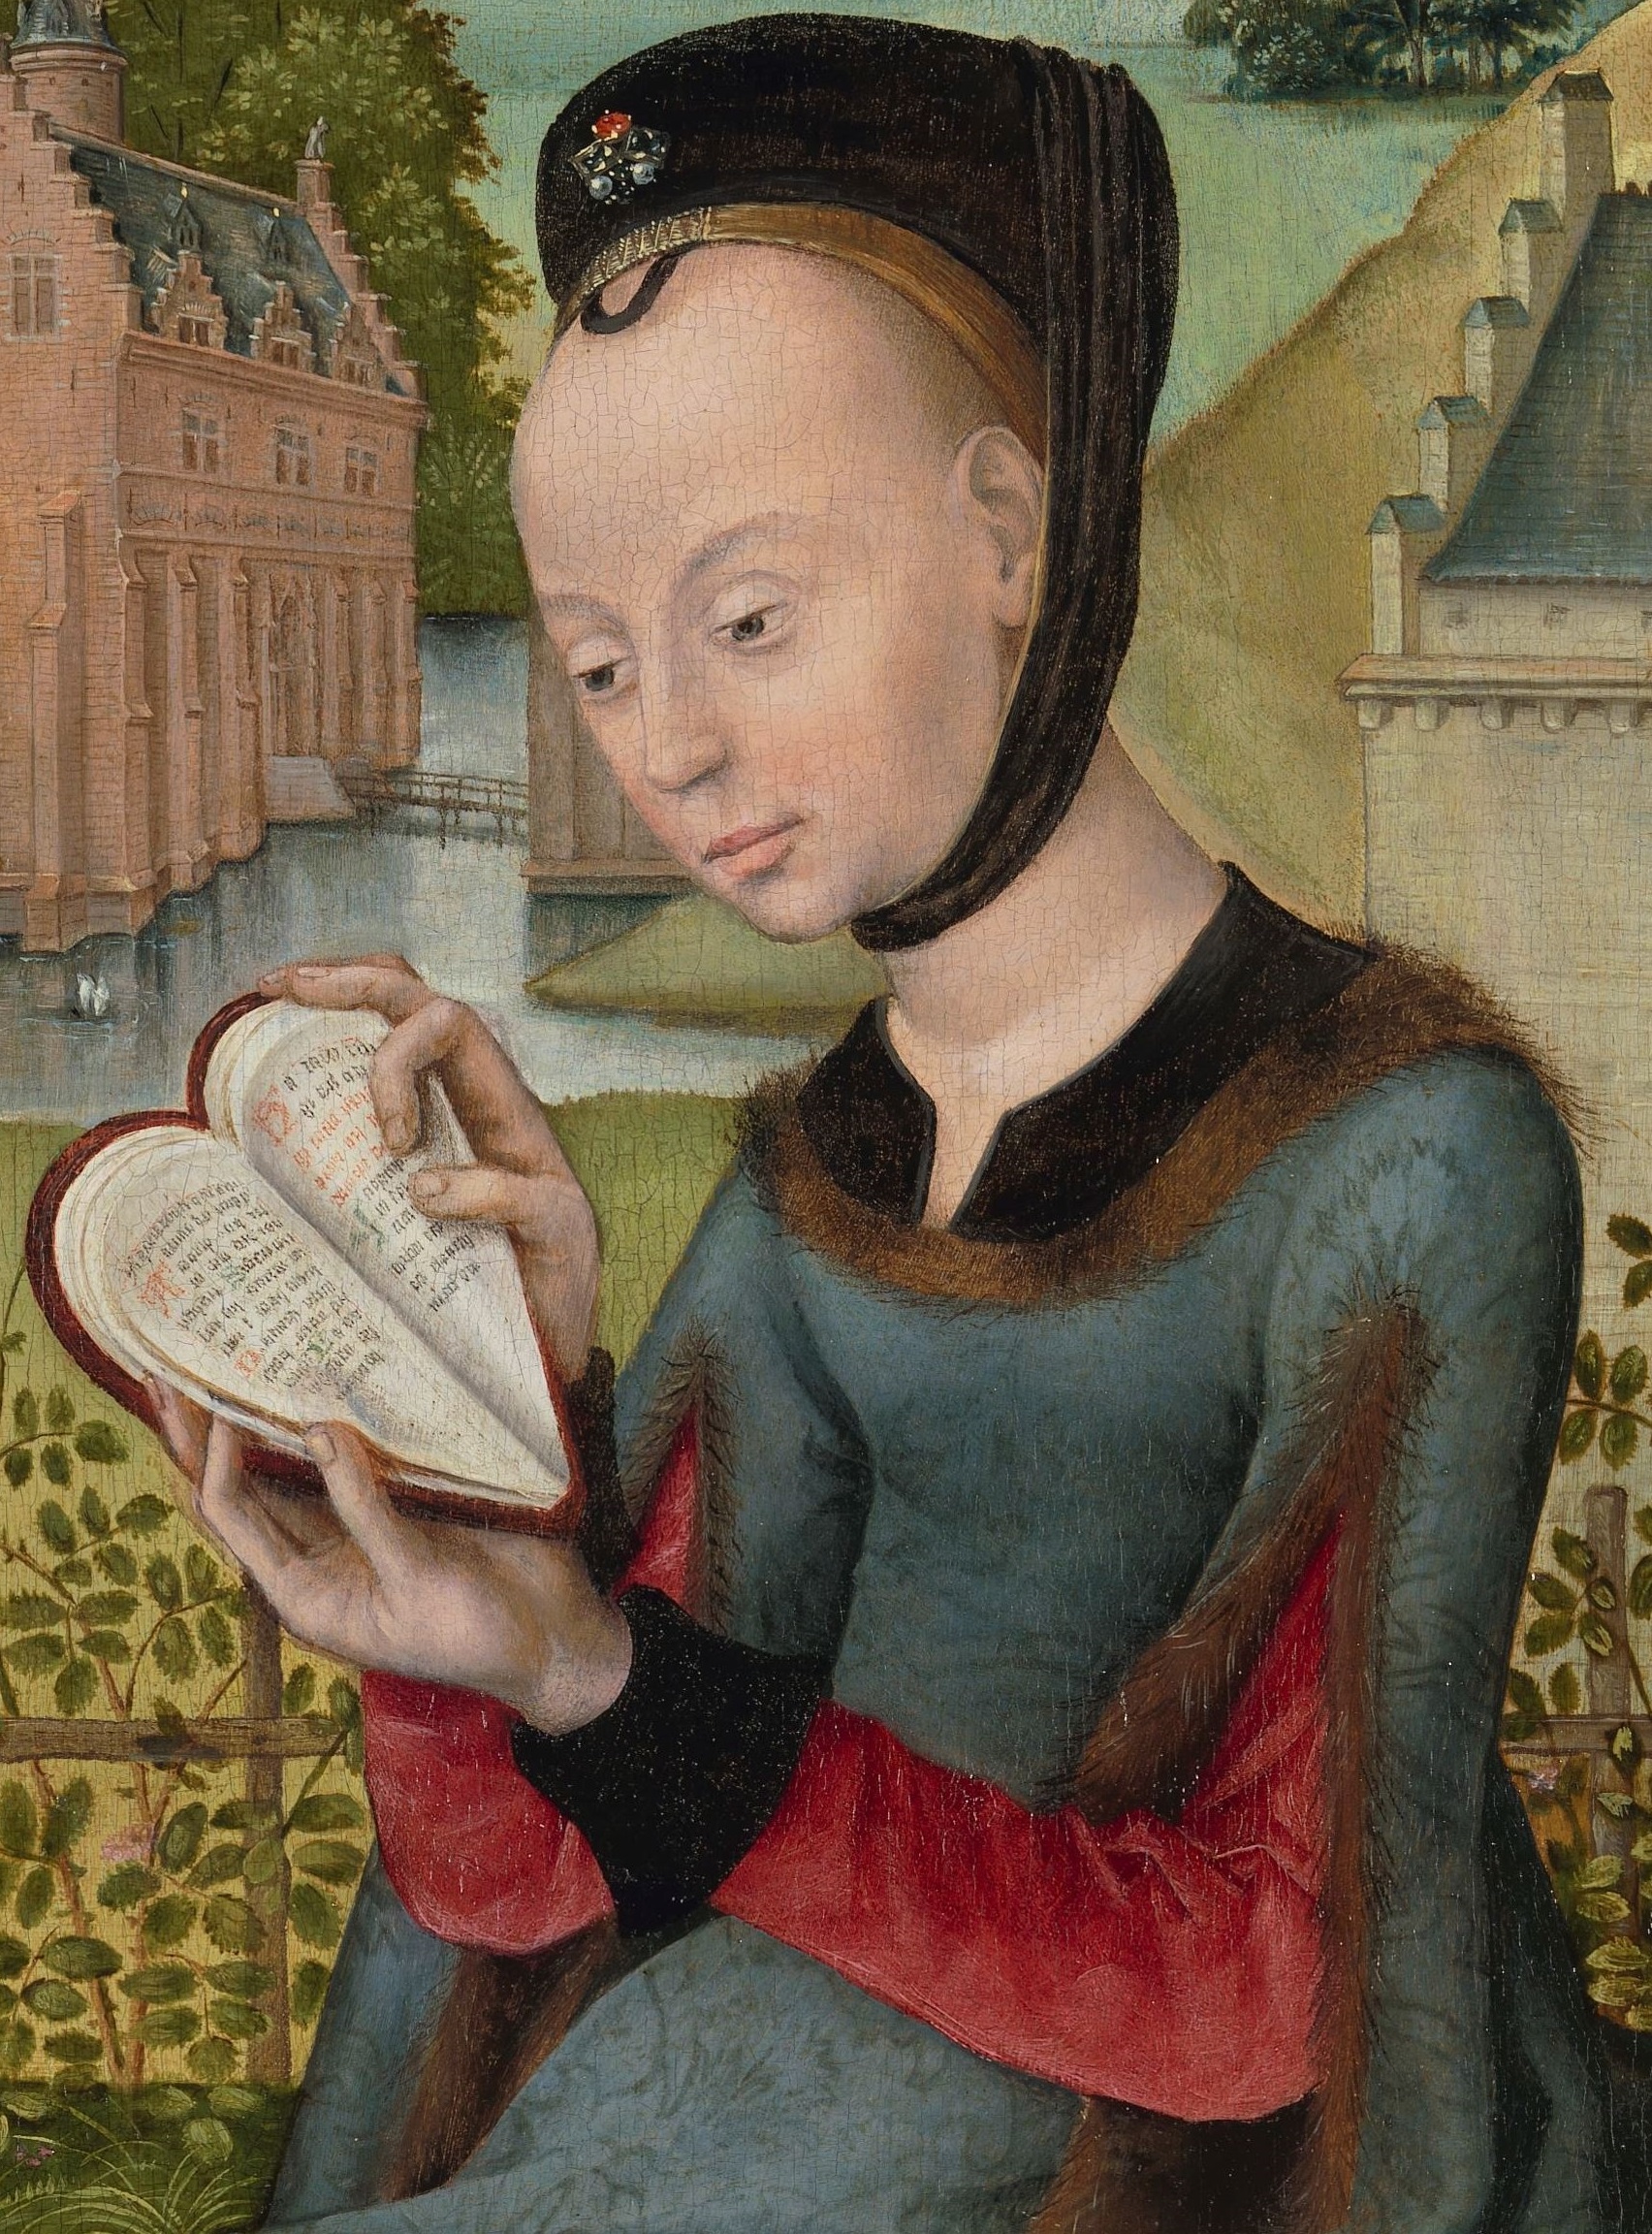
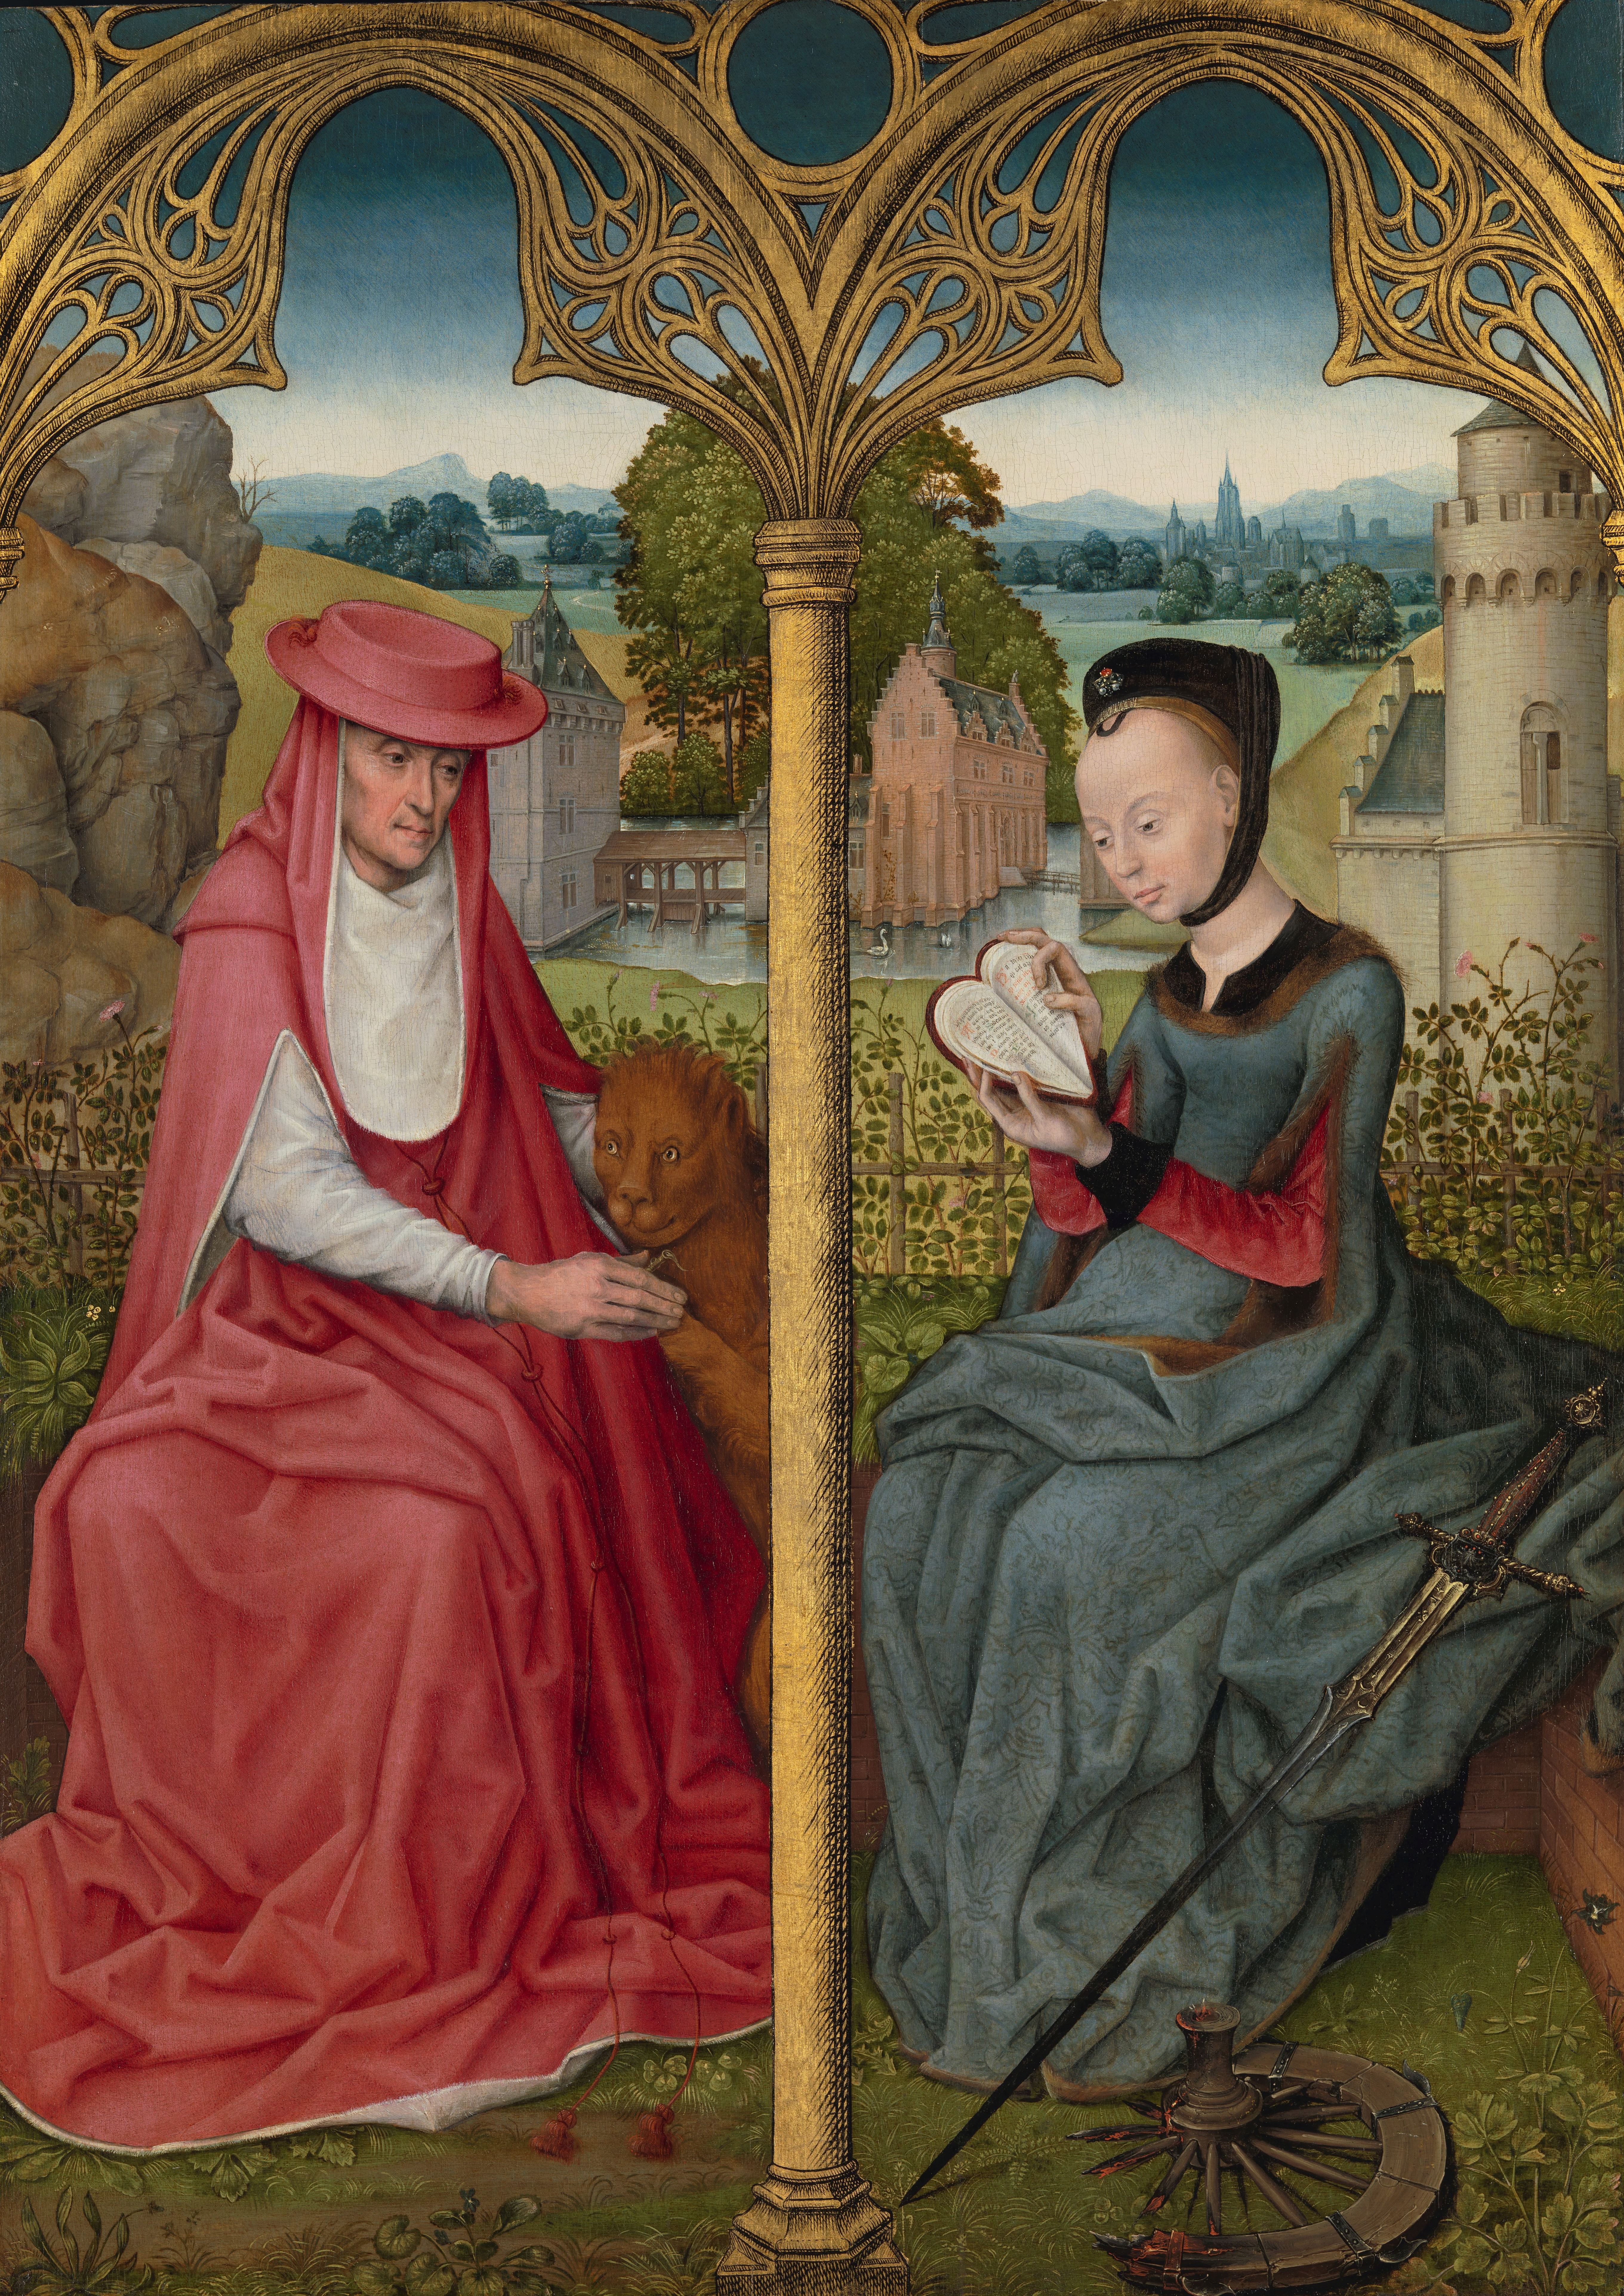


