These Following books will help you on your path to doing this wondrous type of embroidery. It is not a beginners craft, and I often think I have gotten myself way over my head and out of my league. (Snort) I cannot think of any other type of embroidery that will kick my ass, and pick me up by the scruff of the neck and tell me to do better next time. As I learn more about the techniques and read more books, I will be adding them to the list, but for now, these will do. Oh yes, they will.
Sophie’s book contains a dozen techniques for the embellishment of textiles ranging from Crewel to Smocking. Each technique has samples in full-color glossy photographs and well-done drawings in a step by step sequence to give you a good start. The relevant section of the book for this documentation is the chapter on Stumpwork. I found the usual needle lace, detached and raised surface stitches, but the really important part is the Figures primer. In the Figures primer, you find step by step instructions on how to do the raised figures that are the underpinnings of raised figure embroideries. She covers the body, face, hair, and hands.
In this book, Barbara and Roy Hirst guide you along the path of stumpwork embroidery with some history of the craft, pictorial examples and step by step instructions on the various techniques that make stumpwork such an art-form.
Jane Nicholas is touted to be the best in her work and you can clearly see it in the examples she created to teach this technique. The title of her book is rather misleading, however as her book only covers the plants, animals, and insects but not the human figures that are often the central technique that people have come to know as stumpwork. The beautiful Elizabethan Figures that are central to her original piece are not covered in this book. It will, however, teach you the varied techniques needed to create the natural world in the background of your figures. She also helps you use those techniques in a variety of craft projects to beautify your home and needlework basket.
Kay and Michael Dennis give you a really good start to finish guide to stumpwork through the seasons. They start you off with all tools, materials, and threads needed to do the lovely projects pictured in the pages. Besides the stitches and techniques for the surface embroidery, they guide you to staining or painting the backgrounds to give a more natural and realistic look to your work. A good book for those that need color pictures to guide step by step.
In this book, Erica Wilson brings together all of the techniques earlier published in smaller books. She is best known for the revival and popularity of crewel embroidery in the early 1970s. The most relevant is Chapter three, Silk and Gold threads. This chapter brings the history of silk and goldwork together with full directions, list of tools and supplies as well as stitch diagrams.
Muriel gives a good read into the origins and history of Stumpwork or Raised Embroidery from its beginnings to modern craftsmanship.
Tools and Techniques
Making a hand jig
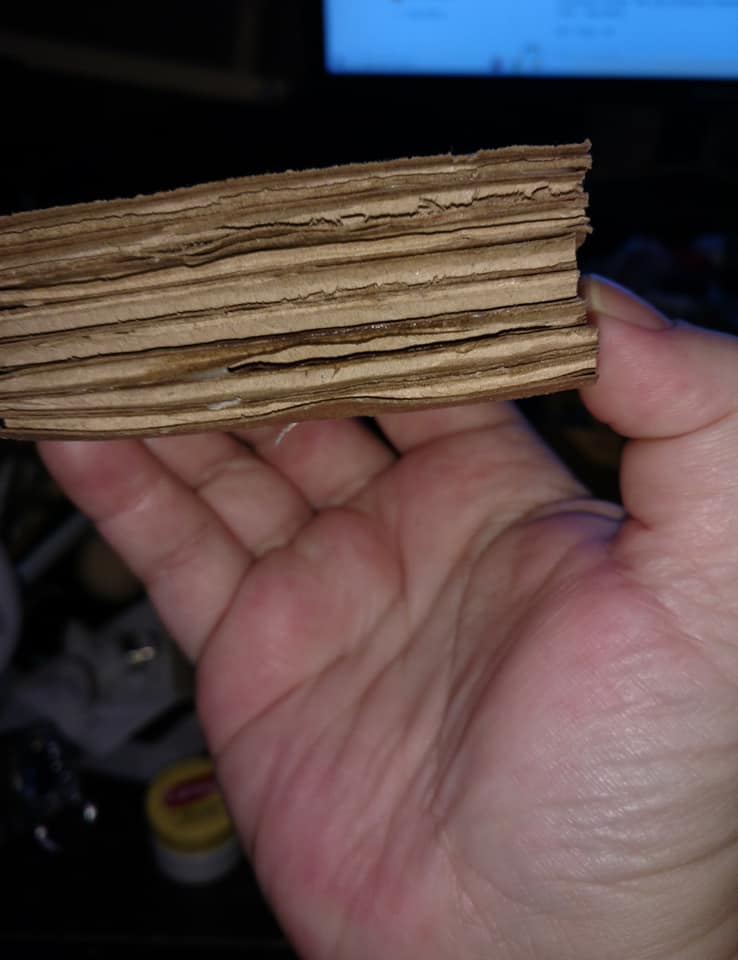
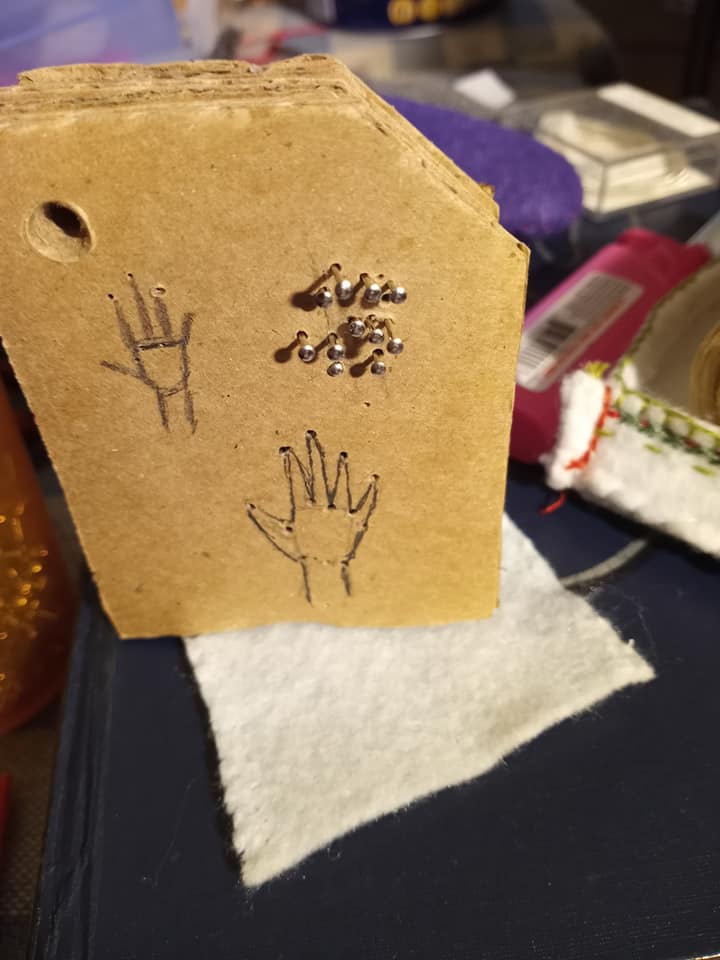
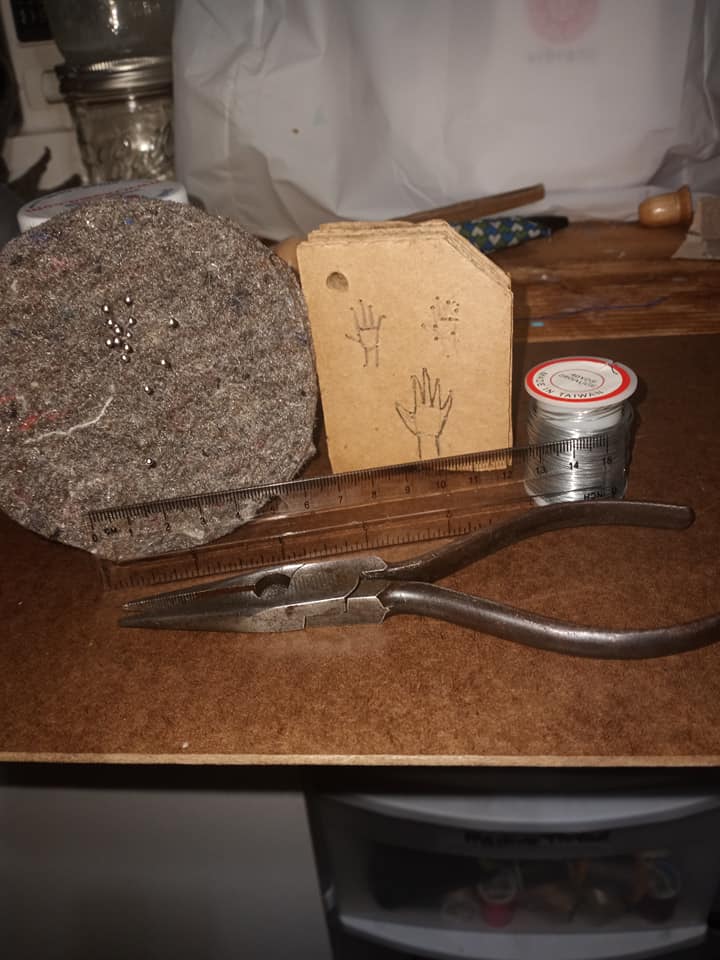
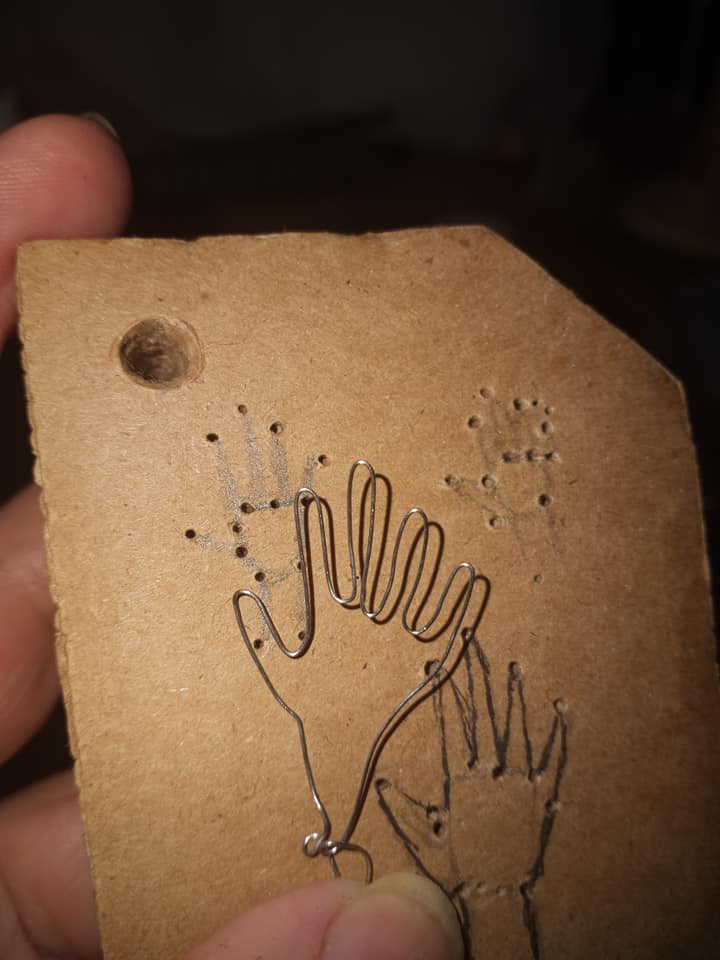
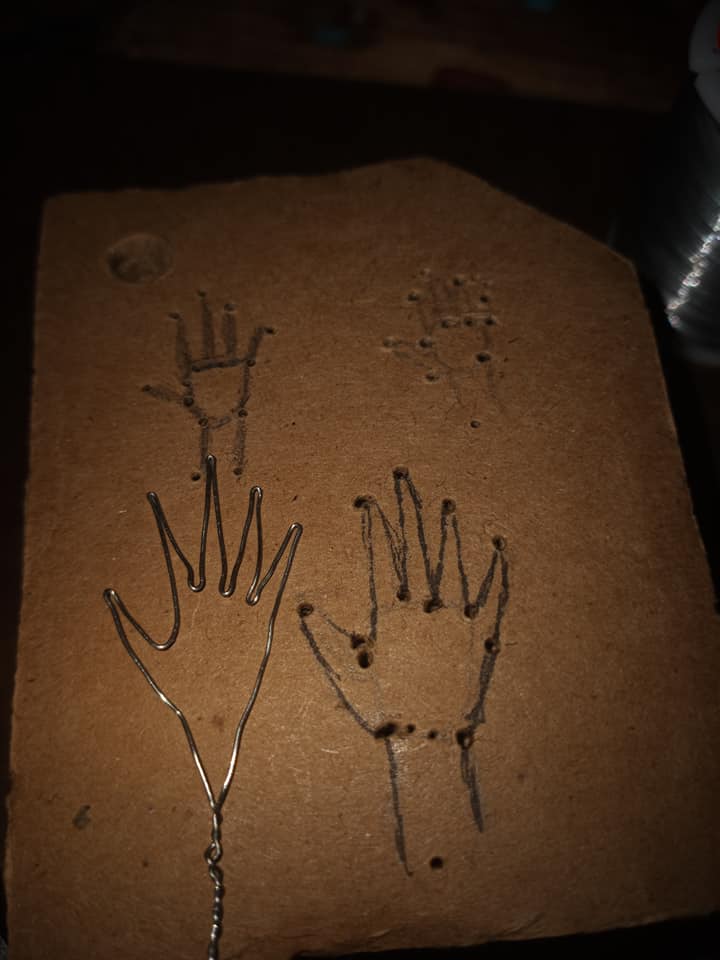
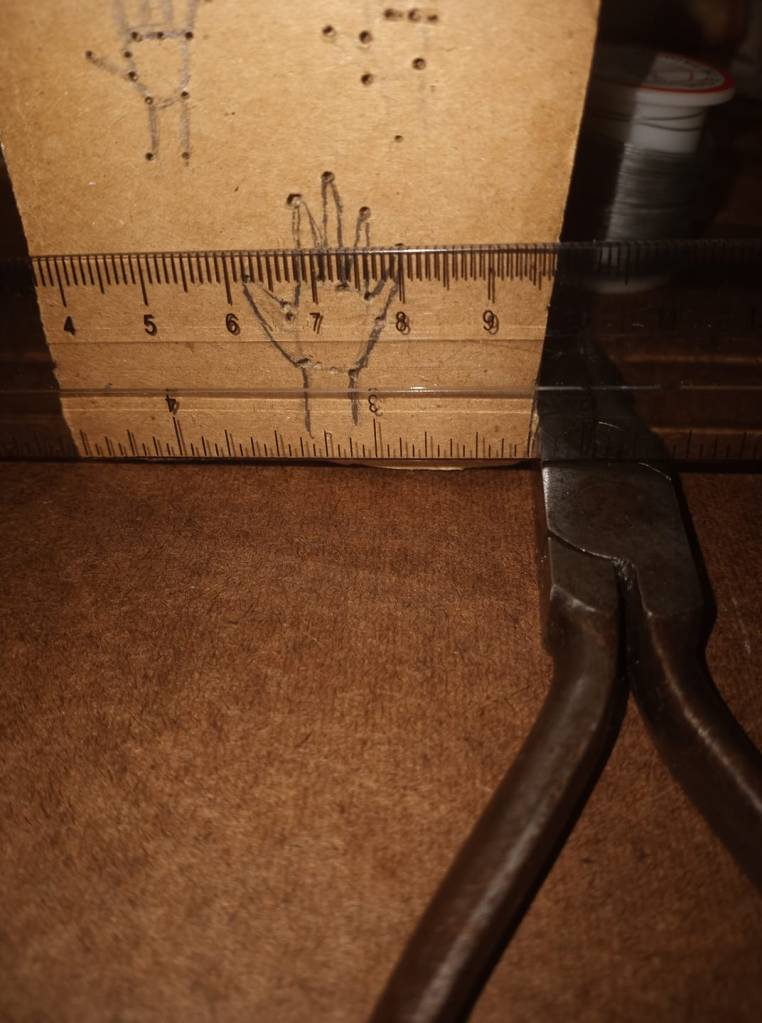
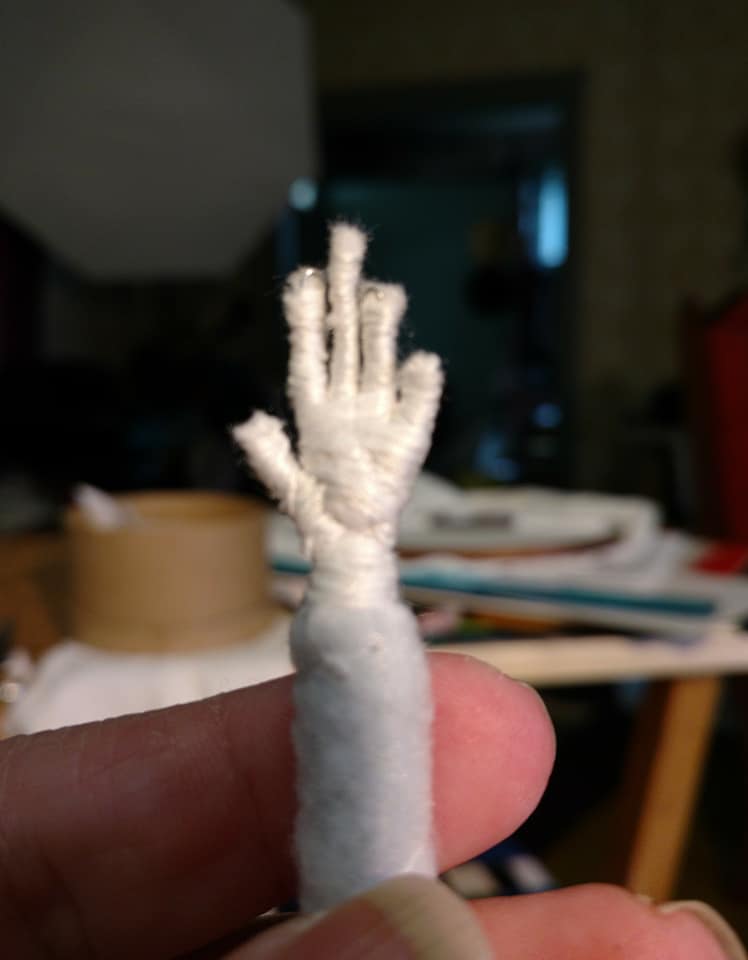
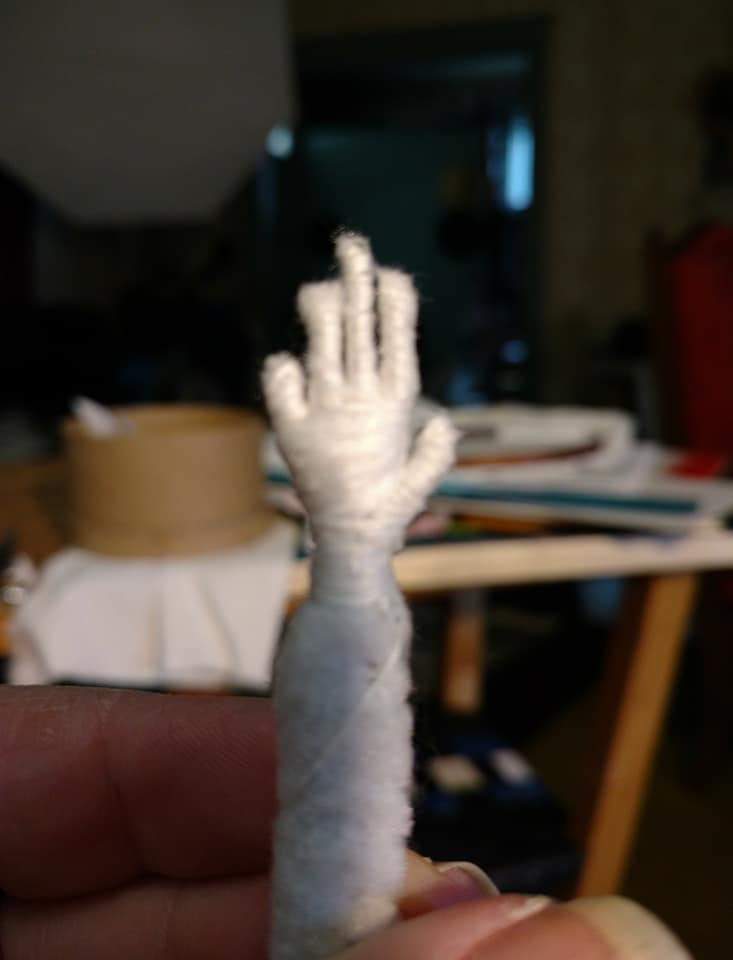
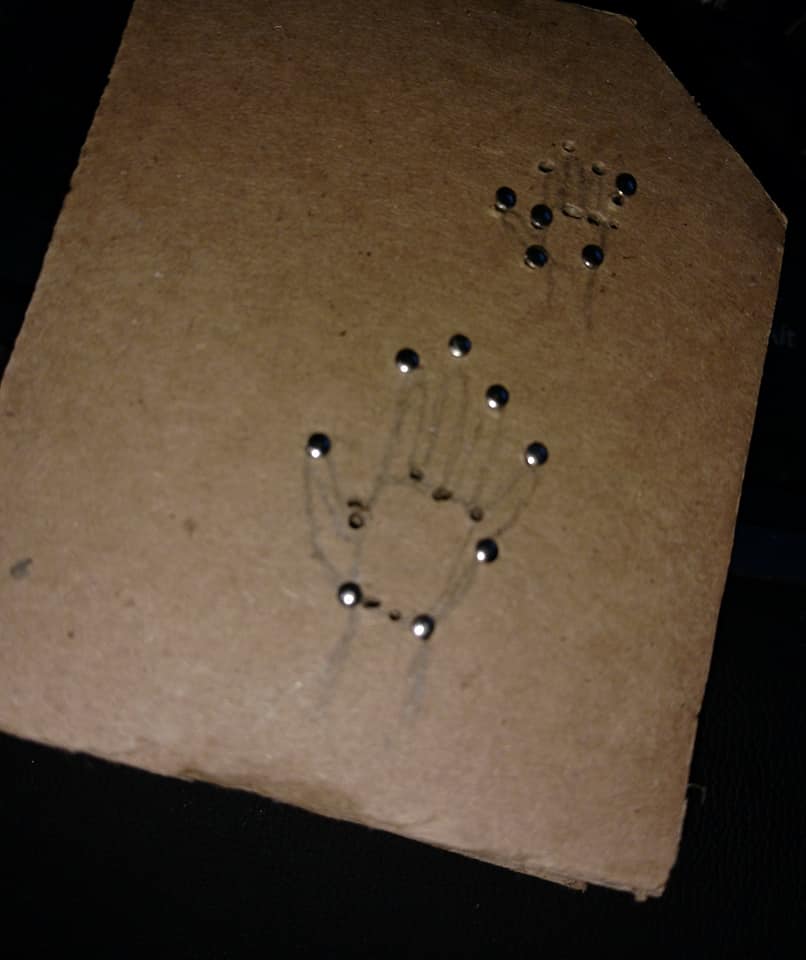
While bending wire is fun all by itself, making hands for raised figures hand be a chore. You will need the following: 1 large hunk of corrugated cardboard saved from an Amazon box, Glue, box cutter, steel ruler, heavy weight. Cut 5 squares of thick corrugated cardboard or 8 from regular and glue them in a stack. Put a heavy weight on them and let the glue dry overnight. On a clean side trace out the small hands needed for your figures.
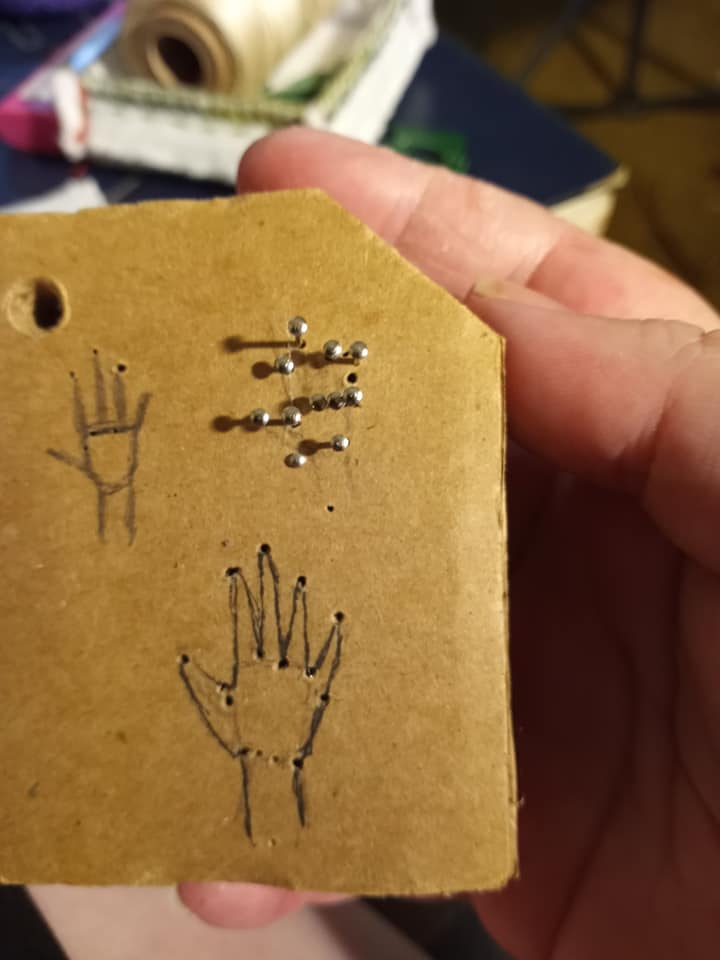
To use your hand jig, you will need steel pins (Not the ball topped pins), strong needle nosed pliers, and 28 gauge wire or finer. Place a pin in your jig pushing the pins in deep, but not too deep. starting at fingertips, then between fingers, and at wrist points. You can see the dark shadows showing the missing pins.
Now its time to wire up your hands. The wire wraps in and out around a pin to form the thumb, fingers and finally the full hand.. Remove each pin carefully so that the wire doesn’t lose its shape. Put them back in and do the other hand. Until the hands are wrapped in silk or cotton floss it’s nothing to worry about, Right and left are the same form.
When you are ready to wrap the fingers and thumb, use the needle nose pliers to pinch the tips of the fingers and also the insides between the fingers, but not the space of thumb in the larger hands, that will form the webbing important to showing the difference between thumb and pinky.
Herein I show you what I found from the past that will lead me forward to finishing this piece of embroidery. The Raised Figures in Extant Pieces from the 14th, 15th and 16th centuries. My success or failures for this project come only from my lack of expertise in executing the techniques required to create a raised figural embroidery, not in the lack of existing pieces. Those pieces have existed, hidden away from sight in safe places until they could be photographed and published on the internet or in books to bring in tourists to far off museums. I myself would love to visit those far off museums, but I will gladly enjoy the pictures posted online in museums or in scholarly papers shared on the internet. Sometimes the places give you the name of the photographer on the museum sites, but some don’t. When it comes to scholarly papers, often the name of the photographer is not listed and you need to contact the author and ask politely for the name of the photographer who took the pictures used in their papers. In my case, the author very nicely gave me the name of the photographer, which made me so happy. I could cite not only the author’s name but the name of the photographer and it really makes your papers shine when that happens.
So, Welcome to Part two of my Article “A Mother and child Raised Figural Embroidery”, where I get to share the lovely pictures of extant embroideries from the 14th, 15th and 16th centuries.
The Cappa Leonis: Legend has it that this cloak was used by Pope Leo III: It is more likely that the cloak was used for the coronation and enthronement of King Charles IV in 1349 (14th century), Sigismund’s in 1414 (15th century) and Charles V in 1520 (16th century). With each successive use, it was given more decoration to bring it up to date with current embroidery and decorative techniques. The reddish-brown velvet is covered with small white blossoms that are embroidered with French Knots in squares which are framed by what looks like woven gold trim, but turns out to be rows and rows of underside couched gold thread. The front part of the hem shows an embroidered border with quatrefoil alternately adorned with three dimensional little birds and heraldic shields. Along the lower hem of the robe, there is a broad, embroidered border with flowers, stars, and the figures of prophets, together with a band carrying 100 hammerless silver bells that produce sounds by knocking each other. I placed this piece first because it straddles several centuries with it’s seemingly continuous use.
Recycling was “In” before Climate change was a manmade disaster.
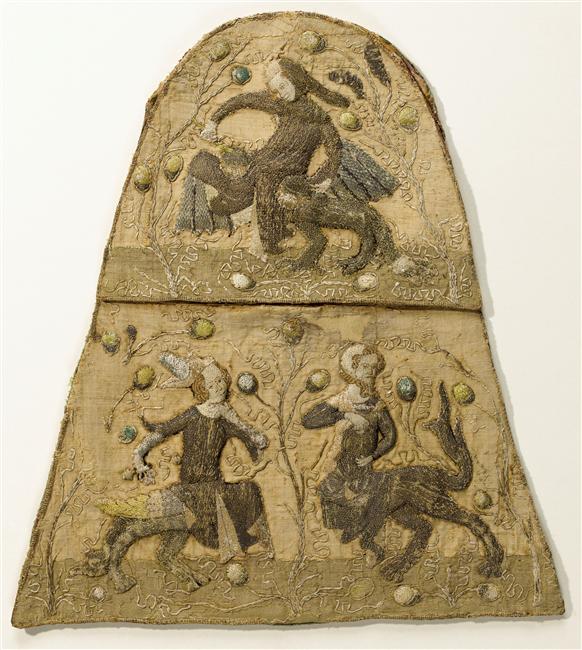
A beautiful extant item from the 14th century is this Aumoniere which I call the Lady on the Griffin. On the flap of the alms purse, sits an angel raining feathers down upon the Lady on the Griffin. Under the Griffon is a tiny bunny which gives a good idea of how large griffins were supposed to be. The Figures are raised with padding and slips were embroidered and appliqued upon the silk of the bag, then further embellished with embroidery. Although worn from the age we can see the glorious beginnings of Raised Figure Embroidery in this bag, which is housed in the Cluny Museum of the Middle Ages. (Berizzi, 14th century)
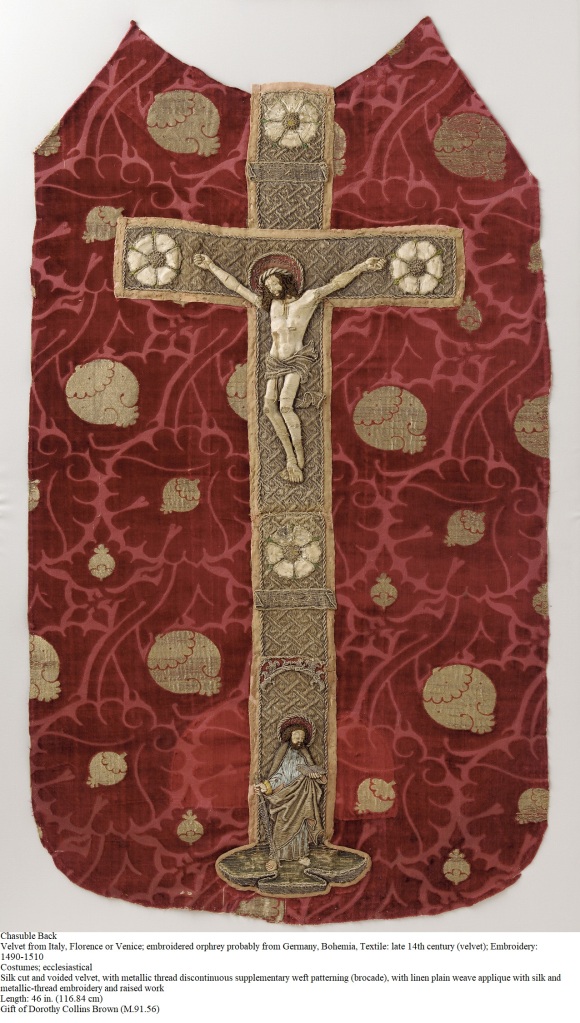
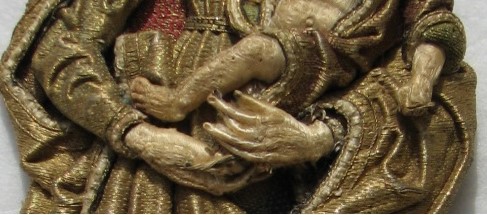
This Ornate Orphrey is housed in the LACMA, it is on the back of a Chasuble, which is an ecclesiastical vestment worn during the offices of the Catholic Church. This particular Orphrey has the figure of Christ on the cross with an attendant at its base. It was recycled from one chasuble and put onto its current textile sometime in the late 14th century. You can see this evidence in the lighter velvet near the base. The velvet textile is thought to be Venetian, but the Orphrey is considered to be Bohemian. (LACMA) The goldwork is couched down over a latticework of yarn. It is directional in that it all goes the same direction, up and down rather than a hodgepodge of side to side. Christ himself is a raised figure made separately then attached to the background and is amazingly lifelike. Unlike his attendant whose only raised pieces are his head, hands, feet. Christ’s loincloth is a very detailed bit of silk and gold embroidered and wrapped around the figure before it was attached. His hair is astonishing in detail.
The order of the Dragon was an order of chivalry founded in the late 15th century by King Sigismund of Hungary to uphold Christianity against the Turks. On gaining admission, new members were given badges of the order which they could bestow on any person they thought worthy of membership. The most famous member of the order was Prince Vlad Dracul. Sigismund founded his personal order of knights, the Order of the Dragon, after the victory at Dobor. The main goal of the order was fighting the Ottoman Empire. Members of the order were mostly his political allies and supporters. The main members of the order were Sigismund’s close allies Nicholas II Garay, Hermann II of Celje, Stibor of Stiboricz, and Pippo Spano. The most important European monarchs became members of the order. He encouraged international trade by abolishing internal duties, regulating tariffs on foreign goods and standardizing weights and measures throughout the country. This particular badge is done in the Oir Nue or Italian shading technique. Colored threads couched down the gold threads that make up the different parts of the dragon.
Yep, it is a figure of a Dragon, but a figural embroidery it is.
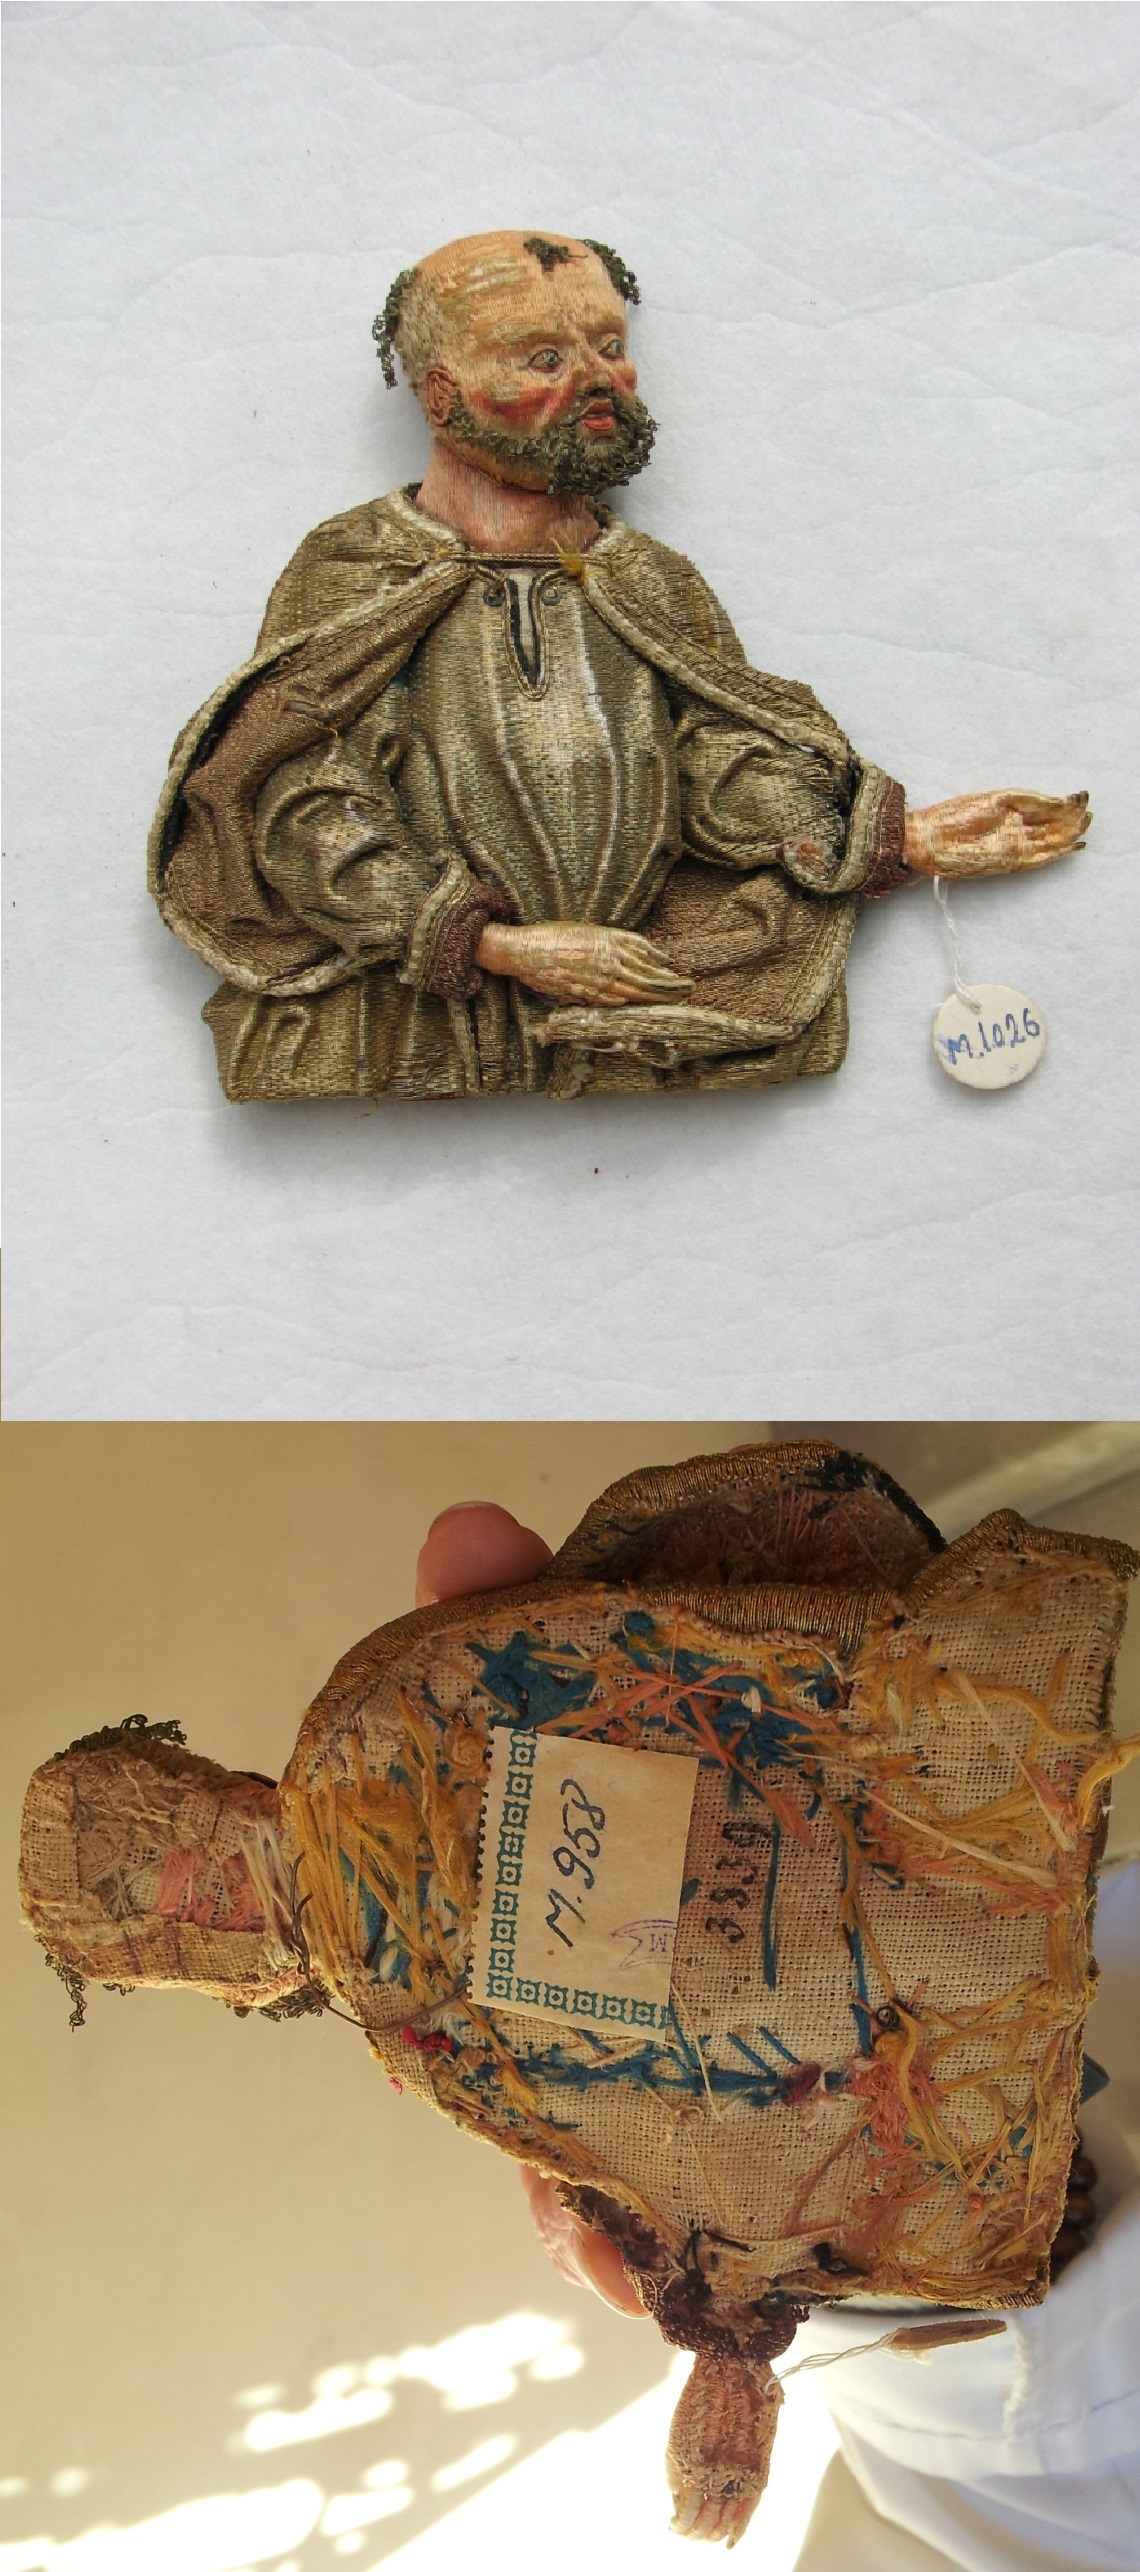
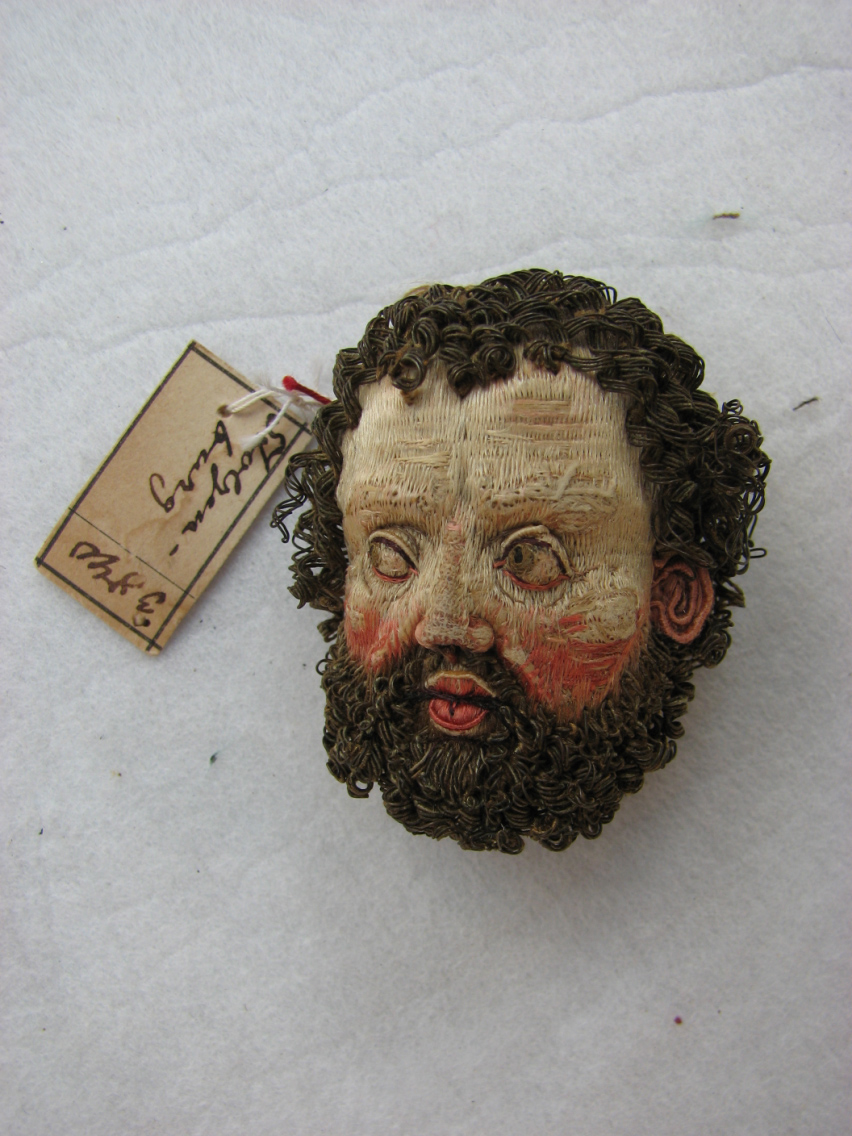
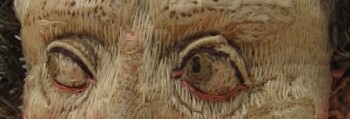
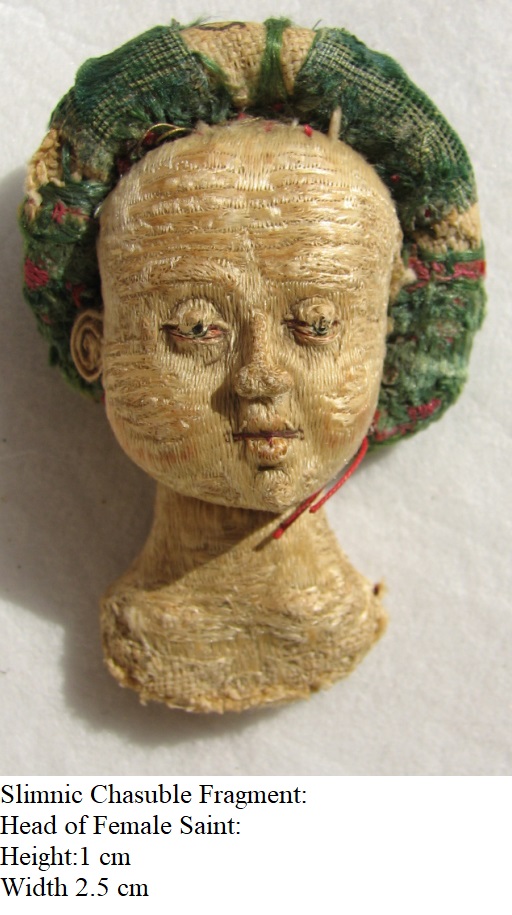
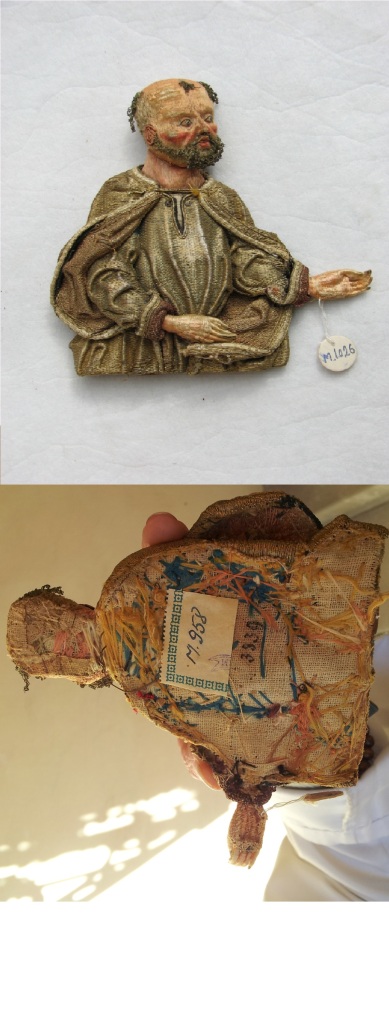
There are Nine fragments from an early 15th century Chasuble are housed in the Brukenthal National Museum. The entry of these artifacts in the old record inventory of the museum was completed by Michael von Kimacovicz in 1913 who mentioned the date “1409”.
The preserved Figurative fragments reflect appropriate features of four saints, together with some of their attribues, whose shape and size have helped the museum to restore the Iconographic composition of the Dorsal Cross. (Damboiu, 2013)
The features of the fragments are of such detail that is rarely done in the modern age. I chose to stick with just one of the figures closest to what I needed for this project, although the rest of the figural fragments are definitely on the list for further study.
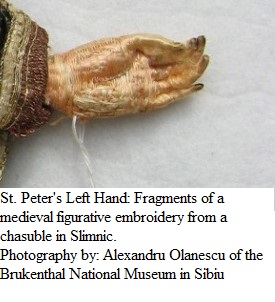
Figure A. The Standing Virgin and Child.
The Virgin is standing with the infant Jesus in her arms, she wears a Burgundian style gown of made of a textile decorated in full in the Or Noue technique also known as Italian Shading. Each part of the garment is draped and couched into place over a padded form of fine wool and textile yarns. Her hands are wire forms wrapped and carefully stitched together with silk as are the legs and arms of the infant Jesus. One arm/hand of the infant Jesus is missing. Her hair is silver wire wrapped in silk, now tarnished. Her lips are outlined in silver and couched down and in the same manner are her ears attached. Her eyes are painted beads or round gold balls painted to look like eyes, held in place by her eyelids with are wire framed with silver wire and embroidered onto the face. I noticed this when looking at the photos with Paint 3d. Their heads are made separately and sewn down to the padded necks and body form with silk thread. The back of the fragment is just as interesting as the front, more so as it shows at least partially how the garments were attached to the figure.
heads up closerear view of standing virgin and childUp close of handsup close of faceStanding Virgin and Child Fragments of a Chasuble in Slimnic: Photographer Alexandru Olanescu of the Brukenthal National Museum in Sibiu.Saints of the Slimnic Chasuble
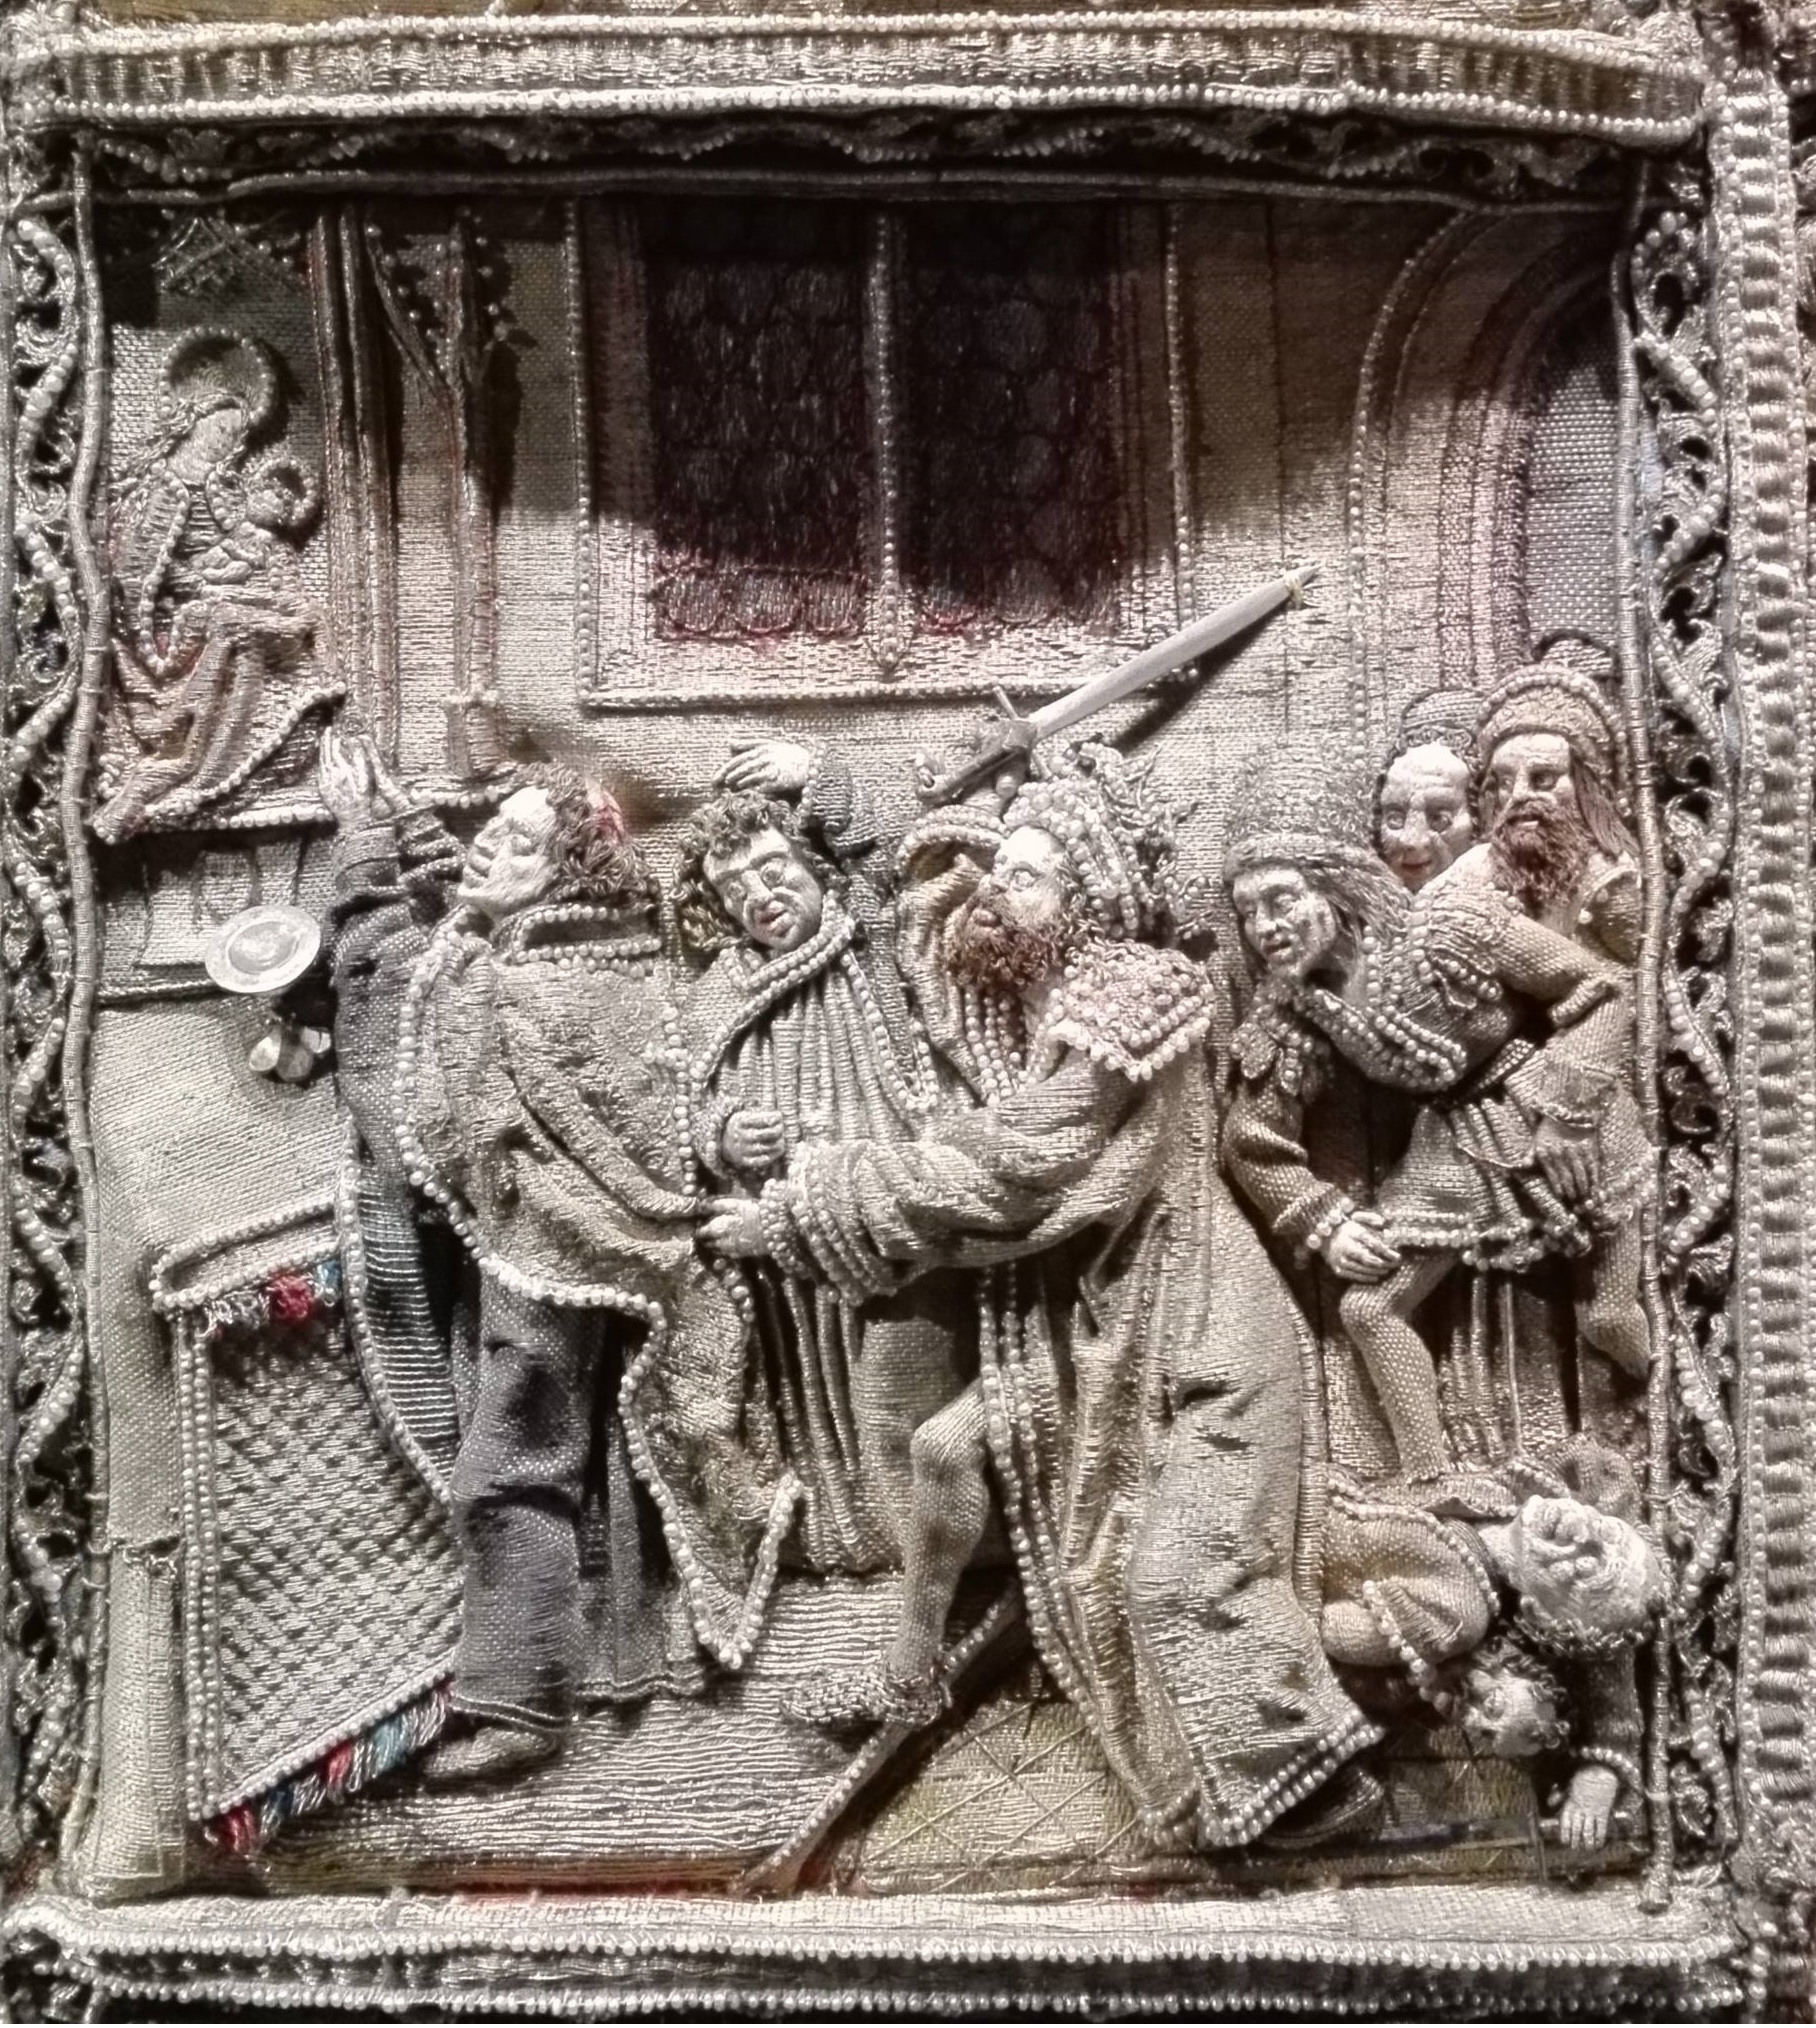
Chasuble of the Crucifixion Story
This precious liturgical vestment consists of two medieval parts, which were joined in Baroque times and bears many symbols.
A chasuble is the outer vestment worn by the priest for Mass. This piece in the Vienna Dom Museum consists of two different textile elements: an embroidered cross on a base of red satin. The cross seems originally to have been part of another chasuble and was probably mounted on this one only in the Baroque era. The cross is worked in intricate raised embroidery in gold and silver. It shows the crucified Jesus; above him there is God the Father and below there are Saint Mary and John the Evangelist with the Apostles Peter and Paul to the left and right and, on the bottom edge of the cross, Saint Martin cutting his cloak in half.
Why is this chasuble right after the Fragments from Sibiu? This chasuble was made in the same century, but from a different workshop, allowing us to see the different techniques used to create the figures of the Orphrey. Many of the techniques are indeed the same, but there are subtle differences.
For the men they have magnificent hair and beards of silk wrapped wire. For Mary, her hair is covered with a veil, which was the way that devout women showed their devotion. Covered their hair, wore robes down to the floor and let the men control them even up to the way they lived and died.
Lets start with the faces of the figures. In this piece, all of the faces are slips embroidered then applied to pads of wool and sculpted to shape, before being added to the Orphrey
The saints have pretty bow lips sculpted and lined in red silk while Mary has barely any sculpting and is embroidered in a plain outline. When we look at the work done on the male saints we notice Mary’s depiction seems to be the ecstatic rolled back eyes, which were supposed to be the “It” expression of devotion, but only the women seem to be shown this way. In every single chasuble that was created for the church the men have commanding or compassionate expressions, but the women are practically dying from their devotions or so demure to be incapacitated.
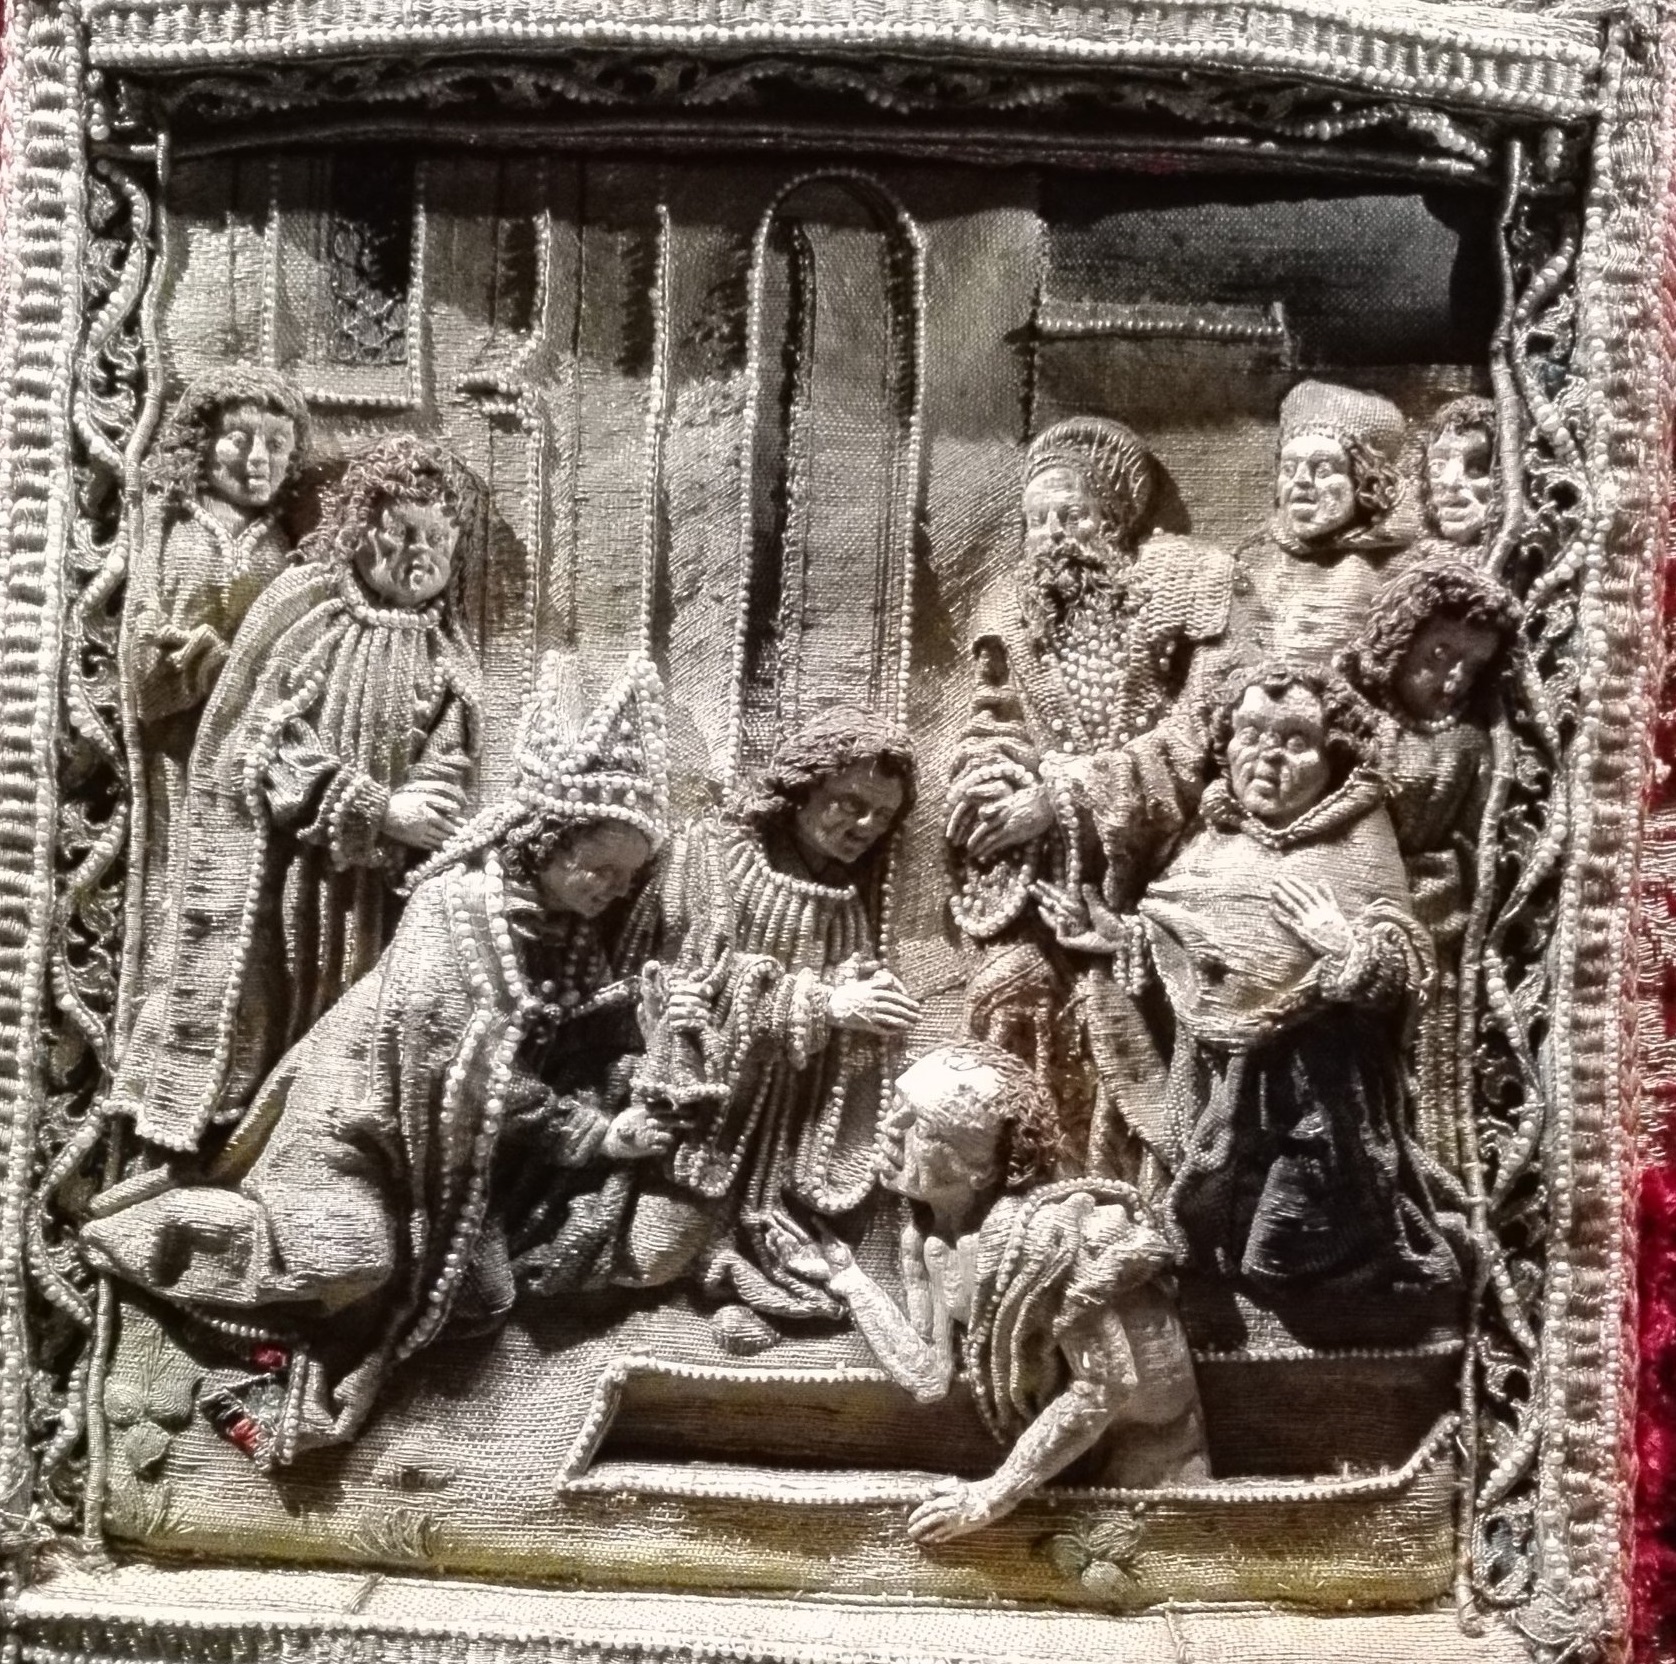
VIRGIN AND CHILD Austria, about 1470 Pilgrimage Church of Mariazell, Styria Treasury Height: 129 cm. Height of the detail: 43 cm.
Cross Orphrey with the Virgin, Saints Barbara and Dorothy, and, at the sides, Saints Catherine and Ursula. Relief embroidery with gold brocade, pearls, gold thread, and silk. The Child, and the faces and hands, in silk, in satin and stem stitch. Background of couched gold threads.
Source:
Black and White Photo: Schuette, Marie, and Sigrid Muller-Christensen: Pictorial History of Embroidery; NY: Frederick Praeger, 1964.
Color Photo: Basilika Mariazell, South Treasury.
OLYMPUS DIGITAL CAMERAI wrote a letter request for color photos of the chasuble, the curators of Mariazell Basilica sent me the gorgeous color photo to display next to the black and white.
The padded and embroidered figure of Christ constructed of velvet with silk wrapped wire fingers and toes, wearing goldworked loincloth applied to a goldworked cross in the form of raw logs. The layered figure of Mary at the foot of the cross has silk wrapped wire fingers on her hand and raised embroidered face. Her garments are layered embroidered textiles.
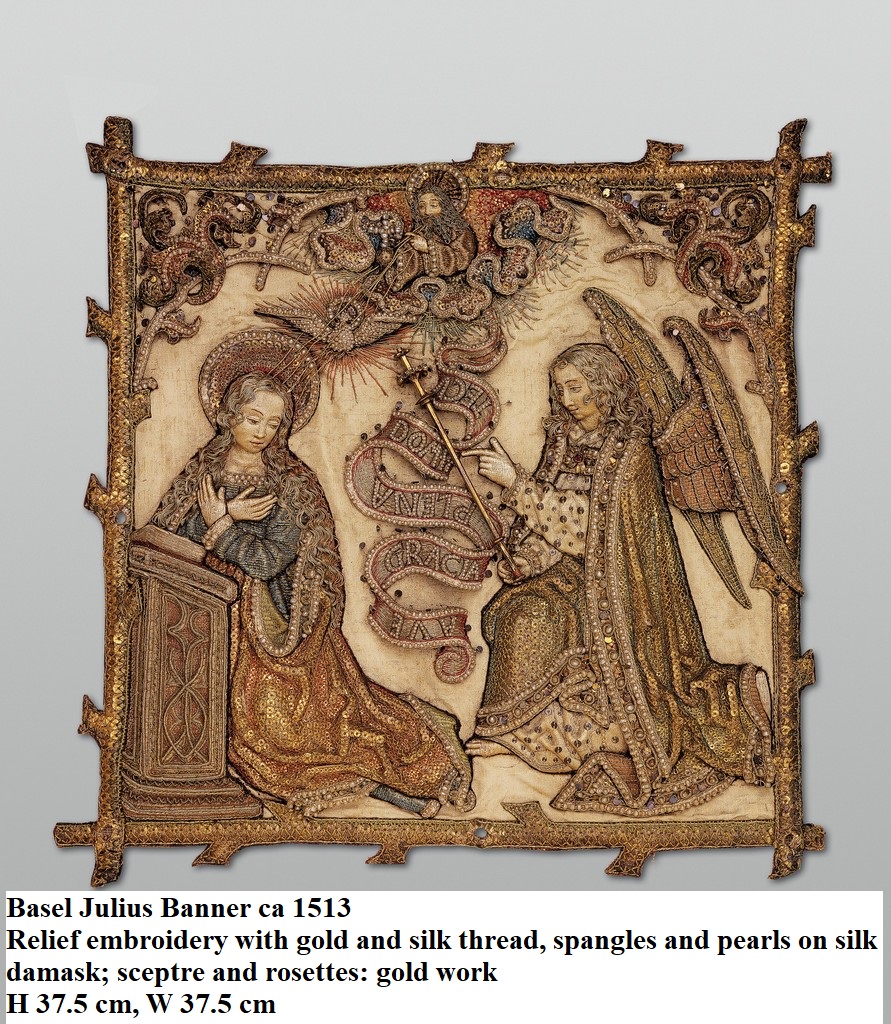
Pope Julius II Banner Quarter of Basil. The victorious battles of the Swiss Confederates against Duke Charles the Bold of Burgundy in 1476/77 justified the reputation of the Swiss in wartime. From then on, the Swiss were courted by the European princes. In 1512, the Confederates, with 18,000 men, arrived to help Pope Julius II drive the French out of northern Italy. In gratitude for the overwhelming victory at Pavia, they were bestowed by Pope Julius II, among other things, the flag trimmings, also called corner quarters (top right at the flagpole), to show Papal Favor. The recipients were allowed to choose a theme from the New Testament or from a sacred life. Basel opted for the Annunciation scene. This is a Reproduction. The Julius banners were made in Milan. Hans Heinrich Gebhart brought the banner in 1512 over the Alps. For the arrival one organized a city festival: 900 boys with harnesses and wooden (hobby?) horses and 500 citizens drew Gebhart and the banner into the city.
For an idea of how big the quarter banners were. Here’s One of the Julius Banners depicted with his banner man.
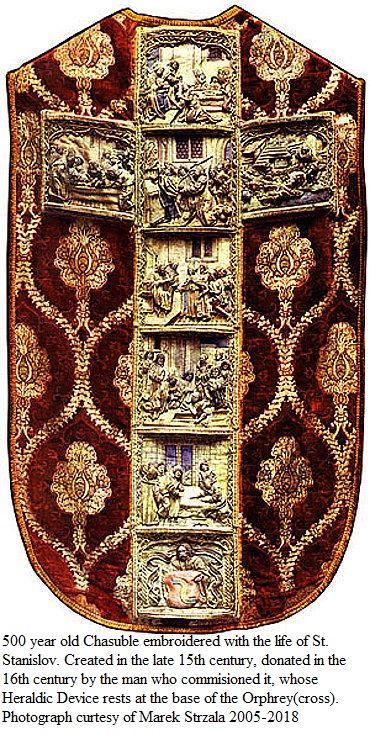
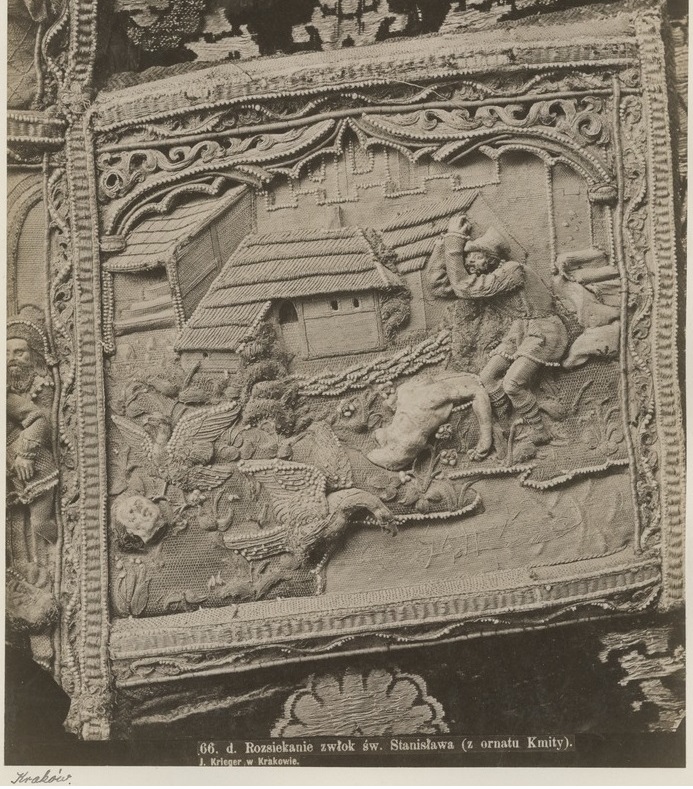
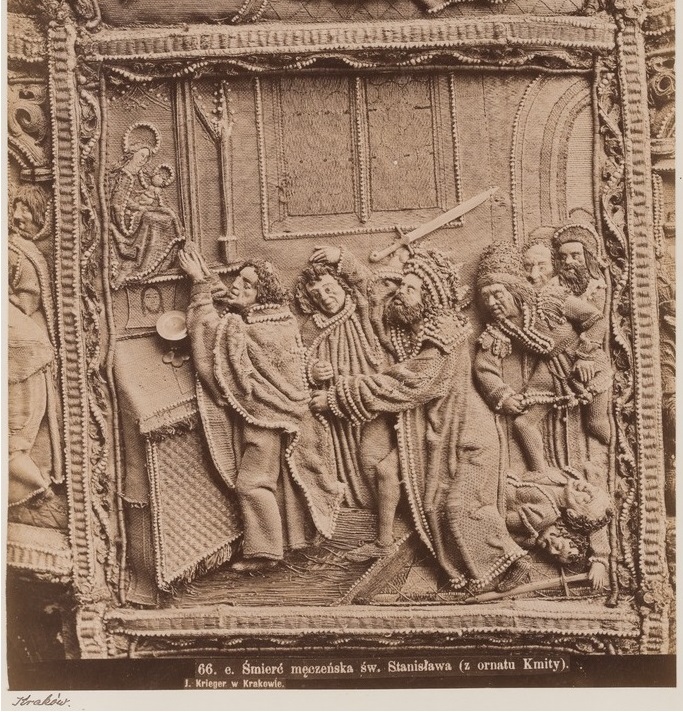
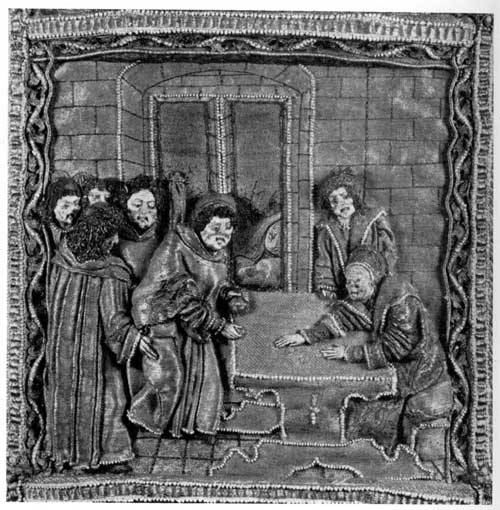
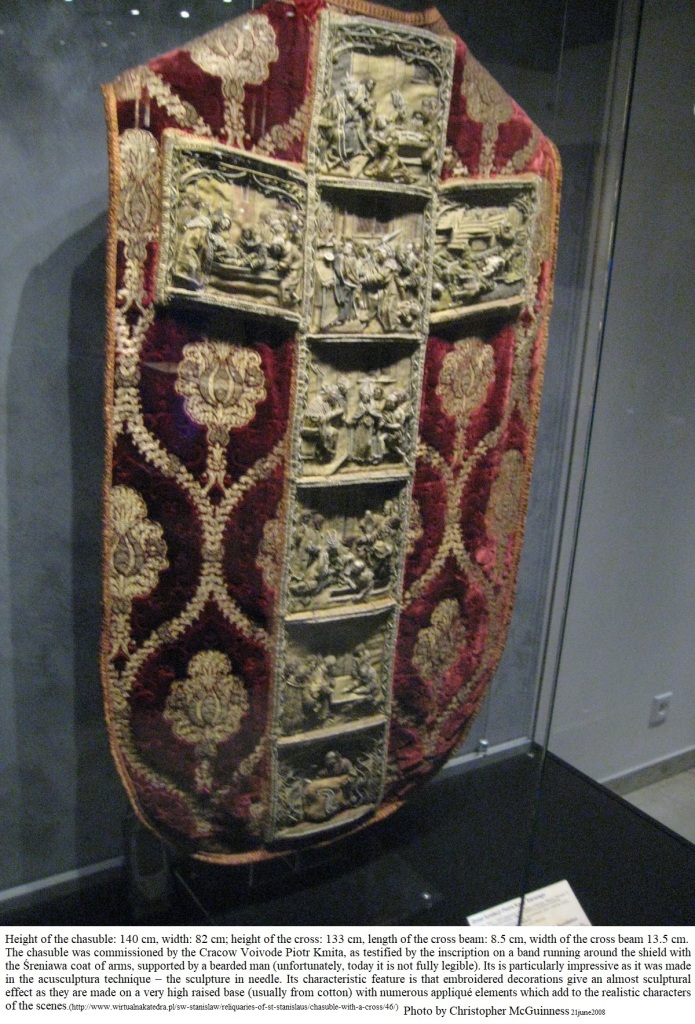
This ornately embroidered Orphrey pictures the life and death of St. Stanislaus. Created in the late fifteenth century and donated to the church in the early sixteenth century by the man who ordered its creation. Wavel Cathedral’s 500-year-old chasuble ranks with the world’s top masterpieces of Gothic needlework. Its relief-like three-dimensional scenes from the life of St. Stanislav, Krakow’s 11th-century bishop-martyr and Poland’s patron saint, embroidered with unbelievable precision and realism, match the best sculpture of the late 15th c. Naturalistic features of tiny heads and detailed faithfulness of depiction (complete with an open wound on the saint’s skull where sword struck) are truly stunning. It is a masterly, dramatic composition that arrests attention. Now the amazing chasuble, known as “ornat Kmity” (“Kmita’s chasuble”) is the pride of the Cathedral Museum on the Wavel Hill, displayed permanently alongside its other treasures of church art. (McGuinness, 2008) The height of the chasuble: 140 cm, width: 82 cm; the height of the cross: 133 cm, length of the cross beam: 8.5 cm, width of the cross beam 13.5 cm. The chasuble was commissioned by the Cracow Voivode Piotr Kmita, as testified by the inscription on a band running around the shield with the Śreniawa coat of arms, supported by a bearded man (unfortunately, today it is not fully legible). Its characteristic feature is that embroidered decorations give an almost sculptural effect as they are made on a very high raised base (usually from cotton) with numerous appliqué elements which add to the realistic characters of the scenes. (The Virtual Wawel Royal Cathedral)
Picture No. 1 The Patron at the Bottom!Picture No. 2 Astonishing!
Chasuble Back LACMA
Embroidery: 1490-1510 embroidered orphrey probably from Germany, Bohemia,
Textile: late 14th century (velvet) Velvet from Italy, Florence or Venice;
Costumes; ecclesiastical
Silk cut and voided velvet, with metallic thread discontinuous supplementary weft patterning (brocade), with linen plain weave applique with silk and metallic-thread embroidery and raised work
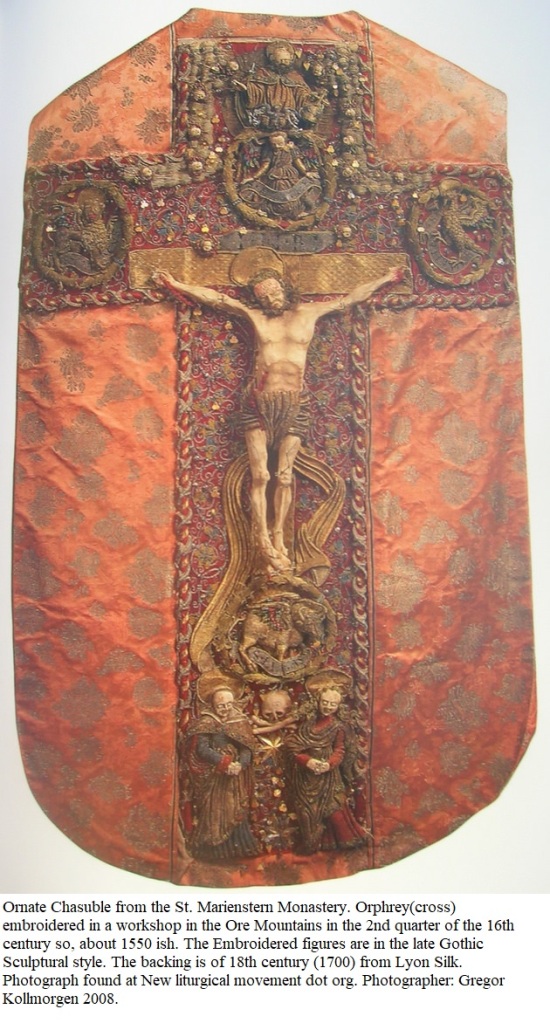
This very Ornate Chasuble comes from the St. Marienstern Monastery. The Orphrey (cross) was embroidered in a workshop in the Ore Mountains in the 2nd quarter of the 16th century so, about 1550 ish. The Embroidered figures are in the late Gothic Sculptural style. The backing is of the 18th century (1700) from Lyon Silk. (Kollmorgen, 2008)
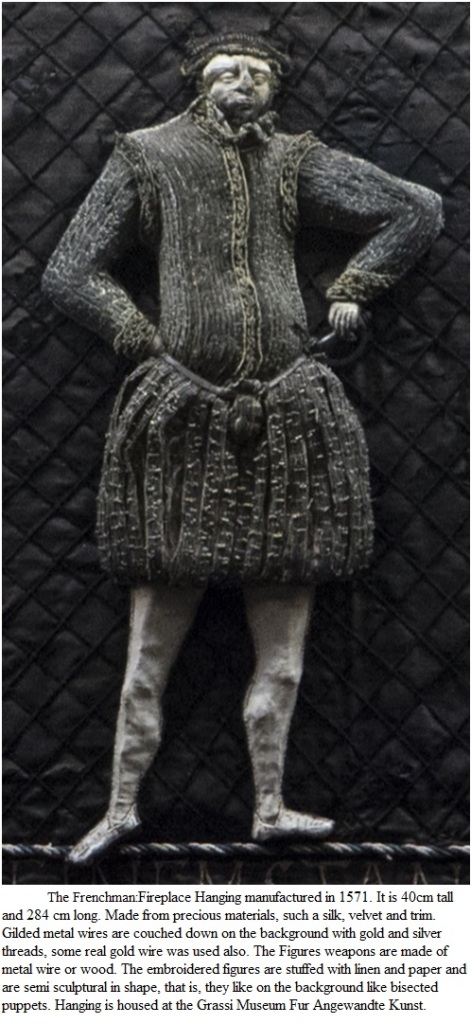
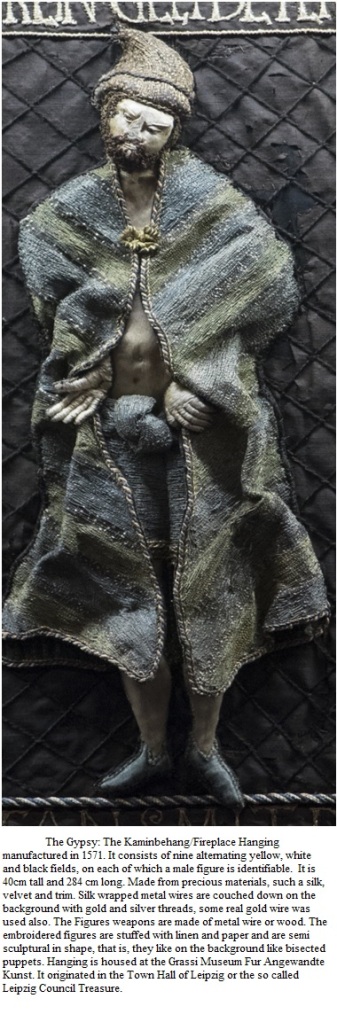
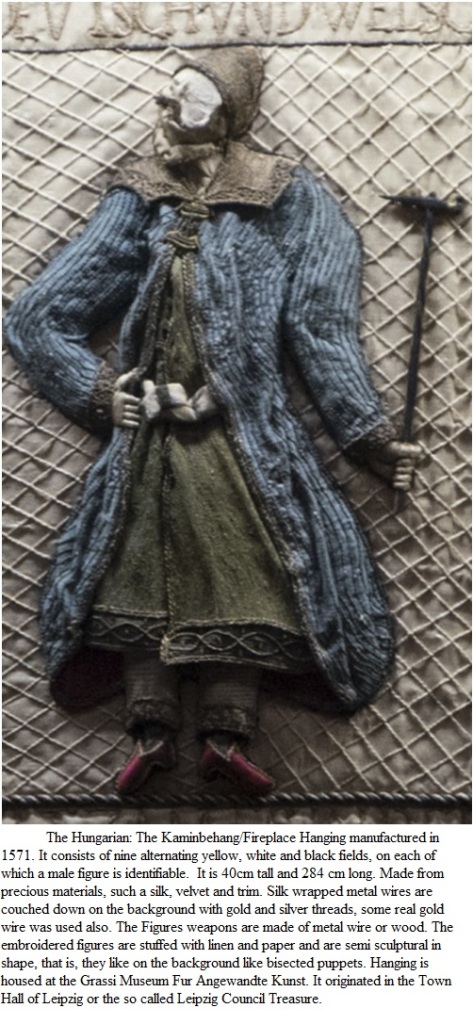
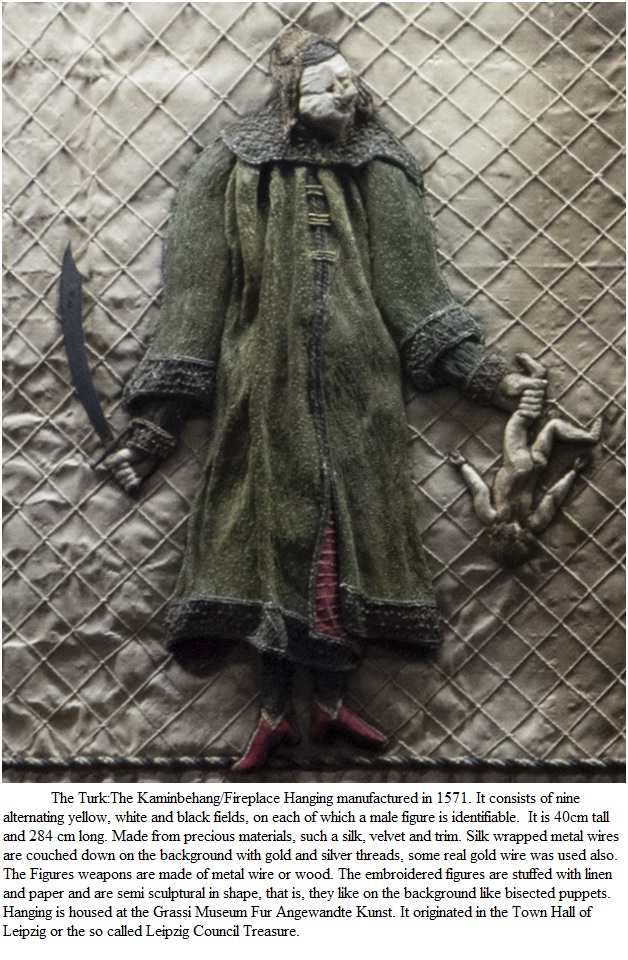
The Kaminbehang/Fireplace Hanging manufactured in 1571 consists of nine alternating yellow, white and black fields, on each of which a male figure is identifiable. It is 40cm tall and 284 cm long. Made from precious materials, such as silk, velvet, and trim. Silk wrapped metal wires are couched down on the background with gold and silver threads; some real gold wire was used also. The Figures weapons are made of metal wire or wood. The embroidered figures are supposedly stuffed with linen and paper and are semi sculptural in shape, that is, they are applied on the background like bisected puppets. Hanging is housed at the Grassi Museum Fur Angewandte Kunst. It originated in the Town Hall of Leipzig and is the so-called Leipzig Council Treasure. The nine figures of this embroidery each represent a then-known nation in the then typical clothing. Only the German on the right edge wears nothing but a bundle of colorful fabrics over his arm because he cannot decide on a fashion style. In embroidered inscriptions, these figures are mockingly and xenophobically explained. In the 16th century, excessive luxury and the adoption of foreign customs were denounced with figures such as this series. (Arts, 1571)
Nine men from around the world in 1571.Magnified pictures of 5 if the 7 figures from the German Fireplace hanging of 1571
Now, these are some absolutely gorgeous bits of Proof that Raise Figural Embroideries existed before the 17th century. All of them made on the continent by embroiderers employed in professional workshops. All of them masterworks lovingly cared for and stored away to keep them from being destroyed. We now have pictures, such detailed photographs to let us see those wonders wrought with the needle. Awed is not a strong enough word to describe how I feel when I look at them closely. Excited comes close. Excited to see how I fare in reproducing the techniques of face, padded body form and hands.
Arts, G. M. (1571). Retrieved from Grassi Museum of Applied Arts: GRASSI Museum für Angewandte Kunst. (2017-12-12). Kaminbehang, sogenannter Umlaufhttps://nat.museum-digital.de/index.php?t=objekt&oges=201040&done=yes
Cloisters, D. o. (2000-2001). The Cult of the Virgin Mary in the Middle Ages, In Heilbrunn Timeline of Art History. Retrieved from The Metropolitan Museum of Art: http://www.metmuseum.org/toa/hd/virg/hd_virg.htm
Dictionary, R. H. (2019). Dictionary (dot) Com. Retrieved from Dictionary.com
Hirst, B. a. (1993). Raised Bmbroidery a Practical guide to decorative stumpwork. In B. a. Hirst, Raised Embroidery a Practical guide to decorative stumpwork (pp. 9-10).
When we look at the Virgin and Child we are looking at the Mother Goddess and Son archetype as it developed over several thousands of years. I love the imagery of a mother and her child. Iconic in symbolism all around the globe, every country in antiquity had legends and images of a mother goddess with a child. Mother and child worship was the basis of ancient religions. In the various religions of the world, the same system of worship was perpetuated under different names. In Egypt , the mother and child were worshiped as Isis and Osiris or Horus, in India as Isi and Iswara, in China and Japan as the mother goddess Shing-moo with child, in Greece as Ceres or Irene and Plutus, in Rome as Fortuna and Jupiter-puer, or Venus and Aeneas, and in Scandinavia as Frigga and Balder. The mother and child were worshiped in Babylon as Ishtar and Tammuz, and in Phoenicia, as Ashtoreth and Baal. (Professor Walter J. Veith, 2009)
Thousands of years later she is still here, In the Newest Incarnation. Most images of the Virgin stress her role as Christ’s Mother, showing her standing and holding her son. The manner in which the Virgin holds Christ is very particular. Certain poses developed into “types” that became names of sanctuaries or poetic epithets. Hence, an icon of the Virgin was meant to represent her image and, at the same time, the replica of a famous icon original. For example, the Virgin Hodegetria is a popular representation of the Virgin in which she holds Christ on her left arm and gestures toward him with her right hand, showing that he is the way to salvation. The name Hodegetria comes from the Hodegon Monastery in Constantinople, in which the icon showing the Virgin in this particular stance resided from at least the twelfth century onward, acting to protect the city. A later type is that of the Virgin Eleousa, imagined having been derived from the Virgin Hodegetria. This type represents the compassionate side of the Virgin. She is shown bending to touch her cheek to the cheek of her child, who reciprocates this affection by placing his arm around her neck. (Cloisters, 2000-2001)
For the longest time, there were no examples to show that raised padded embroideries were made before the late 17th and 18th centuries, any examples were hidden away with such care that until found in a church’s treasury or the back closets of musty castles it was assumed that if they were not found, they never existed. Now, there are plenty of items to choose from, mainly because institutions are photographing and digitizing entire collections to their museum websites, more travelers are sharing their photographs to their blogs, and we have magnificent search engines to help us find what we are looking for. France has museums full of purses decorated with raised embroidery, Germany has Badges and wall hangings, Poland has Chasubles by the score with gorgeous raised figure embroideries, yet Until the advent of modern digital tourism, many of these pieces would never have been shared online. There are blogs by the score where people post pictures of their travels and give accounts of those pieces from the museums. I Love the internet.
Why oh Why do they call it Stumpwork?
Every embroidery book that I have in my library lists raised embroidery under one word. That word is “Stumpwork”.
The term “Stumpwork” may have its start in Victoria’s era, but it was first recorded in her son Edwards. (Dictionary, 2019) In the timeline of history, the English fad we call stumpwork lasted from 1650 to 1700. Fifty years is a rather long time for a fad, modernly most fads last for about half that, but stumpwork has returned with the interest of new generations. The detail that puts 17th-century stumpwork apart from earlier raised padded embroideries is the stitches used. Needle laces were used heavily in 17th-century stumpwork over the raised elements of figures, animals, and plants. Needle laces did not seem to be used in England in this manner before that time period. Those stitches were however, used on the Continent earlier in Germany, Austria, Italy and Poland, but not very often to cover raised figures. Needle laces were used to trim and adorn garments both ecclesiastical and eclectic. See Part Two: 1414 Coronation Robe.
For about two centuries before the emergence of domestic stumpwork in England, professional figurative work was being produced in Europe. Many examples of this earlier embroidery, which featured fine softly-sculpted detailing, with applied and padded fabrics and with additional laid threads, can be seen in the collections of churches, and museums from Krakow to Leipzig and Paris. (Hirst, 1993) Raised embroideries were always an integral part of the repertoire utilized in the workshops producing ecclesiastical embroideries of the middle ages, and became more prominent in the 15th and 16th centuries as it traveled north and east in Europe.
Raised figure embroideries were not just the delight of the church, military banners and insignia were also made to stand out from their background and catch the eyes. My favorites of the military banners and insignia are the Golden Dragon of the Order of the Dragon and the Quarter banner of Pope Julius given in victory to the army of Basil. Military banners showed the pride of the country or city they fought for, often embroidered with the victories on the standard.
My two favorite examples of Raised Figural Embroidery
For the most part, embroideries were made to order and took far longer to manufacture then one would expect in our modern age. If it was a large Item such as a Cope, more people had to work on it and be paid for that work. A workshop might employ different teams of men and women to have larger pieces finished faster because as we all know, many hands make short work. Large pieces could include household items; wall hangings, fireplace hangings, bed curtains, etc.
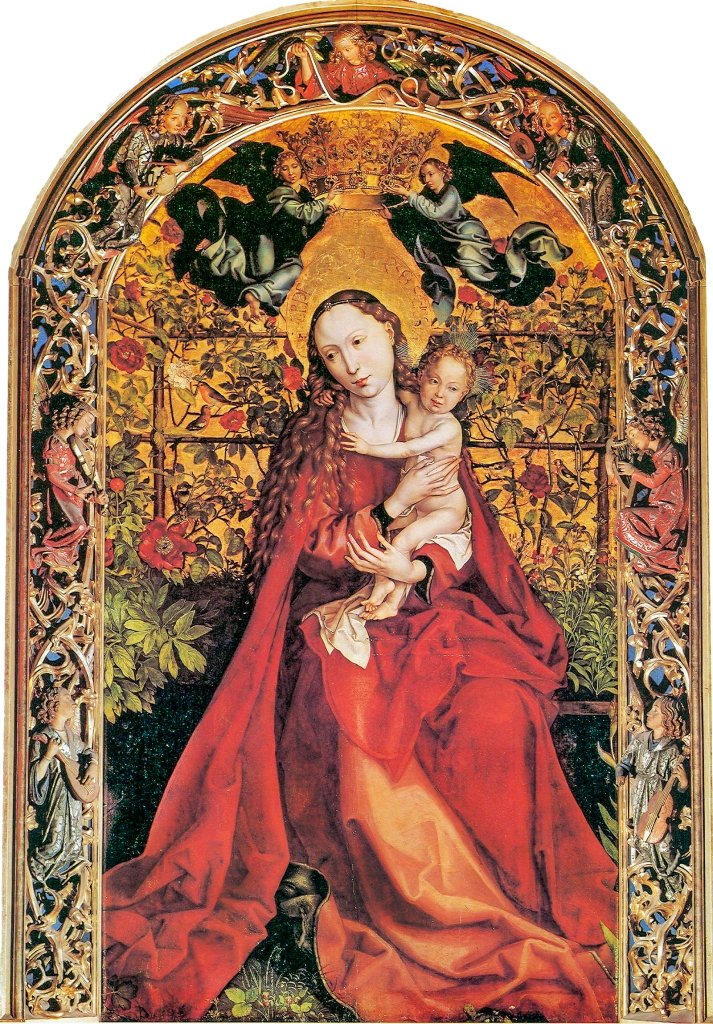
The Cult of Mary, the mother of Jesus was popular in the middle ages, so popular that many artists painted a portrait of her with her infant son in her lap. As I am not a painter, I created this raised figure embroidery in the classic iconography of the Virgin with Child based on three pieces of Marion iconography; the Portrait of the Virgin with Child in Blue by Dieric Bouts the Elder painted around 1455-1460 AD, Madonna of the Rose Bower (or Virgin in the Rose Bower) is a panel painting by the German artist Stefan Lochner, usually dated c 1440-42, and the Madonna of the Rose Arbour by Martin Schonagaur in 1473. In no way am I re-creating any of these paintings, rather I am using them to guide me in making my own iconic piece of art.
All of the embroidery stitching for this project is stitches that were used in the fourteenth, fifteenth and sixteenth centuries; Stem stitch, back stitch, knot stitches, couching stitches, whip stitch, running stitch.
It was the apples that caught my eye. But, Those EARS…
Dieric Bouts has based this small, exquisite image on the ancient Byzantine formula for the affectionate Virgin (glykophilousa)—a type popular in the Netherlands. However, he has dispensed with the gold background and halo of Byzantine practice and has endowed the painting with a human tenderness and simplicity not found in icons. With his subtle and tactile modeling of the flesh, the artist heightened the illusion of living, breathing beings. Focusing on the loving relationship of a mother and her son, his portrayal emphasized human emotions and enhanced the intense inner experience of private devotion. (Metropolitan Museum of Art)
Madonna of the Rose Bower (or Virgin in the Rose Bower) is a panel painting by the German artist Stefan Lochner, usually dated c 1440-42, it is usually seen as one of his finest and most closely detailed works.
The Virgin is presented as “Queen of Heaven”, and is seated under a canopy with red curtains held apart by angels. She sits on a red cut velvet bolster, holding the Christ child in her lap. Her crown and medallion are symbols of her virginity. She wears a minutely detailed brooch, which contains a representation of a seated maiden holding a unicorn (Which the printer cannot seam to capture).
Christ holds an apple while hovering and seated angels offer gifts or play music. Five kneel in the grass before her, with instruments including a portable organ, others bear fruit.
The painting is heavily infused with symbols of innocence and purity, including the red and white roses. Mary sits before a curved stone bench, on a red velvet cushion, around which grow lilies, daisies, and strawberries, with an acanthus flower blooming to her left. Mary herself is presented on a monumental scale (as a larger central figure), underscoring her regal status. (Lochner, 1440-1442)
Martin Schongauer painted around 1473 a ‘Madonna in the Rose Garden’ for the Saint Martin church of Colmar. Martin Schongauer’s picture is a ‘Throning Madonna’ since two angels hold an enormous crown symbolically over Mary’s head. The painting is unconventional in various ways. The hair of the Madonna is flowing freely over her shoulders, which is unusual as it was a sign of sensuality that was rarely associated with Mary. Jesus and Mary are looking in different directions, whereas Mary usually only has eyes for her son. Mary is painted as a melancholic young lady. She holds her head inclined; she smiles affably, secretly and contentedly. But Jesus already tries to escape from her. We mentioned that the colours of Mary’s robe are not conventional. Martin Schongauer must have been one of the first painters to emphasize the strong pyramidal composition, which is obtained by the red cloaks of Mary. Schongauer certainly was a highly skilled colorist and he knew very well how to paint with realism the smallest detail, as seen in the various tones of the folds of the red cloak of Mary (The Art of Painting and a Visual Journey into the Bible)
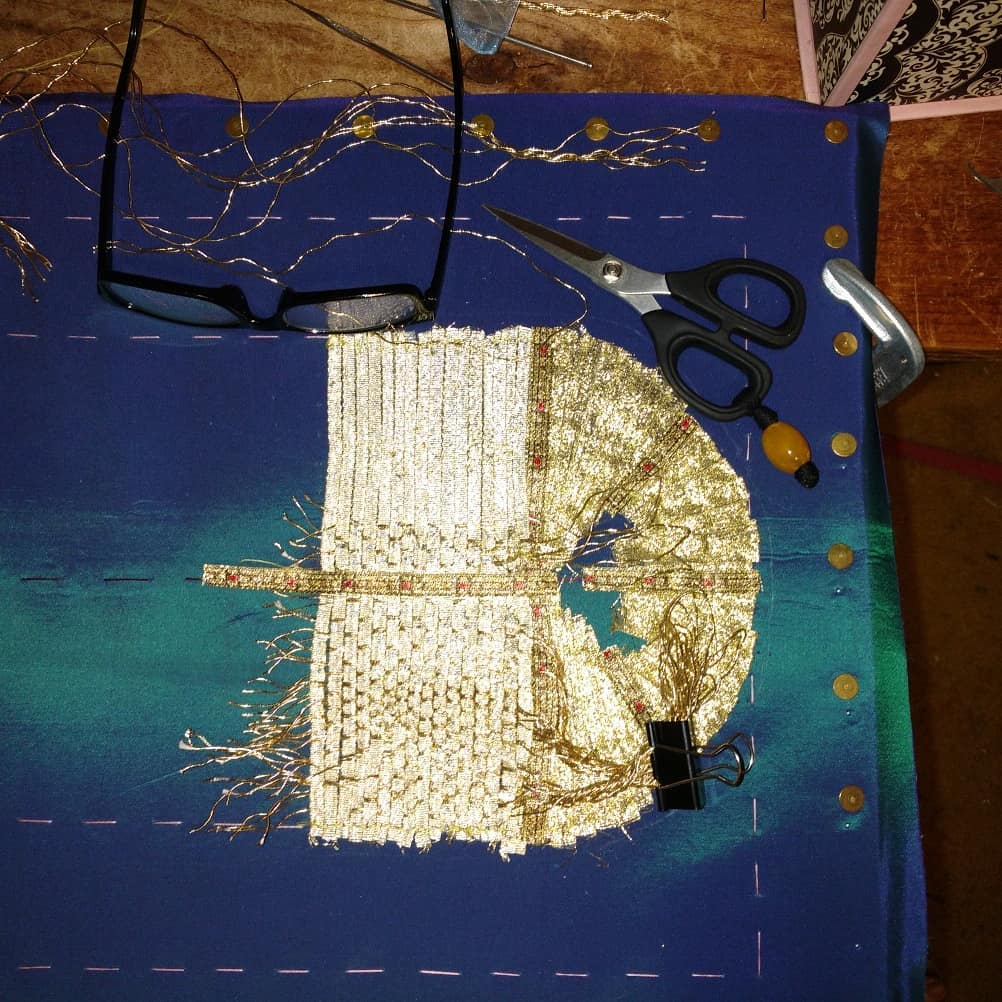
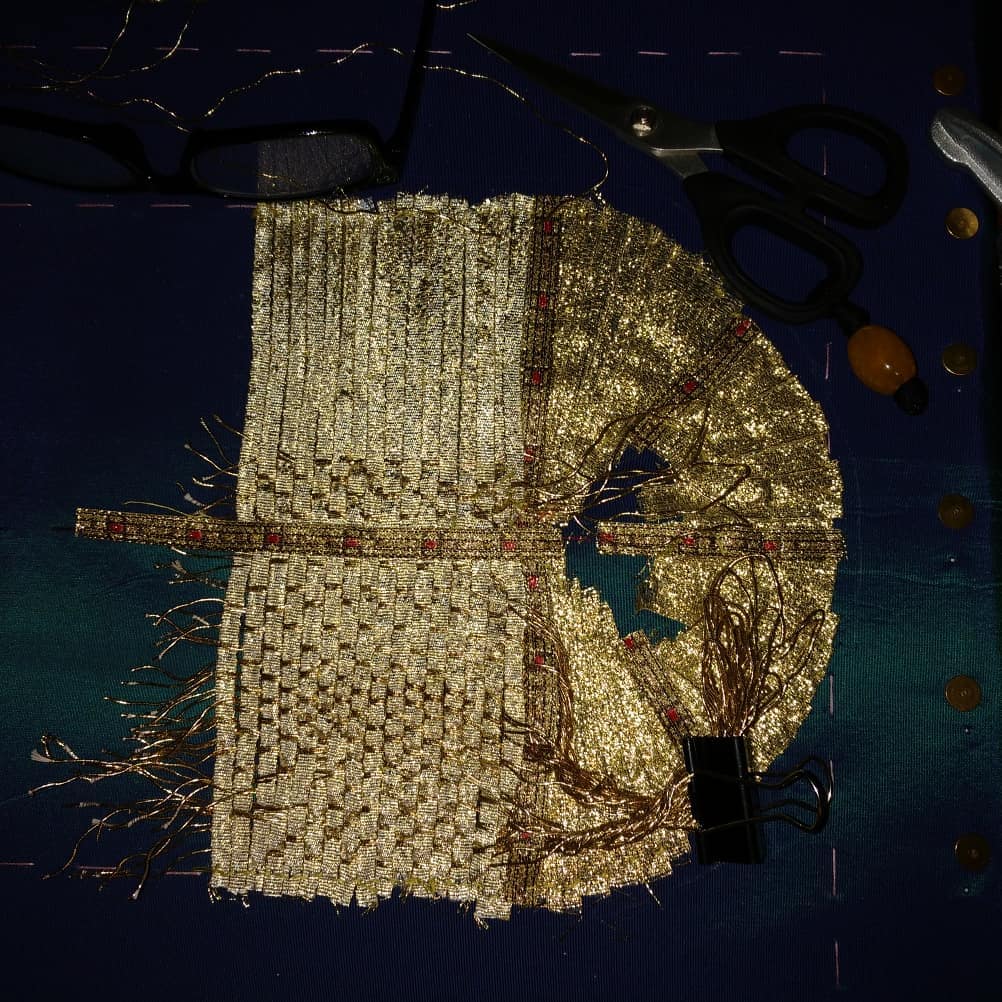
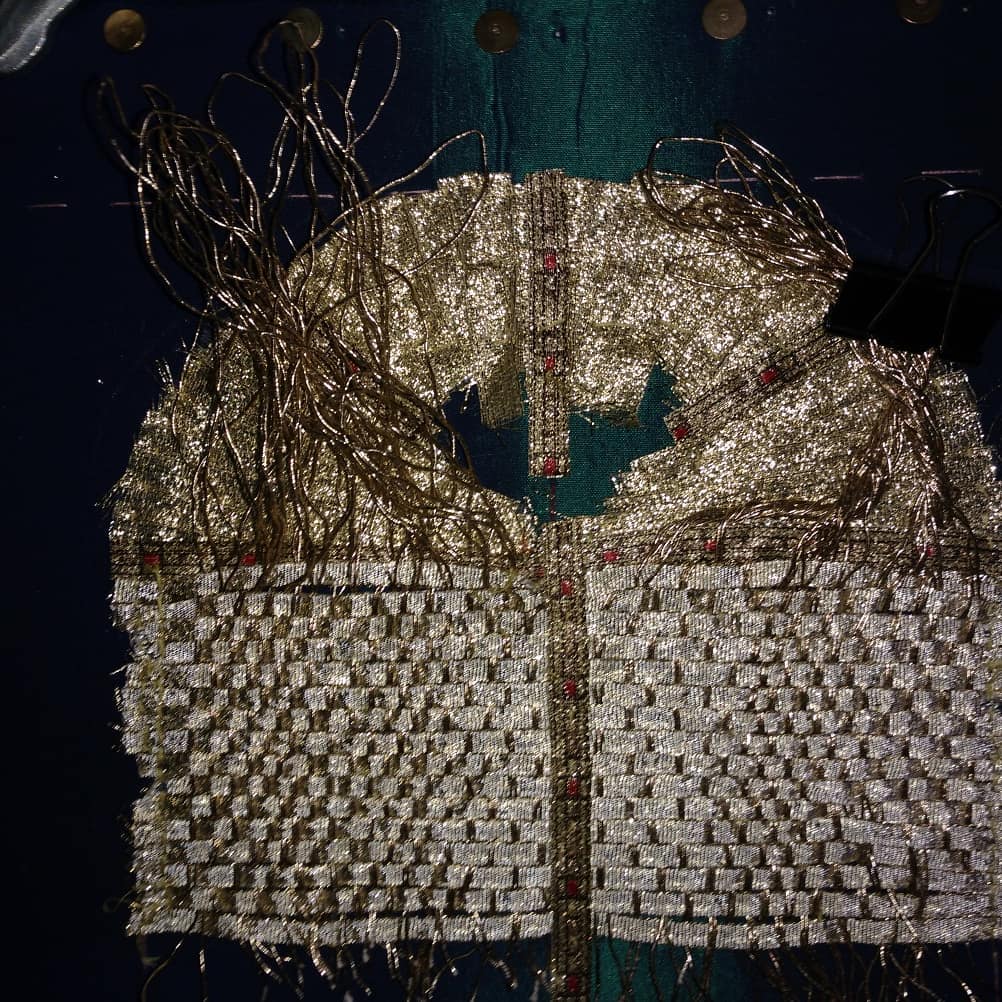
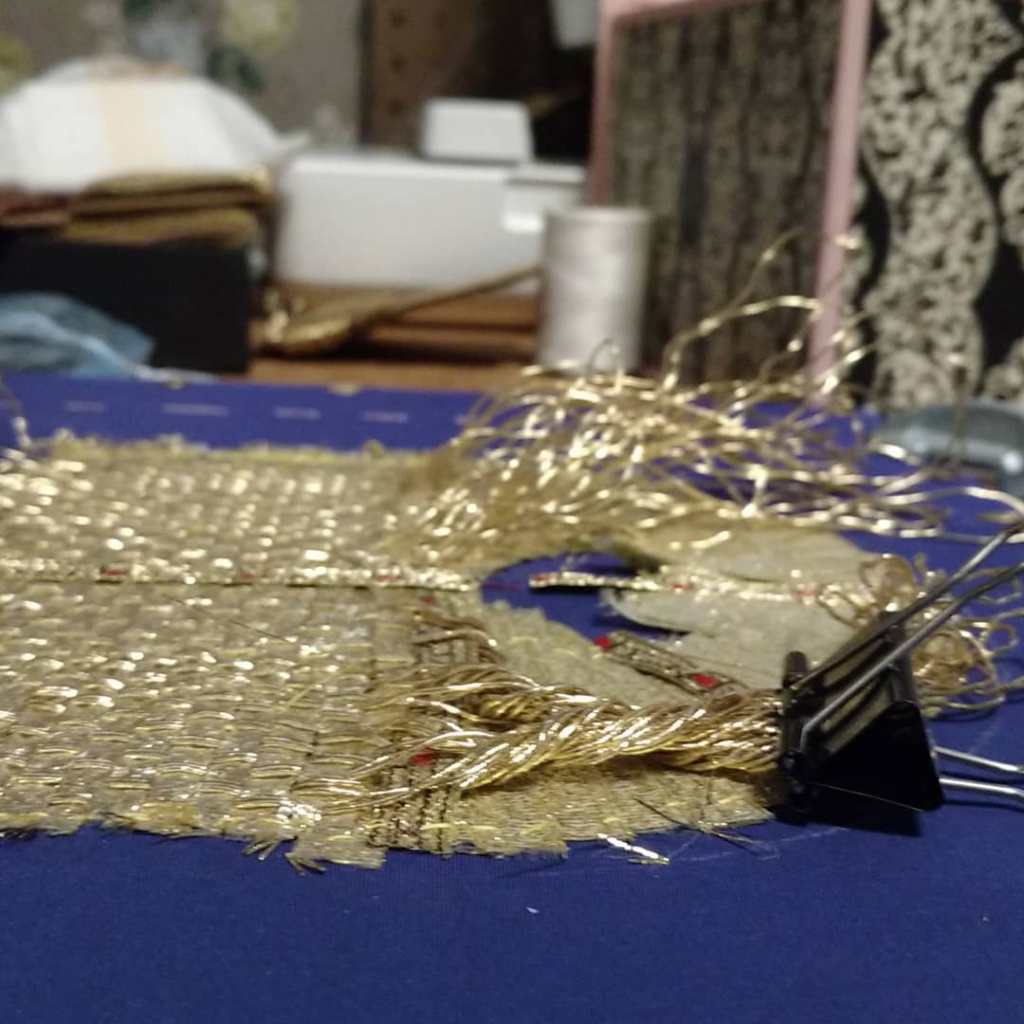
In the Workshops of the middle ages, embroiderers used passing threads that were surface couched to add glints of light or whole swathes of brilliance to their embroideries. The earliest of extant examples of goldwork embroidery is the fragments of the Cuthbert maniple and stole, excavated from his grave. Embroidered in 902-906 AD it’s goldwork of surface couching made of passing threads of pure gold wrapped around a silk core stitched down to the surface with silk thread. (A Brief History of Goldwork)
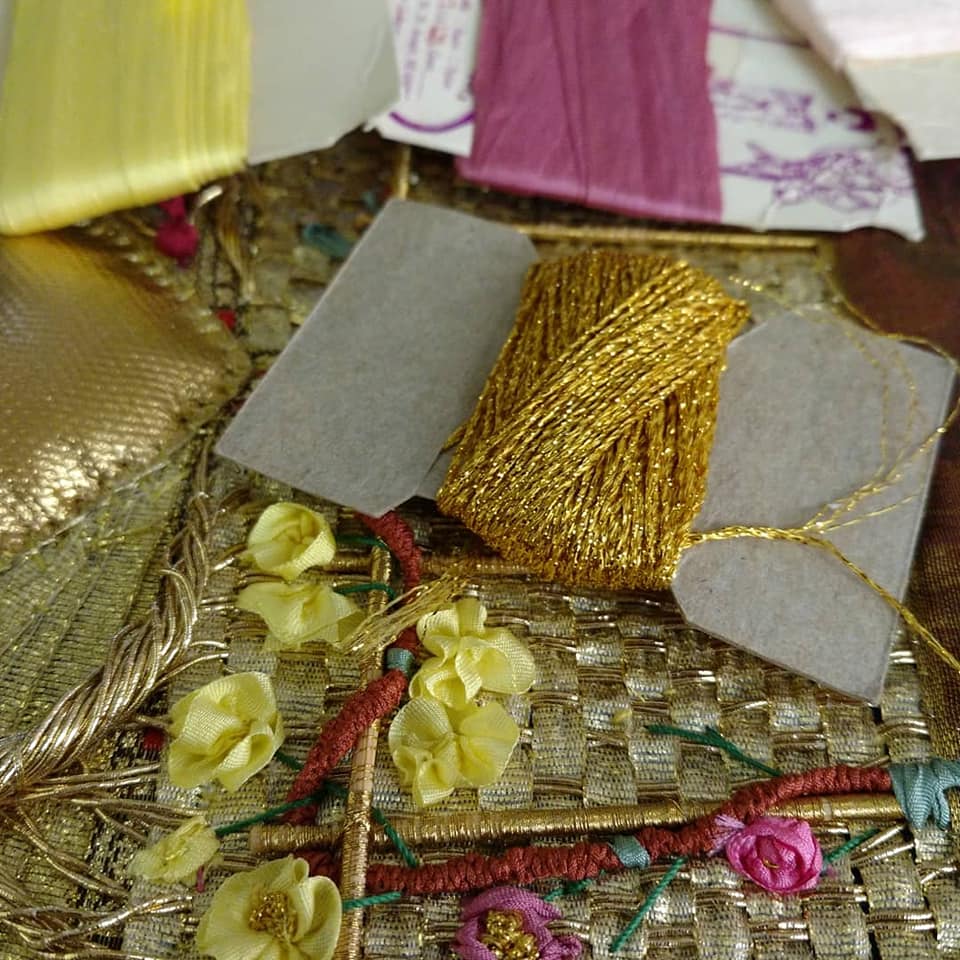
The passing threads are of gilded mylar wrapped around a cotton/polyester core. It is sold at Joanne Fabric and Crafts as single strand or as cable cords. As the “real thing” can be costly and I would need several yards to create this piece, I chose to go with the mylar gilt rather than the 24carat gilt passing thread.
The woven ribbon of gold is Lurex ribbon which is also sold as “Christmas Ribbon” Also less expensive than the real cloth of gold ribbon and comes in a 3 yard spool in the craft section of many stores.
In a historical context, just as with other uses of gold, I would have seen it on display in churches, on the clothing and household furnishings of the Royalty and Nobility, Regalia, and later on in military uniform embellishment.
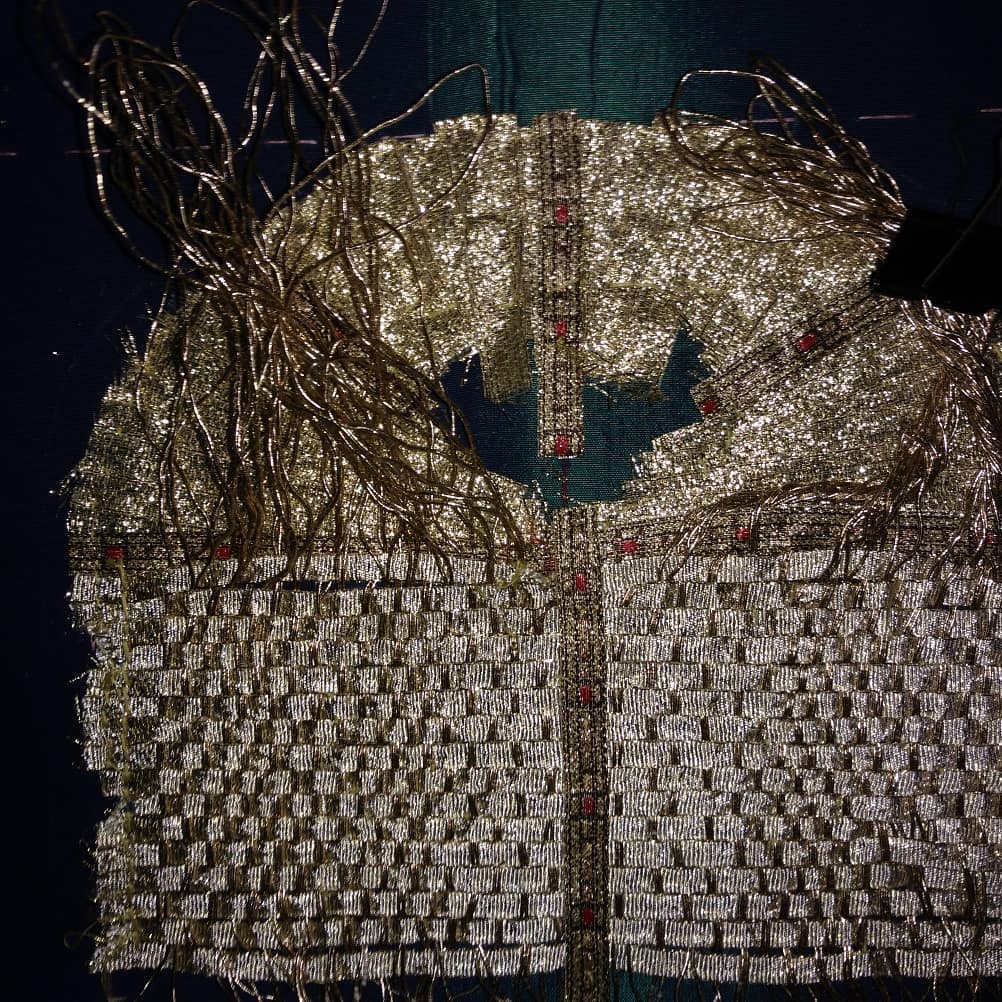
They started with the foundation, or background. Usually on an Orphrey, it was the elaborate goldwork that figures would be attached to. That goldwork itself would also be sewn onto a foundation. Much of the time the foundation was of linen because it would not be seen and was widely available.
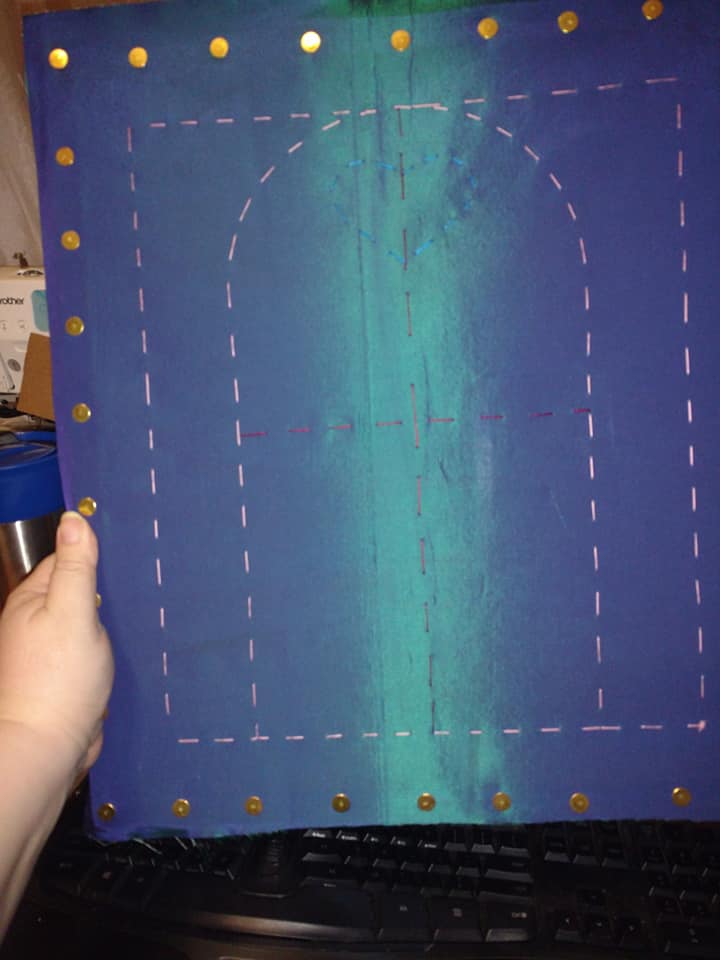
My foundation is of bonded blue/green silk taffeta and cotton muslin, good and stiff, tacked to a fifteen by seventeen wood embroidery frame.
The technique for laying down the background was usually surface couching:
This simple stitch is used to place down everything embroidered on the background.
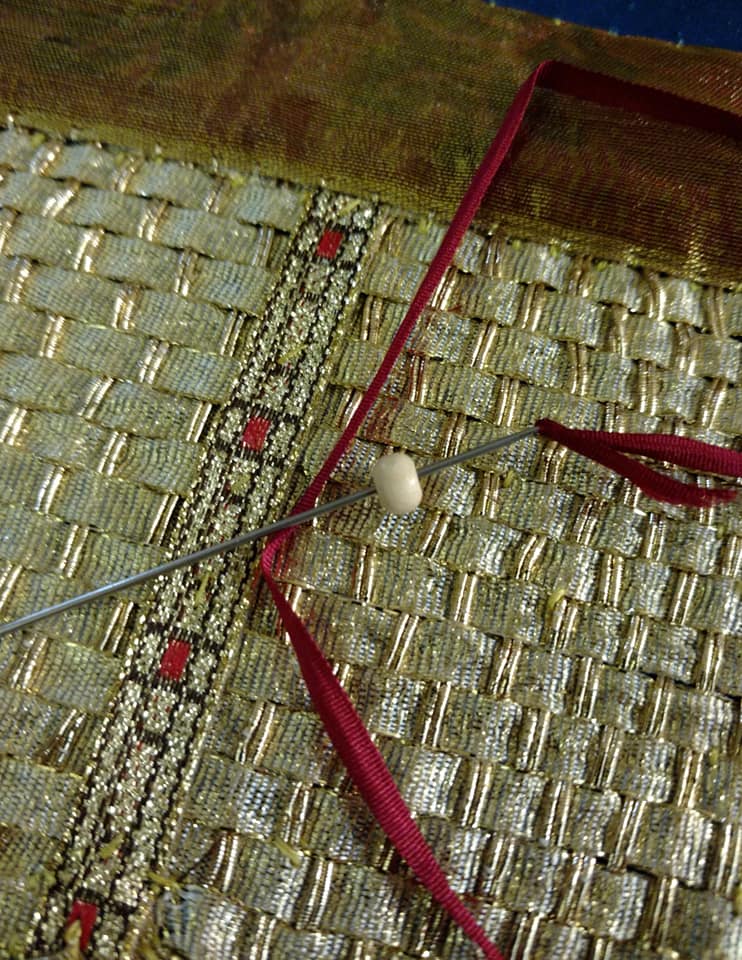
To Work Surface Couching – Lay down the thread to be couched, and with another thread catch it down with small stitches worked over the top. When laying down gold ribbon the same stitch is used to catch along the edges in neat well spaced stitches.
The Background
Upper Half
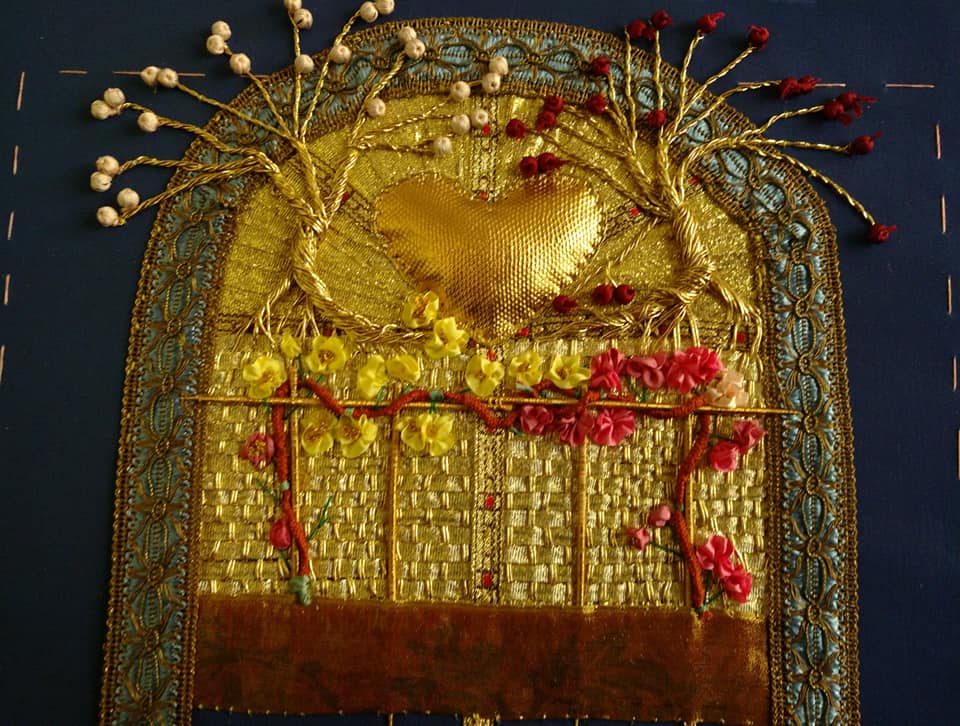
Looking at the background of the Stefan Lochner painting you can see that the upper half is mostly gold with a lovely rose arbor framing the upper body of the Virgin. Closer inspection shows that the figure of *God* is looking down giving the blessings of the Spirit. The texture of the gold is given lines that radiate like the rays of the sun downward to shine on the subjects.
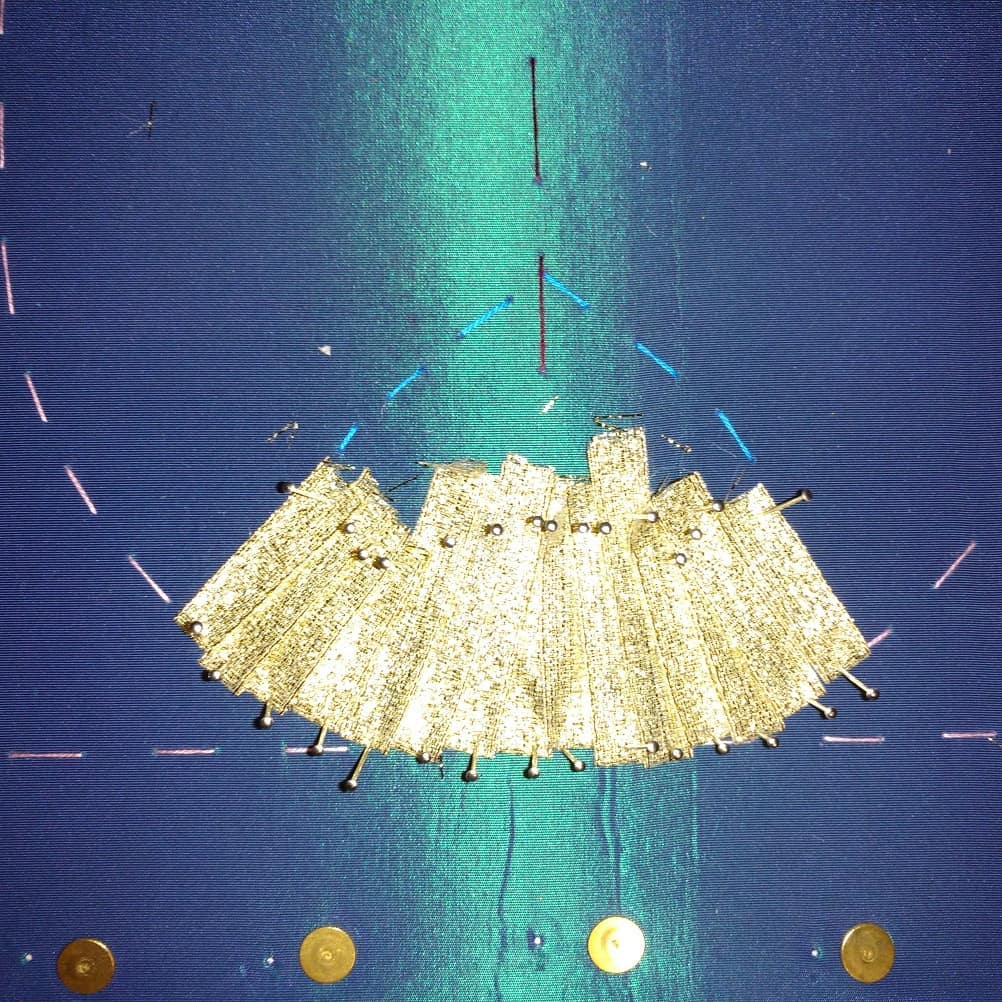
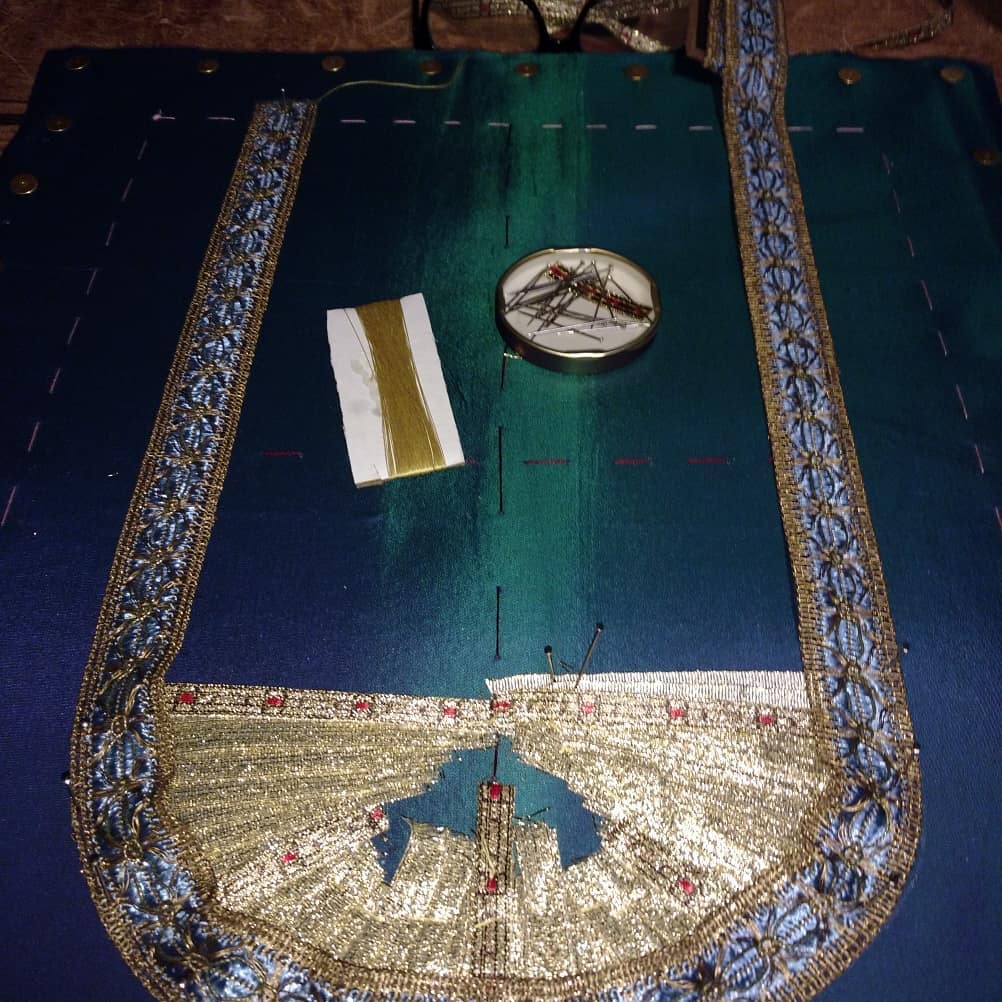
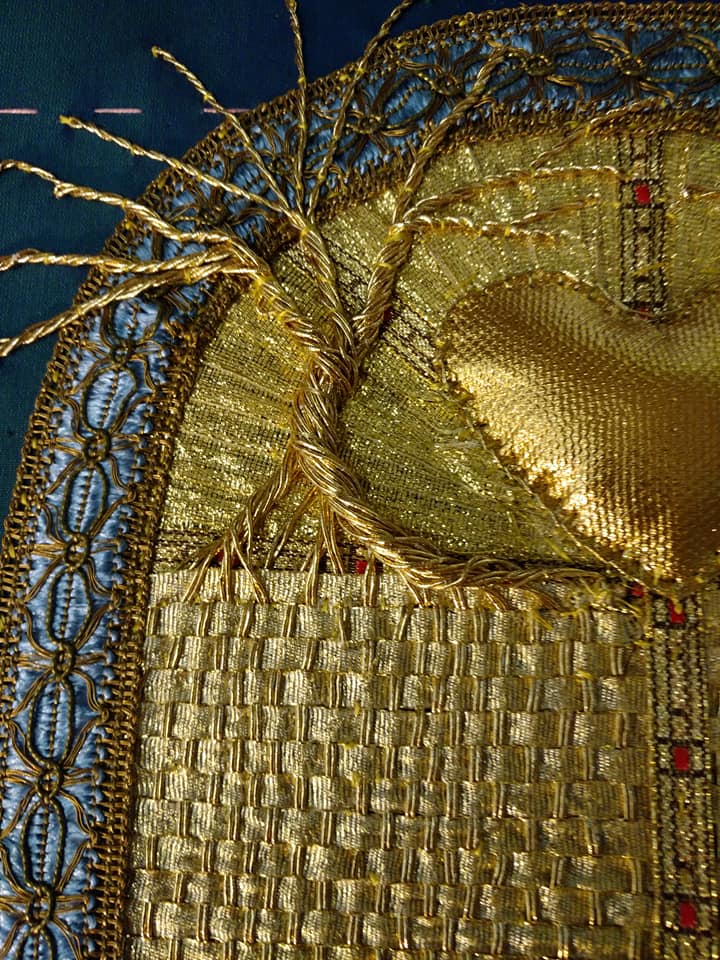
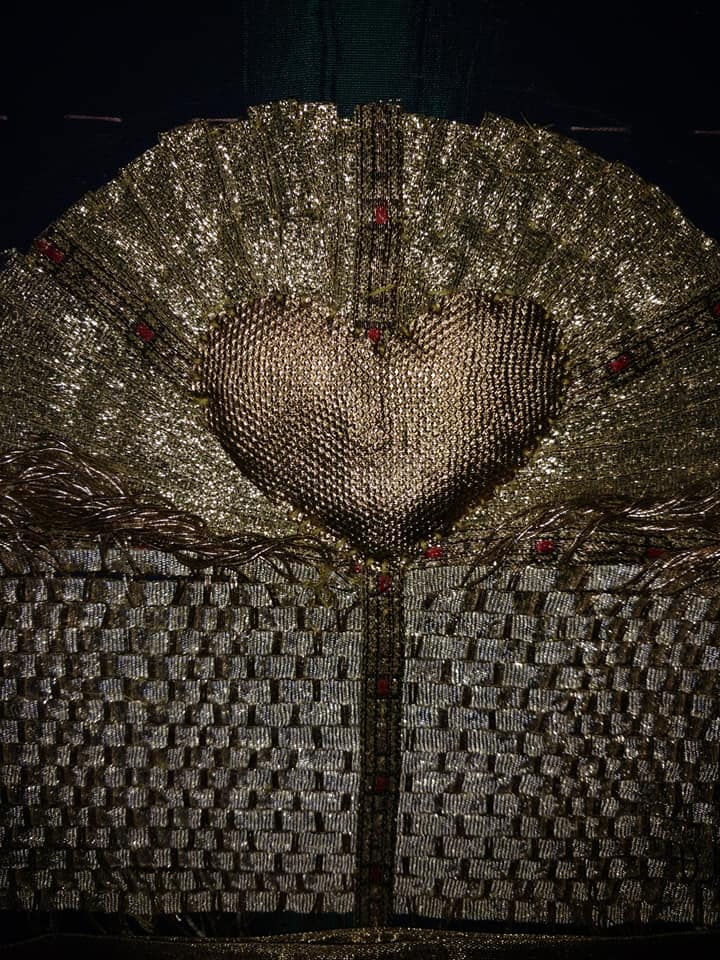
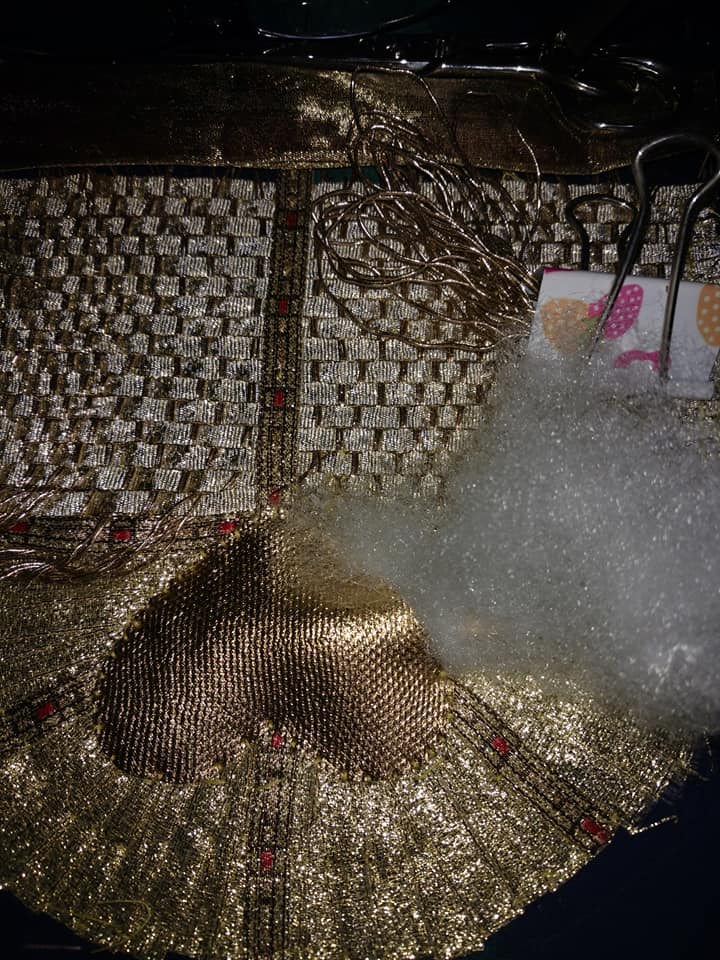
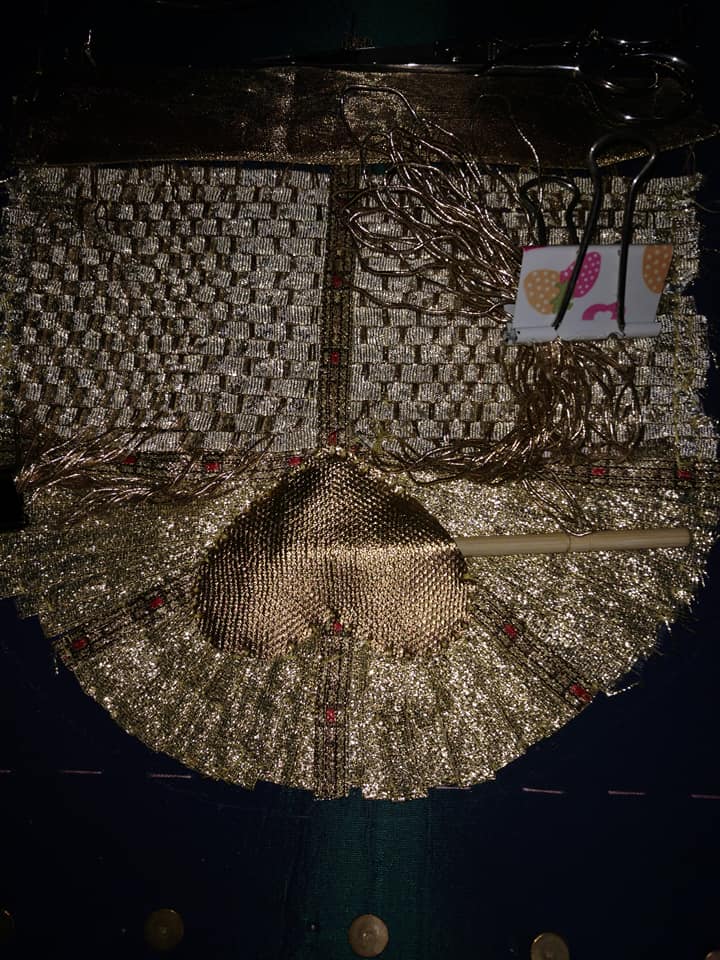
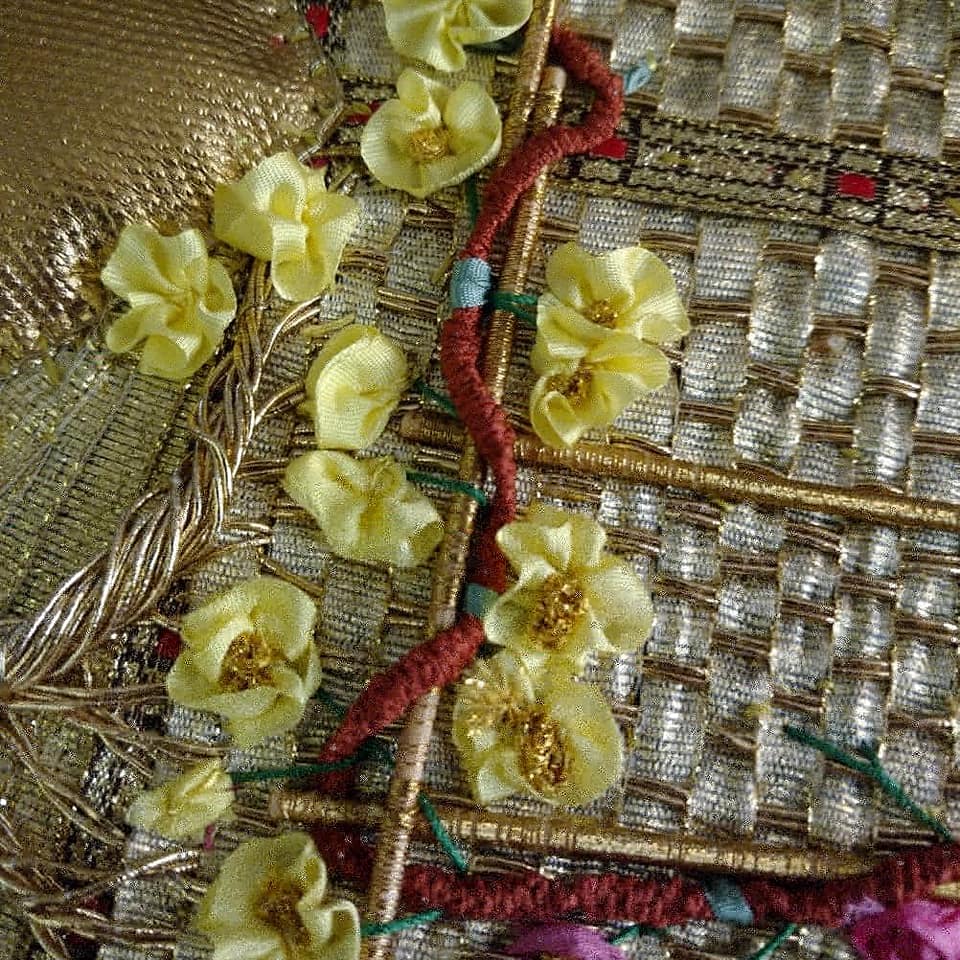
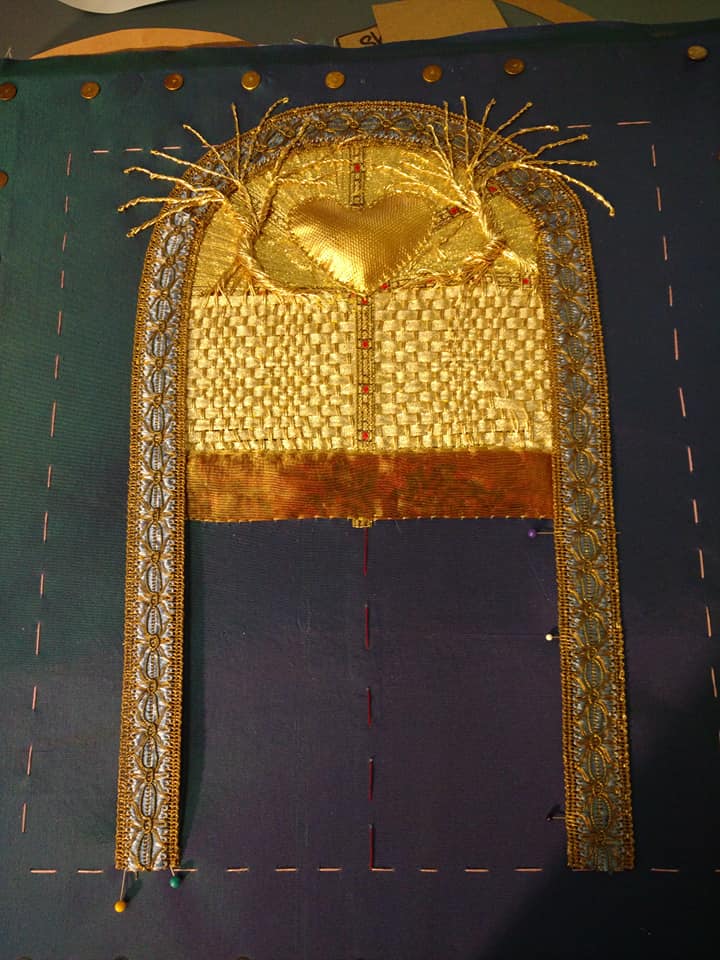
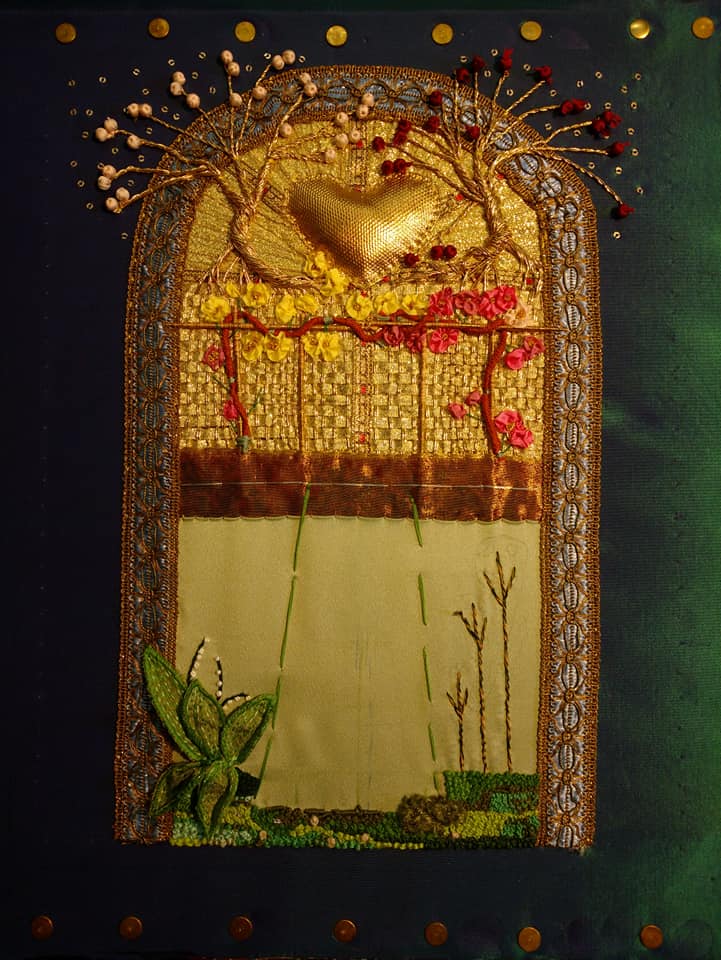
For the upper half of my background I placed a heart, not *God* at the center of the Rays of golden ribbon. The heart is gilded snakeskin. Flanking the heart are two trees, each a contender for the Tree of Knowledge. An Apple with rosy pink silk apples and the Pomegranate with its ruby silk pomegranates. The trunks and branches of both trees are mylar wrapped passing thread, their branches arching out over the Blue silk and antique gold trim that frames the piece in imitation of the arched frame shown framing the Martin Schongauer painting. Their roots are woven into the background of gold ribbons upon which the wooden frames of the arbor are wrapped with gold threads to hold the bramble vines of the roses. I gladly followed the suggestion of a fellow embroiderer Carrie Hulsing who suggested to use of toothpicks for the wooden bower and wrapping them in gold thread.
The Roses rest on brown brambles of silk ribbon braided and bunched along the length of an inner core of more silk ribbon. Silk ribbon roses in pink and yellow fill the brambles with golden twisted knot stitches (french knots) at their centers. Generally in iconography, the roses are red and white. My roses are Pink and Yellow because they are the roses that grew in my mother’s garden. The wide golden trim cuts the background in to upper and lower halves as the garden walls and benches do.
Tacked to the frame.
Outlined with running stitches.
Filling the upper dome.
Overlapping in a arch.
Upper dome filled
Temporary pinned Border.
Lower half of gold dome.
Weaving the tree roots.
Tree roots woven.
Side View.
Both trees Woven.
Up close of Upper dome.
Upper Half Finished.
No Fruit Yet, spring coming.
The First Poms.
Rose Arbor and materials.
No Fruit yet, wait for summer
My heart of gold.
Get Stuffed.
Heart with a stick.
How tiny are they?
Yellow Roses.
itsy bits beads.
All of the pictures leading up to the upper part being finished. I will add captions eventually
The Lower Half
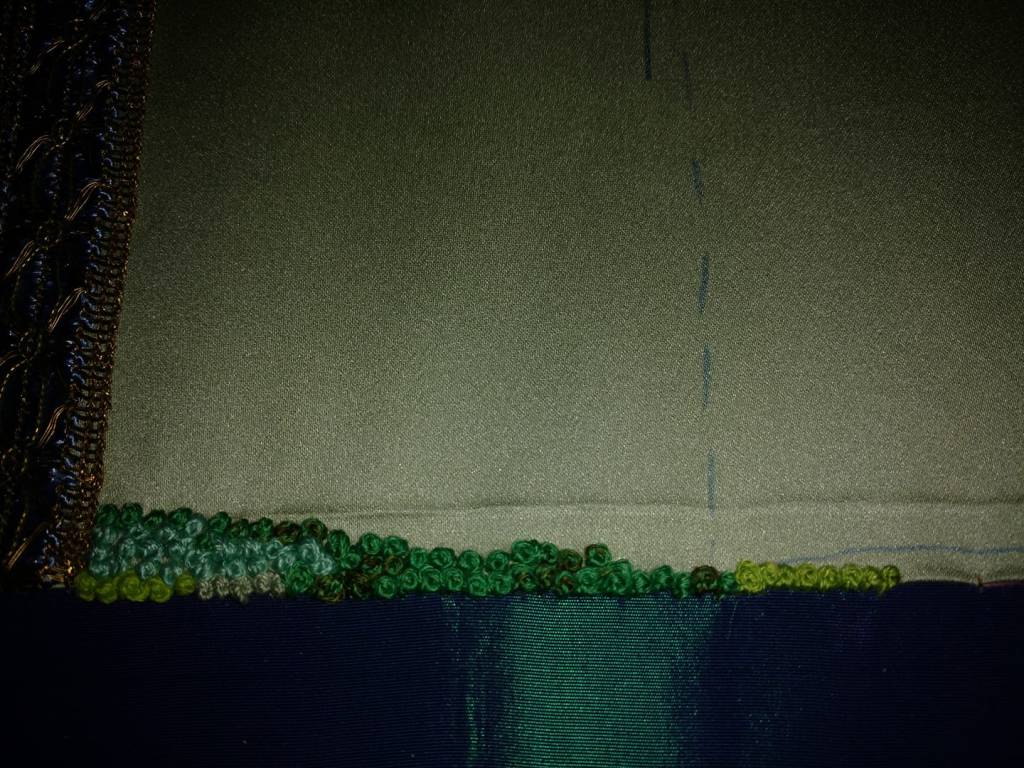
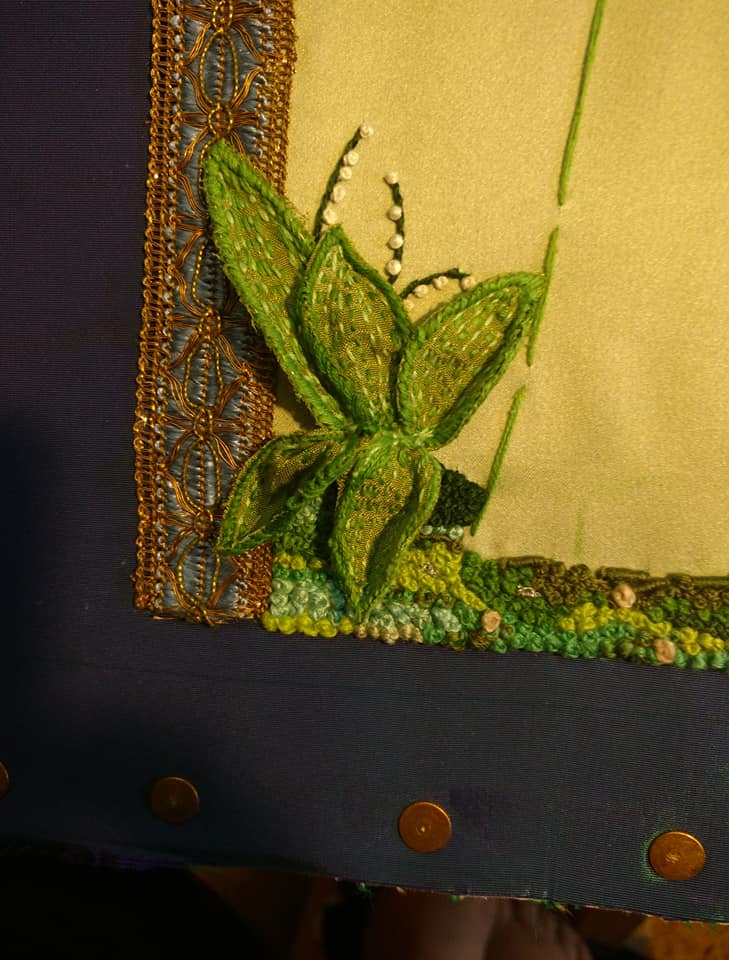
In Stefan Lockner’s Madonna in the Rose bower, the mother and child are seated on a scarlet pillow surrounded by angels. I swung on a pendulum as to whether or not to have her seated or to depict her as a standing Madonna, and I eventually went with her standing. My ground is stitched in with knot stitches in different thicknesses of cotton floss, wool yarns and craft yarns with different textures. All of the yarns and threads are shades of green so that when I use more knot stitches to show the flowers the bright colors of the strawberries, violets and clover will stand out. Though you cannot see them, I blocked out the lower half with a grid so that I would not get overwhelmed the the volume of knot stitches needed to cover it.
No, I did not bother to count the stitches per inch, sorry. I will, however bring a small clear plastic ruler so that any looking at the piece might try and count the number in a square inch space, if they are brave enough. But only if you wear gloves.
Before the green satin is added.
French Knots
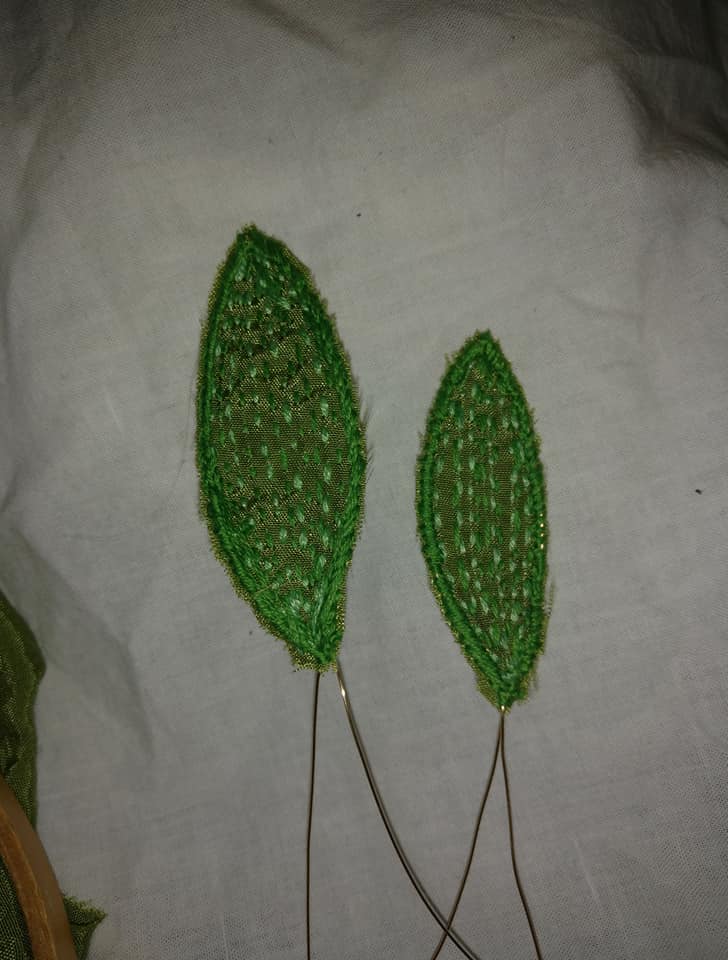
L.O.V leaves cut out.
L.O.V leaves beginning.
L.O.V leaves cut out.
L.O.V leaves and flowers.
Still more French knots.
R.o.S up close
The mother is coming, make room!
Lower Half of the background Update.
It has taken two years to get to this point, I have embroidered some, researched raise figural embroidery some. But it is slowly coming together. Stay tuned as I post part two of this article with the extant examples of Raised Figural Embroideries of the 14th, 15th and 16th Centuries.
The two figures of this raised figural embroidery are a Mother holding her child. As we cannot see the actual sex of the child it remains in that ambiguous area between boy and girl and can therefore be called simply a Child. Therefore no true religious label can be applied. In saying this I allow those that look at the embroidery to make up their own minds as to who this pair are. Earlier in this text I gave examples of the Iconography of the mother and child imagry to show that many different peoples can lay claim to them. Not just one religion raised the mother and child to a pedestal in art. My inspiration comes from christian iconography tis true, but only in the beauty of the artists skill giving me the imagry to imagine in thread instead of paint.
The Underpinnings of the Mother Figure.
Side view A.
Pad those curves.
Can you see me now?
Before the face.
Padding The Mother Figure.
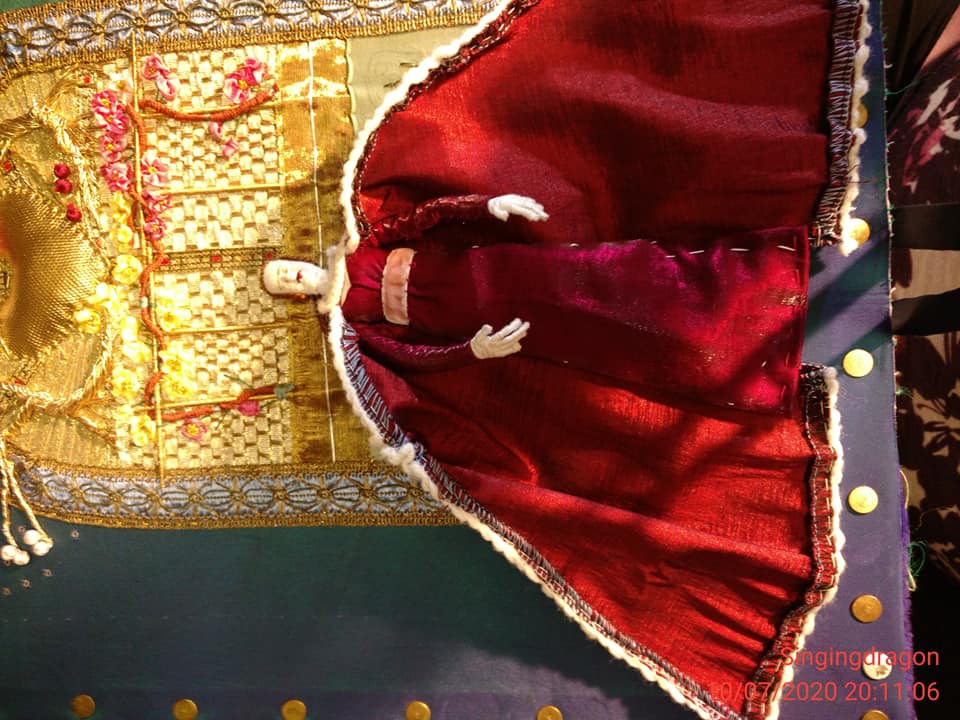
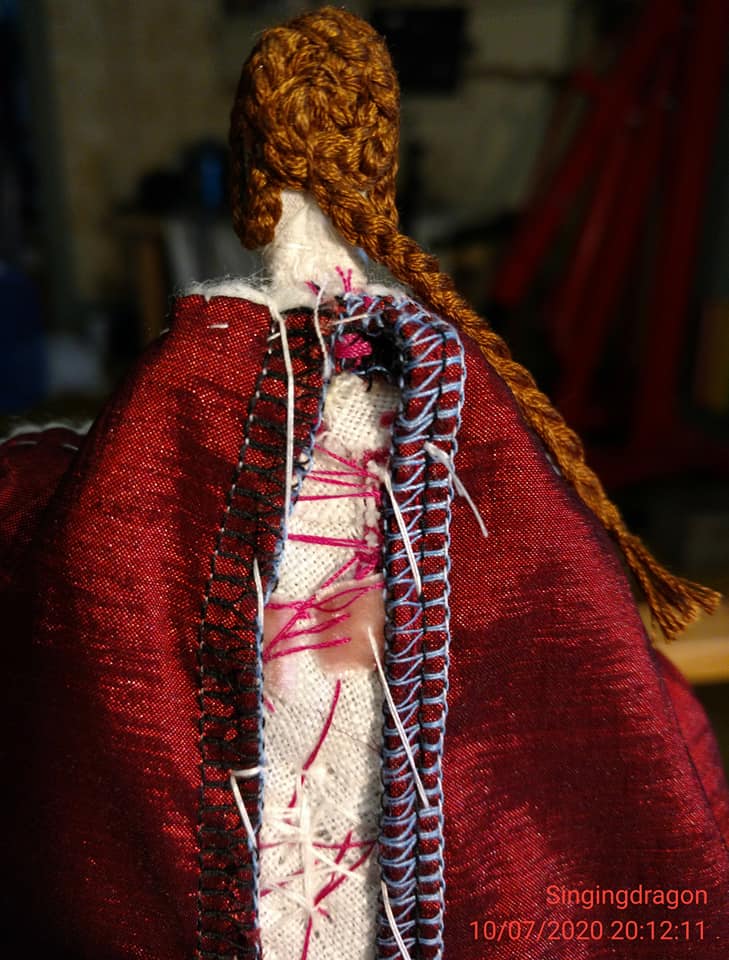
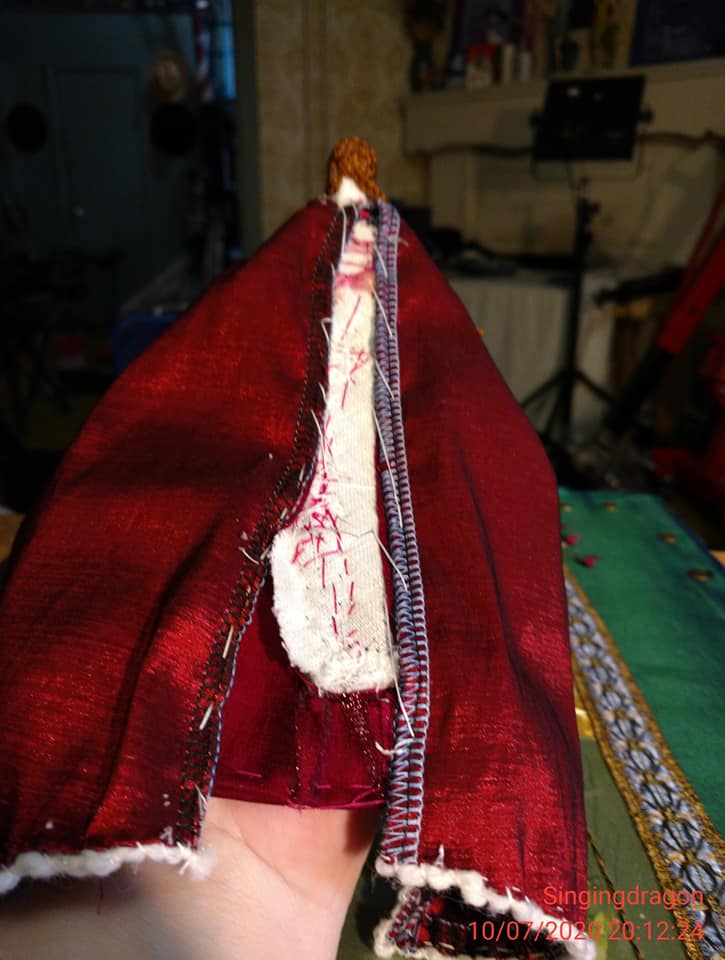
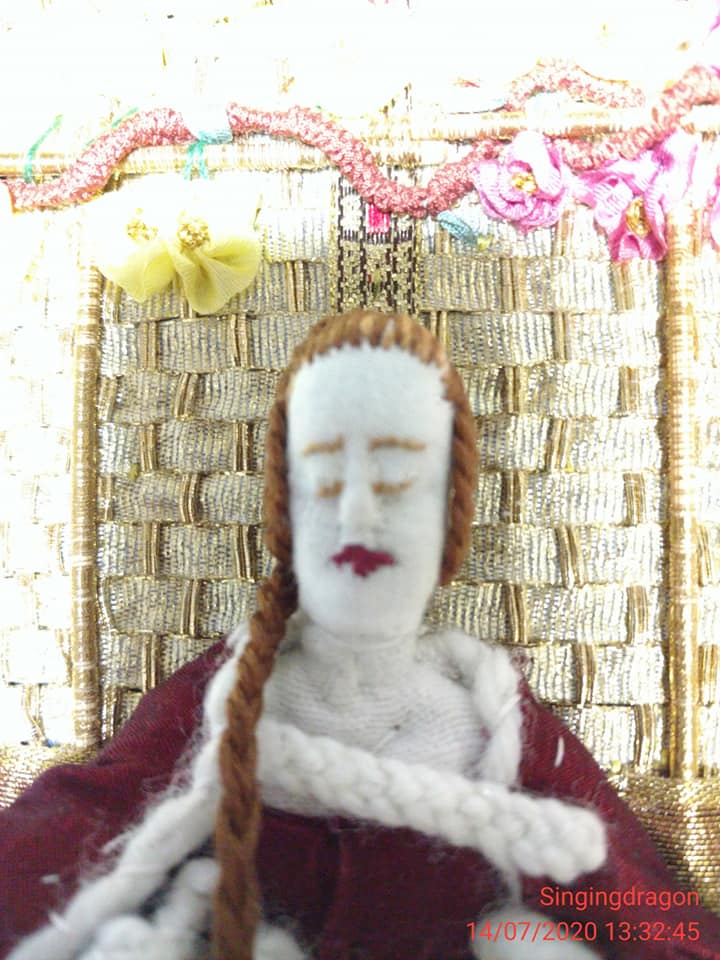
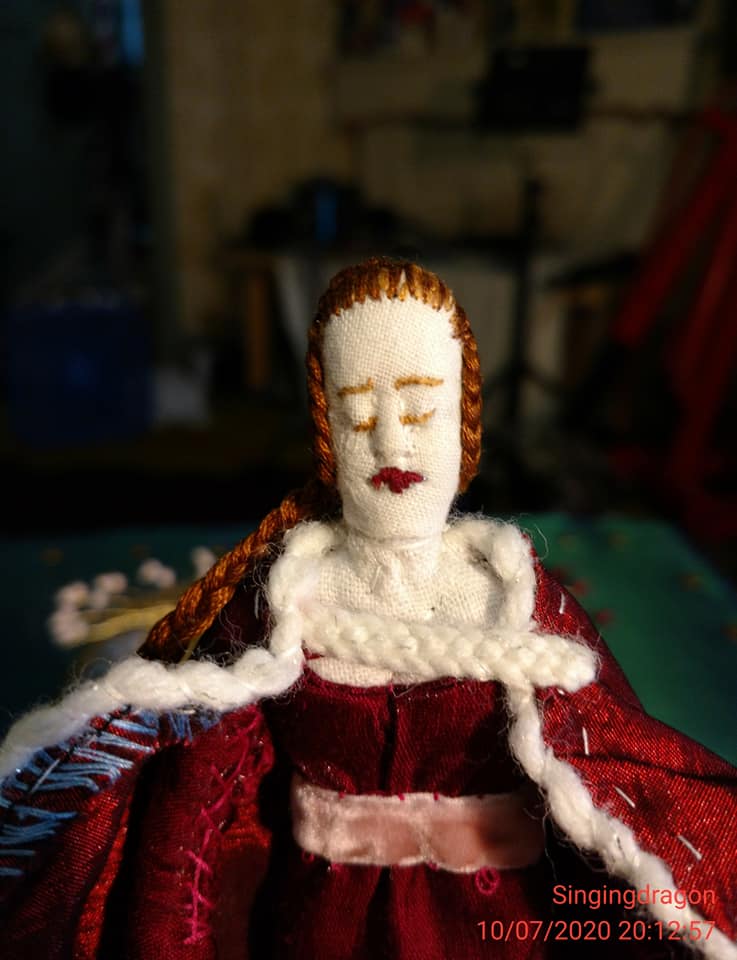
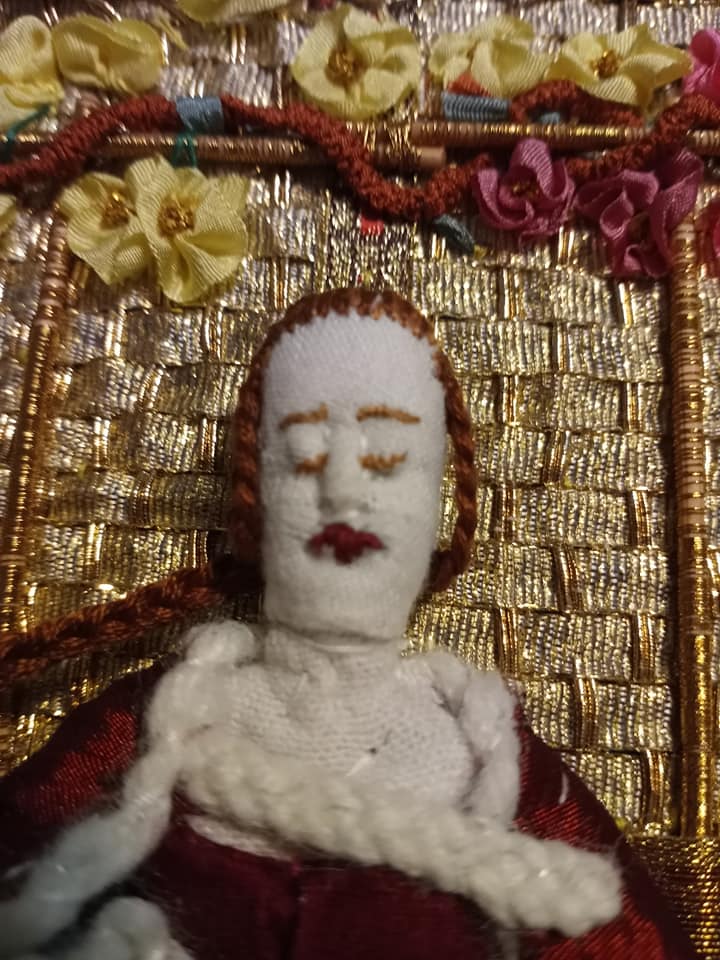
Of Course you can see that my figures are NOT dressed in highly ornamented gold shaded embroidery. My mother figure is wearing scraps of very expensive garments found at thrift shops and up-cycled. Her cloak is a lovely silk taffeta that changes from red to orange and trimmed with gold and white holiday yarn to simulate the fur trim in the paintings. You can see that I surged all of the edges to keep the fraying down to a minimum. Her dress is also from a satin blouse from the thrift shop. Her belt a lovely scrap of pink velvet ribbon from the satin blouse. Her long hair is braided up at both sides and a long braided tail hangs off to the side. The Nice thing about this project is that the figures are merely slip stitched to the background and can be removed for repair.
Mum’s ready.
Nap Time.
Need more coffee.
Do up my zip luv?
Nevermind let’s go.
Mother Figure Dressed Front and Back
Creating the Raised Figures is done pretty much the same way they were done in the 15th and 16th centuries. The figures of saints were raised with a padding of spun wool and other textile yarns, their fingers highlighted under the delicate silk stitching with twisted wire. (Damboiu, 2013) The saints faces and hands were skillfully stitched in silks of many hues by those whose skill with thread and needle made them as highly valued as those who made pictures with brush and pigment.
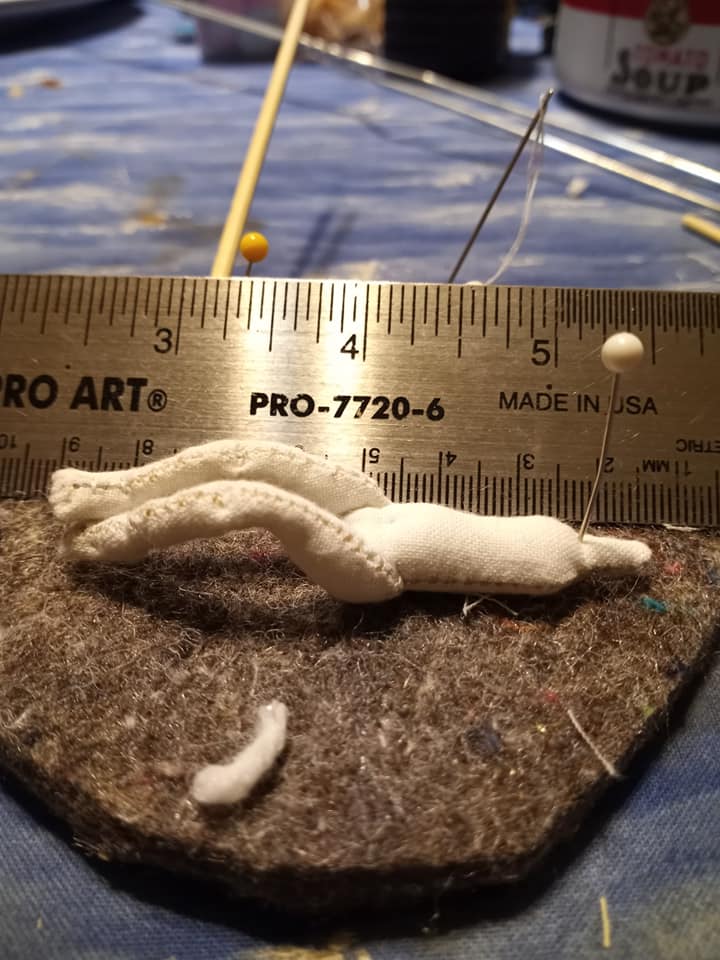
Left hand and arm palm up.
Left hand and arm back.
Hand Jig showing adult and child sized hands.
The Jig is 3 pieces of corrugated cardboard glued together so that pins don’t poke the user.
The Hands and arms, right and left.
The saints vestments were stitched in a spectacular fashion, usually in the renowned technique of “Or Nue” by gilded threads being couched down in colored silk threads. The saints garments were laid out on a piece of linen and the threads were couched down over the tiny garments pattern. Once finished the garment was then draped over the figure and sewn down. Sleeves would have the hands added before themselves being sewn to the figures separately. Faces were embroidered and then added to the padded form.
really, more pictures?
Is the lighting right?
Criminal line up shot 1.
Criminal line up shot 2.
I’m too young for bald spots.
one more if you must.
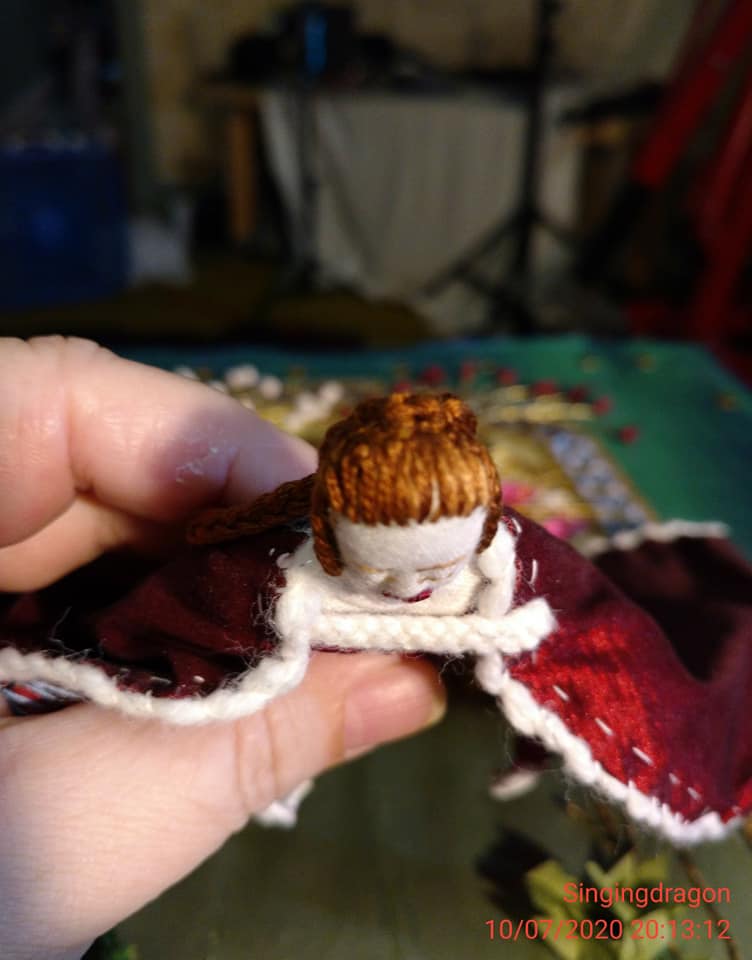
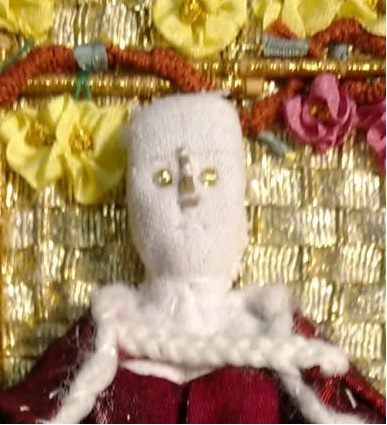
After Face has been embroidered and attached. Then Hair.
Underpinnings of the face.
The Face and head.
Upon finishing, the figure was then added to the Liturgical Vestment, in my case the figure has been added to the embroidered background.
Mother Figure Finished and Attached to the background.
The Child Figure!
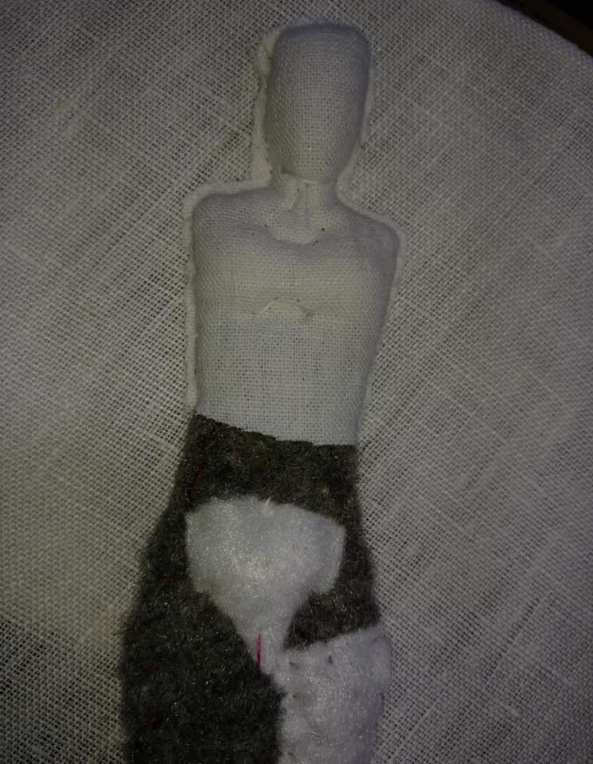
The child was a bit difficult to create owing to it’s tiny size. The pattern for such a small figure did not exist for purchase online, I had to draft it out on scraps of paper until I got the correct size in relation to the mother. Once that was done I carefully traced the pattern pieces onto a doubled over piece of white cotton and put it into a hoop to keep down the fraying. Once sewn it was a matter only of cutting, turning and stuffing.
Body: Drawn, Sewn, Cut and Turned.
Once the body was turned it was a matter of stuffing it. I stuffed it with snips of white yarn using a small bamboo skewer. after closing the feet at the end of the legs I stitched them to the stuffed and closed body that I had done a bit of sculpting for shape, not that anyone was going to see it once the tiny child was dressed, but I did it anyways.
Torso and legs: Stuffed, Sewn and sculpted for shape.
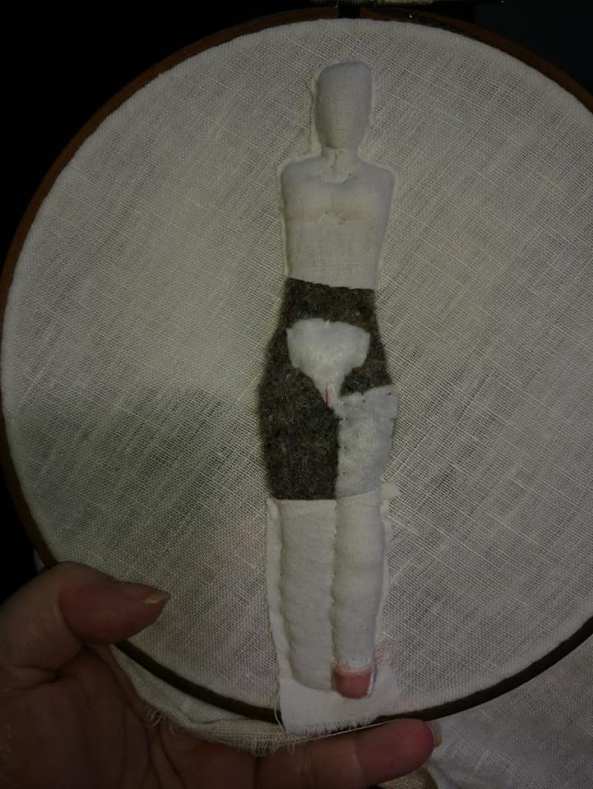
Next came the head and arms of the child. I folded the white cotton back together and traced the head for the underpinnings of the face, unfortunately I did not remember to run upstairs for the camera to get a few pictures. (Don’t worry, I did a second child for a how to, kindly go to Part three.) The head was sewn, cut out and stuffed. and sculpted in a technique similar to soft sculptured dolls. then it was sewn onto the neck of the body. The back of the head was padded with scraps of white linen and felt. The face was a circle of white cotton embroidered with eyes, eyebrows and tiny lips. two little pencil marks for the nostrils were my guide in sewing the face to the head. Once that was done, the excess was gathered to the back of the head and whip-stitched in place. I then added long satin stitches for hair in a matching dmc floss.
Yay! Arms!
Front View no arms.
Side view no arms.
Thumbelina was smaller than this.
Face and Head Attached.
Now out of gate 5 we see our artist checking to see if the hands off of the hand jig were the right size. Humans feature hands that fit our face from chin to eyebrow and this tiny figure is no different. Once that check was done I attached the hands to the arms the same way I did for the mother figure. And then I attached the arms to the child. I used a basic romper style dressing for the child using the same scraps of red that had been used earlier for the mother. I was not going to reinvent the wheel.
Attaching the child to the mother was just a matter of bending arms and fingers around the Childs chest and leg. Like any child being picked up during play, this child has a ball of bright blue in their hands. Almost done.
Waiting to be finished
Finished and attached
No nekkid baby here
Talk to the hand
Got your toy, Good, let’s go.
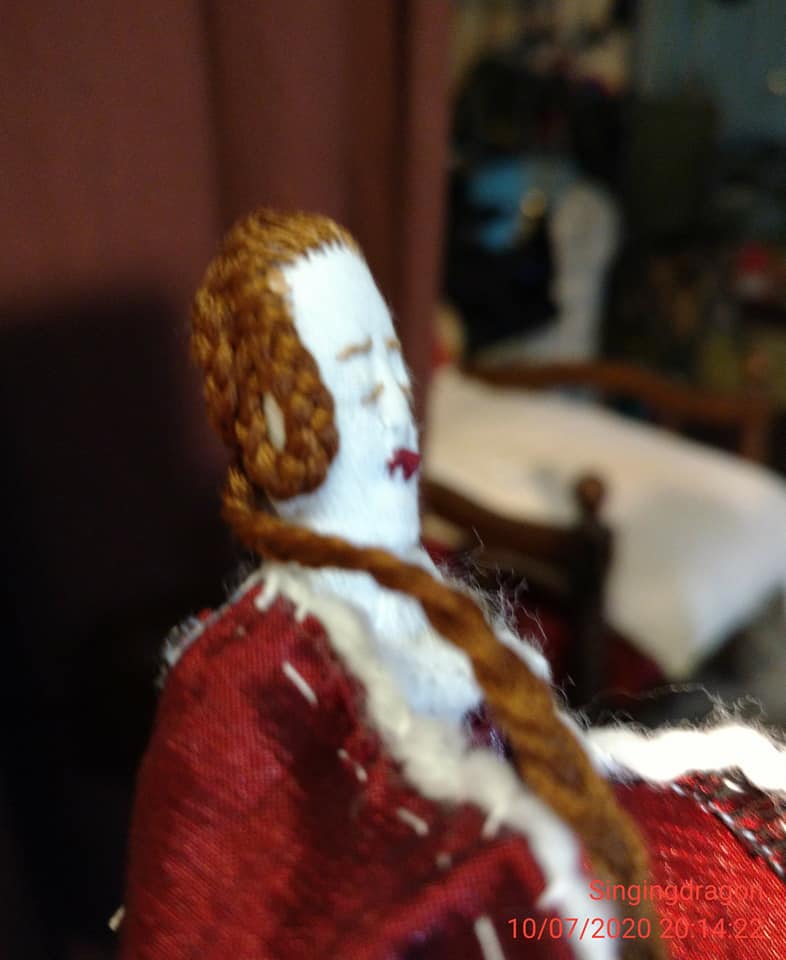
Back of the head
Left side of the head
Right side of the head
Finishing up the Figures.
The stars in the heavens.
You remember earlier that I mentioned my choices of fabric? well not wanting to embroider the dark blue of the vaults of the sky was part of it. the second part was the joyous sprinkling of golden sparkly spangles as the stars.