
When I started this blog in October of 2013 I did not expect to be visited so often and for one Article to be so popular. Writing a Medieval Letter was the Hardest article to do research for that I have ever done. The start of many more to follow. I want to thank all of you who have come to visit and view that Article, which has been viewed 2293 times and counting, so thank you Thank you for wanting to know and coming to learn.
MVRY.
Monthly Archives: November 2015
War and its inevitable byproduct: a surplus of Veterans
What is a war?
War is defined as an active conflict that has claimed more than 1,000 lives. Has the world ever been at peace? My Answer? NO, not really. Of the past 3,400 years, humans have been entirely at peace for 268 of them, or just 8 percent of recorded history. Wars, we read about them, see them on the Television, in movies and Video/Online Games. We Romanticize it, write novels about it, but we often forget the Byproduct of such an Activity: Veterans. How many Veterans are we generating currently: Too Many!
Warning: Monolog moment:
In all of our years as a Nation, there have been only about 21 years of Peace, where we were not in conflict with anyone. Yep, gathered together our years of peace would see a child born, grow up and get to drinking age. I think that is the saddest thing we as a Nation can say. Our Military might has not gotten us Peace, but the continual fight for it, both foreign and domestic. Don’t take this the wrong way, (I know you will anyways) but my pride is not that we are at war, but at war for Freedom, not just ours but for the freedom we enjoy to be extended wherever it is not. At least that is the Ideal. For many we fight against They see our presence there as taking away their rights to kill those who are different religiously, doctrinally, or physically. We fight so that anyone, can wear, think, speak out against someone/something they believe is wrong. We go where freedom is at such a low level that we are willing to lose our lives to bring the level back up or even higher than before. I say We, because as a Nation it is not just our Troops that go to foreign soil and toil so selflessly. It is the Civilians that go forth to bring medical aid, build new homes, roads and bring commerce back into those places devastated by War. We all work, so that life gets better and peace and freedom belongs to all. Yeah, I am idealistic..get over it.
Okay…Monolog done…
Nope sorry…
At the beginning of 2003 there were 30 wars going on around the world. These included conflicts in Afghanistan, Algeria, Burundi, China, Colombia, the Congo, India, Indonesia, Israel, Iraq, Liberia, Nigeria, Pakistan, Peru, the Philippines, Russia, Somalia, Sudan, and Uganda. At How many of those were Our Armed Forces deployed? How many are still there?
There is a Question: How many wars has America still fighting in; with the numbers of Veterans rising in the past few years one should think instead that the numbers of conflicts should be falling…nope, rising higher than ever. According to Nick Turse in his article “How many Wars is the US Really fighting” The conflicts we currently have our military might split between is: 135 nations, and that’s only Special Ops. Look it up and read it here: http://www.thenation.com/article/how-many-wars-is-the-us-really-fighting/
Veterans are Everywhere: You find them at the VA, your local unions, going to college, homeless on the Streets, marching in parades on the National Holiday to Celebrate them..But How did they Become Veterans? The easiest answer is they were enlisted personnel that fought in many and any of the Military conflicts that our country often finds itself embroiled in, tangled up in or cleaning up after all across the globe. You might be related to one or more men and women who for the sake of our Freedoms, went into a recruitment station and signed up to keep our country, its constitution and the lives of its people safe; whether it was from the Communists, the Nazi’s or the Taliban. Or currently from the Evils of that newest Terror Group “Daesh” I refuse to give them the Name Isis, as they are not about the worship of an Ancient Egyptian Goddess, but rather the destruction of History in the name of an Extremist set of Ideals. Spreading Terror and Death, and they are recruiting either by force or by guile more people than ever before.
Back to our Veterans
What happens when they come home? Afterwards, when they are broken and no longer usable, it seems that many are doomed to be on the streets, without support: physical, mental, or emotional, and penniless. Why? We send them there and they come back to nothing. We the people, you know; the ones they go out there to defend, should be OUTRAGED by this. That our own people are coming home to hopelessness. Yes, there are a few good groups out there, working with donations to help heal our soldiers upon their return, but it’s really Not enough. Veterans should have housing and Living expense accounts set up, automatically upon returning home so that they cannot find themselves on the streets, sleeping in the park, scrounging for their next meal. They fought for us, so we should be fighting for them. The VA is not enough, we see that every day with the waiting periods getting longer and longer, and scandals being published about misappropriation of funds being discovered and reported on. A veteran should be able to walk into any doctor’s office, have extended health insurance beyond the pittance they receive after being discharged from our Military. Not only those discharged live in poverty, but our current military personnel have families left behind while they are deployed that are currently on Welfare and receiving SNAP benefits because their military spouse is paid so low that a McDonald’s fry cook can honestly say they get paid better. This should not be the norm…but it is. There will be trolls of course..those that say that our military personnel should not be allowed to have spouses and family until they reach certain ranks…yeah, Fuck off.. (So not sorry, I will drop an “F” Bomb from time to time in my blogging, do get over it) Our Military Personnel have the same rights we do, to marry, have children and try for happiness…Who in the hell are we to deny them that? Who the Hell are we to think that it is okay for them to return to Nothing after doing So Much for Us?
Wednesday November 11, 2015 is Veterans Day..yes, all day. This is the Federal Holiday Celebrating our Veterans: Past, Present, and Future, because yes, there will be more. More people going into recruitment centers and saying;”Sign me up, I want to keep our Constitution, Nation and her Peoples Free from Terror and threats both Foreign and Domestic.”
To All our Veterans: Past, Present and Future; Thank you, from the bottom of my heart and soul. Thank you for being willing to die for my freedom, to protect both Country and Constitution. Thank you, for your Bravery and Dedication. Thank you for the Blood you have lost on Soils both foreign and domestic.
Bibliography
- What every person should know about war: http://www.nytimes.com/2003/07/06/books/chapters/0713-1st-hedges.html?pagewanted=all
- List of Wars the US has participated since the American Revolution: https://en.wikipedia.org/wiki/List_of_wars_involving_the_United_States
End Note: I looked up all of my information on Google, it took me Five(5) minutes to come up with the information in this Article. If you think I missed something or forgot my patriotism somewhere, Think again. I wave my flag as proud as Any American. My Father, and Grandparents on both sides of my bloodline have fought for my freedom to state my opinions, write and protest against War. AS this is NOT a Doctoral Thesis being turned in for a grade, I reserve the right to only go so far in my documentation…You have eyeballs, and access to the internet? Do some of your own, write Petitions, Protest the Treatment of our Veterans. I do it my way, Please do it yours.
The Society for Creative Anachronism..A&S 50 Challenge
My A&S Fifty Challenge Pieces
MVRY Tina Comroe 2015
We who joined the A&S 50 Challenge for theSCA’s 50th year have been working hard on our pieces, and now that it is over I feel that I maybe did not get it done, but all is well, the Challenge I did was the Persona Challenge, to make and learn about what my persona would have used in her life.
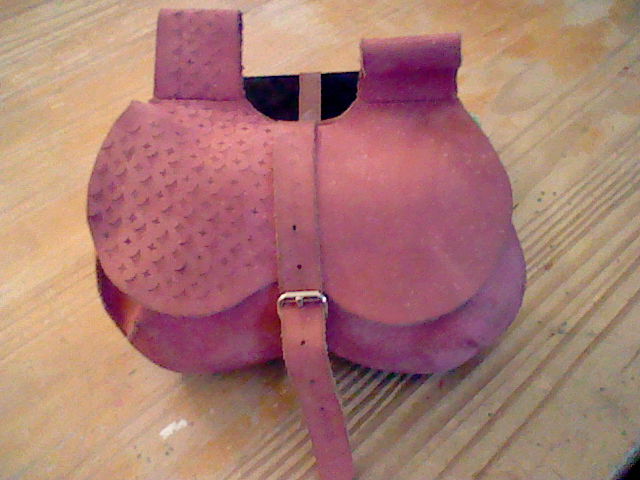
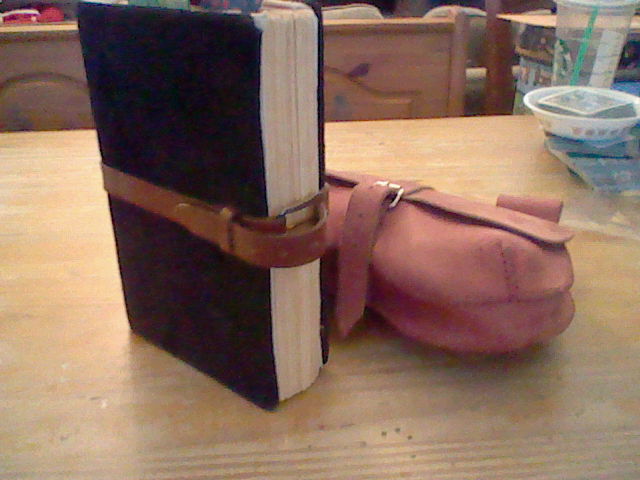
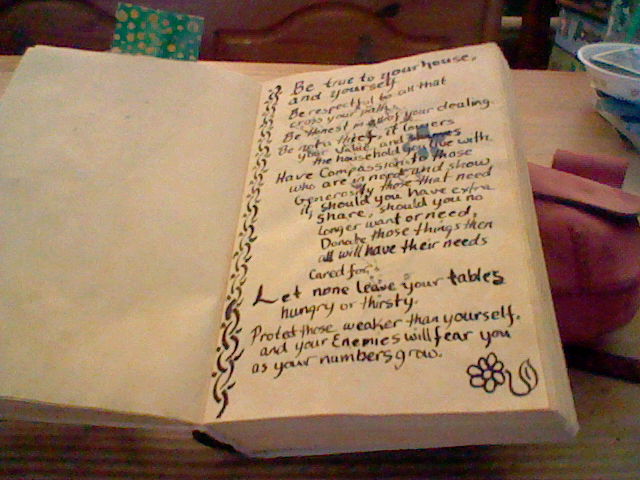
I may not have finished it, but I sure gave it the ole college try: The most important thing is that lovely black covered book…why? Because within it is all of the stuff I researched about my persona: Where she was born, who her parents were, grandparents were, what she would have worn,what kind of games she would have played, hospitality, who was king, who was pope, and most especially her herbal lore, food lore(recipes for yummies), that in itself almost fills the book.. Below you see some of the entries in the book, her favorite pouch of hot flesh colored leather, her embroidered alms bag, her six board chest, two dolls, a leather ball stuffed with wool and leather scrap, her game of fox and hounds and a leather split mitten…Also not pictured are my shoes, fitted kirtle, sideless surcote, under kirtle and hosen and fur trimmed hood which I hand dyed the rabbit fur myself. Also not seen but enjoyed by many are the articles I have written and have the joy of being published in several newsletters and websites. I don’t really count the articles written here…although it makes my heart sing that my article on how to write a medieval letter has gotten so many views from so many different countries. Nope, I may not have finished the challenge but as I said, I did give it the ole college try…and that makes me quite proud of myself.


A 12th Century Embroidered Drawstring Pouch
A twelfth century drawstring pouch
by MVRY Tina Comroe 2015
When I got the urge to embroider a pouch I turned to the internet to find something within my time period, something that came from earlier but lasted beyond the time of my persona..a continuance if you will. I found a line drawing and nothing else.
I have googled the unholy heck out of it, but every link I click no longer exists..do I find another better documented pattern or continue to make the pouch anyways? I chose to make the pouch anyways, just because I really liked the look of it. (It’s not as if I am going to ever enter it into an Arts & Sciences competition as I gave it to a friend later once finished.)
I found a picture online when I did a search for medieval pouches.
I cannot remember from where I found the picture but I fiddled around with the design to come up with a pattern. I then looked through my sketchbook for something vaguely byzantine in nature and found my golden geese which had been inspired by a byzantine tile floor with boys herding geese…(oops, and a small Greek pottery bowl with a goose on/in it.)I did not want just one goose so I drew one, gave it a long curved neck and intertwined it into 4 birds circling. My design is not so fancy, but I liked it enough to try it on the pattern. As you can see, I left out the long tail feathers which looked more like a peacock. For this pouch I used some red felt backed by some green mint linen. I used a piece of waste paper and traced the pattern and then embroidered the outline onto the red felt and tore out the paper. My geese are embroidered in a laid couched stitch. I know that the back of the piece really doesn’t matter because no one is going to see it, but I wanted to remember that just this once, even with the knots it was pretty nice on the back of it. When I was finished with all of the embroidery I
  carefully sewed the lining with a near matching colored piece of poly cotton blend/rayon (I think) 1/4 inch around the outline and then, cut out 1 inch from the outline of the pouch pattern. I clipped the curves and then turned it rightside out watching for the points and any stray pins. I carefully stitched a whip stitch along the edges after turning it and carefully sewed the sides at the cut in areas. When that was done it was basically an embroidered bowl. I used little metal eyelets all the way around for the drawstring. I know most would think that hand sewn
  eyelets would be prettier and they probably would be right. but I wanted the shiny. Not that anyone is going to see them for the grey ribbon going through them. To hang the pouch from a belt I put two flower shaped eyelets at the protruding ends and pulled two pieces of grey ribbon and knotted them. for durability I braided them at the apex where the belt would rub against them. So there it is. All in all this pouch took 6 hours of embroidering, and an hour of seaming/eyeleting etc. Yes, the tassel is one that I made from a skein of dmc cotton floss.
Given time and proper materials would I try this pattern again? Why yes, yes I would. Its simple and can be embellished in lots of ways. When it comes down to being perfectly period or winging it, I would wing it again. If anyone were to find where this design came from..book, magazine, archeological publication what have you, I would not mind seeing it in the comments. Thanks.


The Bibliography
- 13th century reliquary bag: http://www.silverdragon.org/SABINE/Doc_13cRelq.pdf
- A Medieval Tailor Blog: https://medievaltailor.files.wordpress.com/2012/10/14thcclothing1.pdf
- York Archaeology: http://www.yorkarchaeology.co.uk/wp-content/uploads/2015/05/AY17-16-Leather-and-leatherworking.pdf
- Purses in Pieces: http://www.oxbowbooks.com/pdfs/books/purses%20amerika.pdf
- Shoes and Bags: http://cadw.gov.wales/docs/cadw/publications/Shoesandbags.pdf
- Belts and Pouches: http://www.olvikthing.org/wp-content/uploads/2012/07/Belts-Pouches-2-pgs.pdf
- Pictures of Byzantine Boys with Geese: https://wordscene.wordpress.com/category/byzantium/page/3/
Bullying: Take a stand against it
Whether it’s in the Medieval Re-enacting circles or the Doll Collectors/Couture Circles we are finding that there are more and more bullies than ever before. I finished reading the article written by Kate MacDonald in Haute-Doll Magazine for November December 2015 and she hits it right on the cyber snoz! Our Hobbies are looked down on by other Hobbies and Hobbyists, and we look down on theirs; just adding fuel to a very destructive behavior. When it comes down to it Our Hobbies are not cheap, they take up hundreds of hours per month, thousands of Dollars per year and all of them have value and validity without striking out at the hobbies of others., why? Because the same can be said about Their Hobbies.
Cyber Bullies are becoming such a large problem that we all need to stand up against those that are perpetrating it. Trolling posts, telling someone that what they love is less than what you love is bullying. Telling someone that the re-enactment clothing is not correct or the fabric is not correct is bullying..yes, yes it is, because it is NOT just the words you are saying, but how you are saying them.. There are many ways to help someone just starting out, but putting your nose right up to theirs and trolling them is a good way to turn someone off of your hobby..and assisting them in becoming bullies themselves. So Just stop, clamp your pie hole shut and think before you speak face to face, or post on the internet. Remember, once uttered or posted online, there is no way to take it back.
And as Kate MacDonald says in her article,”One person speaking out can have an avalanche effect. You can be that one person.”
So speak out, be intolerant of bullies, give someone a hand up instead of a slap down.
The Bees Knees
Mevanou verch Reys Yriskynit
Tina M Comroe ©2014-2015
The honeybags steal from the humble-bees
And for wax tappers crop their waxen thighs
And light them at the fiery glow-worms’ eyes
To have my love to bed, and to arise
Midsummer Night’s Dream, Act III,
William Shakespeare
Honey is a sweet food made by bees using nectar from flowers. The variety produced by honey bees is the one most commonly referred to, as it is the type of honey collected by most beekeepers and consumed by people.
The use of Honey is as old as written history, where it was mentioned in Sumerian and Babylonian cuneiform writings, the Hittite code, and the sacred writings of India and Egypt. One can presume from evidence gathered from history that the use of Honey goes even further back than that.
Its name comes from the English and German Honig, and it was the first and most widespread sweetener used by man. Legend has it that Cupid dipped his love arrows in honey before aiming at unsuspecting lovers(no wonder those lovers often found themselves in sticky situations). In the Old Testament of the Bible, Israel was often referred to as “the land of milk and honey.” Mead, an alcoholic drink made from honey was called “nectar of the gods,” high praise indeed. Honey was valued highly and often used as a form of currency, tribute, or offering. In the 11th century A.D., German peasants paid their feudal lords in honey and beeswax.
Honey is an ancient remedy for the treatment of infected wounds, which has recently been ‘rediscovered’ by the medical profession, particularly where conventional modern therapeutic agents fail. The first written reference to honey, a Sumerian tablet writing, dating back to 2100-2000 BC, mentions honey’s use as a drug and an ointment. Aristotle (384-322 BC), when discussing different honeys, referred to pale honey as being “good as a salve for sore eyes and wounds”. Although experts argue whether the honeybee is native to the Americas, conquering Spaniards in 1600 A.D. found native Mexicans and Central Americans had already developed beekeeping methods to produce honey.
And, of course, bees perform the vital service of pollinating fruits, legumes, vegetables and other types of food-producing plants in the course of their business of honey production.
So Of Course, I have a recipe for honey. It is seen on the table of almost every feast in the Known World of the SCA.
Honey Butter
2 sticks unsalted butter, 1 cup dark honey
When the butter is room temperature, place in the mixing bowl and whip in the honey until the mixture is light and fluffy. Put into a container and refrigerate.
If you are afraid of using honey in the form it comes in, cook it before use by bringing it to a simmer in a pan on the stove for 5 full minutes, strain through fabric and re-bottle, that way it’s pasteurized and safe to eat. If you don’t want to use Honey, get a jar of Palm sugar syrup to mix with the honey instead.. it tastes about the same and won’t contain any bacteria unsafe for small babies and children.
Bibliography
Books
- A historical review of managed honey bee populations in Europe and the United States and the factors that may affect them:http://ento.psu.edu/publications/van-mex-2010
- Apis Mellifera (the Honey Bee): A teachers companion: http://www.queenofthesun.com/wp-content/uploads/2012/04/QOTS_Edu_Curriculum.pdf
- Beeswax: use and trade: http://www.bee-hexagon.net/files/file/fileE/Wax/WaxBook1.pdf
- LANGSTROTH ON THE HIVE AND THE HONEY-BEE, A Bee Keeper’s Manual, BY REV. L. L. LANGSTROTH: NORTHAMPTON: HOPKINS, BRIDGMAN & COMPANY. 1853
- The Healing Powers of Honey by Cal Orey: Kensington Publishing Corp, 2011
- The Honeybee Hobbyist: the care and keeping of bees, Norman Gary phd.: Bow Tie Press 2010
- The Taste of Honey: The Definitive Guide to Tasting and Cooking with 40 Varietals: Marie Simmons: Andrews McMeel Publishing LLC
Internet
- History of Beekeeping: http://beeswales.co.uk/en-GB/History-of-beekeeping
- Honey and History: http://www.gousiaris.gr/en_meli_istoria.html
Mevanous Fresh White Cheese
Mevanou’s Fresh White Cheese
By Mevanou verch Reys Yriskynit
aka Tina Marie Comroe 2014
I have lived in the Kingdom An Tir, in the Barony of Blatha an Oir and Recently I have been in the Kingdom of the Outlands in the Barony of the Citadel of the Southern Pass and in both places I made cheese. Moving from place to place has not stopped me from enjoying the making and sharing of my cheese. Having an even greater joy of people wanting me to teach them how to make it gives a great warmth to my heart. I am not, however a great teacher. Rather, I am a better writer. So here is the recipe and the instructions for any other cheese-maker to enjoy and mess up their kitchen with!
I have been asked why I use vinegar, lemon juice and a flavoring alcohol to make my cheese. The answer, I am squeamish. Squeamish at the thought of where the Rennet usually used for making cheese comes from, and vegetable rennet does not seem to work well.(My opinion, which everyone is entitled to disagree with and experiment on their own) Another answer is that there are vegetarians in our fair Barony and many animal products are not palatable save for cheese. As an animal need not die for me to have my cheese; I agree, and so I use vinegar, lemon juice and sometimes even alcohol. (Saffron and Bourbon cheese..mmmmm)
There are a great many books out there in internet land and articles also on the history of cheese. Humans have enjoyed making cheese in it’s many gloried forms and flavors for thousands of years. There is also some evidence that cheese was being created and eaten as far back as 7000bc… If you want to find out more on the History of cheese there are thousands of websites and hundreds of books with better bibliographies than I. This little bit of fun is just for how of it, not the historically accurate droning on of information. Believe me, I can drone on and on…and it would most likely put you to sleep…see the bibliography below for good reads.
Now, to make cheese you need these things below.
Tools:
1 – pot large enough to hold 5 gallons
1 very long handled stainless spoon
1 wide bowl ladle with very small holes in the bowl(or small mesh)
1 long candy thermometer that will clip to the side of the pot
1 24inx24in square of muslin
1 deep bowled strainer stainless as plastic will break
1 nine inch x three inch deep plastic container (that’s 9 inches around by 3 inches deep.)
1pkg paper towels (that’s 4-6 rolls)
That Handy Dandy Cheese Press you just finished making will come into play later..trust me. You won’t need the molds this time unless you really want a hard cheese.
Cheese Ingredients
3 gallons whole milk (pasteurized is okay. not Homogenized. Pasteurized is sterilized. Homogenized means they shake it until the fat molecules themselves become so small that it takes longer for the curds to form, if they form at all)
1 gallon half & half
1 cup Lemon Juice
6 cups apple cider vinegar
3 tbsp kosher salt
Instructions
Step One
Let the milk and half&half, sit out on the countertop overnight to get to a warm room temperature. The next day place the pot on the stovetop and gently pour in the milk and half&half one gallon at a time, letting the milk rest between gallons.
Once all milk is in the pot, stir gently to mix it well. Let sit 5 minutes then turn on the stove. Clip the thermometer to the side of the pot allowing it to hang halfway down the pot. Gently heat the milk up to custard temp or 140 degrees F. keep the milk at that temperature for 5 minutes. Mix the vinegar and lemon juice in a large bowl, or container and then gently pour it into the milk. Very Gently stir it in, turn down the heat and walk away…or not. The curds of the cheese will rise to the top and consolidate into a large and thick matt. Do not stir. Wait another 10 minutes and test the curds. When pressing down in the curds creates a tear, it is time to cut the curds with a long bladed knife. Create cubes within the pan gently…That’s the rule. Gently. Turn back up the heat and allow the whey to simmer, cooking the curds further. Gently, Gently Press down the curds into the simmering whey and keep up the simmer for 5 minutes. Turn off the heat and remove the pot from the stove. ALLOW TO COOL! Don’t play with the curds, cover the pot with the square of muslin to keep out hair and flies. Now it’s time to walk away for a few hours…go make something else, or do some research…
Step Two
When the curds and whey are cool to the touch; gently ladle the curds into the strainer lined with that muslin square. Make sure that you get all the curds, you should get about 5 lbs of un-drained curds.
Gently break up the curds into pea sized pieces and allow to drain off the last of the whey. I let that go for an hour.
Step three
Pulling up the edges and corners of the muslin form a pouch with the whey inside, then twist it up causing it to squeeze out the last of the whey. Keep squeezing until the curds inside the bag form a ball. Open the muslin again and break it up again, sprinkling the tablespoons of Kosher salt all over it. Hand toss the curds so that the salt is well mixed in then using the muslin squeeze even more whey out of it. Put the Cheese press over the sink and place the muslin wrapped cheese onto the center of the Cheese Press and put a good heavy plate over the bundle. Lower the bar down onto the place and start tightening the nuts until the cheese starts pouring off more whey. Tighten it a bit at a time waiting about 10 minutes between each tightening. When no more whey is dripping from the bundle, remove it from the press.
Place the ball of curds still wrapped in the muslin into the plastic container. Open the muslin and yet again break up the curds forming it to the container, pressing by hand.
Pull out the bag and gently turn over onto a cookie sheet lined in paper towels and remove the muslin, taking care to keep the shape of the container.
Now cover it with two layers of paper towels, so that they drape down the sides and cover the top evenly. Gently press the container back over the cheese and turn back up and press into the container again. Leave the paper towels; they will help with pulling more whey out of the cheese. Layer paper napkins on top of the cheese, again pressing down. Put the lid of the container over the napkins. Turn the container lid side down and put in the refrigerator. The thicker the layer of paper napkins the more whey is allowed to drain off. Change the paper towels and napkins twice a day, or until they no longer are damp. Let the cheese age for two days or longer and enjoy.
On Crusting the cheese with flavors.
Use whatever flavors that catch your fancy.
Usually I crust a cheese with salt and pepper, if that is too salty then just use the pepper.
Fresh chopped herbs make a fine crust and if you sprinkle it in as you ladle the curds into the molds it will flavor the cheese very nicely.
To crust a cheese with herbs, salt, pepper or even sugar it’s a step before putting the paper towels over the cheese and back into the container. Pour the crusting materials over the cheese and pat it into the surface, covering it well and then put the paper towels over the cheese and then put the mold back over it. pour crusting material onto the surface of the cheese in the mold and then cover with the paper towels and put on the lid. Aging the cheese for longer than a week helps the flavors of the crusting material to slowly fill the cheese. For a sweeter cheese, add 2 cups of honey when the milk gets up to temp and stir gently. Then follow the directions as usual.
Cheese is something to have fun making, even if it never gets as hard as you like, the soft cheese can still be used for dips, spreads and sauces. Sally forth and enjoy the curds!
For those who need some documentation:
I have put some books and articles that I have found as useful references. Luckily the authors have put them in PDF format.
- 14th to 15th Century Soft Cheese. http://www.cheesemaking.com/includes/modules/jwallace/onlinenews/feedbackpics/06_11/friends/pics/meidieval.pdf
- Easy Cheese making: Acid Coagulated Soft Cheeses – Wendy Dunlap
Click to access easy_cheesemaking.pdf
- Traditional Cheese making Manual – Charles O’Connor
- Cheese Making – Amanda Titus
Click to access amandatitus.pdf
- Making Home made Cheese – Nancy Flores
- Home Cheese Making from Goat Milk – Jane Kerstetter http://www.susanparks.com/cheesemaking/makingchevre.pdf
- Bio Science Explained: the Art of cheese making
- Cheese making Simplified
Click to access CheesemakingSimplified.pdf
- 19 easy ways to make cheese and yogurt for beginners.
Click to access Jerry%20Issa%20-%20Easy%20Cheese%20Cookbook.pdf
Make an Inexpensive Cheese Press
Making an Inexpensive Cheese press
by Mevanou verch Reys Yriskynit
We who love cheese know that without a cheese press all we will have is crumbly but good soft cheese. To have hard cheese you need a cheese press, period. I have been reading this website and that one about a ten(10) dollar cheese press. So I went about my business to see if it’s actually a viable price. Depending on where you live, recycled wood and hardware and chunks of spare pvc might be easily come by. Sure, if you live in the city where there are pallets laying about or chunks of wood that could use a good bleaching, sanding and sealing before use, same with chunks of usable pvc that may or may not have been dug up from replacing water or sewage lines. Having known several people that worked in carpenters shops and in various positions with other kinds of companies I know that wild animals and stray cats will spray woodpiles, as will stray construction workers. So, I went looking for all new materials within an affordable but safe range for my cheese press.
When I first wrote this, I live in El Paso Texas, so finding things in the same store would be lovely, but not economically smart. Using my brain, I went to every store I could think of that would have what I need without needing to do anything other than drill holes, sand and assemble. Lazy, but when I don’t have a giant carpentry shop at hand, and very few actual tools I do what I must. I went to their websites first and price checked my supplies like crazy. I avoided Home Depot (despot) for a good reason, none of the supplies in the list would have kept the price under 40 dollars, nor did they have shorter lengths of the pvc needed for the project; the store here near me is expensive in the same way that some department stores are too expensive to shop at while trolling the mall.
My day was started early to keep from being on the road too long, and so that once I was home I could immediately start working on the project.
The stores I went to had all that I needed for this project, the people were friendly and very helpful. To them I give a great big THANK YOU!
So this article will show you a cheese press made with new materials that will cost you under 40(forty) dollars. Not that cheap, to be sure but still a lot less in cost than those fancy jobs you see on Ebay. The added greatness to this design is that the bottom board of the press sits right over the top of a standard sink beautifully. The whole board, there is no need to cut it in half unless you are living in Tiny House Nirvana with a 4 pint sink.
Need for this project:
Power Drill with 5/16in bit
4mm drill bit (for putting holes in the molds)
Sander with sandpaper
Measuring Tape or Ruler
Lock-Tite glue
Supplies
From Lowes Hardware:
2 – 12 inch long x 5/16 inch steele allthread. they cost $1.15 each.
6 – 5/16 in hex nuts. they cost $.11 each
6 – 5/16 x 1/4 inch washers. they cost $.16 each
Total cost after taxes: $4.24
From Walmart:
I know, the evil Empire…nooooo. Ahem, when this town gets a Fred Meyer’s to purchase cheap a$$ things from then I will only be too happy to eschew the premises of Wally World for shoppers paradise. This one purchase takes up the largest portion of the cost of my cheese board and is going to be the best part of the investment, trust me. This is the board that the cheese curds are coming in contact with, a good solid, easy to sanitize board that has not been found in the scrap heap where it has come in contact with who knows what is a good thing to have.
1- 21×15 inch Faber ware bamboo cutting board. It cost a whopping 22.70 after taxes.
From Ace Hardware:
At Ace Hardware you can have the 4 inch diameter schedule 80 pvc pipe cut to length for you. They sell it by the foot so you will end up with two 6 inch long lengths for cheese molds, which I find to be awesome…Twofer!
2- 6 in long x 4 inch diameter pvc molds. cost per foot 2.42 after taxes.
and finally
From Hobby Lobby: Yes, I understand why many eschew shopping there..but It was close to home and has better customer service than the Michael’s Arts & Crafts we went to first.
2 – 4 inch round wood trophy plaques from the wood section of the Craft Department.
They cost me $.79 each
Total costs with taxes that brings the bought Items to a total of: $31.07
Now it comes down to the rest of the non cash bought materials.
1 – 18 3/4 inch length of 2×4 (this is where a clean scrap bin at a neighbors or a friends comes in handy, or you could just buy a full length 2×4 that’s still going cost you less than ten dollars.) This one piece was from my roommates pile of new wood/scrap. It was in a bucket, safe from spraying animals and dirt.
Gather all of your materials into one well ventilated spot so that you are not a headless chicken during the process of making your cheese press. Yeah, yeah I know not everyone has a workshop but a safe, child free patio or garage is good enough, really.
This is going to be a pictorial near step by step set of instructions, so stay with me here.
For the base board:
Measure the cutting board to get the center. For this cutting board it the measurements are 21in x 15 inches so the center line lengthwise is 10.5 inches, for the width it is 7.5 inches. With a pencil and a straight edge mark the center lines edge to edge in both directions.
From each end measure in 4-1/8 inches and drill a hole.
Along the center front edge mark off 5 drains 1 inch apart from the center and drill holes.
Sand the whole board to remove the chemical seal/stain, which will also remove the pencil lines.
For the top bar:
On the 18 3/4 inch length of 2×4 find the center lines and mark them also. Since a 2×4 is not really 2inches by 4 inches the measurements will ne ed to be done carefully.
1 3/8 inches x 3 5/16 inches…So I eyeballed it and got 1 11/16 inch for the width and with a pencil I marked that line, believe me they will sand off. At each end of the top bar mark and drill a hole at 3-1/16 inch.
Sand the whole thing to smooth edges and remove any lumber company stamps.
For the Molds:
Measure 1/4 inch from the bottom edge of the mold and drill holes 1-1/2 inches apart all the way around. Drill 2 more rows as pictured in Figure 3. Sand the outside and round the bottom edge until there are no more makers marks or stains. Figure 4 shows the inside of the mold, ignore the striation in the plastic they are just different colors of th e recycled plastic that is used to make the pipe. It’s not dirt or bad stains, I sanded the dickens out of the inside. Now to put it together.

Once all holes are drilled take the two lengths of all thread and put a nut onto an end, making sure that the tip is flush with the nut. Add a drop of locktite in the threads and allow to dry overnight.


From the underside of the board place a washer on the rod and put the rod through the base board
and from the top add a washer and tighten a nut down to hold the rod in place.
All assembled the cheese press should look like this.
As you can see, it fits right over one of the sinks just right.
The two trophy plaques from hobby lobby sanded down smooth fit into the molds perfectly.
Yes, there is a hole drilled in the center of the plaque, but that is to aid draining, due to the fact that the plaque fits the mold perfectly..
An Expanded thought on Medieval Pilgrimage
Throughout man’s history with the Christian and Many other )religions, there have been pilgrimage sites visited where men and women have been martyred for the “cause”. Those sites are considered holy even to this day. Up and down the European coastline and along trade routes can be found little chapels or larger abbeys where pilgrims on this quest or that can go see the venerated remains of the martyred souls: who, though long dead allegedly work miracles for the faithful.
The burial sites of martyrs were the first destinations for pilgrimage in the Christian West, reports of healings contributed fame to such sites. In the 4th century, Rome became a major pilgrimage as it was considered Holy due to the tombs of the Apostles, martyrs, and the catacombs themselves where it is said that the followers of Christ would preach the word after his death.
In the early middle ages, pilgrimage was mainly focused on the veneration of relics which were contained in the major centers of the Christian world- Rome, compostella, Canterbury, cologne, and Mount-Saint-Michael. Almost every diocese had a place of pilgrimage to honor a patron Saint, Wales was no different. Going on Pilgrimage was considered to be a holy quest and was taken very seriously. One did not make a vow to go on pilgrimage lightly, as the consequence of not going meant excommunication from the church. Excommunication was the worst thing that could happen to one of Christian faith.
The normal rules of society did not apply to those on pilgrimage, as most pilgrims took up the pledge to renounce possession of material goods and only live on charity.
Tens of thousands of men and women set off on pilgrimage to the shrines of saints and sites of miracles during the middle ages. As they traveled along well established routes in hopes of cures or blessings; to fulfill vows or just to see new places.
The most effective way to receive the miracle from a saint was to make a pilgrimage to their shrine, although there are accounts of those that received the blessings by drinking the holy water from the well from someone who did the pilgrimage for them.
The word pilgrimage is from the old French pelegrinage or the Latin peregrination- meaning a journey undertaken in a devotional spirit to some sacred place.
Relics formed the real wealth of the medieval church and the demand for some form of miracle working relic was due in a larger measure to a decree of the second Nicene Council (AD787) by which Bishops were threatened with deprivations of office should they consecrate churches without relics, a decree that no longer stands solid in the Roman Catholic church in this day and age.
Much documentation has been lost on the traveling of women on pilgrimage, the travel diaries of women count for less than 1/3 of the extant sources still available, but go on pilgrimage they did. Women on pilgrimage joined with larger groups going along the same route, rather like Tour Groups to this day. Groups of pious women, sometimes members of tertiary orders, and ofttimes widows would meet privately in a member’s home for the ritual purification before going to the church to receive the blessings to go on pilgrimage.
Travel diaries, written accounts of pilgrimages told the readers what to expect on the road, what kinds of inns and hostels were available, the experiences to be expected when onboard ships (if going to the holy land) and the wonders of the shrines and the miracles to be found there. At the heyday of the Middle Ages it was uncommon to find many people who had traveled more than a day’s journey from their original place of birth. To travel distances greater than about 15 – 20 miles involved finding somewhere to stay overnight, or finding a safe place to make camp, which was always either expensive or dangerous and sometimes both. Undertaking a journey of several weeks, (pilgrims traveled on foot if they were undergoing severe or special penance or by ass, or on horseback) represented a major commitment of time, effort and of course, adventure. Therefore people would often travel in groups with other pilgrims for safety’s sake, as well as companionship.
The small villages along the routes would often have hospices set up for travelers and each was built in pretty much the same pattern the world over. One would find a large main room with straw heaped up thick upon the pavement for them to bed down upon. Occasionally there would be musical entertainment from traveling musicians and jongleurs. There would be a single meal, shared in the main room and then in the morning the pilgrims would be on their way.
Writers of the time gave also a comical look into what a woman would wear while on pilgrimage. Geoffrey Chaucer in his “Wife of Bath” gave a description of her veil and wimple.
“Hir coverchiefs ful fyne weren of ground;
I dorste swere they weyeden ten pound
That on a Sunday weren upon hir heed.
Hir hosen weren of fyn scarlet reed,
Ful streite yteyd, and shoes ful moyste and newe. Ywpmpled wel,
and on hir heed an hat as brood as is a bokeler or a targe;”
She was evidently well and colorfully dressed and loved a large hat. Who doesn’t like a big hat?
According to Alexander Neckam,
“A pilgrim dressed to travel. He carried a wallet (escrepe) around his neck, and a staff (bordon) of ashwood. Like many travelers he wore a hat with a brim somewhat wider than usual, similar to what a peasant might wear in the fields. He also had a cape (chape) with a hood. The wallet and the staff were tokens that identified his purpose to passers by.”
What do you need to do BEFORE the rigorous journey as a pilgrim.
There was a short but important list of things one had to do before going on Pilgrimage.
- A pilgrim had to pay his debts, make a will, settle all arguments and apologize to all they had offended.
- A pilgrim had to see his priest and take a vow to complete his journey; the priest would then bless his journey and give the pilgrim a script and walking staff that had been blessed by the abbot or bishop of the church.
- A pilgrim’s final task was to then take that journey or face excommunication.
Only after taking the vows and blessing of the church could the pilgrim take up the uniform of the pilgrim.
People would choose to visit shrines for several reasons:
- to offer their lives in service to God
- to atone for some wrong thing(SIN) they had done
- to give thanks to God for healing for themselves or a family member
- to pray for healing for themselves or a family member
- to join themselves to the spiritual world by seeking a special place where it was thought possible to draw closer to God
What the well dressed pilgrim wore:
- Broad rimmed leather or felted wool hat
- Coif under the hat, should the hat be lost they must still have a covering for their head representing humility before god. (It doesn’t hurt that the hat and coif combination keeps your head warm and dry.)
- Mantle and Cloak- Both come in handy as they keep the pilgrim warm on their travels as the vow of poverty kept them from leaving with an entourage and baggage wain.
- Sclaven-the ankle length tunic or dress which in symbolism represented Hope. Often made of horsehair if the pilgrim were truly going on pilgrimage to atone for a great sin.
- Script- the essential pouch with shoulder strap used for storing essential items, representing Charity
- Food, Bowl
- Money, Rosary
- Documents
- Book of Holy Scriptures
- Water bottle
- Staff- representing faith: also good for protecting oneself from bandits and wild animals.
- Boots/sandals; for protecting ones feet if not on a pilgrimage that demanded bare feet.
(You’ll note that all of the clothing on the list is just about the same thing one would wear on a regular basis in the Middle Ages. Depending on status, your clothes would be higher or lower quality. )
Hey! Now that you are equipped to go on pilgrimage, ble rwyt ti’n mynd? Where are you going? Of course one did not have to travel far from home in the Welsh country to find a shrine or holy well to visit for home grown miracles. A little bit about Wales: The country of Wales is a small space of land between Britain and the Irish Sea, 175 miles long and 55miles wide. Its population during the Middle Ages was estimated at 150,000 which doubled to 300,000 until taken down by a third by the black plague. In Modern Wales the population has finally swelled to just over three(3) million. (Several different eras found the men and boys of Wales going off to war thus impacting the population of Wales at different times)
When going on Pilgrimage in Wales there are shrines, abbeys and holy wells to consider into your route; Wales in fact, still has over seventeen holy wells, and hundreds of still visited shrines to saints and martyrs. The route through Wales is a near spiral of shrines, wells and churches that should pilgrimage be desired, will get you out after the planting is done and back before the first harvest. Now that is convenient!
In the Middle Ages, there were many factions of the Church out there in the Welsh country that were there to minister to the people and bring in revenue to keep their parishes thriving; Cistercians, Franciscans and Benedictines to name a few. Each with it’s holy wells and relics waiting for pilgrims to visit and be blessed. When you went on pilgrimage you would receive a token or badge to prove you had been to a particular holy place, often if you just went to the holy well you would receive a vial of water from the well or spring. That vial would not only prove you had been to the holy site; but would according to faith, heal whichever ailment the saint was known to heal.
From there you would journey home with the vials of water and possibly a badge or two sewn to your hat to show you had been there. Upon return you would clean yourself up and present yourself to the head of your local church so that he could witness your return and bless the little vials of water.
You would then attend Mass, and the vials of water would be given to whomever you went on pilgrimage for, or you would donate them to the church who could then keep them for a truly needy person. After Mass you would go back to your life, your goods intact and your lands cared for in your absence, or at least you would hope that this was the case. I could not find documentation of the Church having confiscated lands and goods while a pilgrim was away, but if it happened I would hope it did so rarely.
On searching for medieval pilgrims routes I found instead more modern pilgrim routes through Wales called “Ways” which are now well tended walking paths.
- The Cistercian Way
- St. Illtyd’s Way
- Coed Morgannwg Way
- The Tenby Knight’s Way
These “ways” have linked up the counties, cities and back country of Wales along the walking pathways, bicycle paths and bridle paths. They range from 36 miles to the whopping 650 of the circular Cistercian. They can be walked in as little as 10 hours on up to several days. The joys of most of the pilgrimage sites along these routes are the scenic views of Bronze Age ruins and Medieval churches and Holy Wells. The Holy Wells in many of the sites are still visited by pilgrims seeking cures and remission of their sins according to their faith. This revival of the pilgrims ways in Wales comes full circle from the Ages of Saints and the Reformation when it became forbidden to those of the Christian faith to worship saints and go on pilgrimage. A new Age of Saints and Pilgrimages is building itself back up from the rubble of the past and blooming anew the need to go to a holy place and find part of your soul.
We in the Society for Creative Anachronism are one of the few societies that perform yearly pilgrimage all over the known world. Don’t believe me? Yes, I am speaking of the events that we travel to in order to enact our particular historical hysteria. These events can be looked at in a unique manner as well. A way to gather together new pilgrimage badges to sew to your pouches. Pilgrims badges?? No…Those are site tokens you say…Yes, Pilgrims badges I say.
These tokens are not just the pilgrims way of showing they paid in full to attend the event, they are badges that show you took the time to travel far and wide to join in with other pilgrims to go to a particular event for a particular reason…That is all it takes to be a pilgrim. A pilgrimage need not be religious, nope.
Of course the definition is thus:
pilgrimage n
- a journey to a shrine or other sacred place
- a journey or long search made for exalted or sentimental reasons
vb
to make a pilgrimage
So, technically even though we are not on a religious journey to find a sacred place; we can surely say that we make a journey made for exalted (War) or sentimental (kingdom A&S) reasons. Therefore, we are pilgrims and we carry our badges with pride!
Bibliography
Books
- Pilgrim life in the Middle Ages-Sydney Heath 1911
- A History of Private Life-Editors Philippe Aries and Georges Duby 1988
- Pilgrimages and Shrines: A Recognition Long Delayed-Thomas A. Thompson, SM
- Daily Living in the 12th Century: Based on the observations of Alexander Neckam in London & Paris; Urban Tigner Holmes Jr. FSA, University of Wisconsin Press 1952.
Internet Sources
- http://www.saint-jacques.info/women.htm
- http://attractions.walesdirectory.co.uk/Holy_Wells,_Sacred_Wells.htm
- http://blog.makezine.com/2011/06/03/how-to-classic-leather-water-bottle/
- http://bushcraftusa.com/forum/showthread.php/12237-Tutorial-Leather-water-bottle-Cutting-and-sewing
- http://en.wikipedia.org/wiki/List_of_monastic_houses_in_Wales
- The Cistercian Way: http://cistercian-way.newport.ac.uk/route.asp?RouteID=Index02
- http://www.pilgrims-way-north-wales.org/page26html.html
- http://www.margamcountrypark.co.uk/default.aspx?page=1402
