The only thing that doesn’t bleed when pricked with a pin is a pincushion. However, in the context of the early English Language it is not the storage device of pins we are most concerned with in this documentation, but the word to describe it. Most of us today call it a pincushion, and the word brings to mind a small scrap of fabric folded sewn and stuffed, that then gets pricked with more needles and pins than it can hold. Often to be found at the bottom of the sewing basket and found when one of the pins pricks the finger.
Words change, but thankfully we leave behind traces of that change in inventories, judgments and wills.
The Etymological Place-marker is an item used in a time period with its original name still being in use. This little cushion decorated with haphazard Or Nue embroidery and plastic pearls is such a place-marker.
The word used in the 150 years between 1480 and 1630 as found in inventories and judgments: Pinnepillow.
The British History Traded Goods dictionary says this:
¶A rather earlier term for a PINCUSHION, often coupled with a PURSE as in ‘2 purses 1 pinpilow and sheath’ [Inventories (1612)], or actually combined with one to combine the two functions as in ‘1 pin pilow purse’ [Inventories (1612)]. This may be because these were two items that most women carried around with them. (British History Traded goods dictionairy)
165. 16 July. From the ship of Cornelius Nese called Christofer of Middelburg
William Standfast, A, 1 last train oil in narrow brls., £8
Lambert Jacobson, A, 1 dry brl. with 3 pcs. Brabant linen cloth cont. 72 ells, 1 pc. Holland cont. 24 ells, 46s.8d.
Said master, A, 4½ pokes flax, 46s.8d.
John Clays, A, 1 small corf with 1 doz. [S dagger] sheaths, 3 doz. 3 wooden combs, 2 doz. 3 girdles, 17 pairs wooden beads, 4 [S 3] latten girdles, 14 [S 13] small mirrors, 11 doz. leather and thread laces, 18 [S 17] doz. leather and thread points, 5 doz. long laces, 1 lb. brooches, 10 pinpillows, 2 purses, 6 coverings for distaffs, 2 doz. small knives, 6 small pouches, 6 spoons, 1 small chest, 13s.4d.
Said master, A, 1½ ton weight iron, 1 narrow brl. train oil, ½ last cork, 50 wainscots, 2 pokes hops, £8 10s. [S iron and train oil val. £3 10s., the rest £5]
¶William Bocher, A, 3 sacks 4 pokes hops, 1 brl. with 36 doz. pins, 1 doz. lbs. blue thread, 4 lbs. packthread, £12 3s.4d. (British History-London Records, 1480-1481)
5 July, 11 James I.—True Bill that, at Aldersgate Streete in St. Botolph’s near Aldersgate London co. Midd., Jane Bay lie late of Goldinglane co. Midd. spinster stole a towell worth eight pence, a handkerchief worth twelve pence, “duas quadras vocatas squares” worth twelve pence, two yards of bone-lace worth two shillings, one girdle and pinpillow worth ten pence, “unum capitale anglice one blacke wroughte quoife” worth eighteen pence, one napkin worth twelve pence, five ruffe-bands worth ten shillings and eight-pence, one ell and a quarter of flaxen cloth worth four shillings, two pieces of linen cloth called ‘tyffenye and lawne’ worth ten pence, a pair of needle-work cuffes worth twelve pence, one pearle and gold button worth six shillings, ‘one sylver handle for a fanne’ worth eight shillings and six-pence, of the goods and chattels of Sir William Welch knt. On her trial by jury, Jane Baylie was found ‘Guilty’ of stealing to the value of fourpence halfpenny, and was sentenced to be whipt. G. D. R., . . . ., 11 James I. (British History Online, 1603-1625)
March 15; Same to the Customs Commissioners to deliver to Sir Henry Bond 12 little pincushions and two muffs which belong to him, on payment of their appraised value of 3.., same having been seized near Chichester by Rober Tayer. (Customs Commissioners Entry Book March 1686)
These entries give me an insight as to the proper word to use in historical context. I can now use “Pynnepillow” for my pre 17th century attempts in the SCA, and pincushion for my 17th century onward item. Why does this matter? It matters because proper language in the correct historical context is a good practice while conducting historical research of any kind. Words Matter.
Yes, I taught a class at University of Atlantia’s Session 108-9 This past September 18-19th. Yet another box I jumped out of, another comfort zone stepped away from..ad nauseum. I worked really hard on collecting the pictures and the information to create a slideshow. I am not too nice when it comes to describing the Catholic Church, just a heads up. It was recorded. and because it was almost 50 minutes long I had to remember to get my Mevanou’s Musings channel verified. But verified it is and my class is now published for all to see and comment on. My channel is not for children and most of my videos are for those 18+. No, there’s no “adult” content, but I am not a digital babysitter. Please remember to be kind!
When we look at the Virgin and Child we are looking at the Mother Goddess and Son archetype as it developed over several thousands of years. I love the imagery of a mother and her child. Iconic in symbolism all around the globe, every country in antiquity had legends and images of a mother goddess with a child. Mother and child worship was the basis of ancient religions. In the various religions of the world, the same system of worship was perpetuated under different names. In Egypt , the mother and child were worshiped as Isis and Osiris or Horus, in India as Isi and Iswara, in China and Japan as the mother goddess Shing-moo with child, in Greece as Ceres or Irene and Plutus, in Rome as Fortuna and Jupiter-puer, or Venus and Aeneas, and in Scandinavia as Frigga and Balder. The mother and child were worshiped in Babylon as Ishtar and Tammuz, and in Phoenicia, as Ashtoreth and Baal. (Professor Walter J. Veith, 2009)
Thousands of years later she is still here, In the Newest Incarnation. Most images of the Virgin stress her role as Christ’s Mother, showing her standing and holding her son. The manner in which the Virgin holds Christ is very particular. Certain poses developed into “types” that became names of sanctuaries or poetic epithets. Hence, an icon of the Virgin was meant to represent her image and, at the same time, the replica of a famous icon original. For example, the Virgin Hodegetria is a popular representation of the Virgin in which she holds Christ on her left arm and gestures toward him with her right hand, showing that he is the way to salvation. The name Hodegetria comes from the Hodegon Monastery in Constantinople, in which the icon showing the Virgin in this particular stance resided from at least the twelfth century onward, acting to protect the city. A later type is that of the Virgin Eleousa, imagined having been derived from the Virgin Hodegetria. This type represents the compassionate side of the Virgin. She is shown bending to touch her cheek to the cheek of her child, who reciprocates this affection by placing his arm around her neck. (Cloisters, 2000-2001)
For the longest time, there were no examples to show that raised padded embroideries were made before the late 17th and 18th centuries, any examples were hidden away with such care that until found in a church’s treasury or the back closets of musty castles it was assumed that if they were not found, they never existed. Now, there are plenty of items to choose from, mainly because institutions are photographing and digitizing entire collections to their museum websites, more travelers are sharing their photographs to their blogs, and we have magnificent search engines to help us find what we are looking for. France has museums full of purses decorated with raised embroidery, Germany has Badges and wall hangings, Poland has Chasubles by the score with gorgeous raised figure embroideries, yet Until the advent of modern digital tourism, many of these pieces would never have been shared online. There are blogs by the score where people post pictures of their travels and give accounts of those pieces from the museums. I Love the internet.
Why oh Why do they call it Stumpwork?
Every embroidery book that I have in my library lists raised embroidery under one word. That word is “Stumpwork”.
The term “Stumpwork” may have its start in Victoria’s era, but it was first recorded in her son Edwards. (Dictionary, 2019) In the timeline of history, the English fad we call stumpwork lasted from 1650 to 1700. Fifty years is a rather long time for a fad, modernly most fads last for about half that, but stumpwork has returned with the interest of new generations. The detail that puts 17th-century stumpwork apart from earlier raised padded embroideries is the stitches used. Needle laces were used heavily in 17th-century stumpwork over the raised elements of figures, animals, and plants. Needle laces did not seem to be used in England in this manner before that time period. Those stitches were however, used on the Continent earlier in Germany, Austria, Italy and Poland, but not very often to cover raised figures. Needle laces were used to trim and adorn garments both ecclesiastical and eclectic. See Part Two: 1414 Coronation Robe.
For about two centuries before the emergence of domestic stumpwork in England, professional figurative work was being produced in Europe. Many examples of this earlier embroidery, which featured fine softly-sculpted detailing, with applied and padded fabrics and with additional laid threads, can be seen in the collections of churches, and museums from Krakow to Leipzig and Paris. (Hirst, 1993) Raised embroideries were always an integral part of the repertoire utilized in the workshops producing ecclesiastical embroideries of the middle ages, and became more prominent in the 15th and 16th centuries as it traveled north and east in Europe.
Raised figure embroideries were not just the delight of the church, military banners and insignia were also made to stand out from their background and catch the eyes. My favorites of the military banners and insignia are the Golden Dragon of the Order of the Dragon and the Quarter banner of Pope Julius given in victory to the army of Basil. Military banners showed the pride of the country or city they fought for, often embroidered with the victories on the standard.
My two favorite examples of Raised Figural Embroidery
For the most part, embroideries were made to order and took far longer to manufacture then one would expect in our modern age. If it was a large Item such as a Cope, more people had to work on it and be paid for that work. A workshop might employ different teams of men and women to have larger pieces finished faster because as we all know, many hands make short work. Large pieces could include household items; wall hangings, fireplace hangings, bed curtains, etc.
The Cult of Mary, the mother of Jesus was popular in the middle ages, so popular that many artists painted a portrait of her with her infant son in her lap. As I am not a painter, I created this raised figure embroidery in the classic iconography of the Virgin with Child based on three pieces of Marion iconography; the Portrait of the Virgin with Child in Blue by Dieric Bouts the Elder painted around 1455-1460 AD, Madonna of the Rose Bower (or Virgin in the Rose Bower) is a panel painting by the German artist Stefan Lochner, usually dated c 1440-42, and the Madonna of the Rose Arbour by Martin Schonagaur in 1473. In no way am I re-creating any of these paintings, rather I am using them to guide me in making my own iconic piece of art.
All of the embroidery stitching for this project is stitches that were used in the fourteenth, fifteenth and sixteenth centuries; Stem stitch, back stitch, knot stitches, couching stitches, whip stitch, running stitch.
It was the apples that caught my eye. But, Those EARS…
Dieric Bouts has based this small, exquisite image on the ancient Byzantine formula for the affectionate Virgin (glykophilousa)—a type popular in the Netherlands. However, he has dispensed with the gold background and halo of Byzantine practice and has endowed the painting with a human tenderness and simplicity not found in icons. With his subtle and tactile modeling of the flesh, the artist heightened the illusion of living, breathing beings. Focusing on the loving relationship of a mother and her son, his portrayal emphasized human emotions and enhanced the intense inner experience of private devotion. (Metropolitan Museum of Art)
Madonna of the Rose Bower (or Virgin in the Rose Bower) is a panel painting by the German artist Stefan Lochner, usually dated c 1440-42, it is usually seen as one of his finest and most closely detailed works.
The Virgin is presented as “Queen of Heaven”, and is seated under a canopy with red curtains held apart by angels. She sits on a red cut velvet bolster, holding the Christ child in her lap. Her crown and medallion are symbols of her virginity. She wears a minutely detailed brooch, which contains a representation of a seated maiden holding a unicorn (Which the printer cannot seam to capture).
Christ holds an apple while hovering and seated angels offer gifts or play music. Five kneel in the grass before her, with instruments including a portable organ, others bear fruit.
The painting is heavily infused with symbols of innocence and purity, including the red and white roses. Mary sits before a curved stone bench, on a red velvet cushion, around which grow lilies, daisies, and strawberries, with an acanthus flower blooming to her left. Mary herself is presented on a monumental scale (as a larger central figure), underscoring her regal status. (Lochner, 1440-1442)
Martin Schongauer painted around 1473 a ‘Madonna in the Rose Garden’ for the Saint Martin church of Colmar. Martin Schongauer’s picture is a ‘Throning Madonna’ since two angels hold an enormous crown symbolically over Mary’s head. The painting is unconventional in various ways. The hair of the Madonna is flowing freely over her shoulders, which is unusual as it was a sign of sensuality that was rarely associated with Mary. Jesus and Mary are looking in different directions, whereas Mary usually only has eyes for her son. Mary is painted as a melancholic young lady. She holds her head inclined; she smiles affably, secretly and contentedly. But Jesus already tries to escape from her. We mentioned that the colours of Mary’s robe are not conventional. Martin Schongauer must have been one of the first painters to emphasize the strong pyramidal composition, which is obtained by the red cloaks of Mary. Schongauer certainly was a highly skilled colorist and he knew very well how to paint with realism the smallest detail, as seen in the various tones of the folds of the red cloak of Mary (The Art of Painting and a Visual Journey into the Bible)
In the Workshops of the middle ages, embroiderers used passing threads that were surface couched to add glints of light or whole swathes of brilliance to their embroideries. The earliest of extant examples of goldwork embroidery is the fragments of the Cuthbert maniple and stole, excavated from his grave. Embroidered in 902-906 AD it’s goldwork of surface couching made of passing threads of pure gold wrapped around a silk core stitched down to the surface with silk thread. (A Brief History of Goldwork)
The passing threads are of gilded mylar wrapped around a cotton/polyester core. It is sold at Joanne Fabric and Crafts as single strand or as cable cords. As the “real thing” can be costly and I would need several yards to create this piece, I chose to go with the mylar gilt rather than the 24carat gilt passing thread.
The woven ribbon of gold is Lurex ribbon which is also sold as “Christmas Ribbon” Also less expensive than the real cloth of gold ribbon and comes in a 3 yard spool in the craft section of many stores.
In a historical context, just as with other uses of gold, I would have seen it on display in churches, on the clothing and household furnishings of the Royalty and Nobility, Regalia, and later on in military uniform embellishment.
They started with the foundation, or background. Usually on an Orphrey, it was the elaborate goldwork that figures would be attached to. That goldwork itself would also be sewn onto a foundation. Much of the time the foundation was of linen because it would not be seen and was widely available.
My foundation is of bonded blue/green silk taffeta and cotton muslin, good and stiff, tacked to a fifteen by seventeen wood embroidery frame.
The technique for laying down the background was usually surface couching:
This simple stitch is used to place down everything embroidered on the background.
To Work Surface Couching – Lay down the thread to be couched, and with another thread catch it down with small stitches worked over the top. When laying down gold ribbon the same stitch is used to catch along the edges in neat well spaced stitches.
The Background
Upper Half
Looking at the background of the Stefan Lochner painting you can see that the upper half is mostly gold with a lovely rose arbor framing the upper body of the Virgin. Closer inspection shows that the figure of *God* is looking down giving the blessings of the Spirit. The texture of the gold is given lines that radiate like the rays of the sun downward to shine on the subjects.
For the upper half of my background I placed a heart, not *God* at the center of the Rays of golden ribbon. The heart is gilded snakeskin. Flanking the heart are two trees, each a contender for the Tree of Knowledge. An Apple with rosy pink silk apples and the Pomegranate with its ruby silk pomegranates. The trunks and branches of both trees are mylar wrapped passing thread, their branches arching out over the Blue silk and antique gold trim that frames the piece in imitation of the arched frame shown framing the Martin Schongauer painting. Their roots are woven into the background of gold ribbons upon which the wooden frames of the arbor are wrapped with gold threads to hold the bramble vines of the roses. I gladly followed the suggestion of a fellow embroiderer Carrie Hulsing who suggested to use of toothpicks for the wooden bower and wrapping them in gold thread.
The Roses rest on brown brambles of silk ribbon braided and bunched along the length of an inner core of more silk ribbon. Silk ribbon roses in pink and yellow fill the brambles with golden twisted knot stitches (french knots) at their centers. Generally in iconography, the roses are red and white. My roses are Pink and Yellow because they are the roses that grew in my mother’s garden. The wide golden trim cuts the background in to upper and lower halves as the garden walls and benches do.
Tacked to the frame.
Outlined with running stitches.
Filling the upper dome.
Overlapping in a arch.
Upper dome filled
Temporary pinned Border.
Lower half of gold dome.
Weaving the tree roots.
Tree roots woven.
Side View.
Both trees Woven.
Up close of Upper dome.
Upper Half Finished.
No Fruit Yet, spring coming.
The First Poms.
Rose Arbor and materials.
No Fruit yet, wait for summer
My heart of gold.
Get Stuffed.
Heart with a stick.
How tiny are they?
Yellow Roses.
itsy bits beads.
All of the pictures leading up to the upper part being finished. I will add captions eventually
The Lower Half
In Stefan Lockner’s Madonna in the Rose bower, the mother and child are seated on a scarlet pillow surrounded by angels. I swung on a pendulum as to whether or not to have her seated or to depict her as a standing Madonna, and I eventually went with her standing. My ground is stitched in with knot stitches in different thicknesses of cotton floss, wool yarns and craft yarns with different textures. All of the yarns and threads are shades of green so that when I use more knot stitches to show the flowers the bright colors of the strawberries, violets and clover will stand out. Though you cannot see them, I blocked out the lower half with a grid so that I would not get overwhelmed the the volume of knot stitches needed to cover it.
No, I did not bother to count the stitches per inch, sorry. I will, however bring a small clear plastic ruler so that any looking at the piece might try and count the number in a square inch space, if they are brave enough. But only if you wear gloves.
Before the green satin is added.
French Knots
L.O.V leaves cut out.
L.O.V leaves beginning.
L.O.V leaves cut out.
L.O.V leaves and flowers.
Still more French knots.
R.o.S up close
The mother is coming, make room!
Lower Half of the background Update.
It has taken two years to get to this point, I have embroidered some, researched raise figural embroidery some. But it is slowly coming together. Stay tuned as I post part two of this article with the extant examples of Raised Figural Embroideries of the 14th, 15th and 16th Centuries.
The two figures of this raised figural embroidery are a Mother holding her child. As we cannot see the actual sex of the child it remains in that ambiguous area between boy and girl and can therefore be called simply a Child. Therefore no true religious label can be applied. In saying this I allow those that look at the embroidery to make up their own minds as to who this pair are. Earlier in this text I gave examples of the Iconography of the mother and child imagry to show that many different peoples can lay claim to them. Not just one religion raised the mother and child to a pedestal in art. My inspiration comes from christian iconography tis true, but only in the beauty of the artists skill giving me the imagry to imagine in thread instead of paint.
The Underpinnings of the Mother Figure.
Side view A.
Pad those curves.
Can you see me now?
Before the face.
Padding The Mother Figure.
Of Course you can see that my figures are NOT dressed in highly ornamented gold shaded embroidery. My mother figure is wearing scraps of very expensive garments found at thrift shops and up-cycled. Her cloak is a lovely silk taffeta that changes from red to orange and trimmed with gold and white holiday yarn to simulate the fur trim in the paintings. You can see that I surged all of the edges to keep the fraying down to a minimum. Her dress is also from a satin blouse from the thrift shop. Her belt a lovely scrap of pink velvet ribbon from the satin blouse. Her long hair is braided up at both sides and a long braided tail hangs off to the side. The Nice thing about this project is that the figures are merely slip stitched to the background and can be removed for repair.
Mum’s ready.
Nap Time.
Need more coffee.
Do up my zip luv?
Nevermind let’s go.
Mother Figure Dressed Front and Back
Creating the Raised Figures is done pretty much the same way they were done in the 15th and 16th centuries. The figures of saints were raised with a padding of spun wool and other textile yarns, their fingers highlighted under the delicate silk stitching with twisted wire. (Damboiu, 2013) The saints faces and hands were skillfully stitched in silks of many hues by those whose skill with thread and needle made them as highly valued as those who made pictures with brush and pigment.
Left hand and arm palm up.
Left hand and arm back.
Hand Jig showing adult and child sized hands.
The Jig is 3 pieces of corrugated cardboard glued together so that pins don’t poke the user.
The Hands and arms, right and left.
The saints vestments were stitched in a spectacular fashion, usually in the renowned technique of “Or Nue” by gilded threads being couched down in colored silk threads. The saints garments were laid out on a piece of linen and the threads were couched down over the tiny garments pattern. Once finished the garment was then draped over the figure and sewn down. Sleeves would have the hands added before themselves being sewn to the figures separately. Faces were embroidered and then added to the padded form.
really, more pictures?
Is the lighting right?
Criminal line up shot 1.
Criminal line up shot 2.
I’m too young for bald spots.
one more if you must.
After Face has been embroidered and attached. Then Hair.
Underpinnings of the face.
The Face and head.
Upon finishing, the figure was then added to the Liturgical Vestment, in my case the figure has been added to the embroidered background.
Mother Figure Finished and Attached to the background.
The Child Figure!
The child was a bit difficult to create owing to it’s tiny size. The pattern for such a small figure did not exist for purchase online, I had to draft it out on scraps of paper until I got the correct size in relation to the mother. Once that was done I carefully traced the pattern pieces onto a doubled over piece of white cotton and put it into a hoop to keep down the fraying. Once sewn it was a matter only of cutting, turning and stuffing.
Body: Drawn, Sewn, Cut and Turned.
Once the body was turned it was a matter of stuffing it. I stuffed it with snips of white yarn using a small bamboo skewer. after closing the feet at the end of the legs I stitched them to the stuffed and closed body that I had done a bit of sculpting for shape, not that anyone was going to see it once the tiny child was dressed, but I did it anyways.
Torso and legs: Stuffed, Sewn and sculpted for shape.
Next came the head and arms of the child. I folded the white cotton back together and traced the head for the underpinnings of the face, unfortunately I did not remember to run upstairs for the camera to get a few pictures. (Don’t worry, I did a second child for a how to, kindly go to Part three.) The head was sewn, cut out and stuffed. and sculpted in a technique similar to soft sculptured dolls. then it was sewn onto the neck of the body. The back of the head was padded with scraps of white linen and felt. The face was a circle of white cotton embroidered with eyes, eyebrows and tiny lips. two little pencil marks for the nostrils were my guide in sewing the face to the head. Once that was done, the excess was gathered to the back of the head and whip-stitched in place. I then added long satin stitches for hair in a matching dmc floss.
Yay! Arms!
Front View no arms.
Side view no arms.
Thumbelina was smaller than this.
Face and Head Attached.
Now out of gate 5 we see our artist checking to see if the hands off of the hand jig were the right size. Humans feature hands that fit our face from chin to eyebrow and this tiny figure is no different. Once that check was done I attached the hands to the arms the same way I did for the mother figure. And then I attached the arms to the child. I used a basic romper style dressing for the child using the same scraps of red that had been used earlier for the mother. I was not going to reinvent the wheel.
Attaching the child to the mother was just a matter of bending arms and fingers around the Childs chest and leg. Like any child being picked up during play, this child has a ball of bright blue in their hands. Almost done.
Waiting to be finished
Finished and attached
No nekkid baby here
Talk to the hand
Got your toy, Good, let’s go.
Back of the head
Left side of the head
Right side of the head
Finishing up the Figures.
The stars in the heavens.
You remember earlier that I mentioned my choices of fabric? well not wanting to embroider the dark blue of the vaults of the sky was part of it. the second part was the joyous sprinkling of golden sparkly spangles as the stars.
Hi all! Tina here. This Blog is usually mostly about All things Medieval and Mevanou would like to keep it that way. So to post all of my EGA blogginess here would block the cogs in her watermill so to speak. So I have created a new wordpress blog. Tina’s Adventures in EGA-Land. Coming soon. But before that happens I will be copying all of my posts and rewriting them for the new blog, and then deleting them from Mevanou’s Musings. Hope to see you all there!
These Following books will help you on your path to doing this wondrous type of embroidery. It is not a beginners craft, and I often think I have gotten myself way over my head and out of my league. (Snort) I cannot think of any other type of embroidery that will kick my ass, and pick me up by the scruff of the neck and tell me to do better next time. As I learn more about the techniques and read more books, I will be adding them to the list, but for now, these will do. Oh yes, they will.
Sophie’s book contains a dozen techniques for the embellishment of textiles ranging from Crewel to Smocking. Each technique has samples in full-color glossy photographs and well-done drawings in a step by step sequence to give you a good start. The relevant section of the book for this documentation is the chapter on Stumpwork. I found the usual needle lace, detached and raised surface stitches, but the really important part is the Figures primer. In the Figures primer, you find step by step instructions on how to do the raised figures that are the underpinnings of raised figure embroideries. She covers the body, face, hair, and hands.
In this book, Barbara and Roy Hirst guide you along the path of stumpwork embroidery with some history of the craft, pictorial examples and step by step instructions on the various techniques that make stumpwork such an art-form.
Jane Nicholas is touted to be the best in her work and you can clearly see it in the examples she created to teach this technique. The title of her book is rather misleading, however as her book only covers the plants, animals, and insects but not the human figures that are often the central technique that people have come to know as stumpwork. The beautiful Elizabethan Figures that are central to her original piece are not covered in this book. It will, however, teach you the varied techniques needed to create the natural world in the background of your figures. She also helps you use those techniques in a variety of craft projects to beautify your home and needlework basket.
Kay and Michael Dennis give you a really good start to finish guide to stumpwork through the seasons. They start you off with all tools, materials, and threads needed to do the lovely projects pictured in the pages. Besides the stitches and techniques for the surface embroidery, they guide you to staining or painting the backgrounds to give a more natural and realistic look to your work. A good book for those that need color pictures to guide step by step.
In this book, Erica Wilson brings together all of the techniques earlier published in smaller books. She is best known for the revival and popularity of crewel embroidery in the early 1970s. The most relevant is Chapter three, Silk and Gold threads. This chapter brings the history of silk and goldwork together with full directions, list of tools and supplies as well as stitch diagrams.
Muriel gives a good read into the origins and history of Stumpwork or Raised Embroidery from its beginnings to modern craftsmanship.
Tools and Techniques
Making a hand jig
While bending wire is fun all by itself, making hands for raised figures hand be a chore. You will need the following: 1 large hunk of corrugated cardboard saved from an Amazon box, Glue, box cutter, steel ruler, heavy weight. Cut 5 squares of thick corrugated cardboard or 8 from regular and glue them in a stack. Put a heavy weight on them and let the glue dry overnight. On a clean side trace out the small hands needed for your figures.
To use your hand jig, you will need steel pins (Not the ball topped pins), strong needle nosed pliers, and 28 gauge wire or finer. Place a pin in your jig pushing the pins in deep, but not too deep. starting at fingertips, then between fingers, and at wrist points. You can see the dark shadows showing the missing pins.
Now its time to wire up your hands. The wire wraps in and out around a pin to form the thumb, fingers and finally the full hand.. Remove each pin carefully so that the wire doesn’t lose its shape. Put them back in and do the other hand. Until the hands are wrapped in silk or cotton floss it’s nothing to worry about, Right and left are the same form.
When you are ready to wrap the fingers and thumb, use the needle nose pliers to pinch the tips of the fingers and also the insides between the fingers, but not the space of thumb in the larger hands, that will form the webbing important to showing the difference between thumb and pinky.
Herein I show you what I found from the past that will lead me forward to finishing this piece of embroidery. The Raised Figures in Extant Pieces from the 14th, 15th and 16th centuries. My success or failures for this project come only from my lack of expertise in executing the techniques required to create a raised figural embroidery, not in the lack of existing pieces. Those pieces have existed, hidden away from sight in safe places until they could be photographed and published on the internet or in books to bring in tourists to far off museums. I myself would love to visit those far off museums, but I will gladly enjoy the pictures posted online in museums or in scholarly papers shared on the internet. Sometimes the places give you the name of the photographer on the museum sites, but some don’t. When it comes to scholarly papers, often the name of the photographer is not listed and you need to contact the author and ask politely for the name of the photographer who took the pictures used in their papers. In my case, the author very nicely gave me the name of the photographer, which made me so happy. I could cite not only the author’s name but the name of the photographer and it really makes your papers shine when that happens.
So, Welcome to Part two of my Article “A Mother and child Raised Figural Embroidery”, where I get to share the lovely pictures of extant embroideries from the 14th, 15th and 16th centuries.
The Cappa Leonis: Legend has it that this cloak was used by Pope Leo III: It is more likely that the cloak was used for the coronation and enthronement of King Charles IV in 1349 (14th century), Sigismund’s in 1414 (15th century) and Charles V in 1520 (16th century). With each successive use, it was given more decoration to bring it up to date with current embroidery and decorative techniques. The reddish-brown velvet is covered with small white blossoms that are embroidered with French Knots in squares which are framed by what looks like woven gold trim, but turns out to be rows and rows of underside couched gold thread. The front part of the hem shows an embroidered border with quatrefoil alternately adorned with three dimensional little birds and heraldic shields. Along the lower hem of the robe, there is a broad, embroidered border with flowers, stars, and the figures of prophets, together with a band carrying 100 hammerless silver bells that produce sounds by knocking each other. I placed this piece first because it straddles several centuries with it’s seemingly continuous use.
Recycling was “In” before Climate change was a manmade disaster.
A beautiful extant item from the 14th century is this Aumoniere which I call the Lady on the Griffin. On the flap of the alms purse, sits an angel raining feathers down upon the Lady on the Griffin. Under the Griffon is a tiny bunny which gives a good idea of how large griffins were supposed to be. The Figures are raised with padding and slips were embroidered and appliqued upon the silk of the bag, then further embellished with embroidery. Although worn from the age we can see the glorious beginnings of Raised Figure Embroidery in this bag, which is housed in the Cluny Museum of the Middle Ages. (Berizzi, 14th century)
This Ornate Orphrey is housed in the LACMA, it is on the back of a Chasuble, which is an ecclesiastical vestment worn during the offices of the Catholic Church. This particular Orphrey has the figure of Christ on the cross with an attendant at its base. It was recycled from one chasuble and put onto its current textile sometime in the late 14th century. You can see this evidence in the lighter velvet near the base. The velvet textile is thought to be Venetian, but the Orphrey is considered to be Bohemian. (LACMA) The goldwork is couched down over a latticework of yarn. It is directional in that it all goes the same direction, up and down rather than a hodgepodge of side to side. Christ himself is a raised figure made separately then attached to the background and is amazingly lifelike. Unlike his attendant whose only raised pieces are his head, hands, feet. Christ’s loincloth is a very detailed bit of silk and gold embroidered and wrapped around the figure before it was attached. His hair is astonishing in detail.
The order of the Dragon was an order of chivalry founded in the late 15th century by King Sigismund of Hungary to uphold Christianity against the Turks. On gaining admission, new members were given badges of the order which they could bestow on any person they thought worthy of membership. The most famous member of the order was Prince Vlad Dracul. Sigismund founded his personal order of knights, the Order of the Dragon, after the victory at Dobor. The main goal of the order was fighting the Ottoman Empire. Members of the order were mostly his political allies and supporters. The main members of the order were Sigismund’s close allies Nicholas II Garay, Hermann II of Celje, Stibor of Stiboricz, and Pippo Spano. The most important European monarchs became members of the order. He encouraged international trade by abolishing internal duties, regulating tariffs on foreign goods and standardizing weights and measures throughout the country. This particular badge is done in the Oir Nue or Italian shading technique. Colored threads couched down the gold threads that make up the different parts of the dragon.
Yep, it is a figure of a Dragon, but a figural embroidery it is.
There are Nine fragments from an early 15th century Chasuble are housed in the Brukenthal National Museum. The entry of these artifacts in the old record inventory of the museum was completed by Michael von Kimacovicz in 1913 who mentioned the date “1409”.
The preserved Figurative fragments reflect appropriate features of four saints, together with some of their attribues, whose shape and size have helped the museum to restore the Iconographic composition of the Dorsal Cross. (Damboiu, 2013)
The features of the fragments are of such detail that is rarely done in the modern age. I chose to stick with just one of the figures closest to what I needed for this project, although the rest of the figural fragments are definitely on the list for further study.
Figure A. The Standing Virgin and Child.
The Virgin is standing with the infant Jesus in her arms, she wears a Burgundian style gown of made of a textile decorated in full in the Or Noue technique also known as Italian Shading. Each part of the garment is draped and couched into place over a padded form of fine wool and textile yarns. Her hands are wire forms wrapped and carefully stitched together with silk as are the legs and arms of the infant Jesus. One arm/hand of the infant Jesus is missing. Her hair is silver wire wrapped in silk, now tarnished. Her lips are outlined in silver and couched down and in the same manner are her ears attached. Her eyes are painted beads or round gold balls painted to look like eyes, held in place by her eyelids with are wire framed with silver wire and embroidered onto the face. I noticed this when looking at the photos with Paint 3d. Their heads are made separately and sewn down to the padded necks and body form with silk thread. The back of the fragment is just as interesting as the front, more so as it shows at least partially how the garments were attached to the figure.
heads up closerear view of standing virgin and childUp close of handsup close of faceStanding Virgin and Child Fragments of a Chasuble in Slimnic: Photographer Alexandru Olanescu of the Brukenthal National Museum in Sibiu.Saints of the Slimnic Chasuble
Chasuble of the Crucifixion Story
This precious liturgical vestment consists of two medieval parts, which were joined in Baroque times and bears many symbols.
A chasuble is the outer vestment worn by the priest for Mass. This piece in the Vienna Dom Museum consists of two different textile elements: an embroidered cross on a base of red satin. The cross seems originally to have been part of another chasuble and was probably mounted on this one only in the Baroque era. The cross is worked in intricate raised embroidery in gold and silver. It shows the crucified Jesus; above him there is God the Father and below there are Saint Mary and John the Evangelist with the Apostles Peter and Paul to the left and right and, on the bottom edge of the cross, Saint Martin cutting his cloak in half.
Why is this chasuble right after the Fragments from Sibiu? This chasuble was made in the same century, but from a different workshop, allowing us to see the different techniques used to create the figures of the Orphrey. Many of the techniques are indeed the same, but there are subtle differences.
For the men they have magnificent hair and beards of silk wrapped wire. For Mary, her hair is covered with a veil, which was the way that devout women showed their devotion. Covered their hair, wore robes down to the floor and let the men control them even up to the way they lived and died.
Lets start with the faces of the figures. In this piece, all of the faces are slips embroidered then applied to pads of wool and sculpted to shape, before being added to the Orphrey
The saints have pretty bow lips sculpted and lined in red silk while Mary has barely any sculpting and is embroidered in a plain outline. When we look at the work done on the male saints we notice Mary’s depiction seems to be the ecstatic rolled back eyes, which were supposed to be the “It” expression of devotion, but only the women seem to be shown this way. In every single chasuble that was created for the church the men have commanding or compassionate expressions, but the women are practically dying from their devotions or so demure to be incapacitated.
VIRGIN AND CHILD Austria, about 1470 Pilgrimage Church of Mariazell, Styria Treasury Height: 129 cm. Height of the detail: 43 cm.
Cross Orphrey with the Virgin, Saints Barbara and Dorothy, and, at the sides, Saints Catherine and Ursula. Relief embroidery with gold brocade, pearls, gold thread, and silk. The Child, and the faces and hands, in silk, in satin and stem stitch. Background of couched gold threads.
Source:
Black and White Photo: Schuette, Marie, and Sigrid Muller-Christensen: Pictorial History of Embroidery; NY: Frederick Praeger, 1964.
Color Photo: Basilika Mariazell, South Treasury.
OLYMPUS DIGITAL CAMERAI wrote a letter request for color photos of the chasuble, the curators of Mariazell Basilica sent me the gorgeous color photo to display next to the black and white.
The padded and embroidered figure of Christ constructed of velvet with silk wrapped wire fingers and toes, wearing goldworked loincloth applied to a goldworked cross in the form of raw logs. The layered figure of Mary at the foot of the cross has silk wrapped wire fingers on her hand and raised embroidered face. Her garments are layered embroidered textiles.
Pope Julius II Banner Quarter of Basil. The victorious battles of the Swiss Confederates against Duke Charles the Bold of Burgundy in 1476/77 justified the reputation of the Swiss in wartime. From then on, the Swiss were courted by the European princes. In 1512, the Confederates, with 18,000 men, arrived to help Pope Julius II drive the French out of northern Italy. In gratitude for the overwhelming victory at Pavia, they were bestowed by Pope Julius II, among other things, the flag trimmings, also called corner quarters (top right at the flagpole), to show Papal Favor. The recipients were allowed to choose a theme from the New Testament or from a sacred life. Basel opted for the Annunciation scene. This is a Reproduction. The Julius banners were made in Milan. Hans Heinrich Gebhart brought the banner in 1512 over the Alps. For the arrival one organized a city festival: 900 boys with harnesses and wooden (hobby?) horses and 500 citizens drew Gebhart and the banner into the city.
For an idea of how big the quarter banners were. Here’s One of the Julius Banners depicted with his banner man.
This ornately embroidered Orphrey pictures the life and death of St. Stanislaus. Created in the late fifteenth century and donated to the church in the early sixteenth century by the man who ordered its creation. Wavel Cathedral’s 500-year-old chasuble ranks with the world’s top masterpieces of Gothic needlework. Its relief-like three-dimensional scenes from the life of St. Stanislav, Krakow’s 11th-century bishop-martyr and Poland’s patron saint, embroidered with unbelievable precision and realism, match the best sculpture of the late 15th c. Naturalistic features of tiny heads and detailed faithfulness of depiction (complete with an open wound on the saint’s skull where sword struck) are truly stunning. It is a masterly, dramatic composition that arrests attention. Now the amazing chasuble, known as “ornat Kmity” (“Kmita’s chasuble”) is the pride of the Cathedral Museum on the Wavel Hill, displayed permanently alongside its other treasures of church art. (McGuinness, 2008) The height of the chasuble: 140 cm, width: 82 cm; the height of the cross: 133 cm, length of the cross beam: 8.5 cm, width of the cross beam 13.5 cm. The chasuble was commissioned by the Cracow Voivode Piotr Kmita, as testified by the inscription on a band running around the shield with the Śreniawa coat of arms, supported by a bearded man (unfortunately, today it is not fully legible). Its characteristic feature is that embroidered decorations give an almost sculptural effect as they are made on a very high raised base (usually from cotton) with numerous appliqué elements which add to the realistic characters of the scenes. (The Virtual Wawel Royal Cathedral)
Picture No. 1 The Patron at the Bottom!Picture No. 2 Astonishing!
Chasuble Back LACMA
Embroidery: 1490-1510 embroidered orphrey probably from Germany, Bohemia,
Textile: late 14th century (velvet) Velvet from Italy, Florence or Venice;
Costumes; ecclesiastical
Silk cut and voided velvet, with metallic thread discontinuous supplementary weft patterning (brocade), with linen plain weave applique with silk and metallic-thread embroidery and raised work
This very Ornate Chasuble comes from the St. Marienstern Monastery. The Orphrey (cross) was embroidered in a workshop in the Ore Mountains in the 2nd quarter of the 16th century so, about 1550 ish. The Embroidered figures are in the late Gothic Sculptural style. The backing is of the 18th century (1700) from Lyon Silk. (Kollmorgen, 2008)
The Kaminbehang/Fireplace Hanging manufactured in 1571 consists of nine alternating yellow, white and black fields, on each of which a male figure is identifiable. It is 40cm tall and 284 cm long. Made from precious materials, such as silk, velvet, and trim. Silk wrapped metal wires are couched down on the background with gold and silver threads; some real gold wire was used also. The Figures weapons are made of metal wire or wood. The embroidered figures are supposedly stuffed with linen and paper and are semi sculptural in shape, that is, they are applied on the background like bisected puppets. Hanging is housed at the Grassi Museum Fur Angewandte Kunst. It originated in the Town Hall of Leipzig and is the so-called Leipzig Council Treasure. The nine figures of this embroidery each represent a then-known nation in the then typical clothing. Only the German on the right edge wears nothing but a bundle of colorful fabrics over his arm because he cannot decide on a fashion style. In embroidered inscriptions, these figures are mockingly and xenophobically explained. In the 16th century, excessive luxury and the adoption of foreign customs were denounced with figures such as this series. (Arts, 1571)
Nine men from around the world in 1571.Magnified pictures of 5 if the 7 figures from the German Fireplace hanging of 1571
Now, these are some absolutely gorgeous bits of Proof that Raise Figural Embroideries existed before the 17th century. All of them made on the continent by embroiderers employed in professional workshops. All of them masterworks lovingly cared for and stored away to keep them from being destroyed. We now have pictures, such detailed photographs to let us see those wonders wrought with the needle. Awed is not a strong enough word to describe how I feel when I look at them closely. Excited comes close. Excited to see how I fare in reproducing the techniques of face, padded body form and hands.
Arts, G. M. (1571). Retrieved from Grassi Museum of Applied Arts: GRASSI Museum für Angewandte Kunst. (2017-12-12). Kaminbehang, sogenannter Umlaufhttps://nat.museum-digital.de/index.php?t=objekt&oges=201040&done=yes
Cloisters, D. o. (2000-2001). The Cult of the Virgin Mary in the Middle Ages, In Heilbrunn Timeline of Art History. Retrieved from The Metropolitan Museum of Art: http://www.metmuseum.org/toa/hd/virg/hd_virg.htm
Dictionary, R. H. (2019). Dictionary (dot) Com. Retrieved from Dictionary.com
Hirst, B. a. (1993). Raised Bmbroidery a Practical guide to decorative stumpwork. In B. a. Hirst, Raised Embroidery a Practical guide to decorative stumpwork (pp. 9-10).
I went searching for my past projects and found just the images, not the documentation for the projects themselves. I have been gathering all of my projects and putting them here so that people can enjoy them as much as I enjoyed making them, oh well the pictures will have to speak for themselves.
A Kidney Pouch in Pink Leather
A six board Chest
A three fingered glove
Game Board for Fox and geese
Board and pieces Fox and Geese
Leather Ball
Various small things. A leather three fingered glove, Board Game of Leather with hand painted pieces for Fox and Geese, Viking Doll, Elizabethan doll
Belts
or girdles have been used by mankind for centuries, millennia even. Whether it
was twisted rope, braided leather or studded with precious metals and gems it
has the purpose of being the single most utilized accessory by men or women
since the need to hold up a skirt or pair of pants. They come in a variety of
thicknesses and materials that nearly boggles the mind. Archeological digs have
discovered them as far away as China, and as close to home as the peat bogs of
Ireland and ship burials in the Norse Countries. They have been represented in
carved marble, early portraiture, miniatures in manuscripts and tomb effigies.
They have evolved from pure utility of the peasant and middle classes to the
almost useless bling of the upper-class in the middle ages.
When doing
research for this item I wanted to make sure that it was within the period for my persona and the SCA. I have found
many pictures supporting the 15th-century
use of this belt, but few actually in the 14th century. I kept entering search
criteria ” 14th-century girdle
belt” and it would bring up pictures of one type being the long,
decorated buckled style. This simple round the hips with hooks and chain was
pictured in 15th-century illuminations
but not 14th. I knew it had been in use in the 14th century but was having
difficulty finding it under the search criteria. That is until I went to La Cotte Simple and read her lovely article
“Building a 1480 English Lady’s Outfit” and she had the correct name
for the girdle. Demysent. With that one word,
I was able to find at least 1 picture supporting the notion that it was worn in
the 14th century, and it was in the same museum as the Well of Moses in Dijon
France. The Retable de la Crucifixion carved in 1390 by Jacques de Baerze. That Wonderful Sculptor of wood carved
a side panel full of Saints and one of them is a lovely lady wearing the Demysent
(Picture1a).
So,
this one style was worn in three centuries, 14th, 15th and 16th. This one style
of the belt can be used to accessorize
three centuries of garb and not be out of place.
Where
I found my inspiration:
The style of the
belt that I wanted was to be found in a manuscript of plays written in
1400-1500 Item 12148 The comedies of Terence: folio 66r. It is not said at the
website of the BnF Gallica as to which play this picture belongs but it is her
belt which she holds in her hands that I really had the hot’s for. and the
illuminator did a really good job showing the clasp at the end of the belt, for
lo, it is a hook.
Housed
in the National Museum of Antiquities Leiden is
a lovely fragment of a studded leather belt with fittings. It’s got pretty bits
nailed to it in a flower pattern, which is a center stud surrounded by six more
flanked by a stud on either side and another stud between each flower set. The
metal belt mount at the end shows that it may have been an add-on from a larger belt as it isn’t the same
width of the belt and has two loops but
no tongue and the mount is made to be used with a buckle that has a tongue.
The buckle is not what drew me to
it, the studs and their pattern are.
On making my belt:
I chose not to go with a flower pattern, though it’s
pretty, because of costs. I used turquoise sparkle rivets because by the time
the Church in Rome finally allowed anyone not of the clergy, mainly Bishops, to
wear “Turkey Stone” it had reached English shores in the 14th
century. Nickel rivets to emulate the studs
and chose instead of making metal mounts to use leather to hold the pouch
hanger and “D” rings at each end. Why, because metal work requires
skills I have yet to learn safely. when cutting the metal sheeting for the
mounts I could not control my hands and cut myself when I got distracted. This
is Not to say that I won’t try to make my own mounts at another time, but for now, the leather wrapped around the
“D” Rings at each end will be just fine and look just as
“peri-Oid” as any other modern made belt.
Materials, tools, resources/links
I
tend to work with scraps and left-over’s for my persona’s belongings to keep
the cost low. Living with a leather crafter has an advantage that I sometimes
shamefully take advantage of: This is not one of them. To make this belt I am
dipping into his business supplies and therefore will be paying for them, once
done, so that his inventory will not suddenly become short.
Here is the basic supply list and the cost of the materials:
Turquoise sparkle Rivet: 14=$3.15 (because I like even
numbers and have left the center back rivet as nickel)
Nickel D Rings 3/4 inch: 3=$0.43
307 D Solid Brass Nickel Rivet: 88=$5.60
3/4 inch wide 54 inches
Black Bull hide Strap: $2.00
Mounts, S Hooks and Chain: To be researched and made at a
later date.
Materials: $ 11.18 Time: 1.5 hours at $15 dollars per hour.
This information is important should I decide to start making them for sale.
Leather Strap: Made using a large
leather strap cutter while cutting bulk lengths of straps for belt making and
other leatherworking projects. The
leather itself is cut from a large bull hide purchased from Weaver Leather.
Hole
Punch: I used a standard hole punch and mallet to put the holes for the
decorative rivets measuring between each center hold of the design the width of
my left palm. The design was then punched around the center holes the length of
the belt blank. The rivets were then set in the holes and the backs put on with
a set and the mallet. When setting the rivets I started with the turquoise
rivets first as they are domed and would need extra care in setting, so a hunk
of leather was placed on the anvil to protect the stones. I left the leather on
the anvil when setting the non-stone
bearing rivets to allow a dimple to form, while not a practice in the period that I know of, it looks pretty in my
opinion.
To
form the purse hanger I used a length of half inch wide polished leather strap
and a “d” ring, held in place by two nickel rivet.
The
Belt at each end is set with a “D” Ring so it can be worn with a
ribbon until I can find the proper belt mounts and hooks for it, which can be found online, or I make them
myself.
Sparkle Rivets and nickel silver dented rivets on Buffalo textured black leather strap
*Trigger Warning: This article has some harsh views on the Church in Rome. It is not written to offend anyone of an extreme devotion to the Church of Christ in any of its current incarnations.
The purpose of
this article is to show how a woman in the middle ages would have healed the
bruises of the people in her household. What tools, herbs, and supplies she would have used and what kind of
education she might have had if she were of a status higher than that of a
peasant, say a merchant or tradesman’s, a daughter.
I wrote this
article for any person who would use the same methods to create a bruise salve
for those in their households, those in Martialate, fighters, light, heavy and
other’s of those types of activities..or just about anyone that needs a salve
for pain and bruising.
Even though the
lack of education for lesser classes,(A myth that has been debunked in England
by the Peasants Revolt of 1381) would have made it hard for a peasant to have
the education needed for advanced herbal medicine., a medieval woman could
indeed have used the tools and herbs listed to make a bruise salve, because
medieval woman of any class would have
known what herbs of the field to us in a bruise salve, even if they learned it
from a local Herb Wife or Midwife. The education level of certain higher
classes encouraged the lady of the house to run a healing still room or
scullery for her household.
Background:
My Persona
Mevanou verch Rhys
Yriskynit, or Mevanou daughter of Rhys the Tailor; born to Proswetel verch Brethoc and Reys ap Madoc Seis in the year of
Our Lord 1441 in the few years before the start of what we now call The War of
the Roses on the 24th day of March. Her Saint on that day would be Saint
Gwuinear of the Springs. Her Mother had
been trained in the verbal traditions of healing and midwifery. Her father born
of the English speaker for the village of his birth sent Reys via monk to
London to be the apprentice to a Sutor(shoemaker) but was turned away when
there was no room for another apprentice. The monk quickly found him a place as
an apprentice to a Tailor shop instead. Maddoc Seis was only too happy to find his
youngest son out of dangers and predations of his elder siblings, who in
typical Welsh fashion killed each other off. Mevanou was taught to read, write,
do simple sums and all of the skills in using, preserving and healing available
to her mother. She was taught by both parents the joys of sewing, embroidery
and how to tend to a household.
I have found this recipe on a site called Stephen’s Florigilium[1], It’s called Bruise Cream. The recipe is a favorite among the fighters heavy or otherwise in the Society for Creative Anachronism. In this collection of messages each person listed their favorite recipe for the cream and I noticed that they all had some of the same ingredients, so I combined those in the lists that I knew would be helpful for bruising, and I simplified it down to the more basic recipe with amounts of herbs that would make just 2 cups of the herbal oil, which could then allow me to make a simple salve. I have been using this recipe for several years and finally decided to write a paper. which I then cleaned up for an article here.
In order to know if the herbs in my recipe were also used in the time period of my persona by her counterparts I then did research as to whether or not a woman of middle class would have had the knowledge either handed down to her by another woman, her mother or the local herb-wife or even the local Abbess in a Nunnery.
What follows is my
discovery.
Every person who
has been unlucky enough to fall off the swing set at a school playground has
had an encounter with a bruise, or scuffed knee. While it healed we marveled at
the colors of that bruise as it healed and wondered what was really happening
and disappointed when it was fully healed as our badge of courage faded. Well,
for those who know how a bruise happens but not what a bruise actually is, here
is a lovely explanation.
Forgive me, but I
am going to use the modern terminology to keep it simple.
A bruise also called a contusion, is a type of
relatively minor hematoma of tissue in which capillaries and sometimes venules
are damaged by trauma, allowing blood to seep into the surrounding interstitial
tissues. Bruises can involve capillaries at the level of skin, subcutaneous
tissue, muscle, or bone. A bruise may be named by the length of its diameter as
a petechia (less than 3 mm), purpura (3 mm to 1 cm) or ecchymosis (1 to 3 cm),
although these terms can also refer to internal bleeding not caused by trauma.
As a type of
hematoma, a bruise is always caused by internal bleeding into the interstitial
tissues, usually initiated by blunt trauma(falling off the swing set), which
causes damage through physical compression and deceleration forces. Trauma
sufficient to cause bruising can occur from a wide variety of situations
including accidents, falls, and surgeries, the pounding one receives with the
duct tape covered rattan sword from one’s opponent in the lists. Disease states
such as insufficient or malfunctioning platelets, other coagulation
deficiencies, or vascular disorders, such as venous blockage associated with
severe allergies can lead to the formation of bruises in situations in which they
would not normally occur and with only minimal trauma. If the trauma is
sufficient to break the skin and allow blood to escape the interstitial
tissues, the injury is not a bruise but instead,
a different variety of hemorrhage called bleeding, although such injuries may
be accompanied by bruising elsewhere.
Bruises often
induce pain, but small bruises are not normally dangerous alone. Sometimes
bruises can be serious, leading to other more life-threatening forms of
hematoma, such as when associated with serious injuries, including fractures
and more severe internal bleeding. The likelihood and severity of bruising depend on many factors, including type and
healthiness of affected tissues. Minor bruises may be easily recognized in
people with light skin color by characteristic blue or purple appearance
(idiomatically described as “black and blue”) in the days following
the injury. There, now you know what a bruise is.
Bruises go through
a rainbow of color changes as the body begins to heal itself. The rainbow of
color changes means that your body is
breaking down the red blood cells that collect under the skin. As the red blood
cells break down, they eventually get flushed away by the body’s natural
process. These red blood cells cause the bluish, purplish, reddish, or blackish
marks that are typical of a bruise. That’s where black-and-blue marks got their
name – from their color under the skin. You can pretty much guess the age of a
bruise just by looking at its color:
When you first get a bruise, its reddish as the blood
appears under the skin.
Within 1 or 2 days, the hemoglobin (an iron-containing
substance that carries oxygen) in the blood changes and your bruise turns
bluish-purple or even blackish.
After 5 to 10 days, the bruise turns greenish or yellowish.
Then, after 10 or 14 days, it turns yellowish-brown or
light brown.
It usually takes
2-4 weeks for bruises to disappear, depending on
the person and how severe the injury is. Bruises can last from just days to
months. [i]
Women in Medieval Medicine: Conflicting
Attitudes
Like the lepers
and lunatics with whom they were sometimes categorized, women occupied an
ambivalent position in the eyes of the medieval Church and the medical
profession alike. On the positive side, female saints; headed by the Virgin
herself, were venerated for their miraculous healing powers; housewives were
expected, as a matter of course, to supervise everything touching the health
and welfare of their families; and all the larger hospitals and almshouses
employed women to care for the sick, albeit often in mental hospitals. On the
Negative side: although contemporary literature abounds with examples of
fictional heroines noted for their medical skills, the authorities were in
practice increasingly hostile towards those women who overstepped the bounds of
their amateur or domestic role by setting themselves up as empirics of various
kinds. Mistrusted by the ecclesiastical establishment, whose fears found
expression in a series of legal measures designed to curb, if not completely
suppress their activities, women nevertheless continued their freelance
practices that were more often than not the inherited businesses from husbands
or fathers. The Church, unable to completely curb these women set out to vilify
them with rumors that these wise women were practicing the black arts. A bit
more, in the medieval Church’s mind,
women were so far inferior as to inherit their souls as many as 20 days later
than boys while in the womb. Women had to work three times as hard to be taken
seriously and often would be punished for trying to clean the slate and show
that we were not inferior. This has changed little in the years since AD 380
when the Christian religion was made the official state religion of the Roman Empire by Emperor Constantine I.
As said before
women were expected to care for the sick and infirm with the preparations of
herbal remedies. In the Roman period, the
women of the family treated the illnesses of ordinary folk, using methods and
remedies handed down from mother to daughter for many generations. This
practice continued throughout the middle ages with the same remedies being
passed from villager to villager all through Europe.
The recipes used were the same regardless of whether you were pauper or Pope.
These were often written in commonplace books available to any who could read
and afford them. Most would often learn the recipes from the wise woman before
them, be that their lady mother or a nunnery if they had the money to be
accepted.
A woman of the middle classes would have learned
to read and write under the hand of her mother or nurse, especially if she were
the child of a tradesman[ii].
While young she would have been made sure to be able to do basic if not minimal
mathematics in order to assist her husband in the running of his business,
which due to the lifespan of women she would most likely have taken over the
running of it after his death leaves her a widow. Remember, that in the middle ages men still
thought of women as their functions..wife, mother, housekeeper, servant etc.
Her education would have been such to enable her to do her one womanly job in
creating and raising the next generation. Remember that includes caring for the
entire household and their health and well being, so knowledge of herbs for healing
would have been part of it.
The Herbals and the People that wrote them
Many of the
medieval herbals and health manuscripts were written by people who were putting
their own thoughts onto paper or copying what had been written by others many
centuries before them. Some of those writer’s thoughts had nothing to do with
what those herbs were actually used for or were proven to be useful for in
later centuries. Others were putting their religious dogma into the mix with
the original wording of text being replaced with the chants and prayers of
their faith.
Take heed when
looking for a cure for some of the earlier diseases before the coming of
Christianity, it’s likely you will not find the original text as it will have
been changed to a church-approved prayer.
To get to an earlier text you will need to be lucky enough to find much earlier
manuscripts, and I wish you much luck. The world of medicine and healing went
from a golden age of depression being seen as an illness that could be treated
with herbs and therapy(Egyptian papyri) to depression being a madness that was
the work of Satan and God who let the demons into your mind(Hildegard von
Bingen). Also, a lot of works were lost when
the first council of Nicaea convened and decided the fate of the doctrine of
faith; a great many manuscripts became anathema and were destroyed. Those that
were not destroyed were hidden and lost.
More and more as the Church of Rome took control everything written and
believed in; from medicine, women’s rights and who believed or did not were
examined and became blasphemy if it did not tow the company line. While many a
Christian doctor believed that the shite of a white animal was pure enough to
be included in medicines and cures, those not of the Christian faith frowned and
continued with medicines that actually worked, but were considered barbarous by
pious Christians. Some manuscripts that
were believed to be written by women were often deliberately rumored to have
been written by men to either discredit them or make them acceptable in the
eyes of the medical schools and its bevy of boys club practitioners. Anything
to do with the healing of women was left to women and was taboo to study or
write about.Mostly because the Church in
Rome was against anything that would lift up women in the eyes of mankind, and
because women were considered dirty and the origin of Original Sin…so long as
the church controlled how women were viewed, educated, married off and
subjugated; We would not find equality…funny, today we are still having that
issue.
The Red Book of Hergest
The First
manuscript I looked at was the Red Book of Hergest and its section of medicine
compiled in the late 13th century by order of The Prince of South Wales Rhys
Gryg, who ordered his physician Rhiwallon to compile his medical knowledge in
Welsh for others to make use of the information both then and during the
centuries that followed. Rhiwallon lived at Myddfai, a tiny village in
Mid-Wales. This little village was the center of herbal healing in Wales, and
little has changed the centuries that have passed. Indeed even today the Elders
of Wales prefer the herbal healers to the modern medical practitioners because they never gave up the
Herbal traditions or even came to see it as an alternate
form of medicine. Myddfai to the non-native
Welsh became a legendary place, where the
Fair folk gave the magic of medicinal knowledge to one man and his bloodline.
This tradition was orally passed down from generation to generation in the form
of rhymes and songs until Rhys Gryg had that knowledge compiled, but Rhiwallon
being a man forgot to compile the knowledge of the wise women in the villages,
thus leaving a very large gap for generations later to work on filling. The
book had little in it to help me, other than to point me to earlier works and
to show that the Welsh had a healing tradition of some merit. Rhiwallon did not
cover the common herbs, nor bruising in the Red Book of Hergest, however his
long descendant Jon Jones, physician of Myddfai and last lineal descendant of
the family left behind his book of medicine in his own handwriting and in Welsh
at a time when the English were generally
how one communicated when educated in medicine. It is His book that I found a remedy for bruising that had a recipe for a
salve for “any kind of wounded integument. On Page 331, #176 of the
English Translation from Welsh; One
should know that the Integumentary System is the Skin. While not exactly the
same recipe that I have been using it at least shows that healers used not just
one herb good for bruising(a simple) they used several herbs together to make a
powerful salve to heal a bruise or wound right well.
After some thought, I followed my nose to the works of the
Anglo Saxons…They too were of the groups of people that had migrated eventually
to the lovely British Isles, just as the ancestors of the Welsh did in the
first of many Celtic Migrations. It’s a walk backward
in time and publication, but it was worth the trip back in time. The History
Channel likes to show the Angles and the Saxons as Hairy, Unwashed Barbarians
as they like to portray them as Dirty Warriors. Which is NOT true. They enjoyed
the Arts, Music and Herbal healing as well as educating themselves. Many of the
Migrations that came to the British Isles were well educated, with different
parts of their society being equal in standing, even the slaves had status, and
Women, when the Christian monks and missionaries came to the Isles they readily
found that women had equal standing..well, doncha
know that had to go…
Bald and his Leech book
Written in the
early 10th century in England
under the direction of one Bald, who, if he were not a personal friend of King
Alfred’s, had at any rate access to the king’s correspondence; for one chapter
consists of prescriptions sent by Helias, Patriarch of Jerusalem, to the king. We learn the names of the first owner and scribe from
lines in Latin verse at the end of the second part of the MS.
“Bald is the owner
of this book, which he ordered Cild to
write, Earnestly I pray here all men, in the name of Christ, That no
treacherous person take this book from me, Neither by force nor by theft nor by
any false statement. Why? Because the richest treasure is not so dear to me as
my dear books which the Grace of Christ attends.”
The109 leaves of
this book are written in a large, bold hand and one or two of the initial
letters are very faintly illuminated. The Leech Book of Bald was as evidence
shows, the manual of a Saxon doctor or leech, and he refers to two other
doctors—Dun and Oxa by name—who had given him prescriptions.
The position of
the leech in those days would have been very difficult, for he was subjected to
the obviously inequitable competition of the higher clergy, many of whom
enjoyed a reputation for working “miraculous” cures. The leech being so inferior in position, it is not
surprising that his medical knowledge did not advance on scientific lines.
The treatments of
many ailments are described within its pages; from being elf shot to flying venoms. The Anglo-Saxons had
a love of herbs and there are many in that book used then, that is still in use today, among them: Arnica
(Wolfsbane), Wood Betony, Vervain,
Mugwort, Plantain, Yarrow, Comfrey, Calendula, and
Juniper.
The recipes and
treatments are written in Old English (Anglo Saxon), and translations are few
and far between, especially descriptions and meanings of the words. There is a
movement to translate all Old English Texts so that the newer generations will
be able to see how their ancestors thought, treated and healed ailments. As it happens, while searching the interwebs
searching for a translation I found one in
Rev. Oswald Cockayne, who did the work and his translations of the Old English
Anglo Saxon manuscripts were published as Leechdoms, Worcunning and Starcraft
of Early England in three Volumes. Volume II contains the Leechbook of Bald
part I, II, and III. Also contained within is the Herbarium Apuleii, translated
from the Lingua Romaic to Anglo Saxon and finally to English… Thank the
Anglo-Saxons for being so thirsty for knowledge, without them, the English as a
nation would not have been so Educated.
Bald was working
with recipes and folk medicine drawn from the countryside around him, passed on
from mother to daughter, father, and son,
borrowed from the king’s physicians. He
had gathered the recipes and treatments, and
all evidence points out that this manuscript was the culmination of his
knowledge so that he would have it on hand and not need to worry about
forgetting any of it in my opinion; since I too have my notebooks written
nearly the same way while collecting recipes. This one for coughs, that one for
skin ailments, another for my persona’s herbal knowledge.
With regards to
the way in which Anglo-Saxons used their drugs, it should be said that they mostly
employed simples(single herbs as ingredients) in infusions or powders; though there were quite a few containing often
a great number of herbs, are uncomplicated and very different from the formulae
of Galen. Each of the herbs in this recipe is
covered in the Leechbooks and can be grown in an English Garden save for
Arnica. Arnica also is known as Wolf’s
Bane, is a Continental Herb and though is cultivated throughout northern Europe
has not been introduced to England of the Anglo Saxons save by trade, as it is
almost impossible to grow it anyplace that does not have alpine meadows or is too acidic in soil content. It
may be that at one time English soil was not so acidic and Arnica could have
been grown there, but scientific data of the range of habitat suggest that it
may not have been grown there at all.
The Anglo-Saxon
pharmacy in comparison to those taught in the schools of such higher learning,
such as Salerno can be considered of a lower state of medicinal practice. Herbs
were used as watery infusions and decoctions, or made up with ale and milk in
draughts, or as confections made with honey,
or mixed with butter or lard as an ointment. At the heart of it all, I find
that I prefer this lower state to the often dangerous formulae into which a
great many heavy metals and other poisons which have been shown to be far more
dangerous in the hands of uneducated snake oil salesmen of later centuries. Throughout the Leechbooks the
herbs in this recipe were used either together or as simples to help with pain,
bruising, and leprous diseases of the skin, so it’s not impossible that they
would never have been used together, just harder to find evidence of.
The Leech book is
rare in that it contains instructions for plastic surgery; the recipe, in
particular, prescribes surgery for a harelip[iii].
Amazing isn’t it that in the 10th century there was a way to
surgically alter a debilitating birth defect?
The Process
Herbal infusions
have been made and drunk throughout history – both for their medicinal
properties and culinary attributes. Our breakfast tea is, after all, simply an
infusion of an herb in water. Herbal infusions can consist of just one
individual herb or can be made of two or
more herbs blended together.
Infusing an herb
in oil allows the active fat-soluble
constituents to be passed into the oil. Hot infused[iv]
oils are slowly, simmered for a couple of hours, whilst cold infused oils are
heated by the sun over several weeks. Both types of oil infusion can be used
externally as a massage oil or added to creams
and medicaments as in a salve.
Bald seemed to
prefer the use of either lard or butter[v]
as the base for all of his salves, but in looking at how fast butter goes
rancid it would seem a large waste of materials to continually make the salves
needed to cover the many ailments, but then again, those remedies were used
pretty quickly and did not need to be kept longer than needed.
My Process is much
the same as that instructed in the Leechbook of Bald, I took the herbs and
pounded them together in a Mortar with a pestle, This took quite a few hours due to my mortar
being a smaller one of marble, (I then quit using the mortar and pestle and
cheated by using an electric coffee grinder, ground is ground after all.); then
added them to the pot of oils/fats and macerated them for a few hours, keeping
careful watch to make sure that I did not burn the house down with a grease
fire. When I got to be too nervous, I switched to a crock pot for the better
control factor. The need for complete control of heat and time allows me to put
all of the ingredients into the crockpot
and leave it covered for the amount of time needed and not leave me with the
worry of burning down the house or burning the herbs in the oil and therefore
making the infusion useless. When the allotted time was done I removed the pot
from the heat and allowed it to cool before straining out the herbs in a fine
muslin cloth. That was rather fun, the oil was still rather warm as I squeezed
the bag of herbs to get all the oil out. My hands had never been so soft and my
osteoarthritis quit complaining about a
bit, so It was all the proof I needed as to whether or not it would work.
The Herbs
Achillea
Millefolium – Yarrow
Its name is
derived from the Greek hero Achilles, and during the Trojan, wars were reputedly
used to treat wounds. According to the many herbalists of that time, Yarrow is
somewhat warm and dry and has a discreet
and subtle power of healing wounds. If a person is
wounded by a blow (bruised), let the wound be washed with wine. Then gently tie
warm yarrow, cooked moderately in water and with the water squeezed out, over
the bandaged placed over the wound. It will draw out the infection from the
wound and the wound will heal. Today yarrow is valued mainly for treating colds
and influenza, and also for its effectiveness in treating problems of the
circulatory, digestive and urinary systems, and inflamed joints.
Arnica
Montana –
Arnica
Arnica can be
found in many medieval herbals to cure the fires of overexertion and even for stoking the fires of sexual love,
according to Hildegard of Bingen. “Arnica is very warm and has a poisonous heat
in it. When a man or a woman burns with desire, if that man or woman’s flesh
touches the greenness of arnica, they will burn with love for whoever is afterward
touched with the same herb. The person will be so incensed with love, almost
infatuated, that he or she will become a fool” In Modern Usage, however, Homeopathic Arnica is a perfect
fit for all kinds of childhood bumps, bruises and contusions, and many
occupational and sports injuries. As a general rule, homeopathic Arnica is a
prime candidate for any accident or injury that results in physical trauma
consisting of bruising, tissue damage, broken blood vessels, black and blue
skin discoloration and swelling. It is most specific to blunt forms of trauma,
especially to soft tissues. Arnica can also be of benefit in strains, sprains
and muscle injuries.[2] It
comes as a little white pill approved by the FDA for internal use..for
herbalists who prefer it as a topical ointment it comes in a little tube of
cream. Do NOT use this on broken skin. It causes irritation to mucous membranes and the skin on your body is
the biggest one. (if one uses the recipe below, and prefers to remove Arnica
from the recipe, the resulting oil will still be just as efficacious as if it
were included. Just remember to double the Calendula.)
Artemisia
vulgaris – Mugwort
Related to
wormwood, this herb is highly regarded medicinally in both East and West. It
was planted along roadsides by Roman soldiers, who put sprigs of it in their
sandals for their aching feet on long journeys. Used medicinally in compresses
by many cultures for its properties in treating bruises and bites it is
included in my bruise juice also for its antibiotic properties to ward off
infection.
Calendula
officinalis – Pot Marigold
These golden
flowers have been a favorite among the herbalists for centuries. It has been
recommended for everything from gastritis to inflammations of all kinds. Hildegard
used Calendula for crusty scalp by pounding it in a mortar with bacon fat and
smearing it on the scalp so that the crustiness falls off after a few days of
use. Calendula is very useful for cuts and scrapes, mild sunburn and dry skin
conditions.
Hypericum
perforatum – St. John’s
Wort
Old herbals often
refer to tutsan (H. androsaemum), from
the French toutsain or heal-all, which
was also used to treat injuries and inflammations. I use this herb for joint
pain, inflammation and fighter’s elbow. One word of caution: use of this herb
has been known to make the user sensitive to sunlight, so please use
precautions when out in the sunlight.
Juniperus
communis – Juniper
Long associated
with ritual cleansing, juniper was burned in temples as part of regular
purification rites and in homes to ward off the plague. Called Savin or
Juniperus Savin, Imported from Rome, it
was in the gardens when the Anglo-Saxons invaded and took over[3]. Several
Medicinal papyri have survived dating back as far as 1550 BC in which contains
Juniper berries. Now many herbalists use the berries for their help for
inflamed joints, muscle pain, and gouty joints. oh, and don’t forget its very
tasty inclusion in the recipe for a good gin.
Symphytum
officinale – Comfrey
A country name for
comfrey was knitbone, a reminder of its traditional use in healing fractures.
The herb contains Allantoin, which encourages bone, cartilage, and muscle cells
to grow. This recipe contains comfrey to do just that; encourage the healing of
damaged muscles, and joints.
The Tools of the Medieval Kitchen
One simply cannot
think of a kitchen without seeing the modern kitchen; full of modern
appliances, knives, spoons, pots, and
pans. The medieval kitchen would have been a tad different…not by much..there
would have been none of the modern appliances such as stove and
refrigerator..food storage would have been simpler than even the pantry. In
most larger medieval homes there were different spaces used for the different
functions of preparing food or even medicines. The Scullery was used for food
storage and preparation and the kitchen with its fireplace where the pots and
pans would be used to cook the food. Also in the scullery were the herbs
hanging in bunches to dry for later use in culinary and medicine. There would
have been shelves for jars of food sealed with waxed linen and twine and the
same for the different herbs and spices(in those houses that could afford
spices, a locked cupboard would have been built to keep servants from the temptation to steal the valuable commodities.)
There were Pots
and pans for stews, soups, and frying and
sautéing as with any household we can walk into today, most were made of thick
clay with three or four feet on the bottom to keep the pot out of the coals of
the fire. the biggest would hang from an iron hook for larger stews or roasts.
The chief tools of the kitchen that I am concerned with would have been found
in an apothecary shop. The chief tools used in every kitchen and most
apothecaries were:
knives and shears(scissors)
mortar & pestle
strainer, sieve, and/or colander (to filter liquids
or foods ground in the mortar)
cloths for filtering almond milk and cleaning
surfaces, scouring sand, and tubs for washing.
weighing scales,
heat source (fireplace with iron hooks for pots.)
clay jars for storage.
My kitchen has
those things, in modern terms all the kitchen cutlery and scissors, tiny mortar
and pestle, washcloths, straining cloths,
strainer, wire sieve, Sink, scales, electric stove, crock pot and ball canning
jars for storage of salves. I get most of my herbs from apothecary shops in
town and online. They come in separate packages weighed out to my
specifications and labeled so that I need only put them in jars for later use.
When you go to the apothecary in your area, remember to mention that you need
them in separate and labeled bags, not jumbled together hastily in a paper
lunch-bag, it happened to me once..and in hindsight,
I should have refused the lot and demanded that they do my order again. oh
well, there’s always next time.
The Results
What I got was a
lovely all-purpose itchy owie oil that I
could then turn into a salve or cream. I
tried it on myself first, (remember that part above about straining it?) thinking that if it works for my
bruises it would work for anyone; then when friends found that I had been
making bruise juice(the oil) I was offered up things in trade, now truthfully,
those people asking for it were heavy fighters who at the end of the day on the
field wanted something to make the ouch go away and I happily obliged. Don’t
tell them, but I would have happily given it away for free, but in the one
instance, I needed that tailors dummy really badly. All of the herbs work well
together, in the oil base and those who use it are only too happy to take it
off my hands when I make it. If it didn’t work, no one would want it.
Conclusion
Would my persona
have used the tools and herbs to make the oil and the salve? Yes, she would
have.
She would have
heated the fats in a cooking pot(clay being the usual material) to make them
liquid and added the herbs to make the salves and strained them through scraps
of cloth or just left the herbs in the fats as it cooled. The cloth would have
been linen, made from the retted fibers of the plant commonly called flax, and
indeed she might have even used the scraps leftover from making her own clothes.
Truly, I myself have used the larger scraps of linen left over from making my
garb to make the straining sacks for herbal work.
After all of the
reading and researching, I do believe
that my persona would indeed have had the education and thus the use of the
very basic tools to keep her household healthy and safe from the superstitions
of the day, shite of a white animal indeed…
Please take note that most of my trips to Wikipedia
are in search of more questions to ask, and to take a peek at the bibliography
of the authors and their sources.
I did not use them as First line sources due to the
changeability of Wikipedia itself.
4 Tablespoons
Calendula flowers (if not using arnica double this)
4 Tablespoons
arnica flowers (Remember that this will irritate the broken skin)
4 Tablespoons
comfrey leaves
2 Tablespoons st Johns Wort
2 Tablespoons
mugwort
2 Tablespoons yarrow
2 cups olive oil
Using a coffee
grinder, grind all of the herbs together into a coarse powder and in a large
crock pot place all ingredients. Cook for 8 hours on low heat then let cool. Don’t
lift the lid, not even to stir it. Squeeze out the oil using muslin or linen
bags and bottle. Store in a cool, dark place. it should last up to a full
calendar year if properly cared for.
Use oil to massage
painful joints and bruises.
Bruise Cream
Instructions
8 Tablespoons
bruise juice
3 Tablespoons Shea
butter
3 Tablespoons
cocoa butter
2 Tablespoons beeswax
Heat all in a double boiler until beeswax, Shea butter, cocoa butter is fully melted. Pour into a mixing bowl and put a wire whisk blade on the mixer and wait 4 minutes to let the mixture cool. Then turn the mixer on and slowly bring up to high speed and fluff the balm into a good creamy consistency. Spoon into jars and let cool…use on bruises and painful joints. Good to make ahead of time for the fighting season; your heavies will love you for it! The rapier fighters will adore you too!!! Okay, don’t forget anyone that may have any physical activities during eventing season…even if it’s just getting up to refill the big mead bucket they call a flagon…
Bibliography
Books Consulted
“Hildegard’s Healing Plants
from Her Medieval Classic Physica” Translated by Bruce W. Hozeski, Beacon Press
2001
“The Medieval Health Handbook
tacuinum sanitatis”
translated and adapted by Oscar Ratti and Adele Wesbrook
from the original Italian edition Luisa Gogliati Arano, Tacuinum Sanitatis, Electa Editrice. 1976
“The Complete Medicinal
Herbal” Penelope Ody, DK Publishing 1993
“Medicine and Society in
later medieval England” Carole Rawcliffe, Sandpiper Books LTD, 1995
“Medicine before Science”
Roger French, Cambridge University Press 2003.
“The Greek Achievement”
Charles Freeman, Penguin Group Publishing 1999
“Greek and Roman Medicine”
Ian Dawson, Enchanted Lion Books, 2005
“The History of Medicine Vol.
1 Primitive and Archaic Medicine ” Henry E. Sigerist MD. Oxford University
Press 1977
“The Genesis of Science”
Stephen Bertman, Prometheus Books, 2010
“Herbals, their origin
and evolution”, Agnes Robertson Arber Cambridge at the University Press,
1912
“English medicine in the
Anglo-Saxon Times”, Joseph Frank Payne, Oxford at Clarendon Press, 1904
“History and Hygiene of
Linen.” Harry C. O’Neill, Overland Monthly Magazine, November 1902
PDF E-Books, Booklets and
Reports Consulted:
“Herbals: The Connection between Horticulture and Medicine”
Jules Janick, HortTechnology April–June 13(2): 229–238
“Medical journals in the Eastern Mediterranean Region”
Report of a conference Cairo,
Egypt, 7–9
October 2003
“Otology in Medical Papyri in Ancient Egypt” Albert
Mudry, MD, The Mediterranean Journal of Otology 2005
“An Interlinear Transliteration and English Translation of
Portions of
THE EBERS PAPYRUS
Possibly Having to Do With Diabetes Mellitus”,
Stephen Carpenter, Michel Rigaud, Mary Barile, Tracy J.
Priest, Luis Perez, John B. Ferguson, Bard College Annandale-on-Hudson NY 1998
“The Old Egyptian Medical Papyri”, Chauncey D. Leake
Vice-President, University
of Texas—Medical Branch Galveston
UNIVERSITY
OF KANSAS PRESS, LAWRENCE, KANSAS
– – – 1952
“The doctor in Ancient Egypt” J.F. Nunn
“HISTORY OF INGUINAL HERNIA REPAIR”.
R. Van Hee Institute of the History of Medicine and Natural
Sciences,
University of
Antwerp, Belgium.
Jurnalul de Chirurgie, Iaşi,
2011, Vol. 7, Nr. 3 [ISSN 1584 – 9341]
[A. BIBLIOGRAPHICAL DEMONSTRATION’ IN THE LIBRARY OF
THE FACULTY OF PHYsICIANs AND SURGEONS, GLASGOW,
JANUARY 12TH, 1893.].”
BY JAMES FINLAYSON, M.D.,
Physician to the Glasgow
Western Infirmary, and to the Royal
Hospital
for Sick Children, Glasgow; Honorary Librarian to the
Faculty of
Physicians and Surgeons, Glasgow, etc. page 748 The British
Medical Journal APRIL s, 1893..
Leechdoms, wortcunning,
and starcraft of early England.
Being a collection of documents, for the most part never before printed,
illustrating the history of science in this country before the Norman conquest
(1864) Cockayne, Thomas Oswald, 1807-1873 Vol. I, II, AND III
Documentation of 14th Century Trapezoidal Alms Purse
by Mevanou verch Reys Yriskynit
A 14th century Dome Topped Trapezoidal Alms Purse Pattern and Pouch, Purses, Pouches, Bags, and Sacks oh my! The things we put in them vary but they all have one thing in common. They were made to hold our stuff. As far back as recorded history goes there too shall we find that accessory we so crave and go crazy for. Today we collect purses and bags and clutches like they will disappear in an instant if we don’t buy it now. Back in the 14th century the ladies and gentlemen were NO Different. Judging by how many extant alms purses have been found up and down the Atlantic Seaboard of Northern Europe all the way down to the Egyptian Tombs we have always craved stuff and bags to hold that stuff…
Alms Purses or Aumonieres were so named because of the Medieval tradition of giving Alms or being generous to those in need. The Alms purses one finds these days has been carefully curated and stored by museums and churches around the world. They come in a variety of shapes and sizes, I looked and found that the largest number of Alms purses are of the square or rectangular pouch type, usually embroidered and embellished during the 14th century with an embroidery technique that includes gold work couching and silk figure embroideries often called Opus Anglicanum which translates to English Work. This English work was well coveted throughout Medieval Europe as some of the finest needlework of the time. Mostly due to the costly gold wrapped threads than the fine stitches in silk. Look up ” 14th-century Alms Purse” on Pinterest and you will get a large avalanche of pictures and websites that celebrate the square or rectangular type. and then search for “14th-century trapezoidal alms purse” and you might get a dozen. Most are found and labeled as reliquary purses in church museums Or as donations to major museums.
Okay, now to the meat of the dish.
I have made many a pouch and purse. Some in linen, a few in leather; square, kidney-shaped and circular they have all come and gone. The Trapezoidal Alms Purse, however, I could not find a pattern for and it was hair-yanking frustrating.
The Collections housing the purses I found for this project as inspiration were of the usual listing style. Who once owned it, What it was made of, Its dimensions and some photos of it front to back and each of its bits if not complete. The problem is that so often these listings don’t give a full picture of its measurements. Width and length..that’s it. They don’t give width at the top and center, which would give a better Idea of actual measurements…This leaves one open to much error in pattern making. (yeah, understatement of the year.)
The three extant pouches I used for designing the pattern and eventually making the pouch come from two museums.
The First is the Belgian Art Links and Tools: a. the purse of John of Brabant, and the Embroidered Purse. The Second is housed in Paris, at the Cluny Museum – National Museum of the Middle Ages: Chaplain of a Bar Countess (the lady on the griffin).
And One Statue of the Prophet Isaiah wearing the usual garb of a 14th-century man: his belt has that pouch hanging right there for all to see.
Take a closer look at the statue of Isaiah as he was placed on the Moses Well. His pouch is dome topped and trapezoidal and also a ring pouch. which is to say a pouch with a ring for rigid support and a drawstring added for security. It does not have buttons for closure just tassels for decoration. It may have been simpler for the mason carving the statue to not have buttons. You can see that the inner ring of support was carved, as a ridge just under the flap and his belongings showing inside. I love this pouch that Isaiah wears. It shows how it was hung from the belt with a strap and buckle, which many museums cannot show as the strap has long been worn away or lost. I love buckles they’re so fun.
One of my favorite things is to search the manuscripts of the 14th century to find those garments or items displayed as they were used or worn. For this style of the pouch, I have been hard-pressed to find manuscriptural (this word made Grammarly and Word Spell check shit themselves)proof of use. The pictures of the pouch that I have found are usually displayed as hanging from a pole or closet rod type instrument such as the yellow alms pouch displayed in the BnF (Biblioteche Nationale of France): Manuscript Catalog Item: The Apocalypse of St John f62.
Fabrics and Embellishment:
Mine: Plum Linen shell, White Linen lining. Thread: Heavy Duty Coats and Clark
Mine: Not embroidered. Hand Sewn with period stitches, bound with plum linen
binding. Mine Differs in Fabrics and Embellishment because Silk and real gold are out of
my price range.
Original: Silk shell and lining appliqued slips embroidered in the images of an angel and a lady on a griffin.
Originals:
embellished trim. Hand-knotted buttons.
How it was made:
The Pattern: From a picture and the information at the Cluny Museum of the Middle Ages I drafted the pattern to be approximately the same size as the pouch housed in the museum. I added 1/4 inch seam allowances to make adding the binding easier for narrow trim or ribbon. I cut the pattern out of thin cardboard recycled from inserts packaged with moving blankets, and a family sized box of Frosted Flakes. They were of the right size. I used chalk to trace around the pattern on the plum and white linen and then cut them out. For the Front shell and lining, I pinned and sewed around the opening, clipped the curves and turned the seam. Using 15 gage steel wire I coiled a 2 foot length and fit it in place between the front shell and lining and carefully backstitched to keep it in place. I lay out the back with the lining on top and placed the front with the shell facing outward and pinned the layers together. Using bias cut binding in the plum from another scrap I bound the edges all the way around, making sure to carefully cover the coil of wire completely. I pinned the flap layers and bound them and placed it on top of the others making sure to keep the bottom of the flap parallel to the bottom edge, and finished it with a ladder stitch. I added a strap and buckle to allow easier hanging and removal from a belt or belt hanger, and when I added the rivets I carefully used an awl to place the holes so that I could later change it to a ribbon loop should I choose. You can see proof of usage as pictured on the statue of Isaiah
Stitches:
Back Stitch, Running Stitch, ladder stitch (when attaching the front flap)


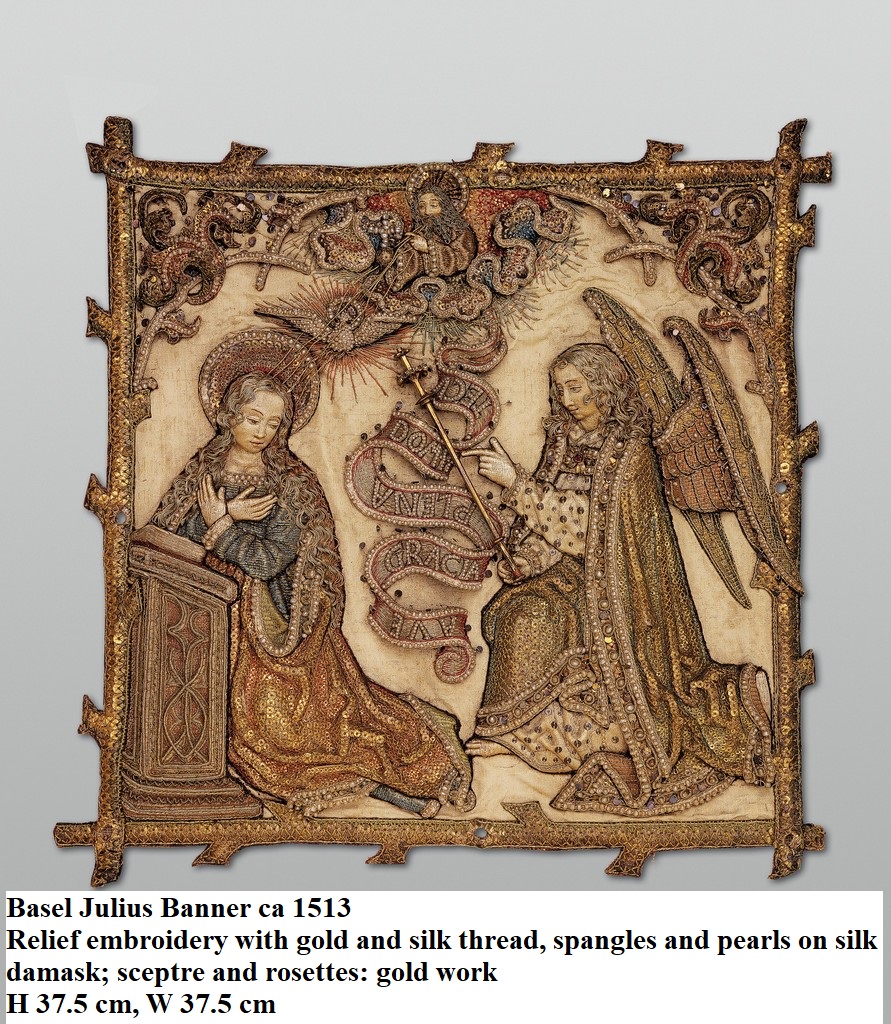

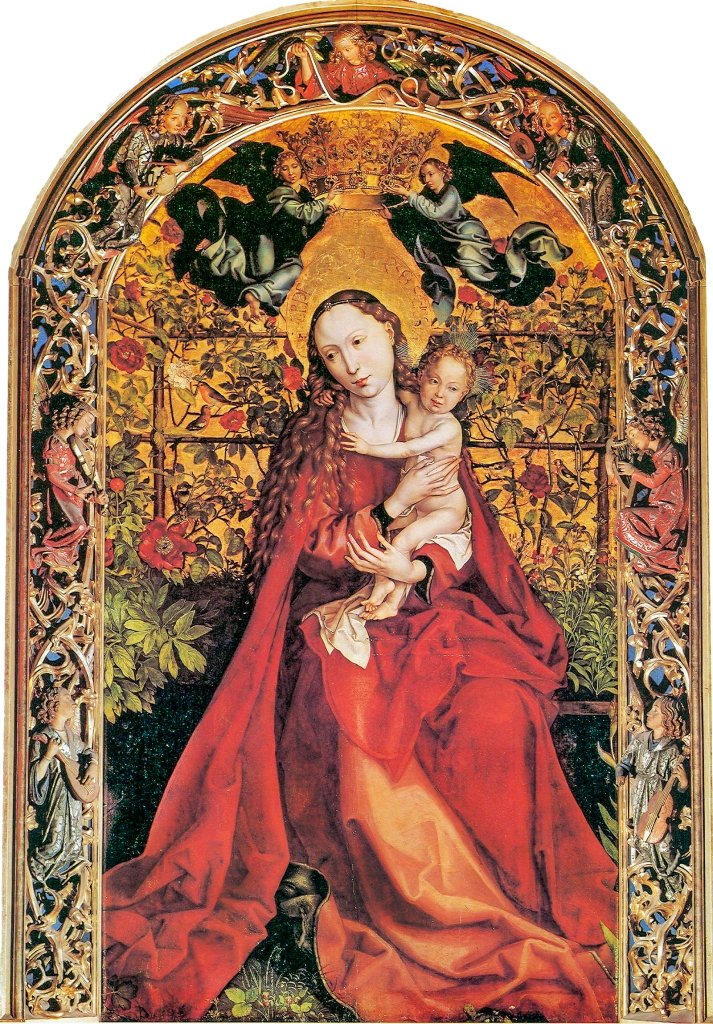


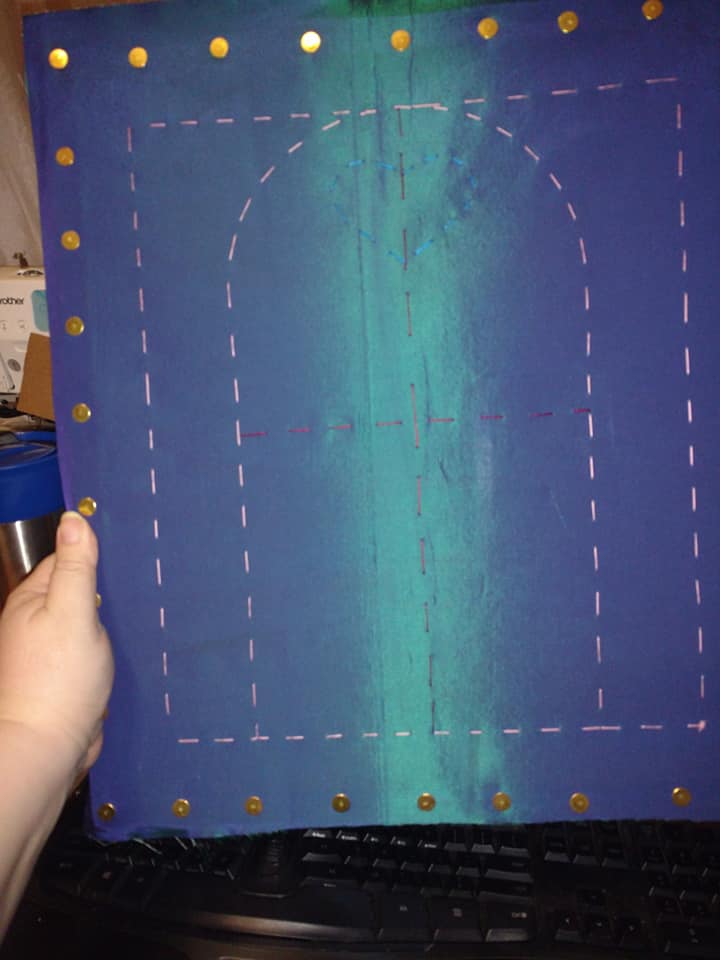
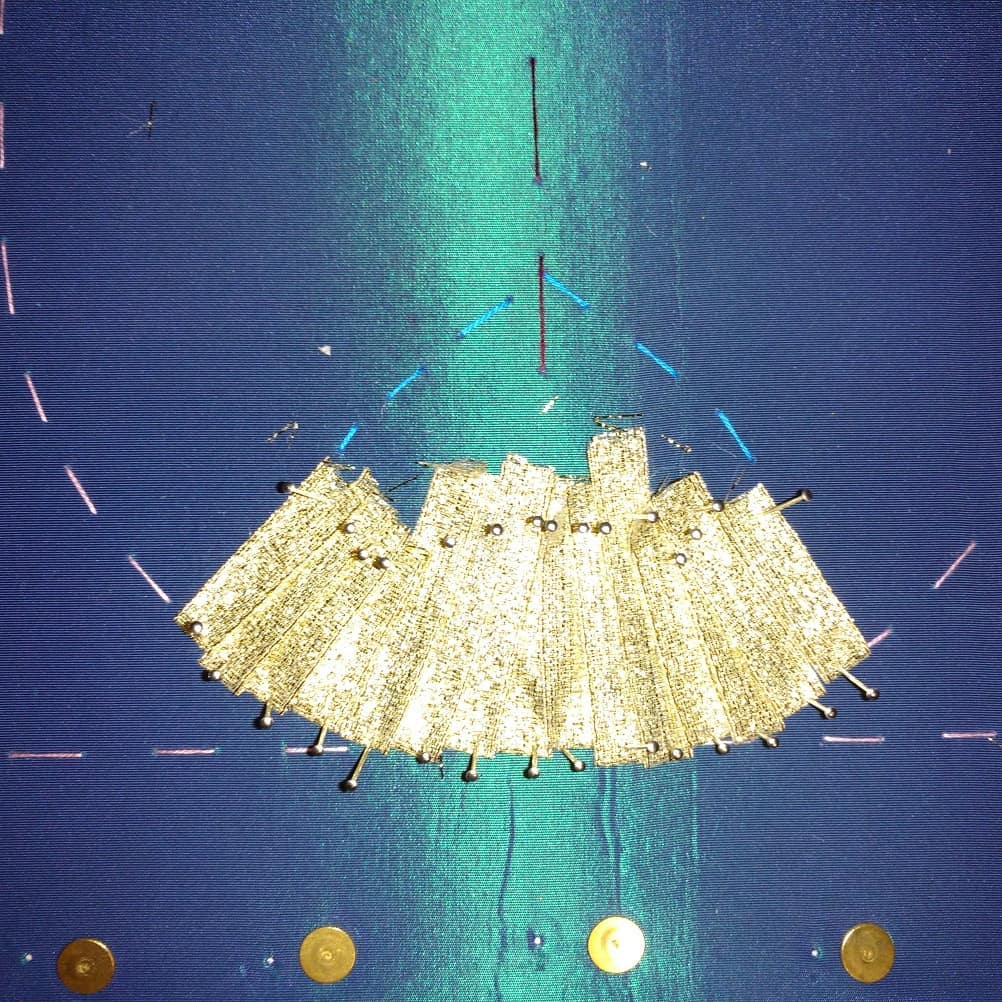


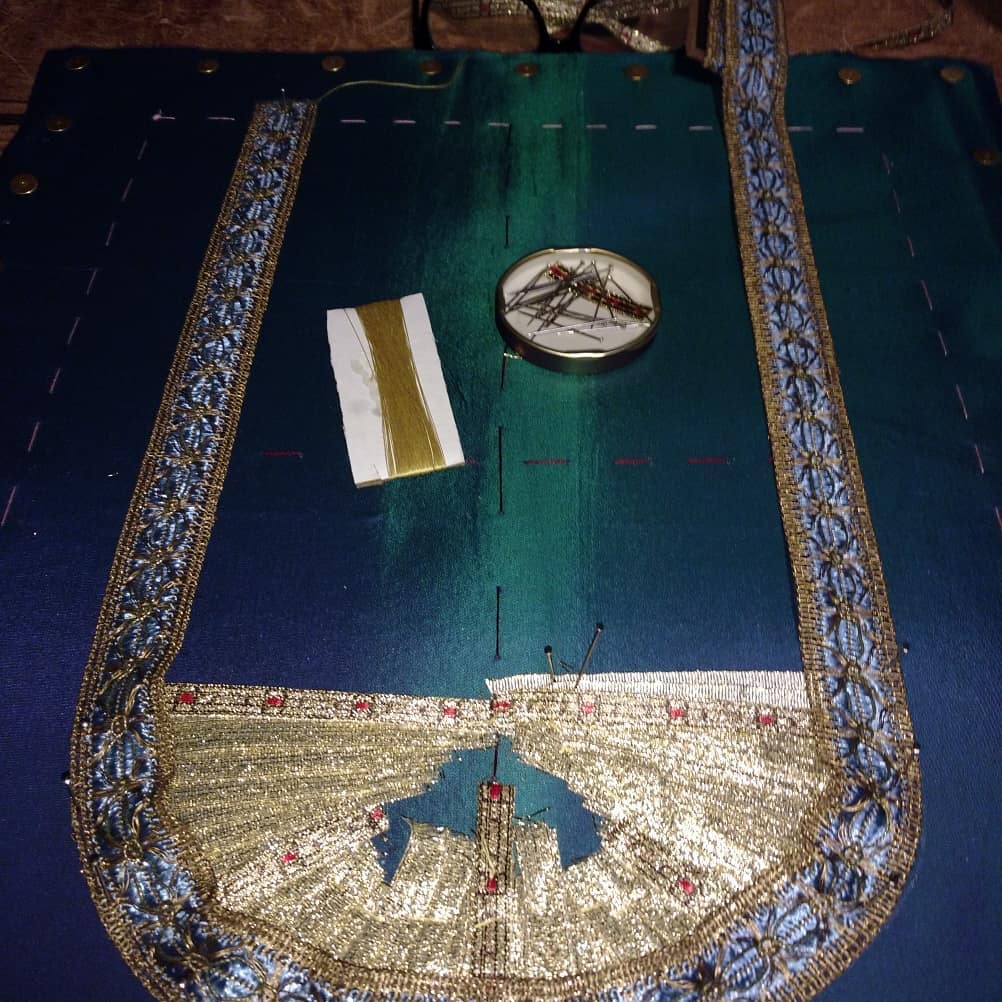
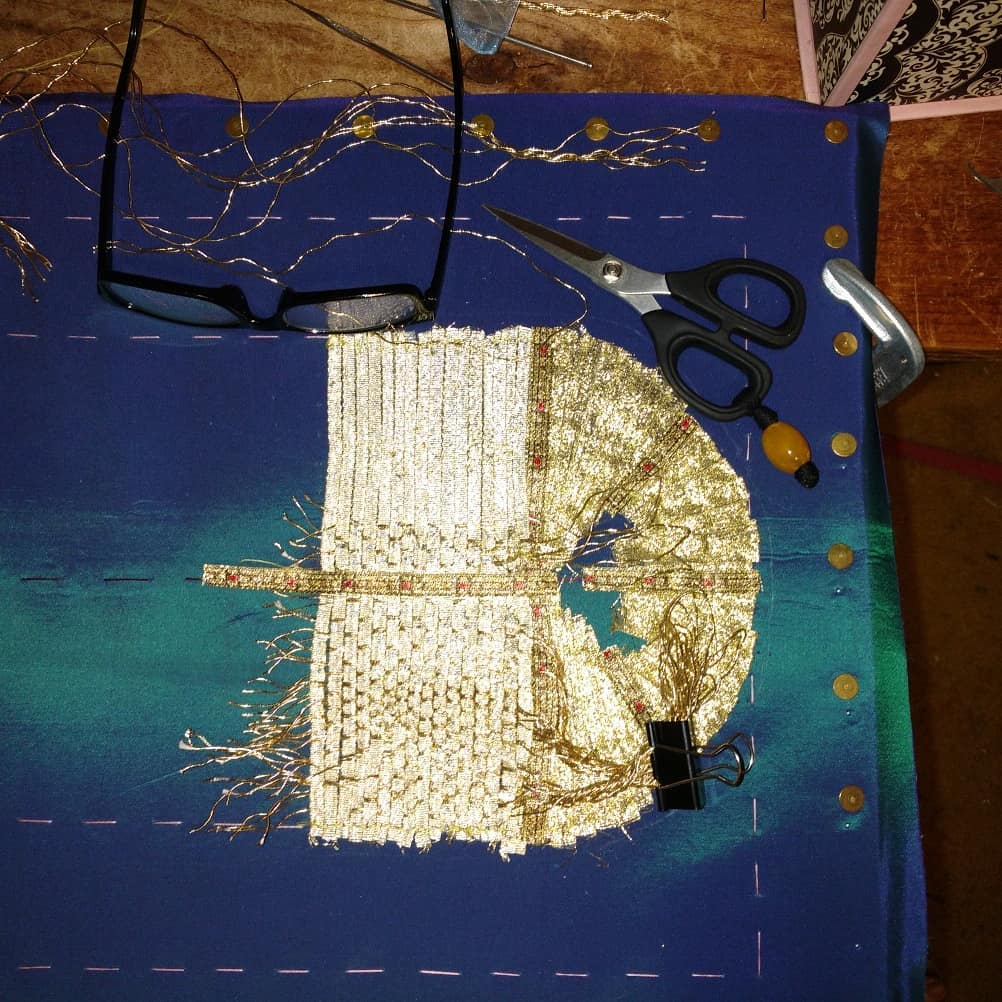
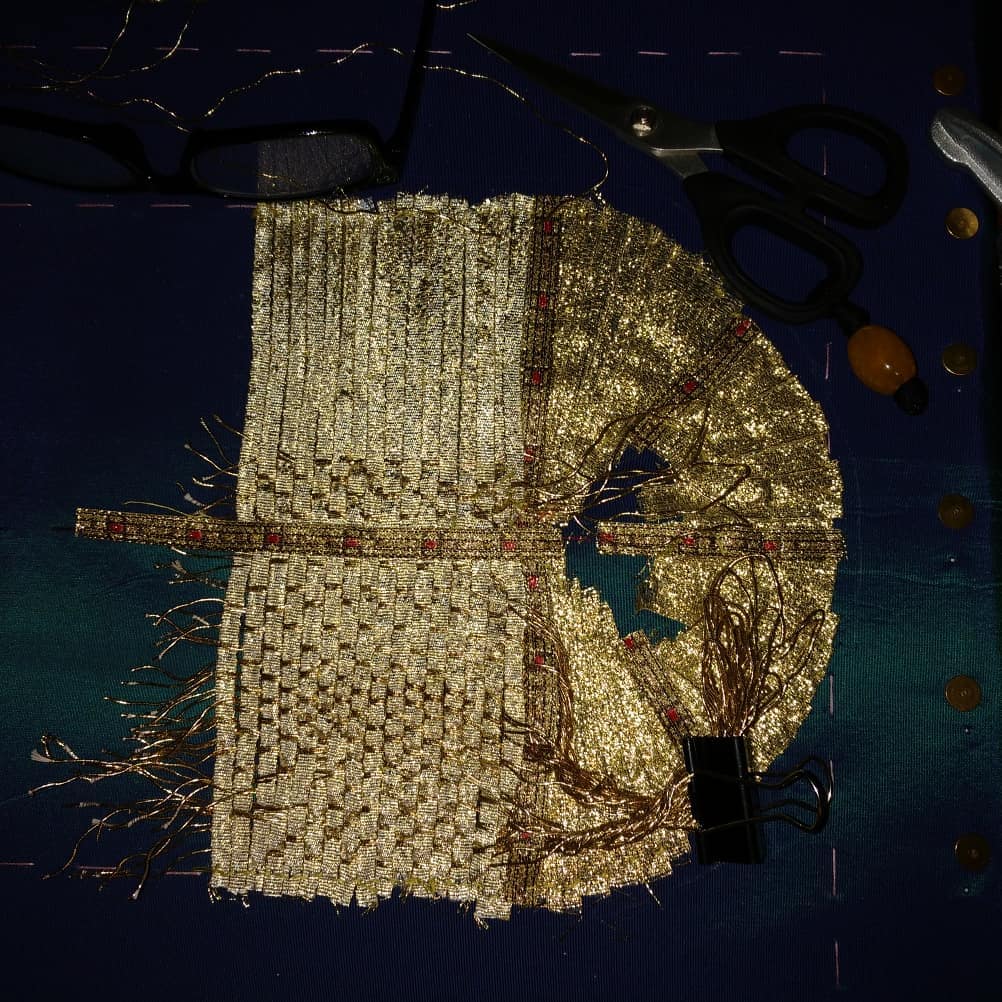
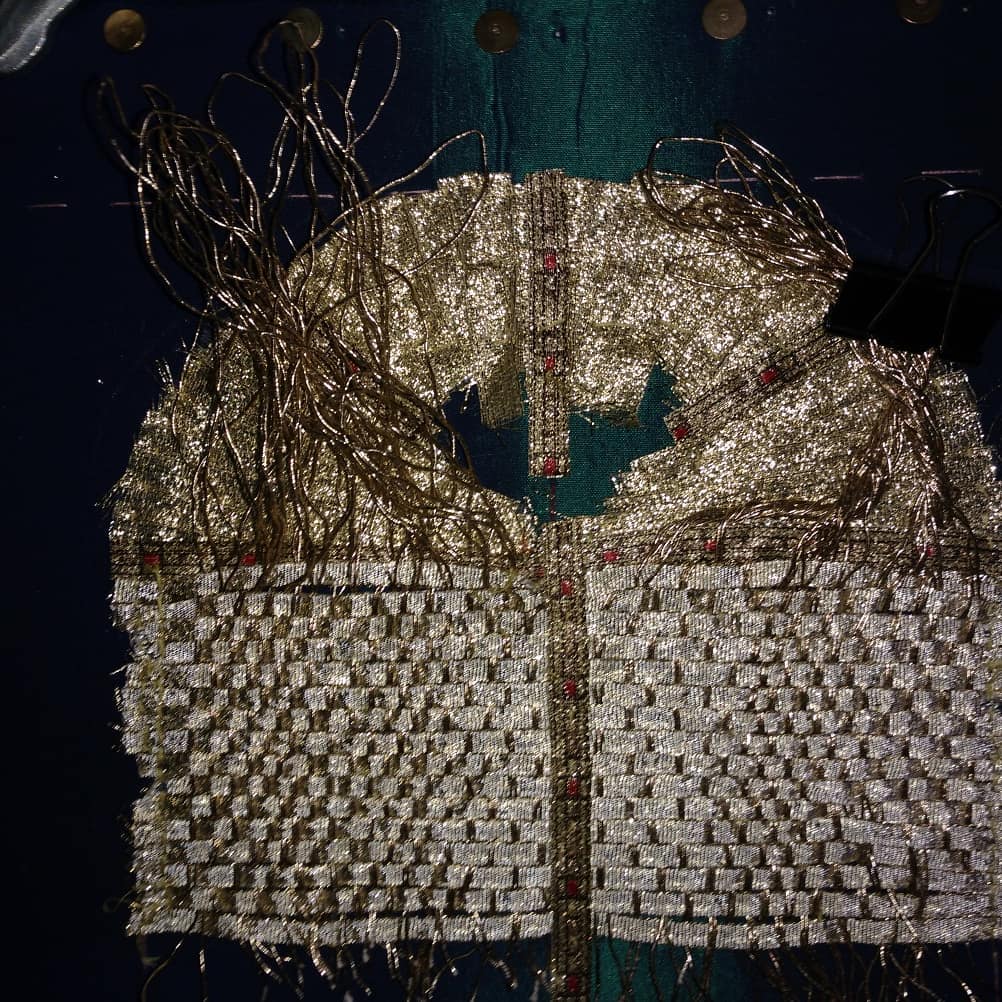
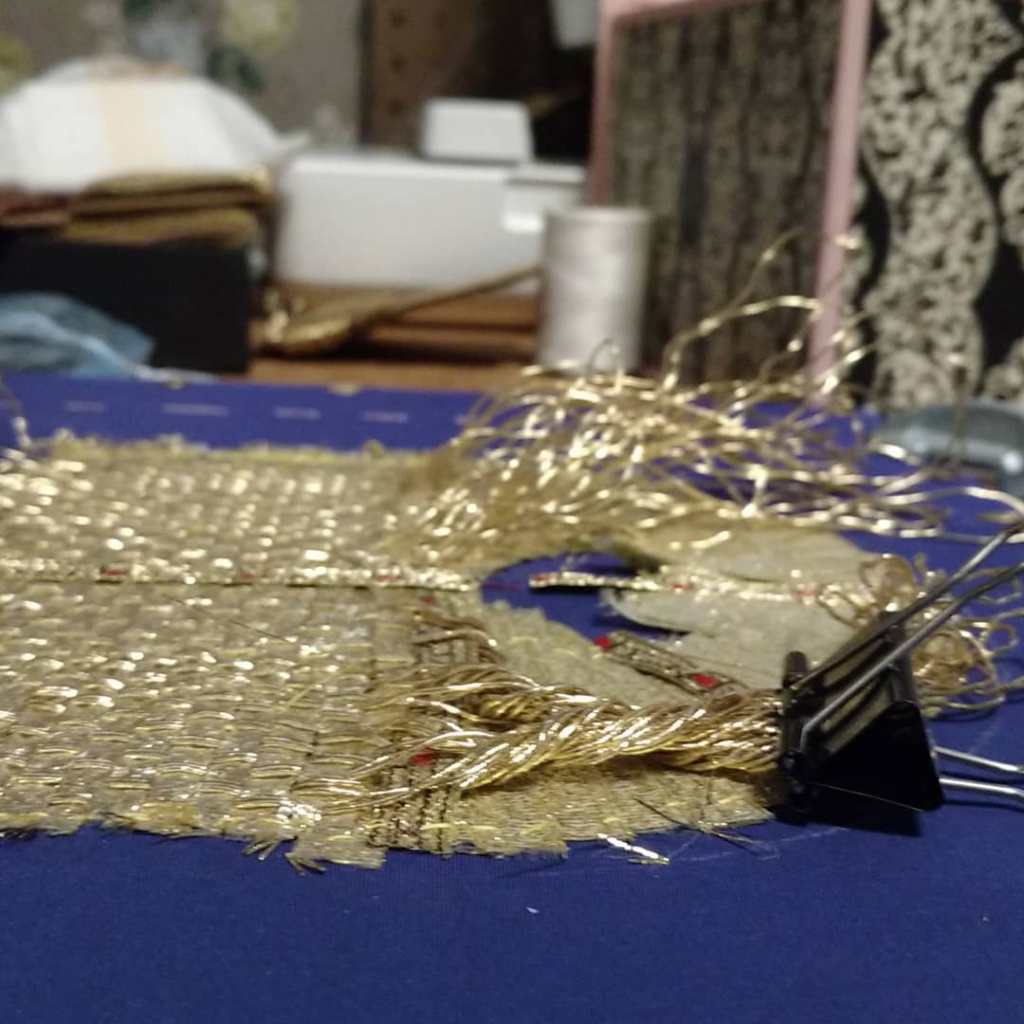
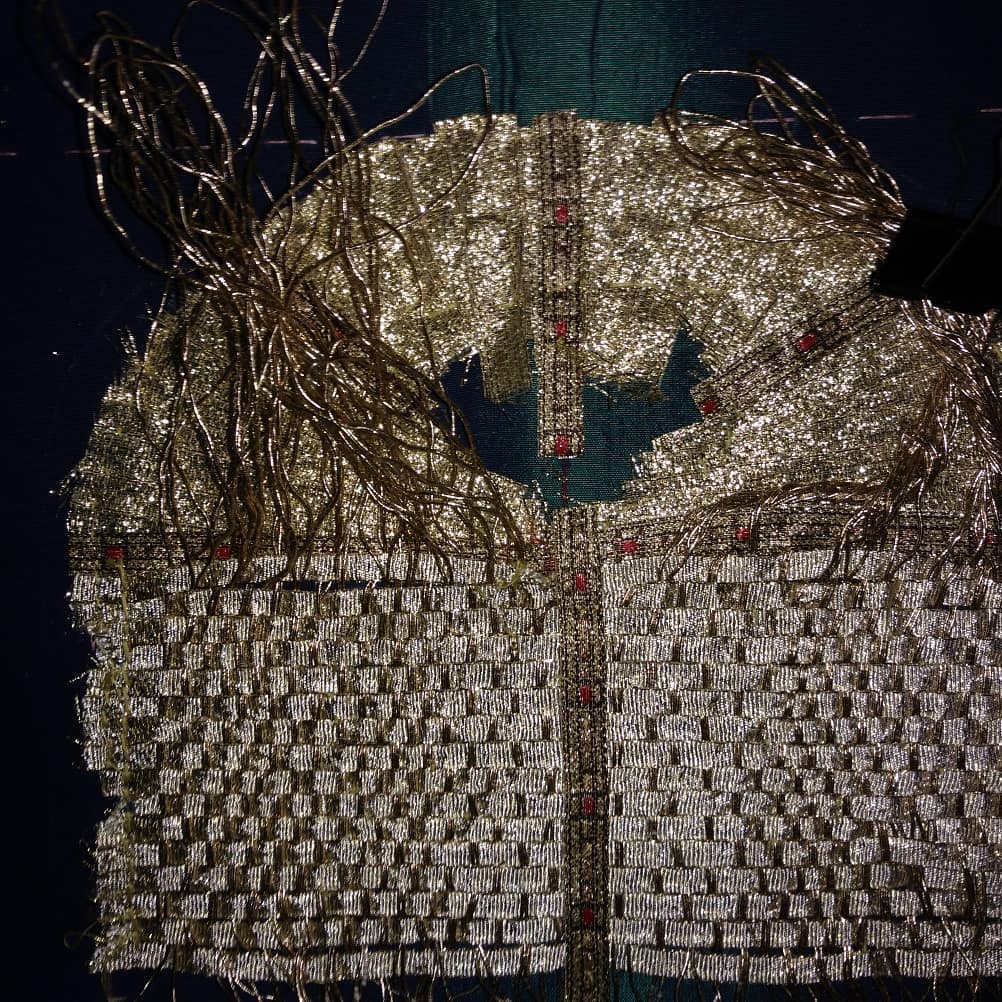

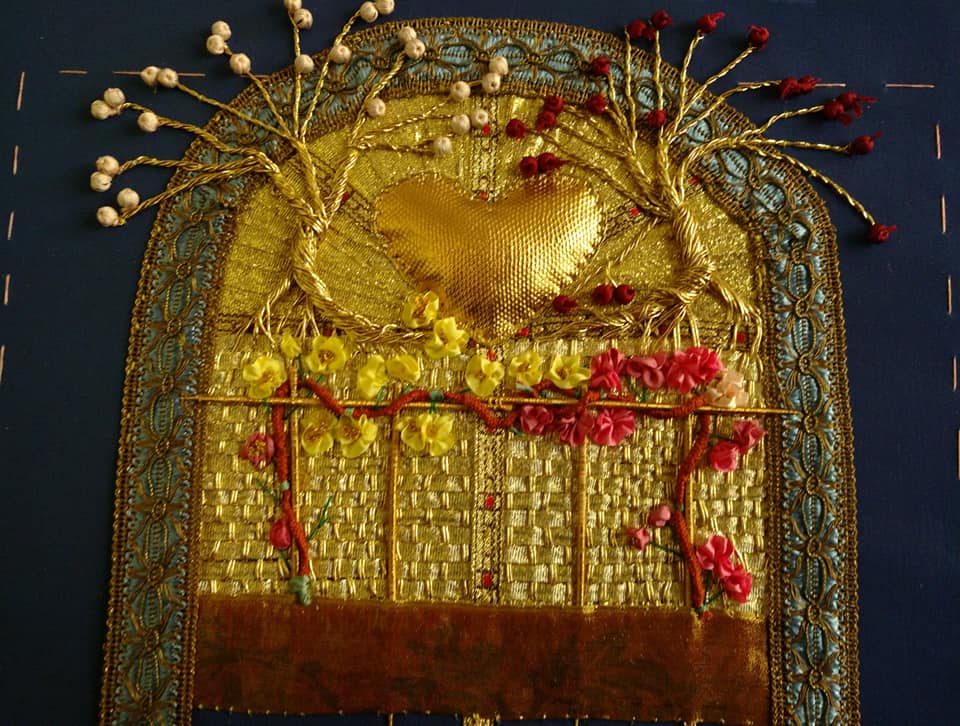
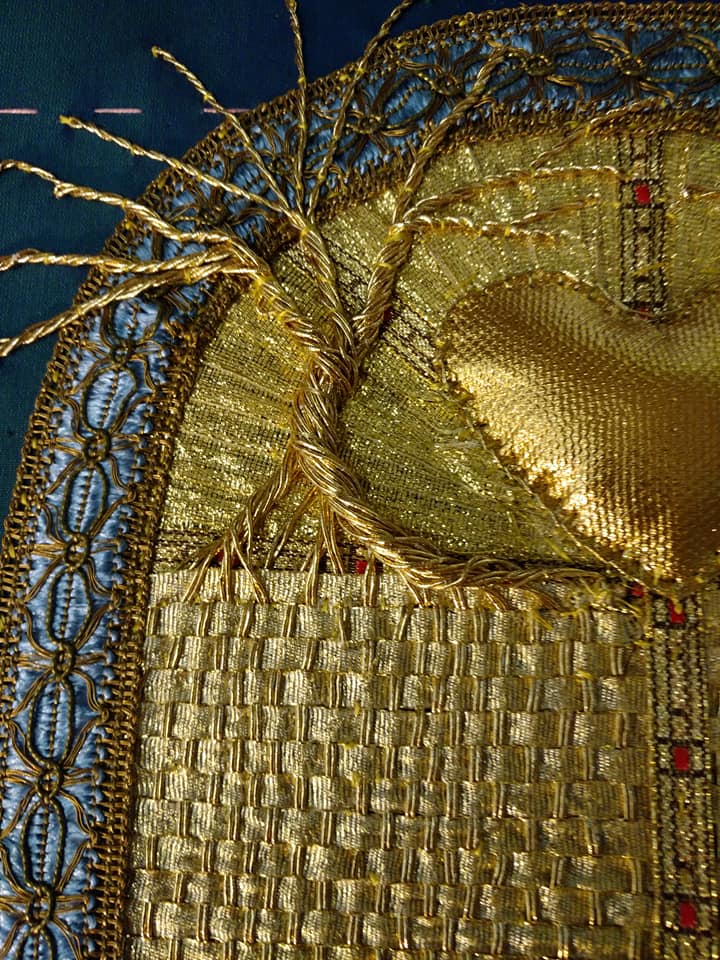

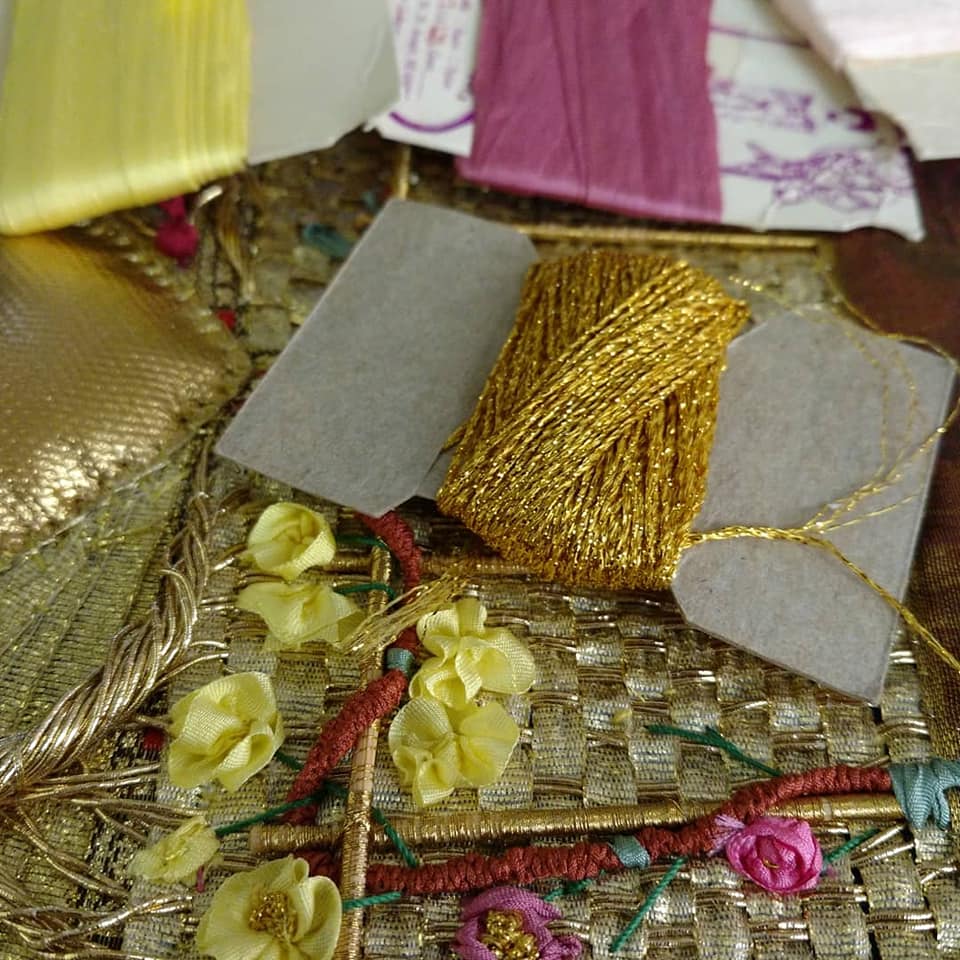

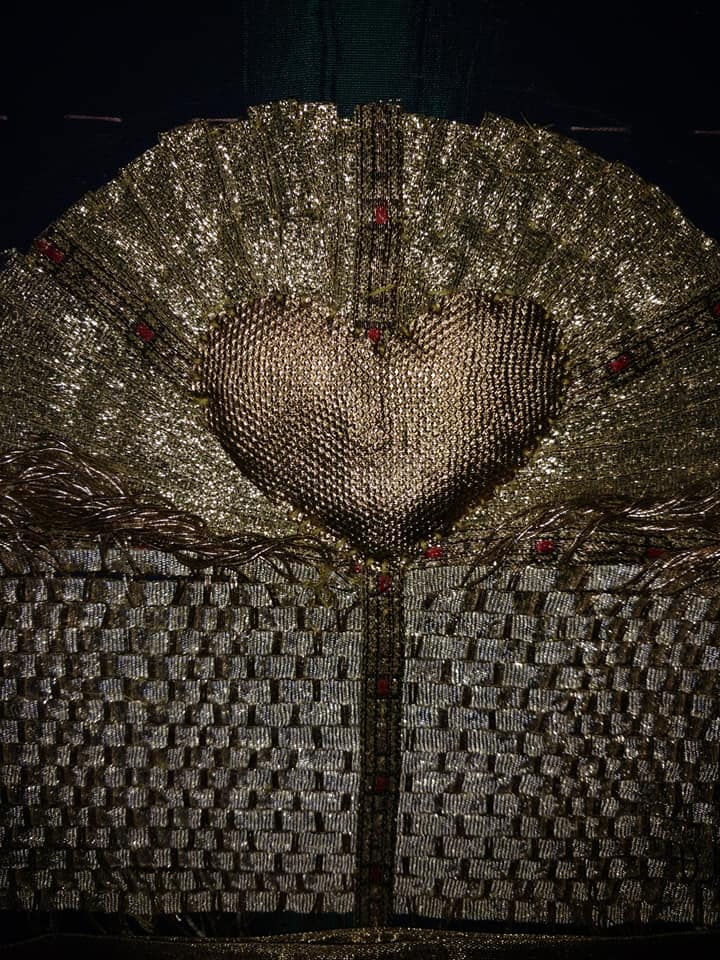
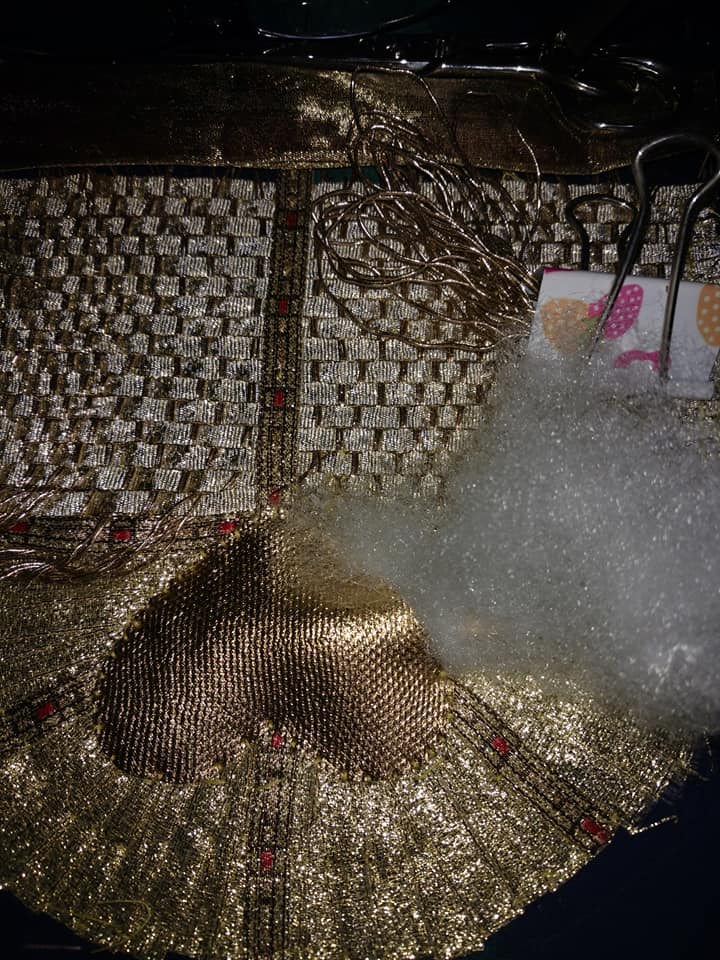
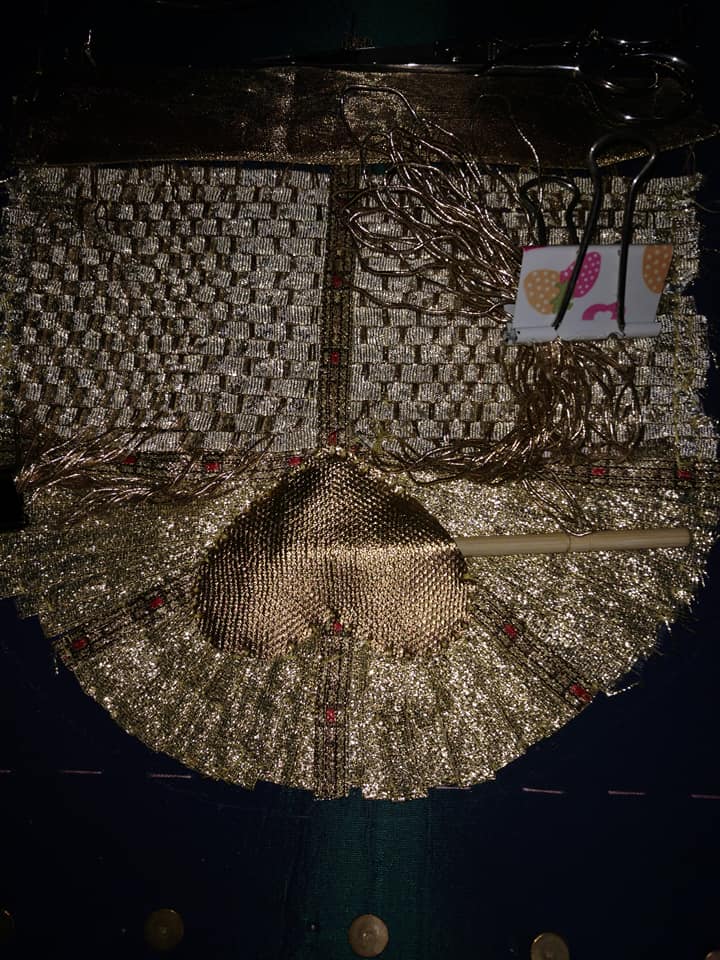

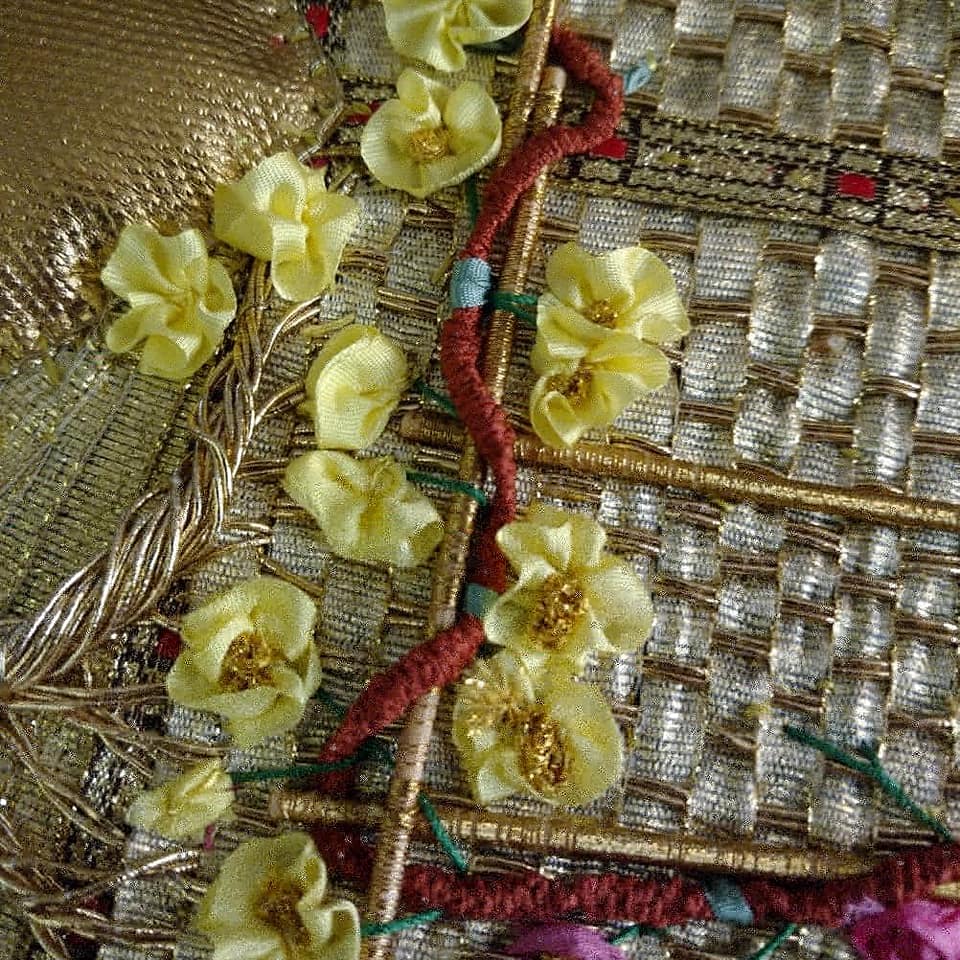
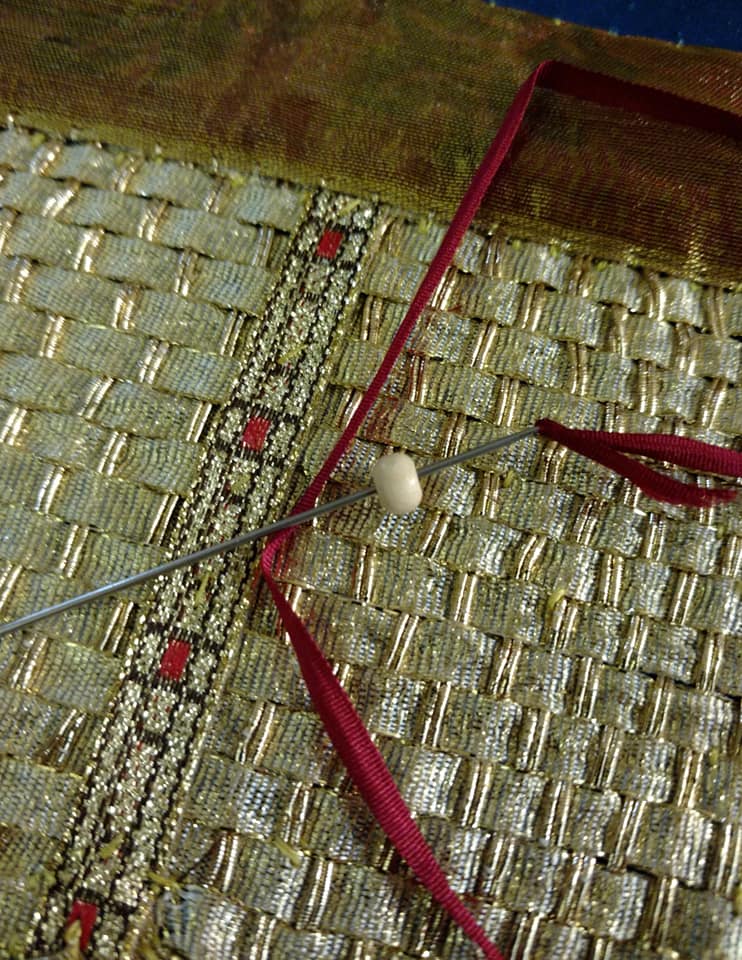
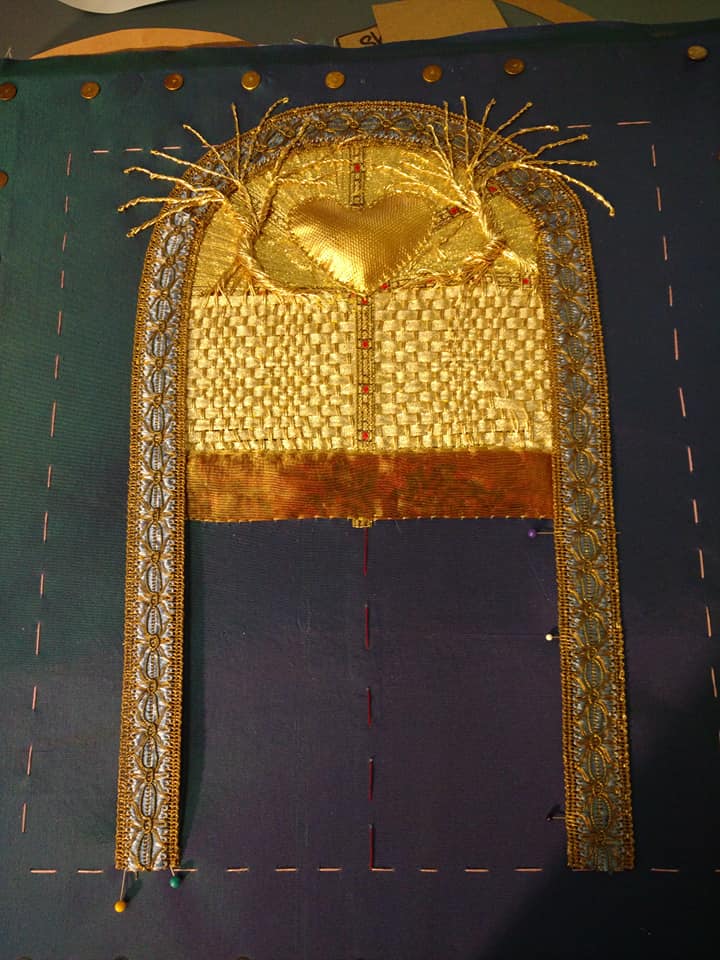
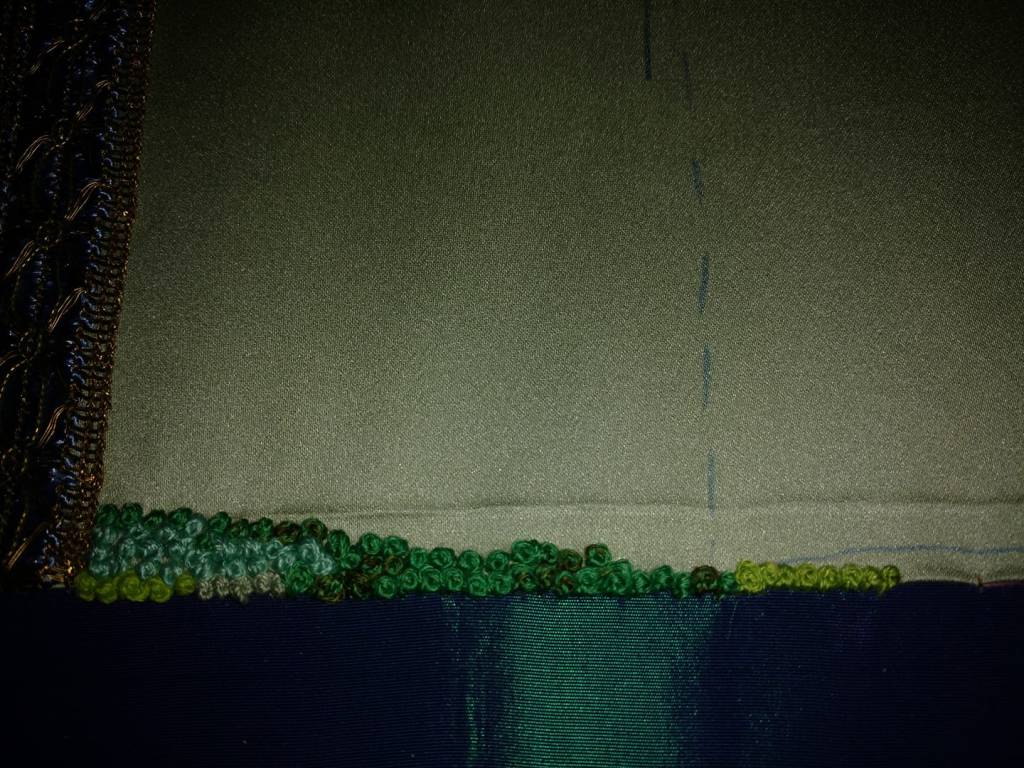


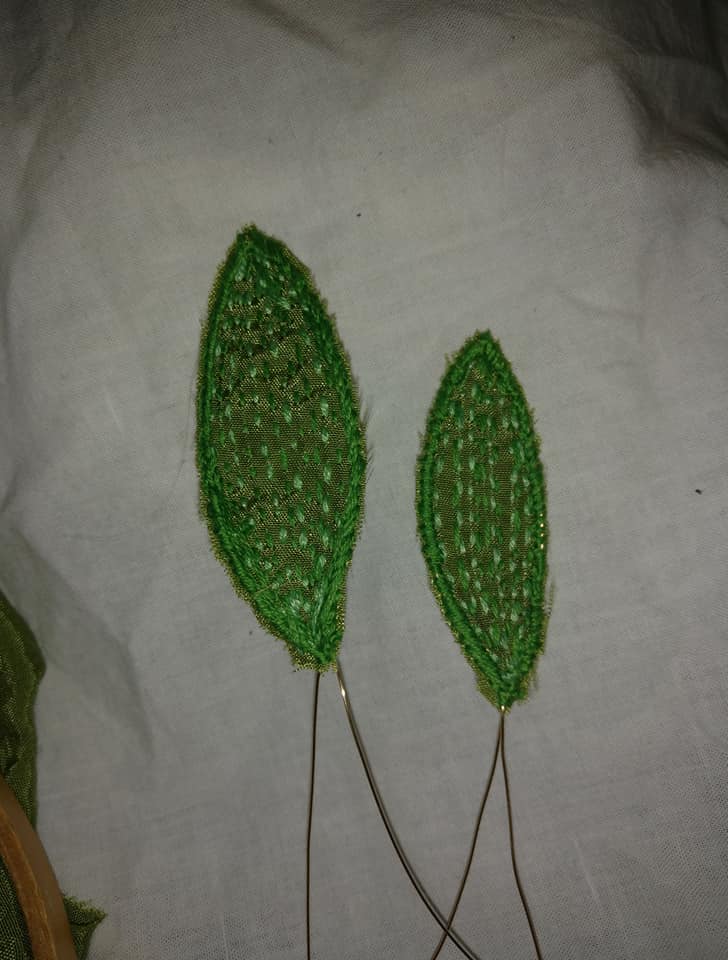
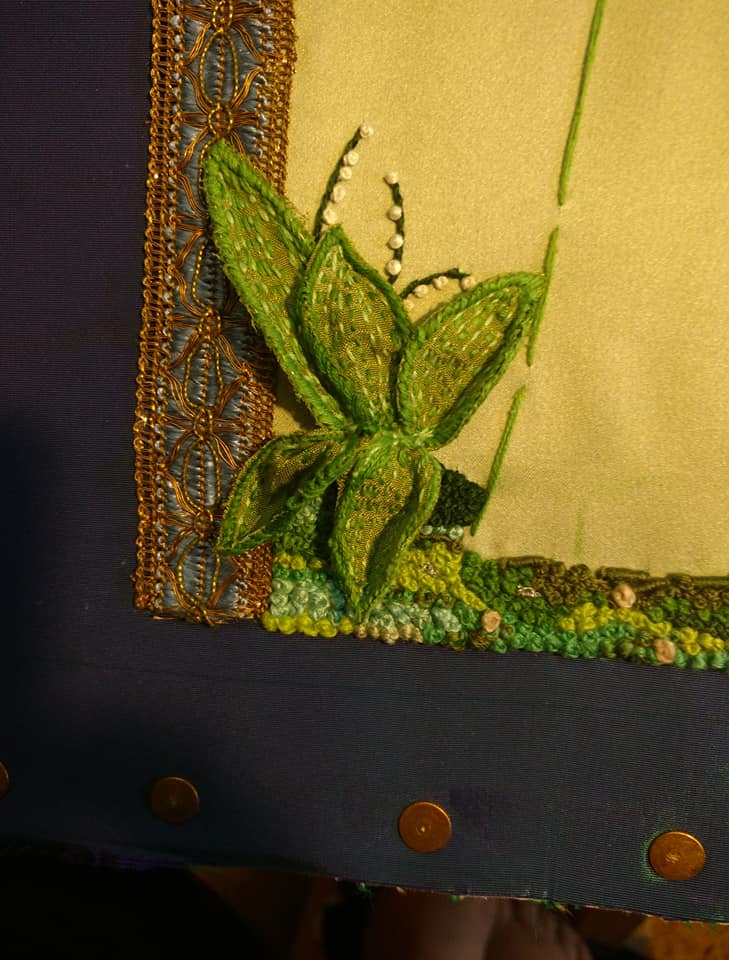


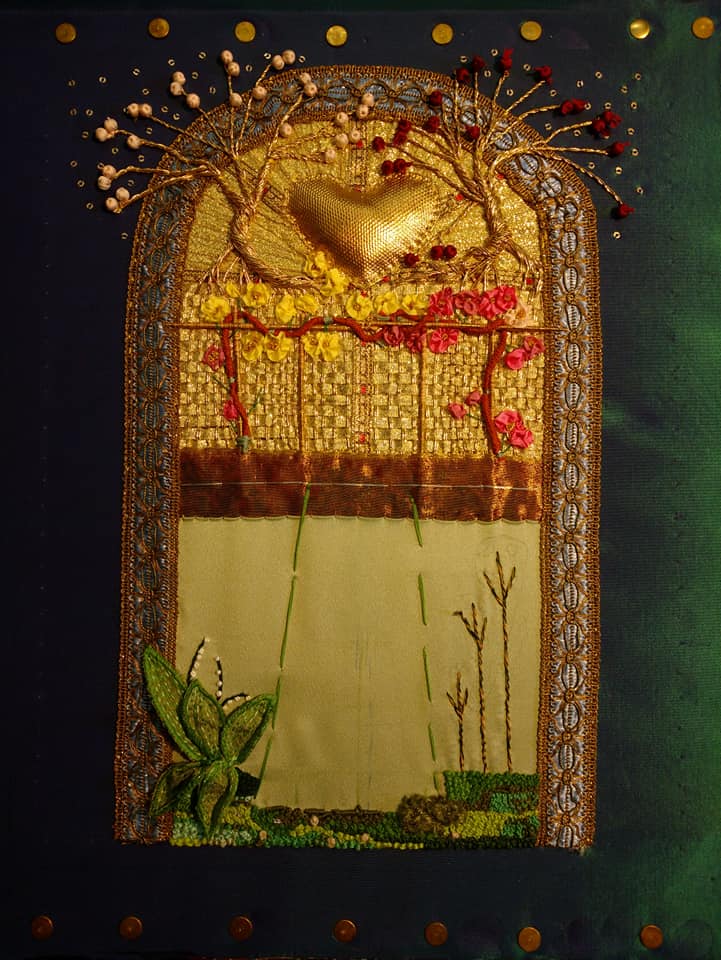


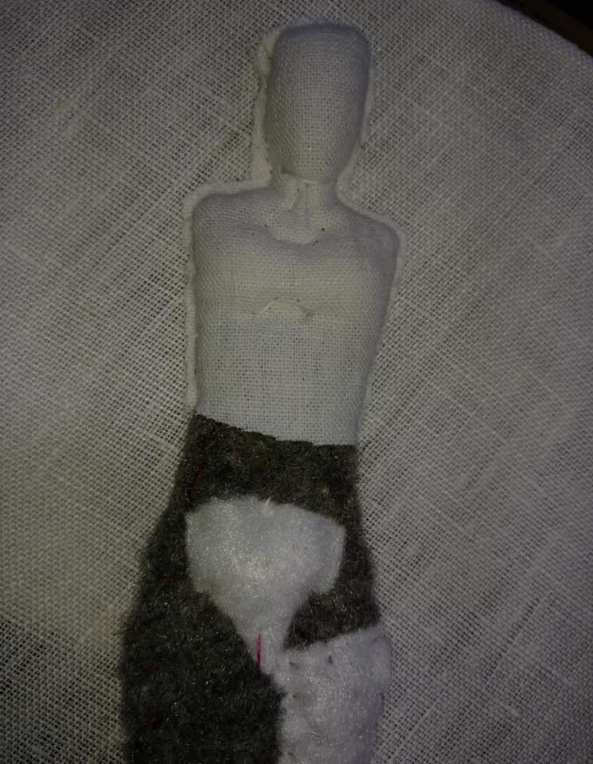

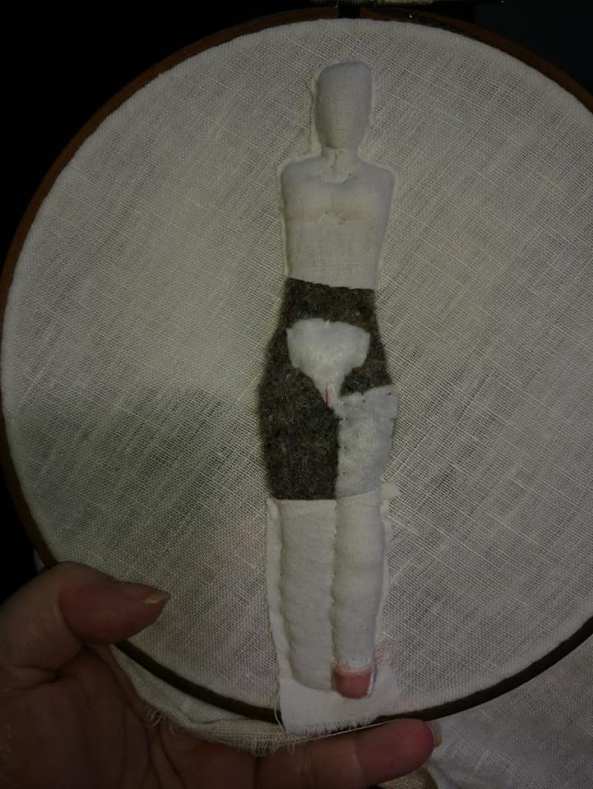
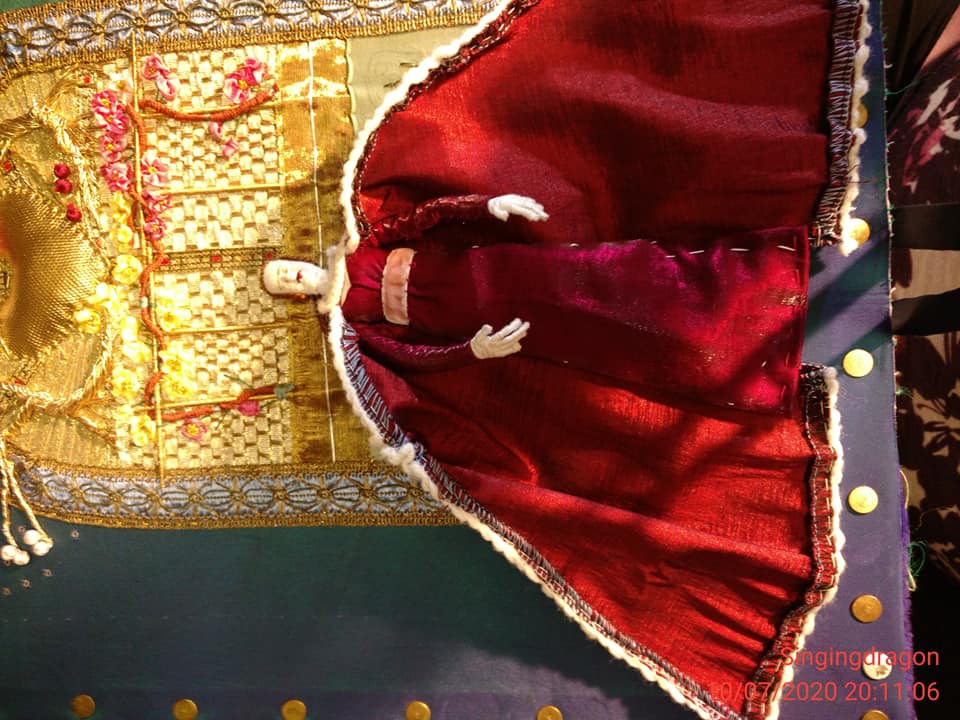


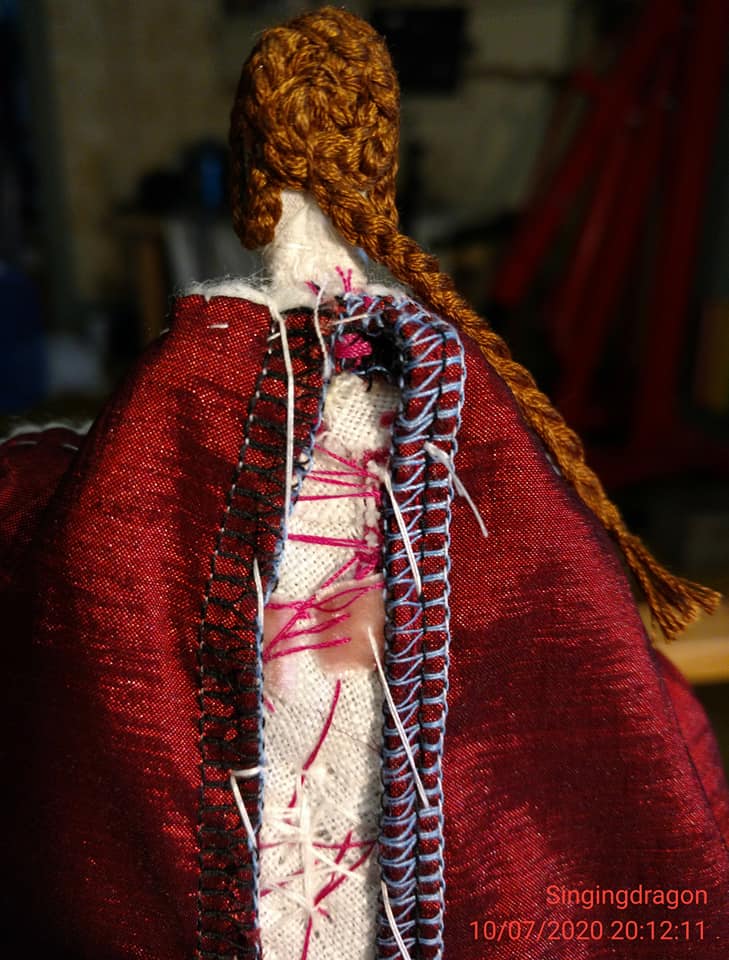
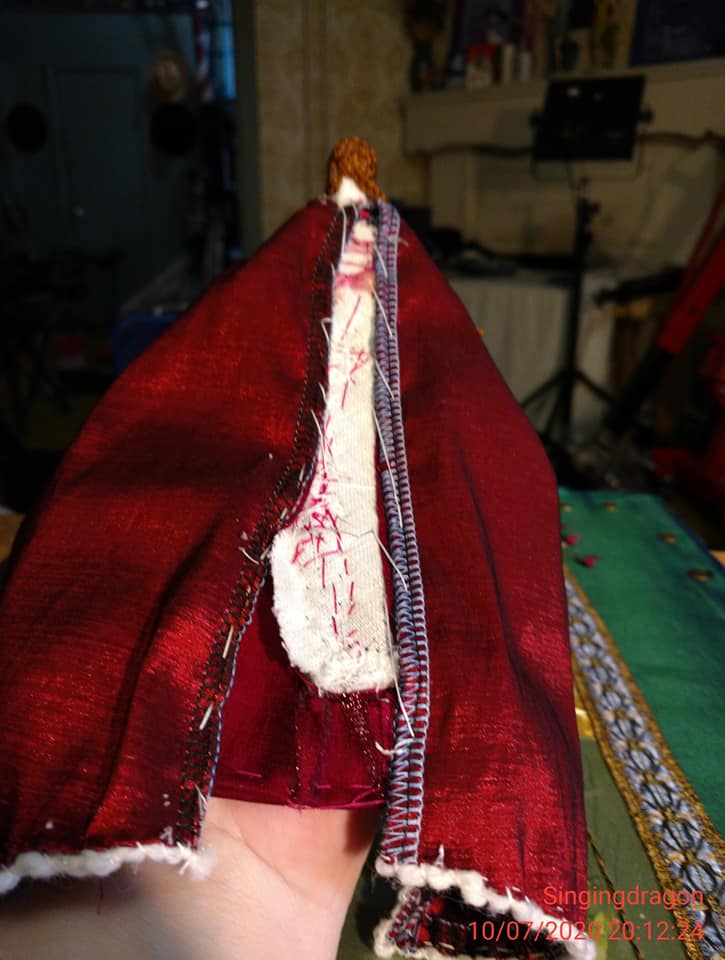
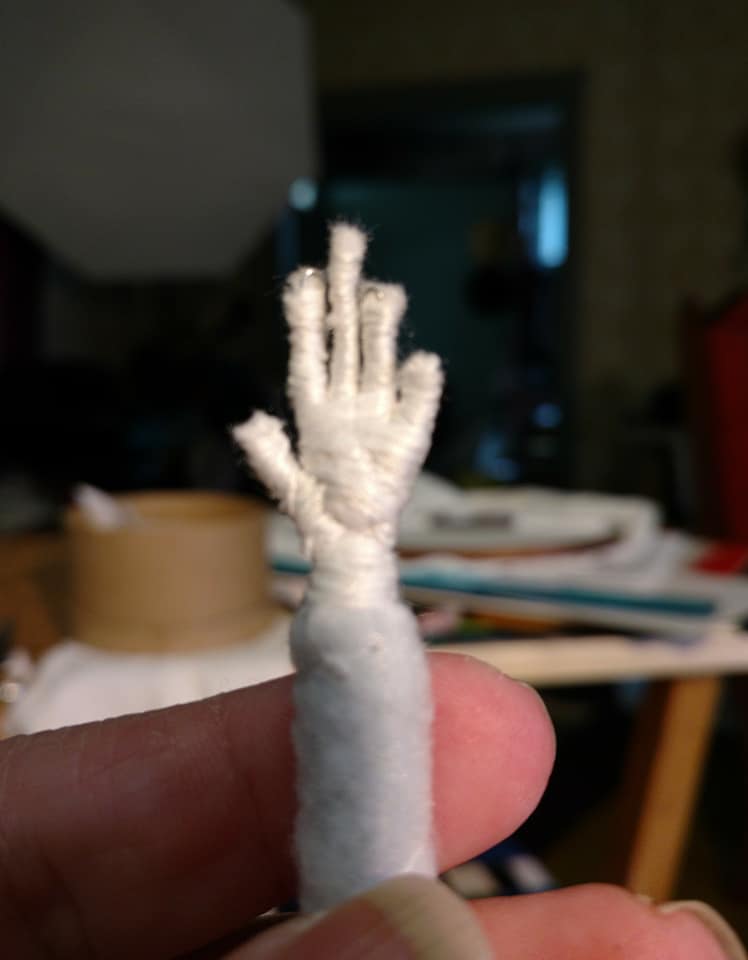
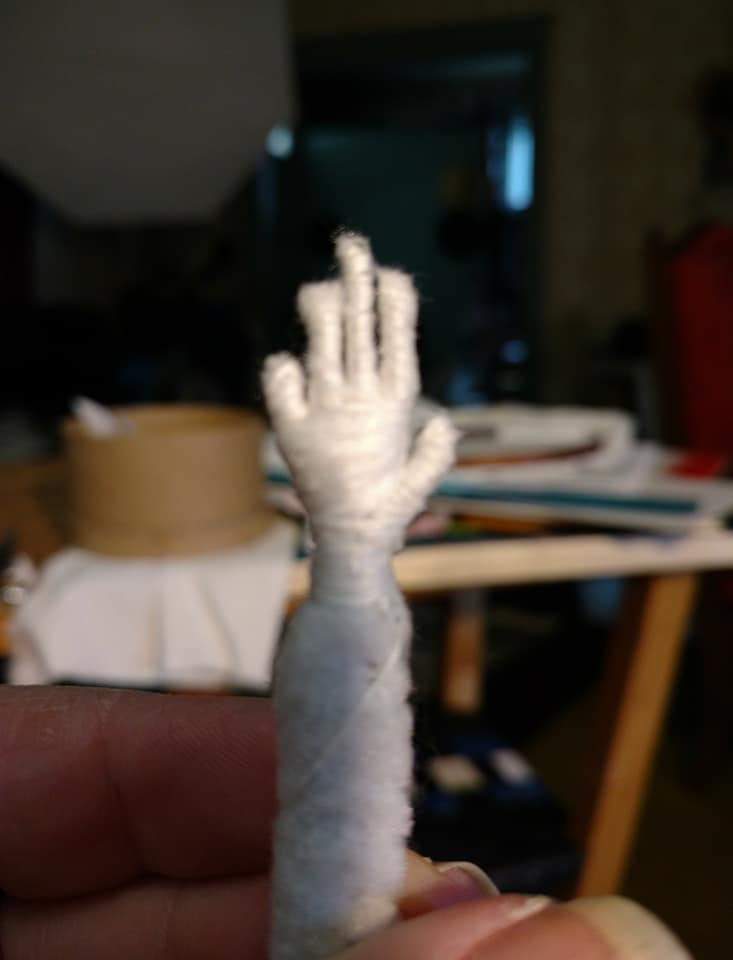
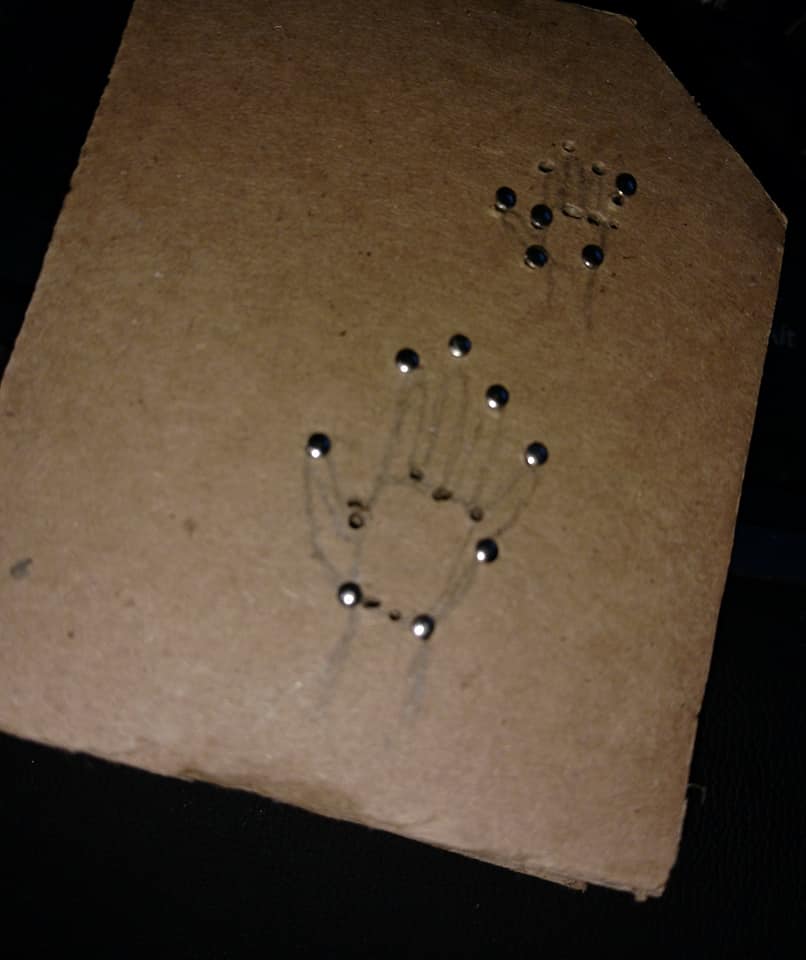


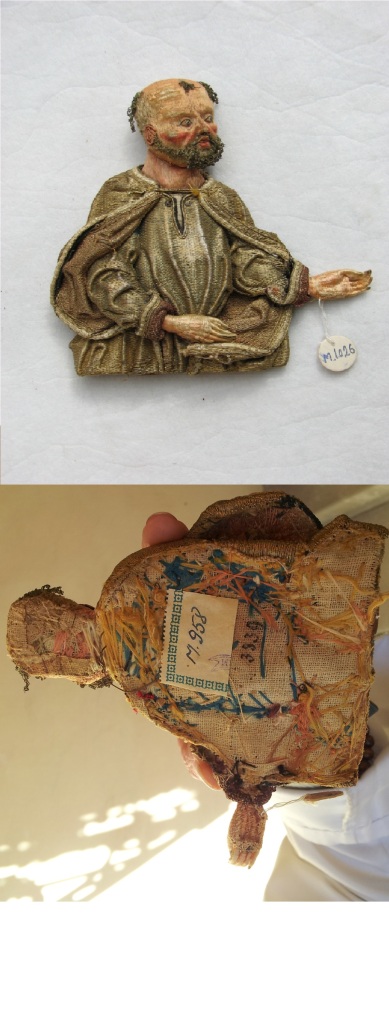


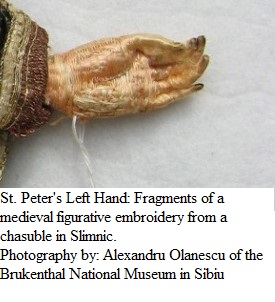

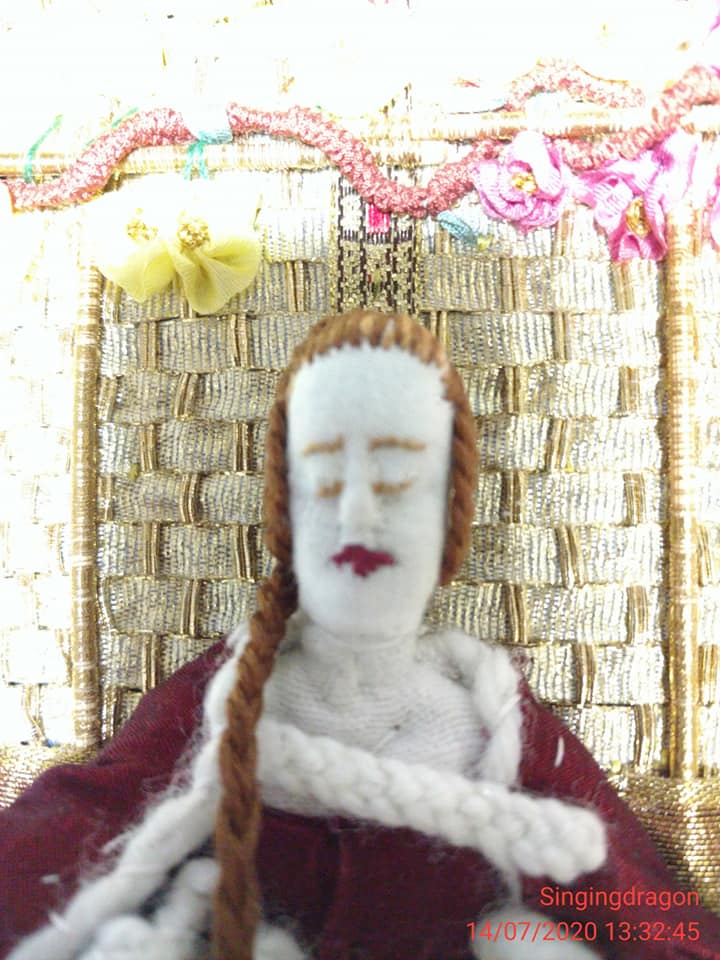

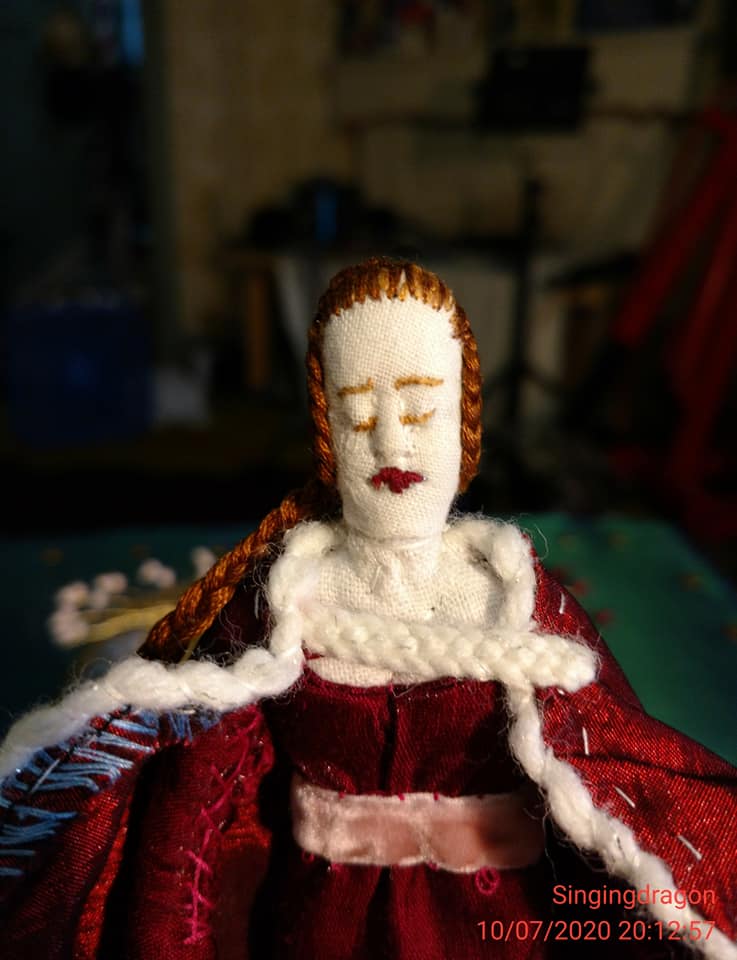
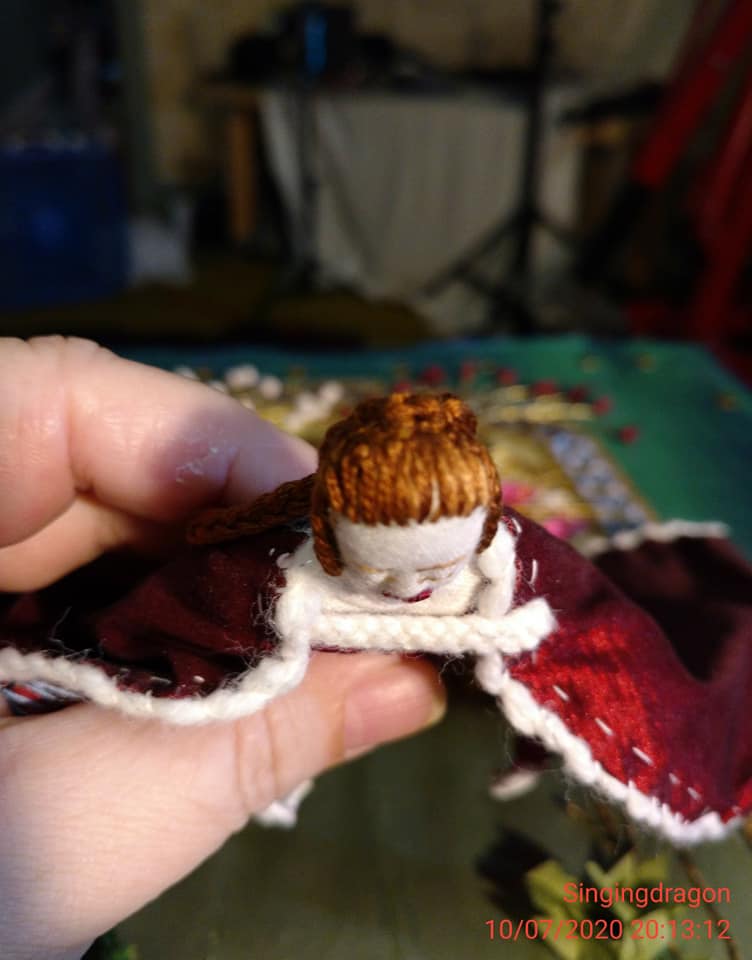
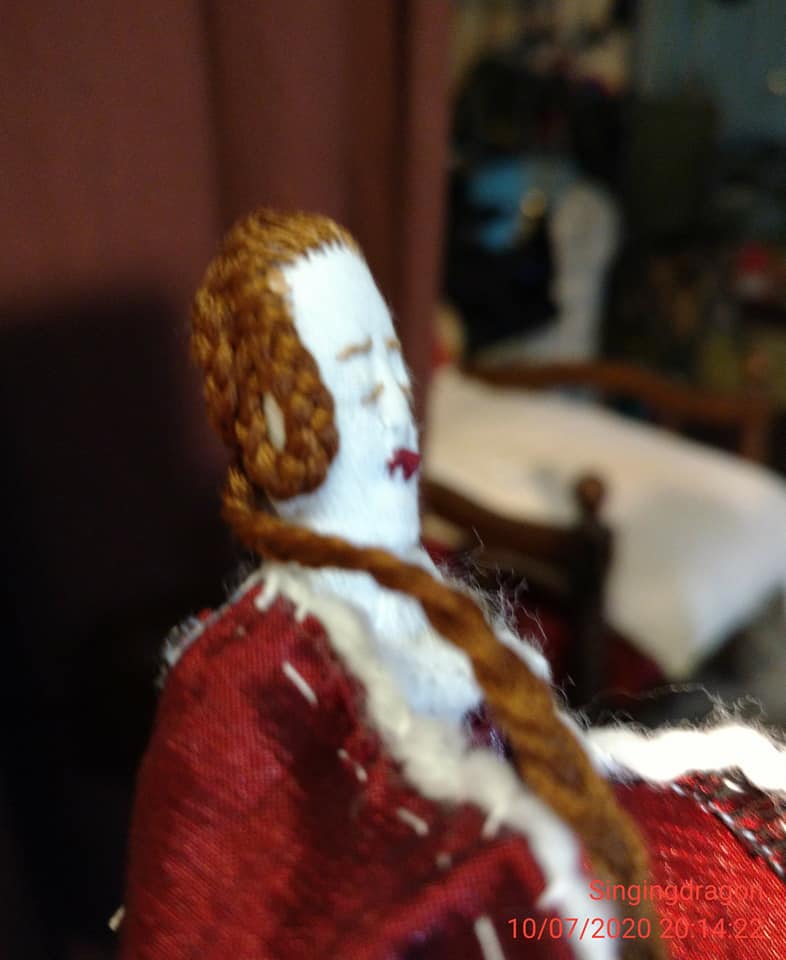
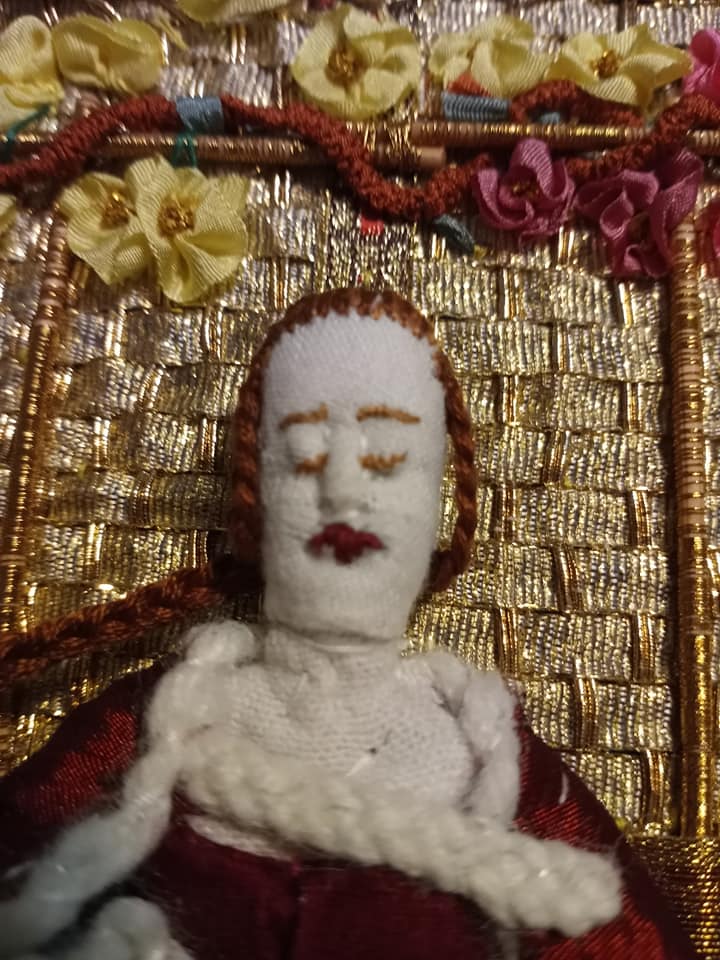
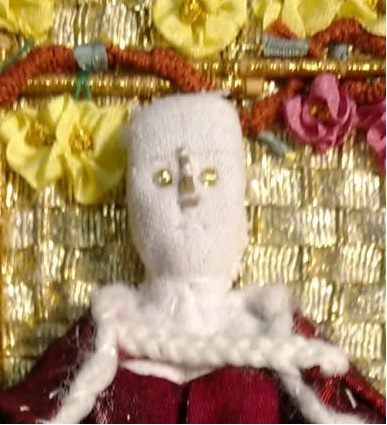


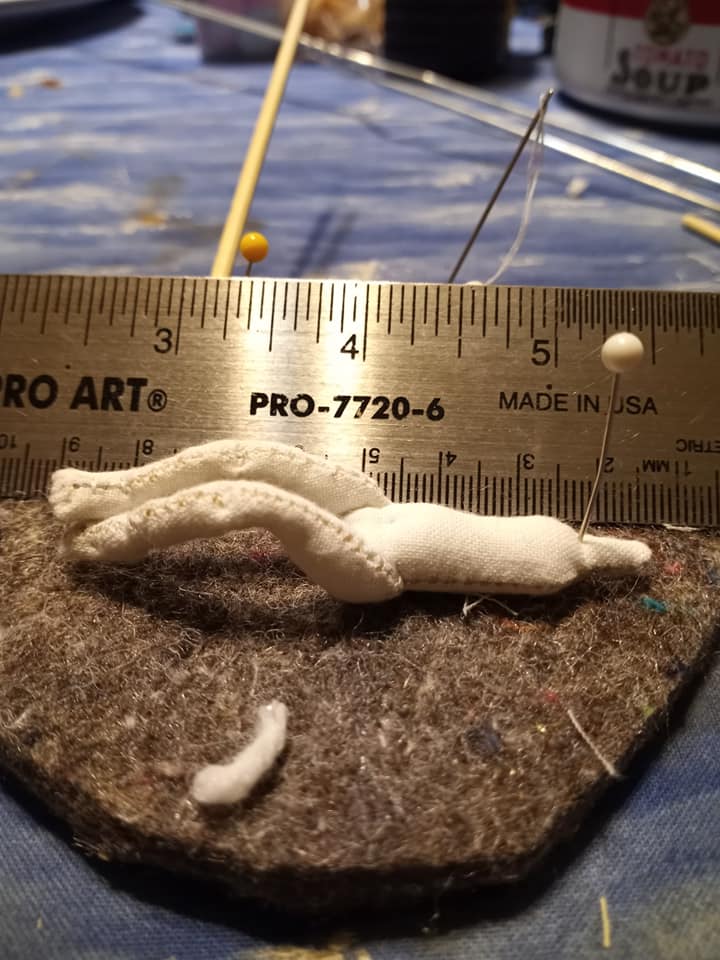


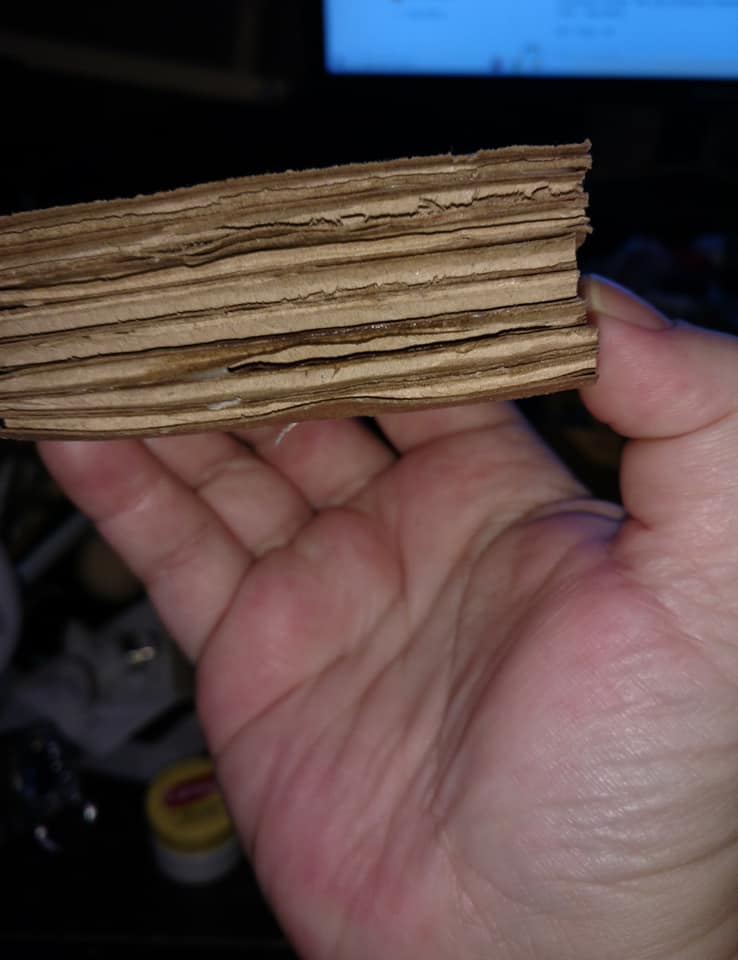

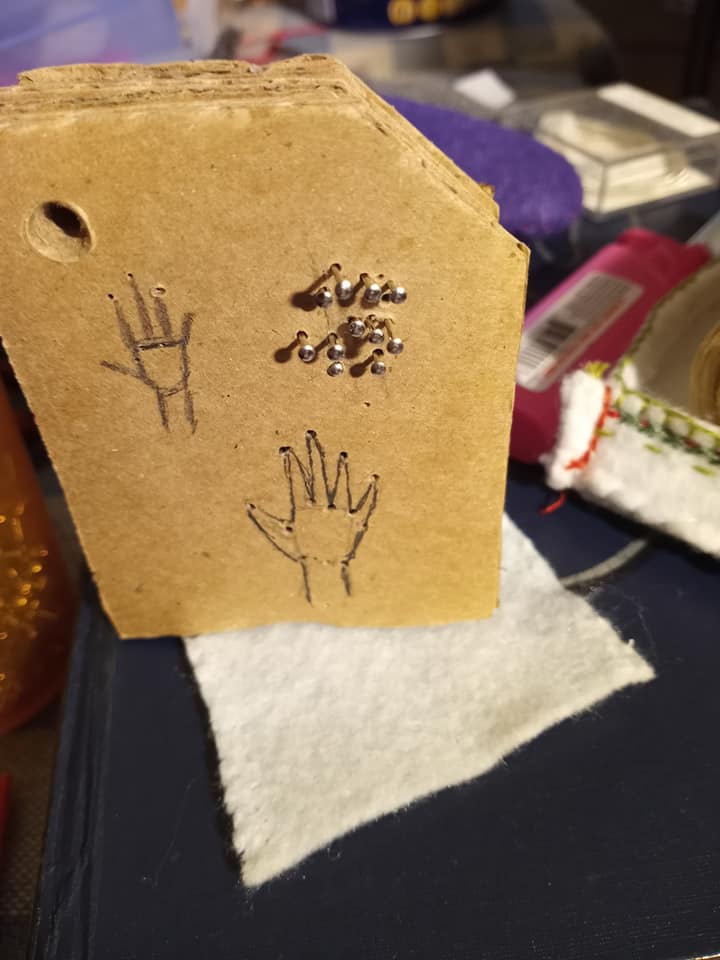
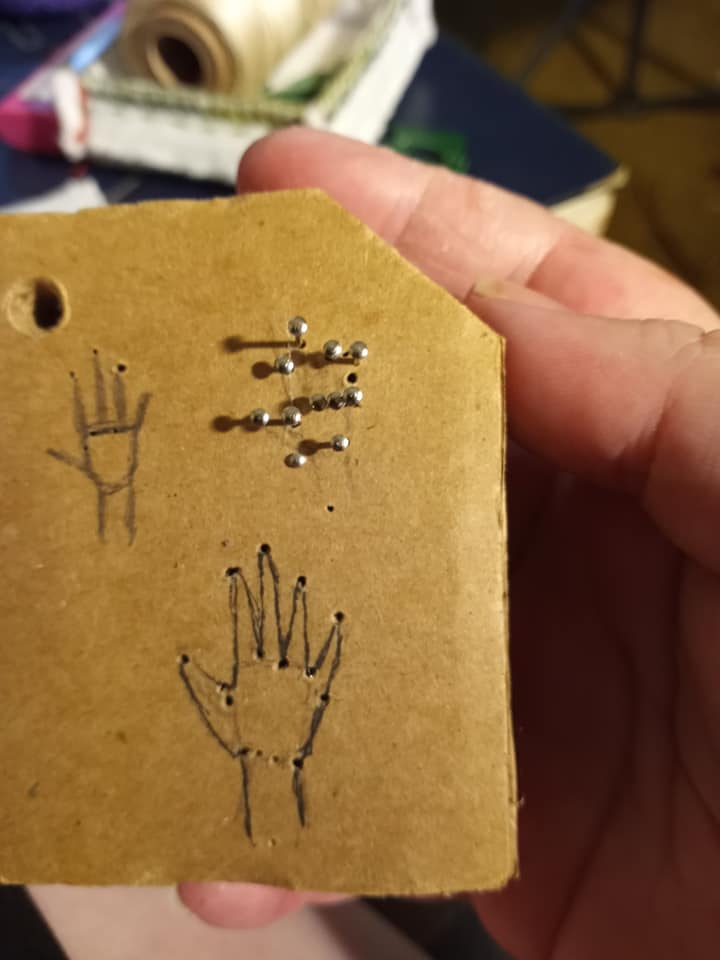


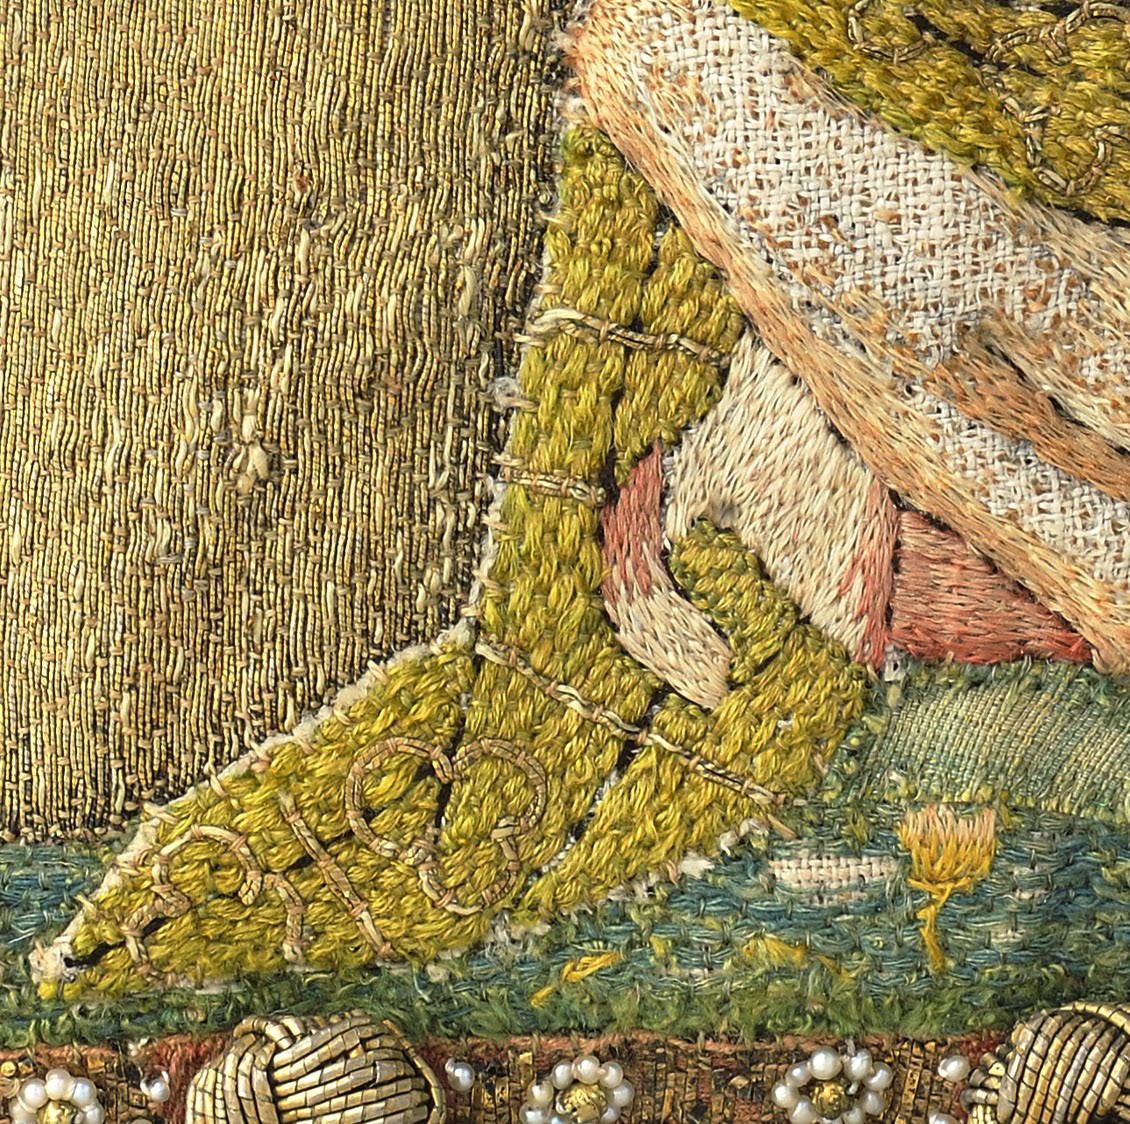
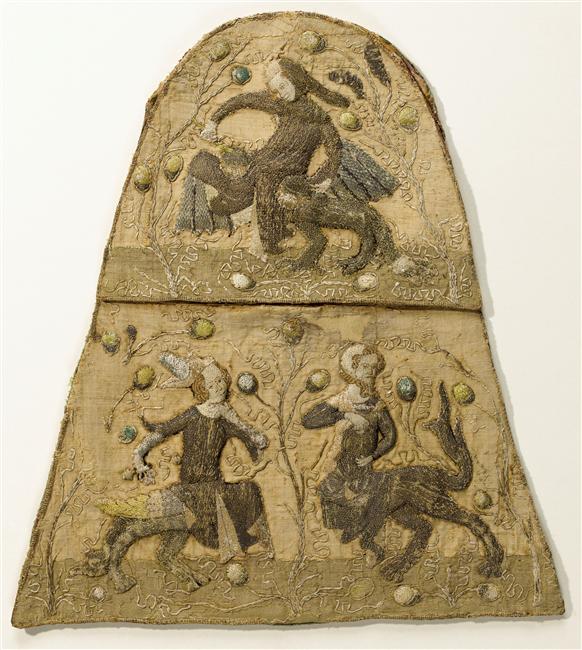
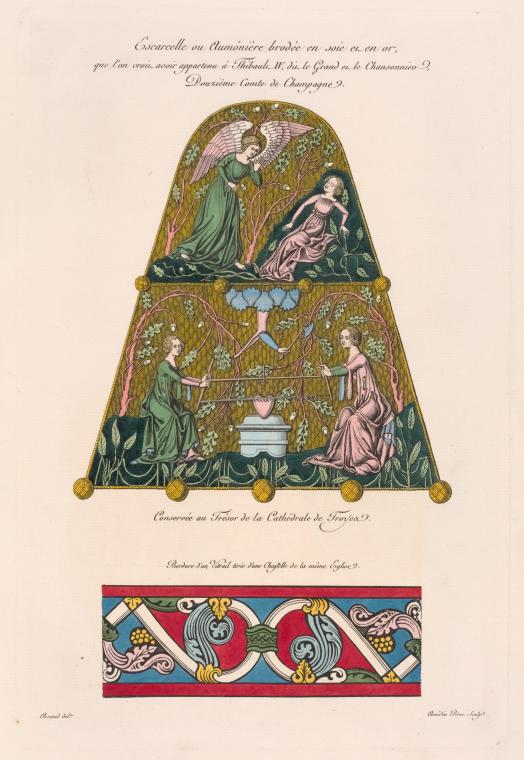

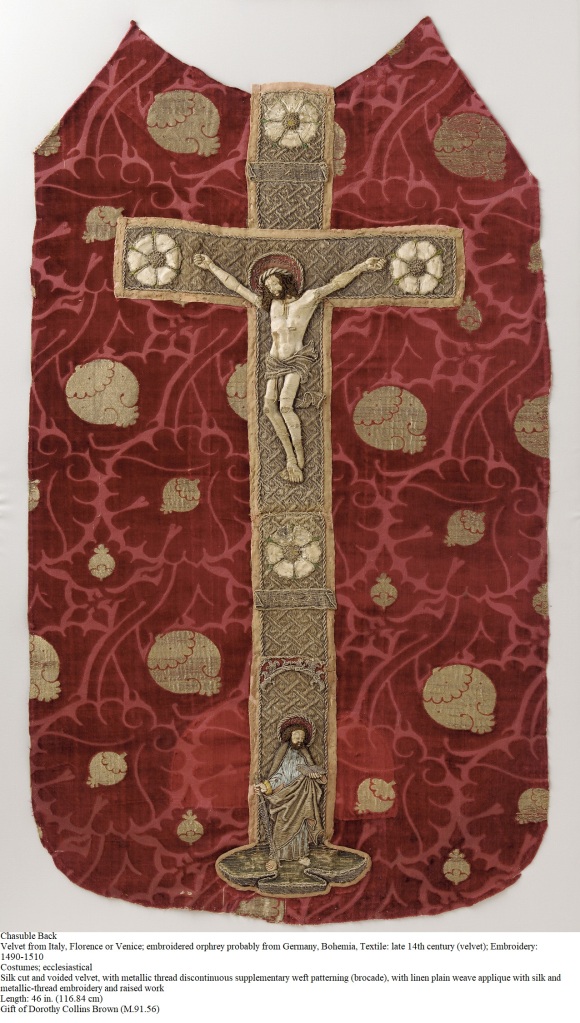


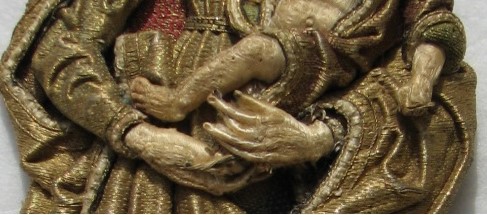


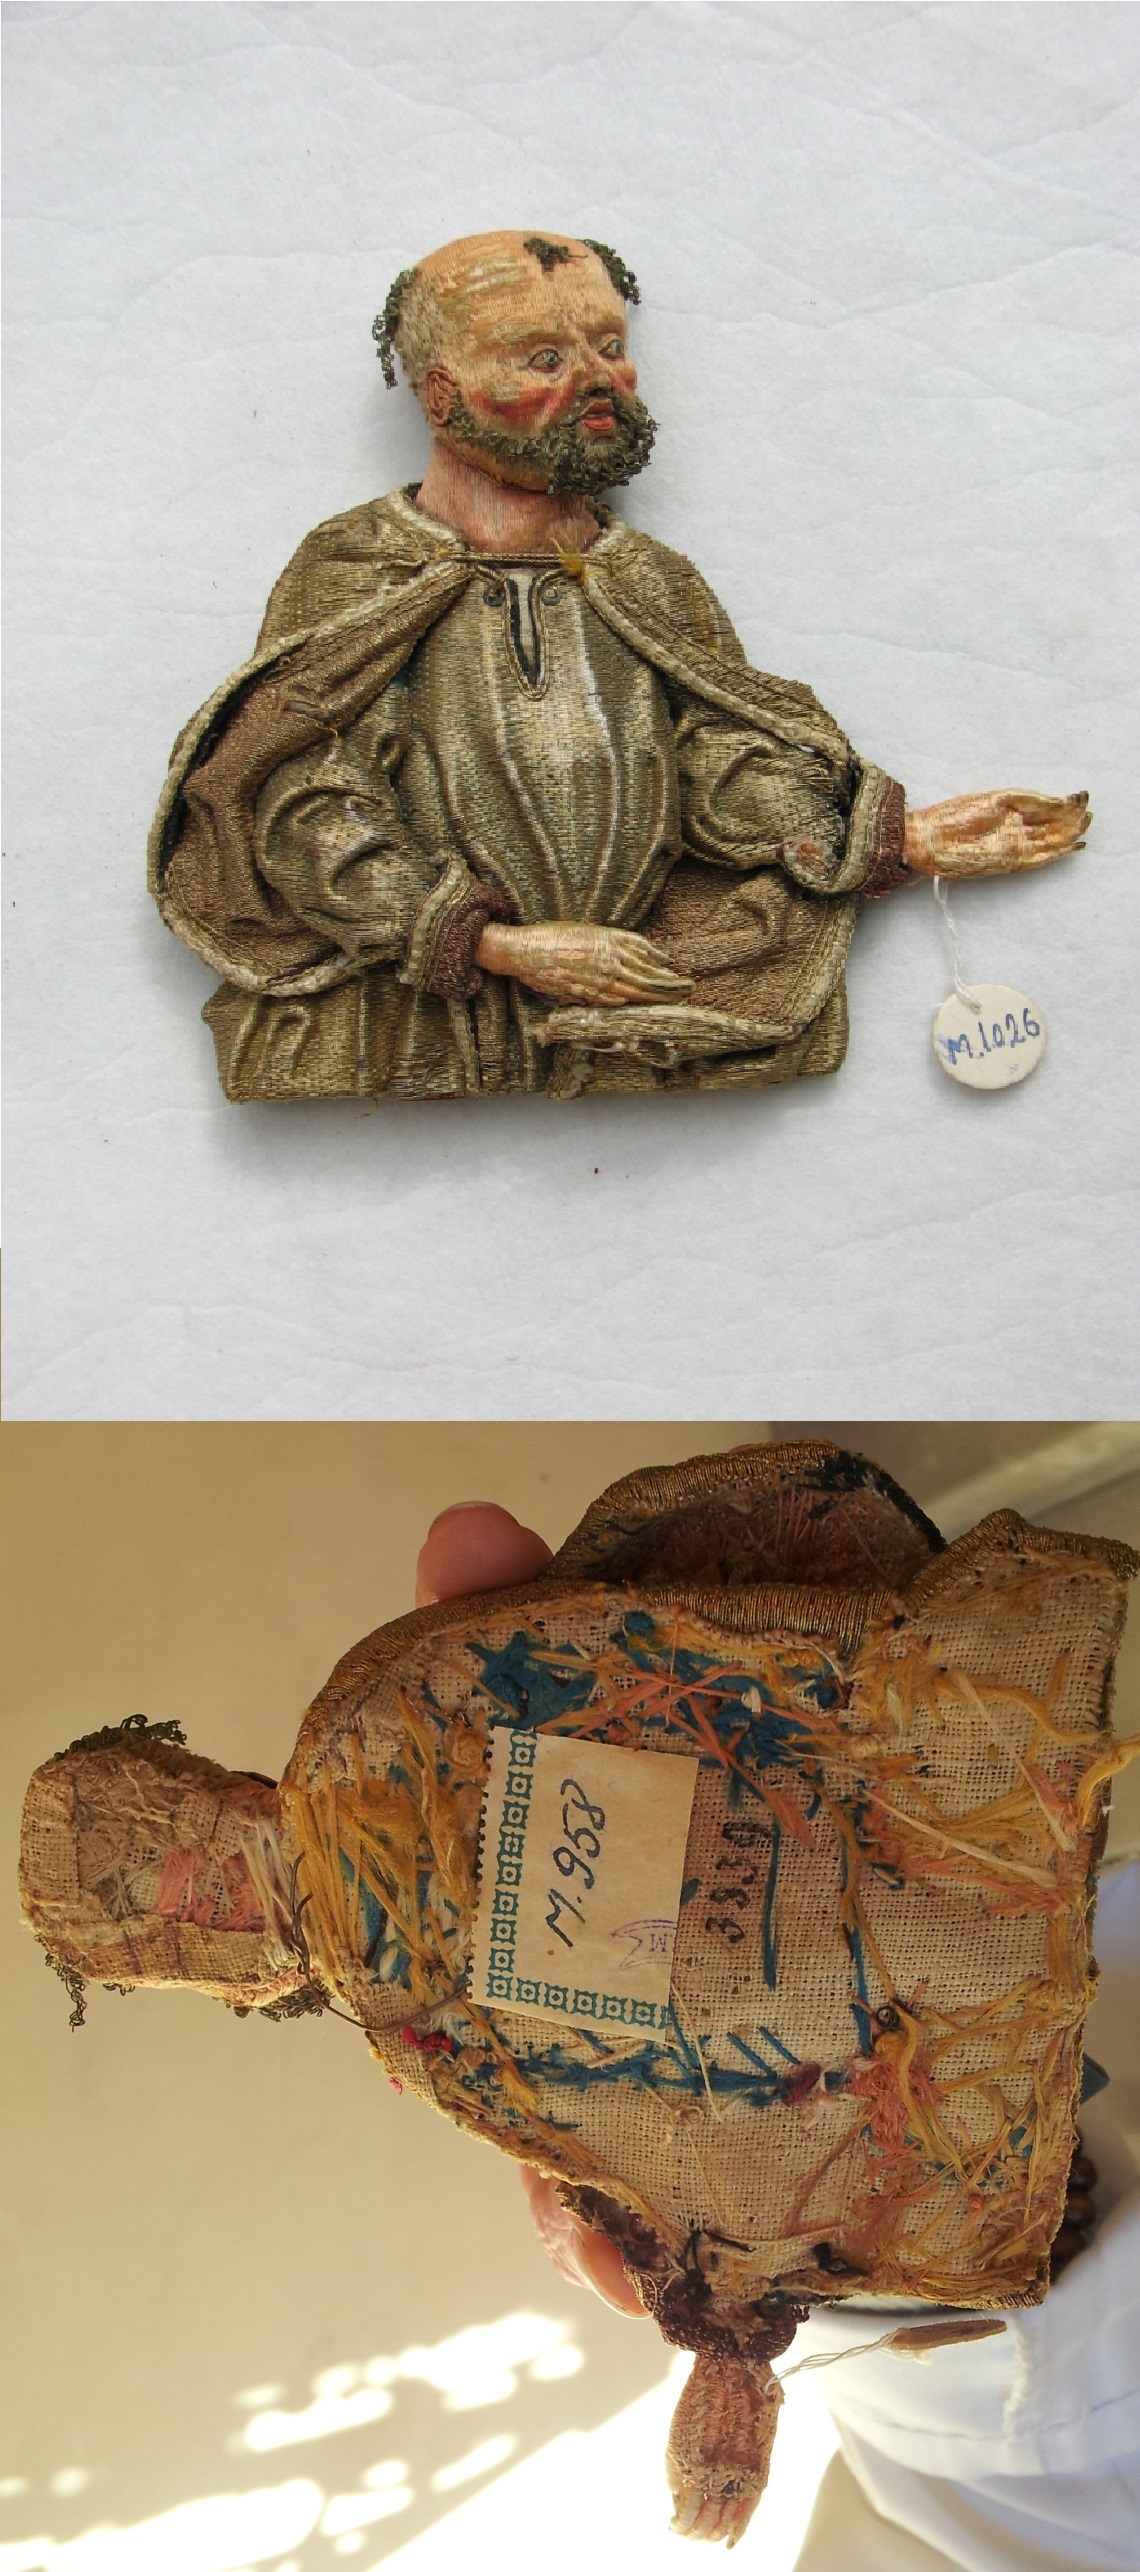
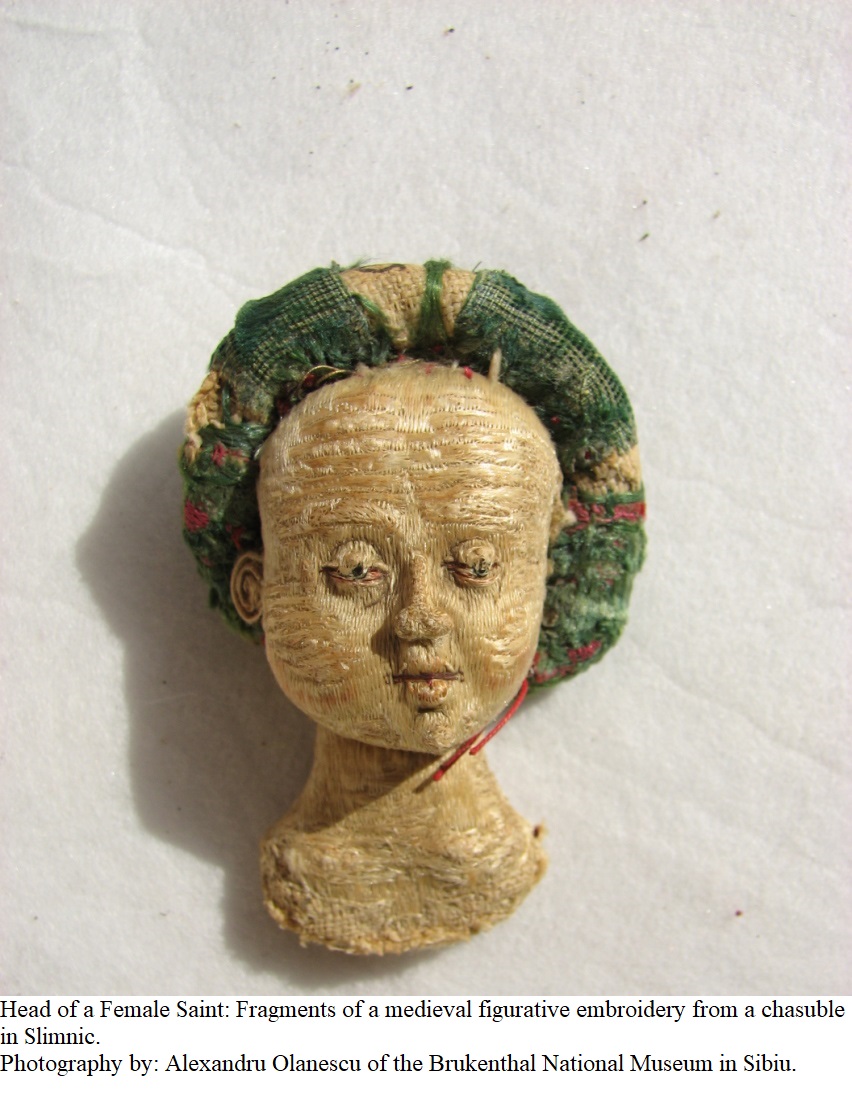

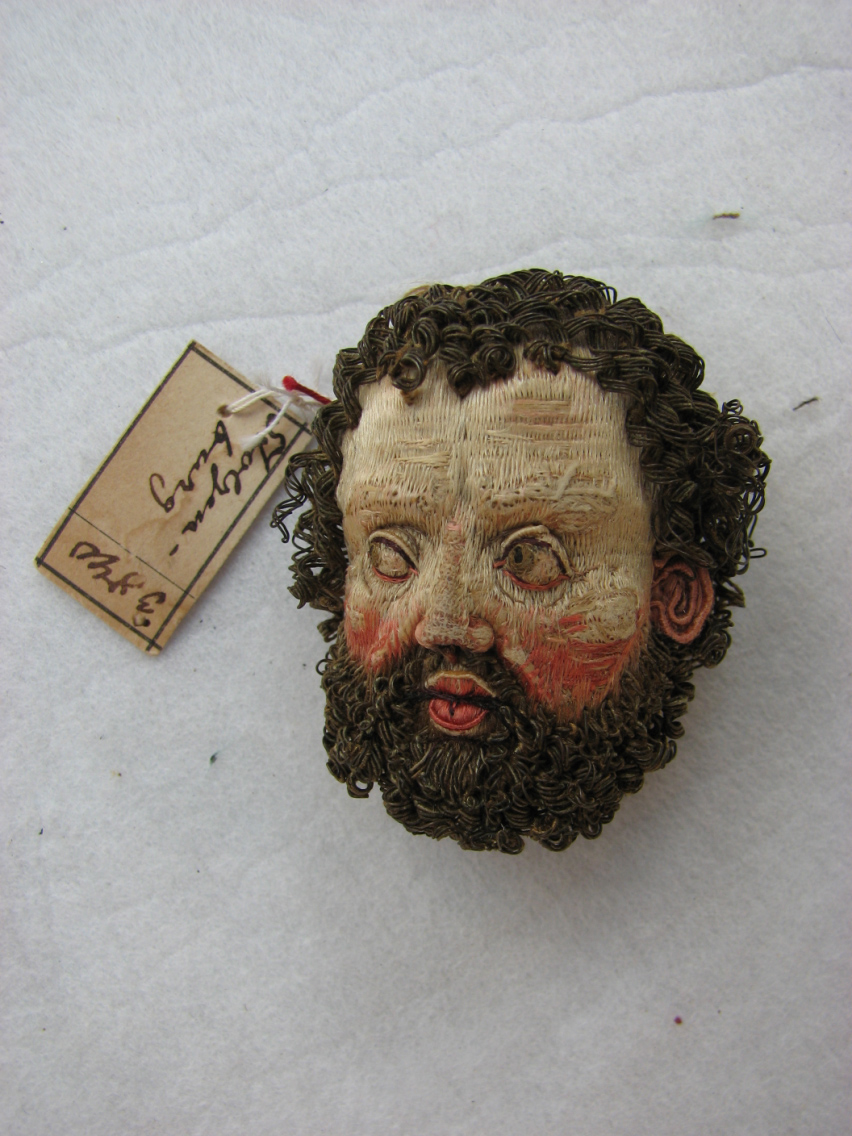

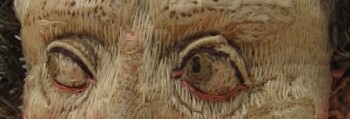
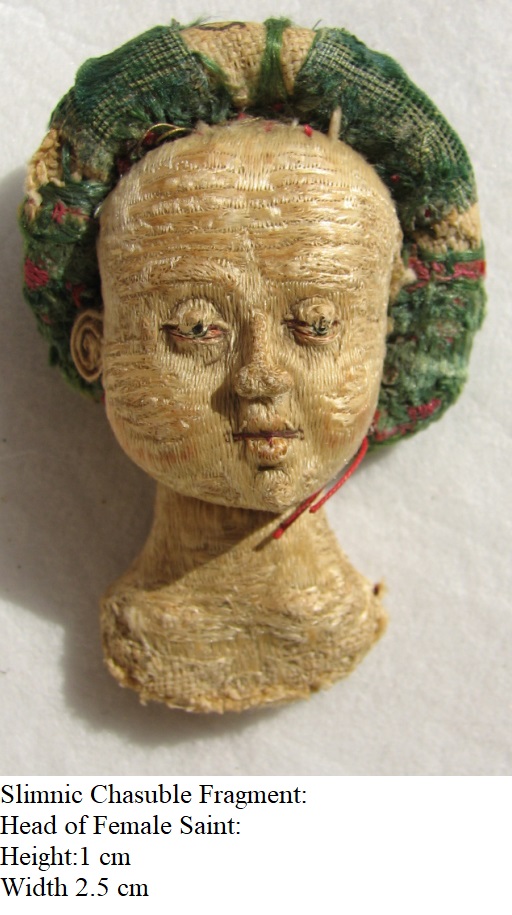


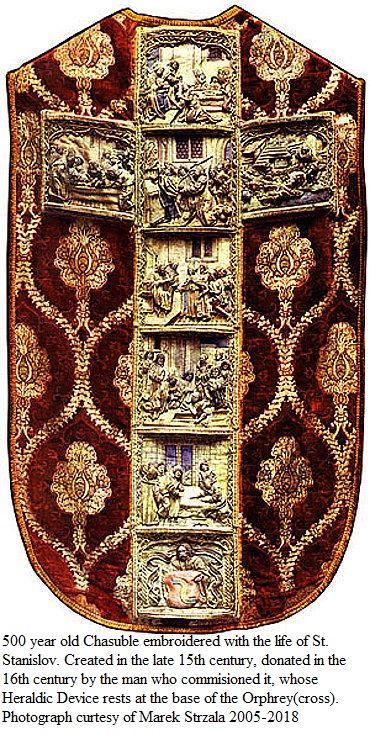
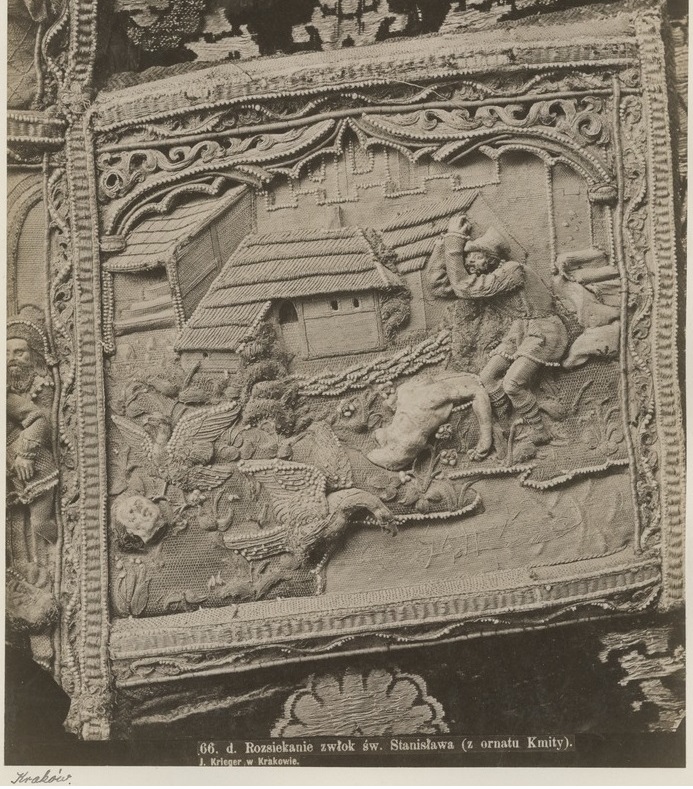
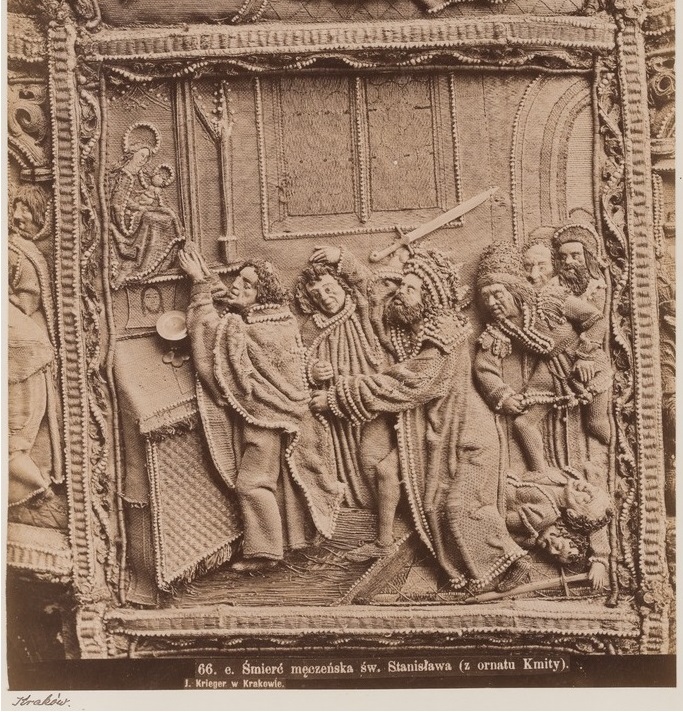


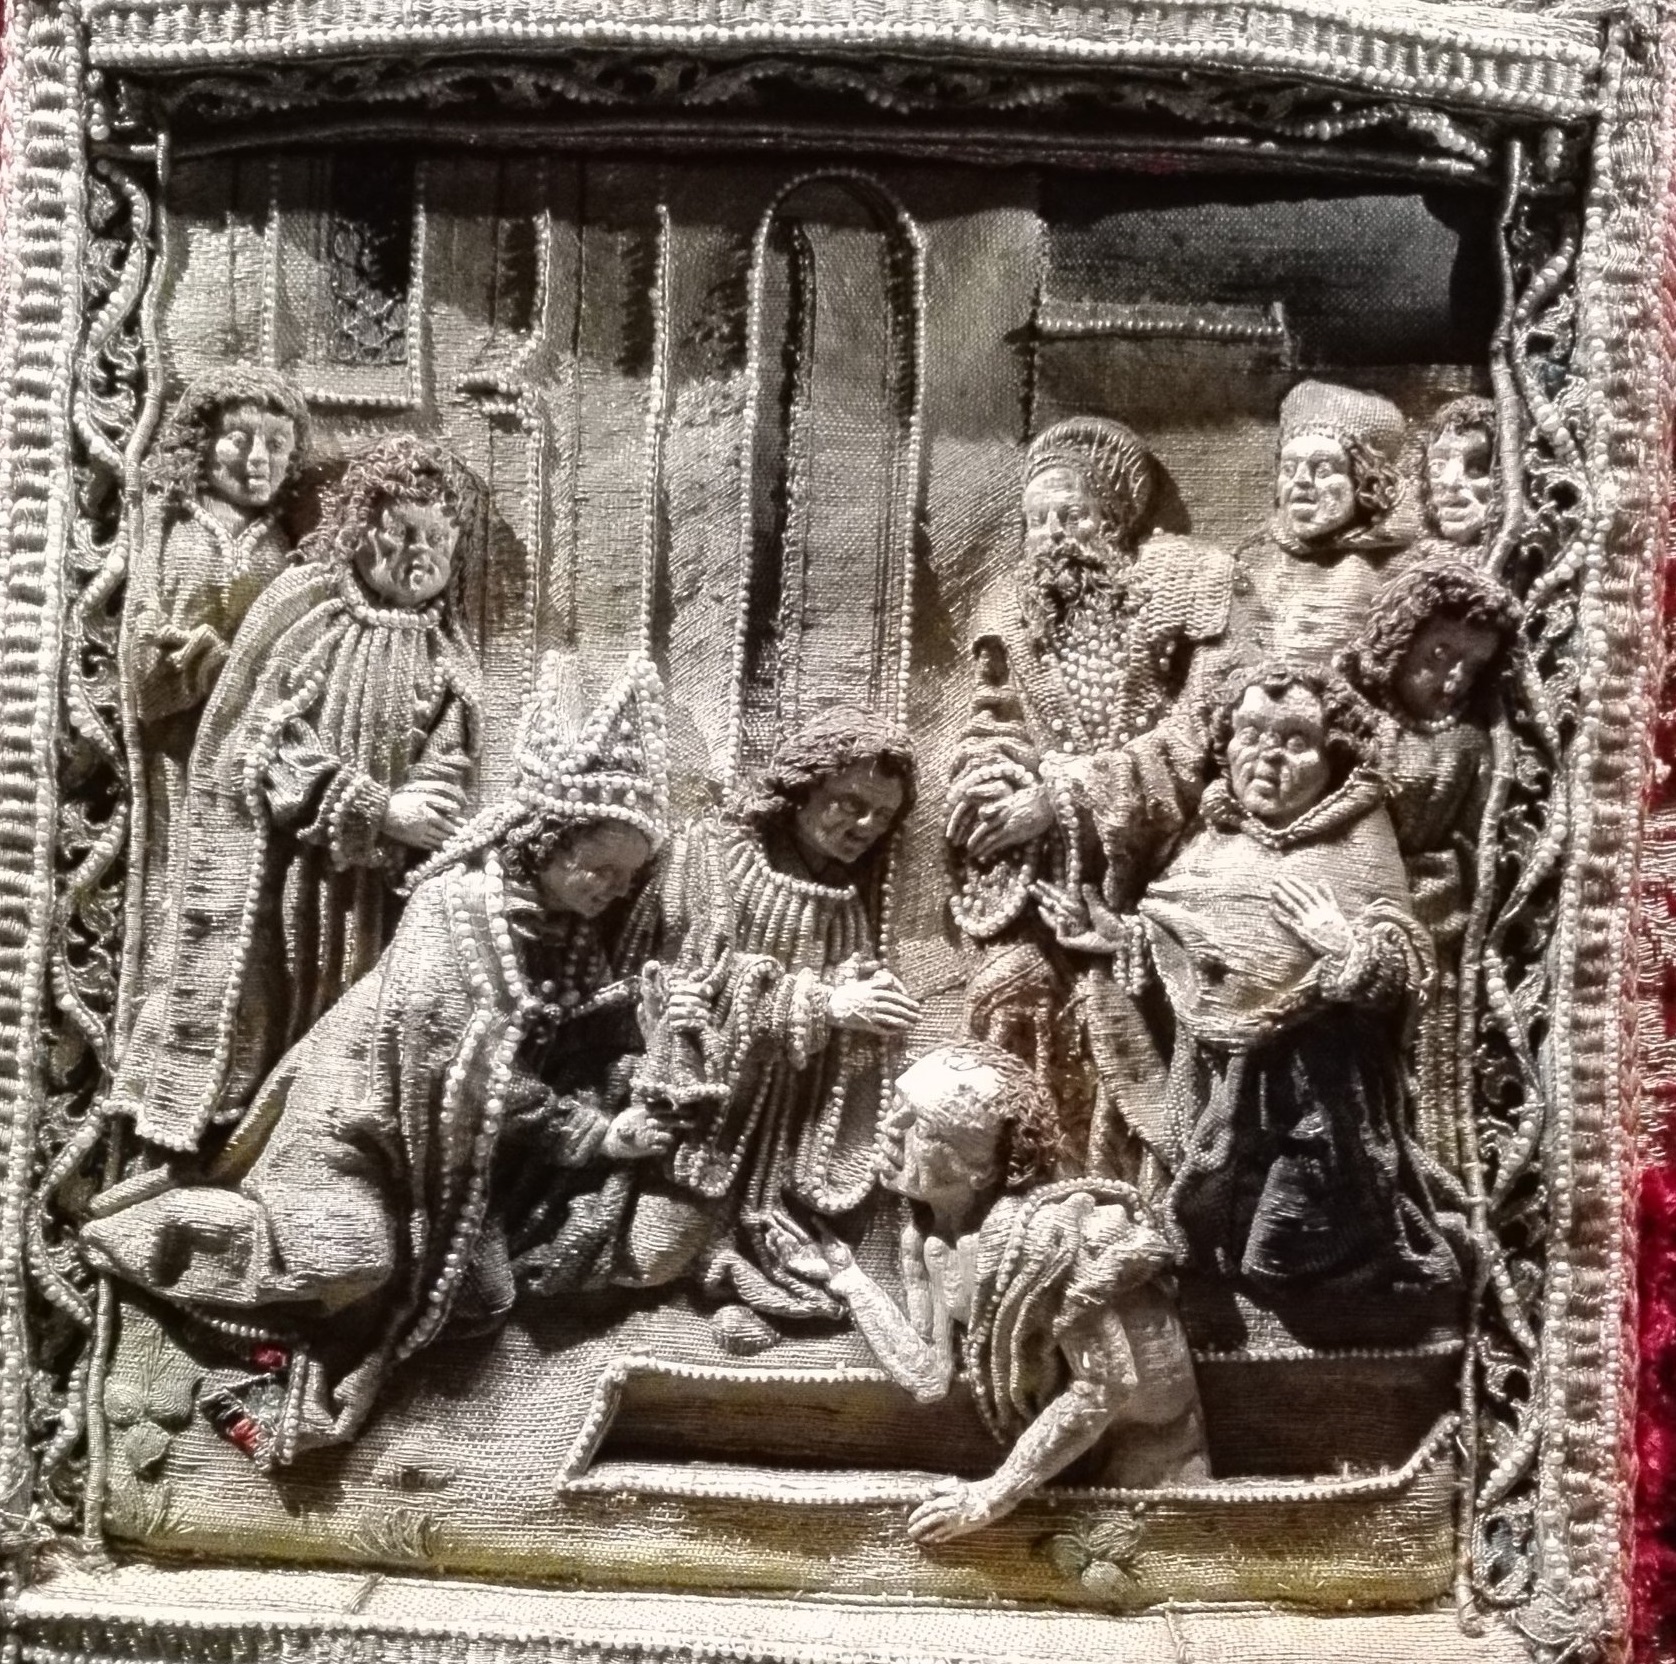

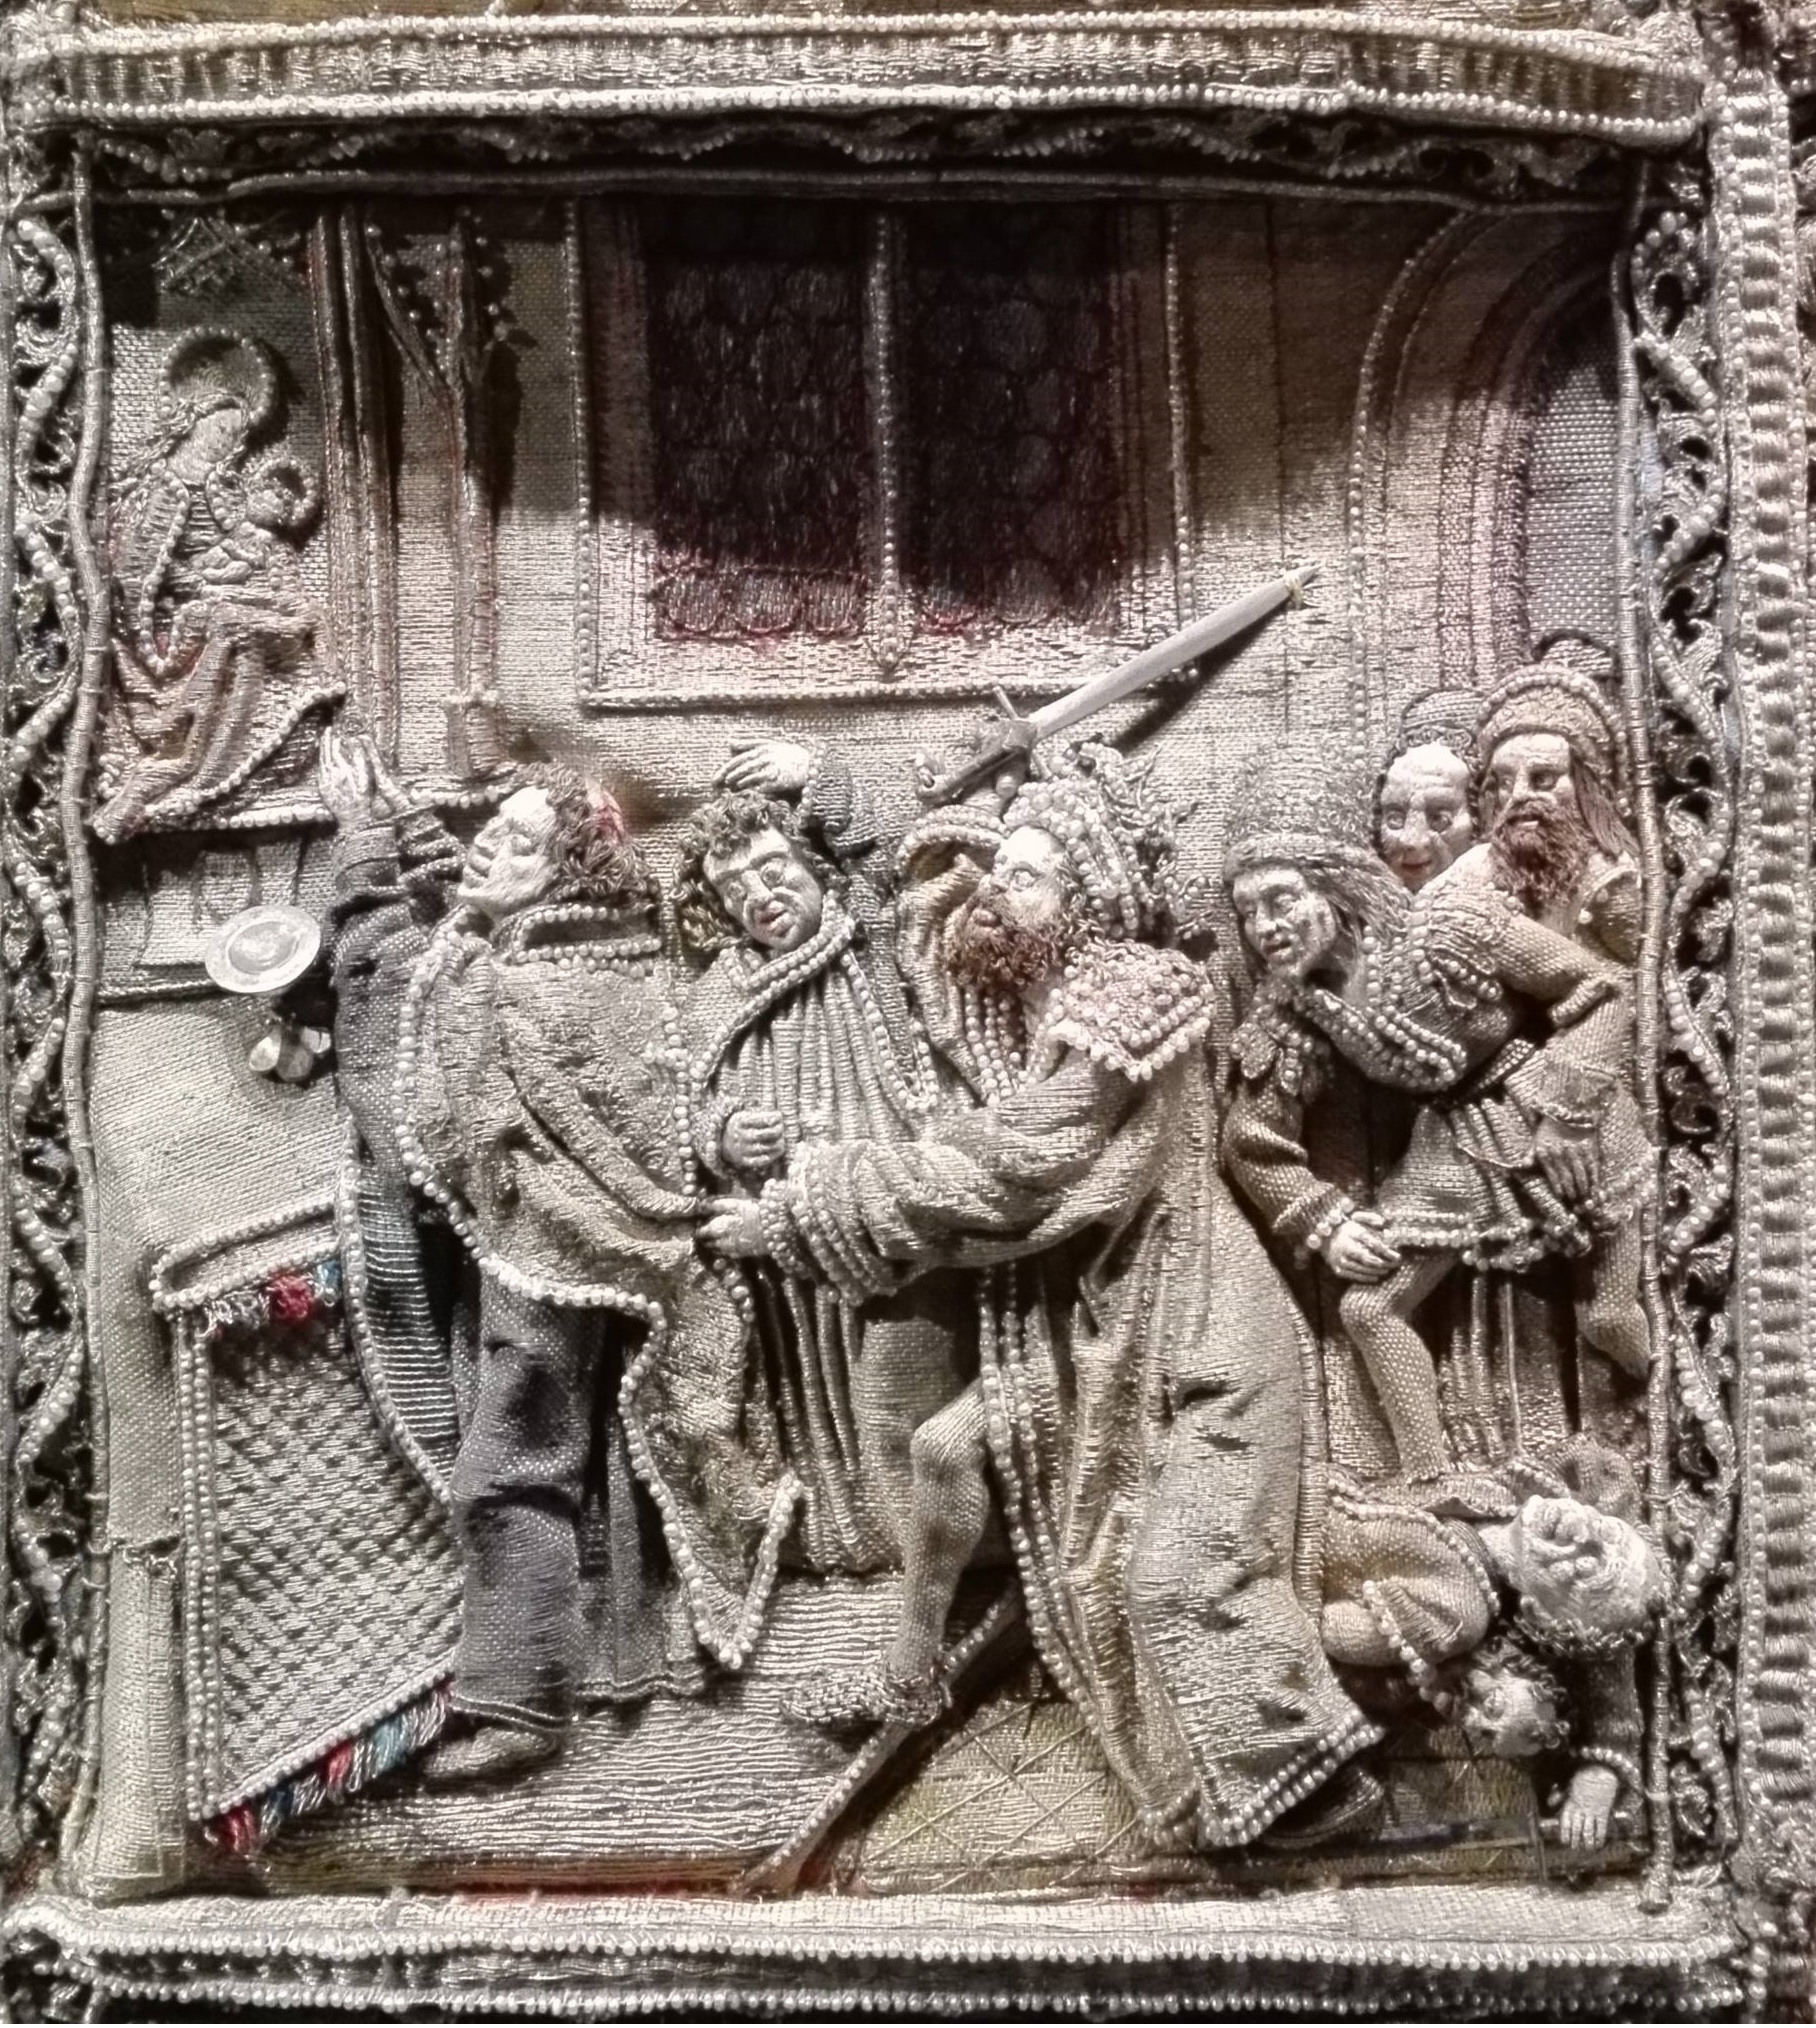


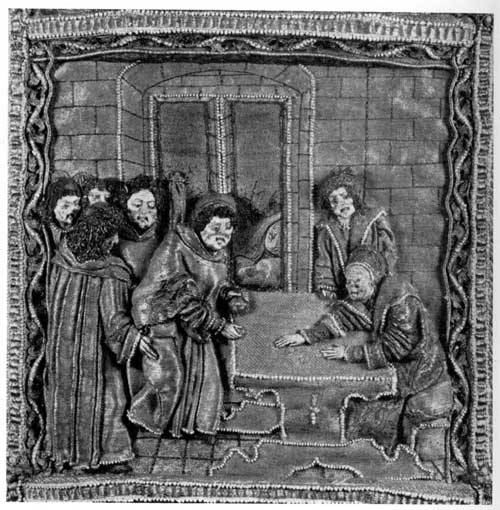

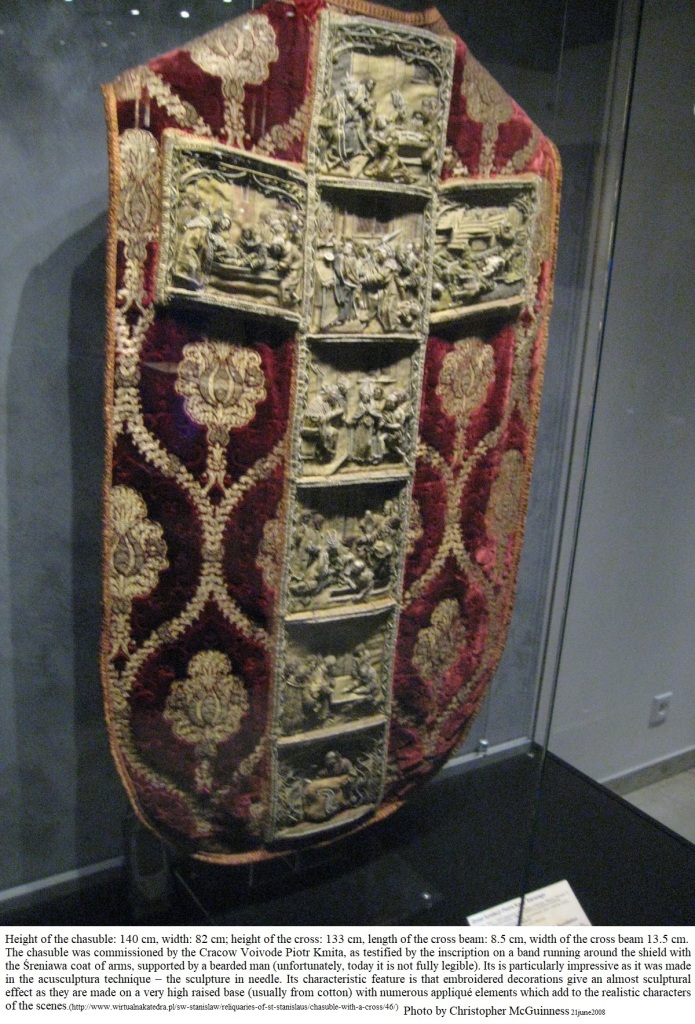


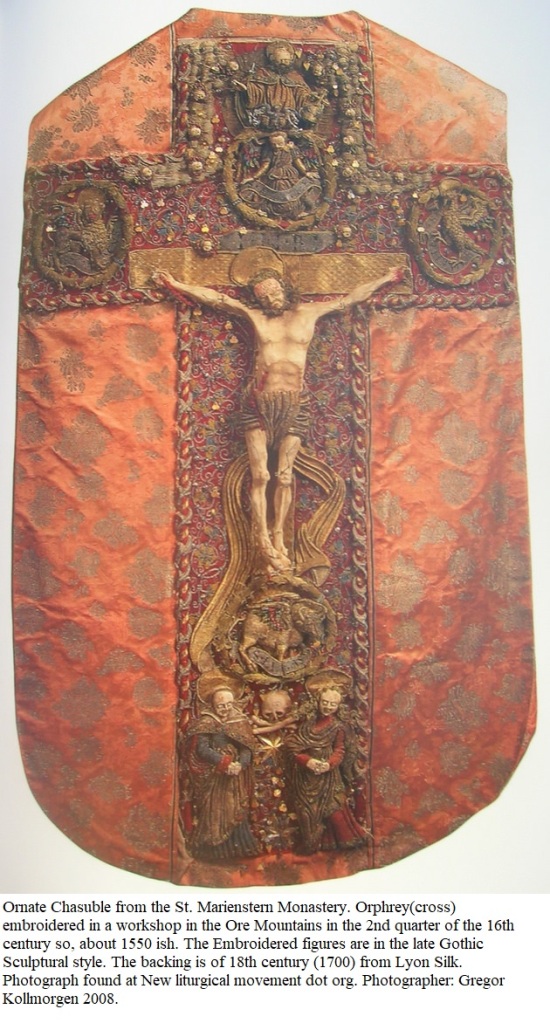

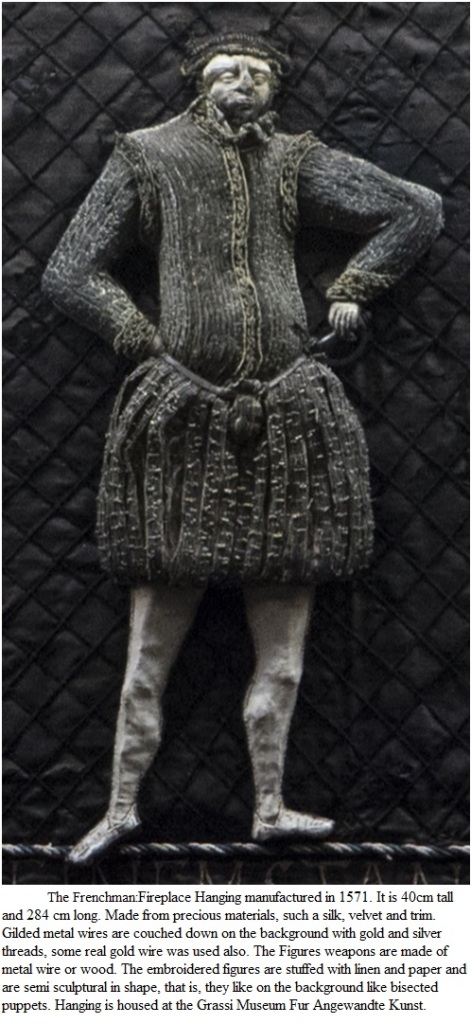
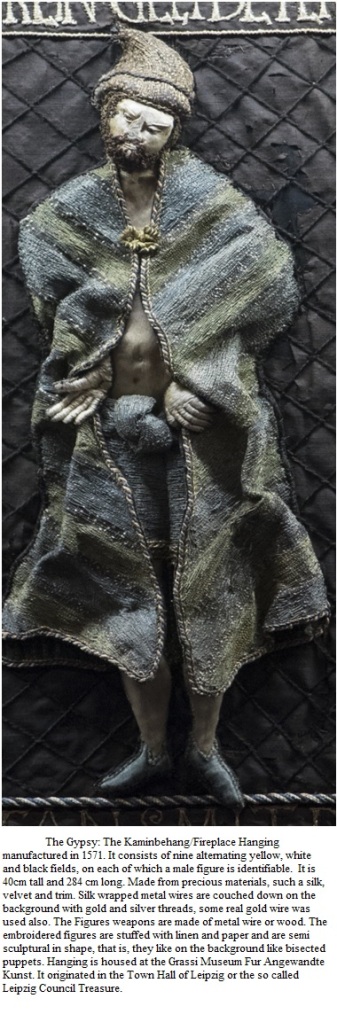
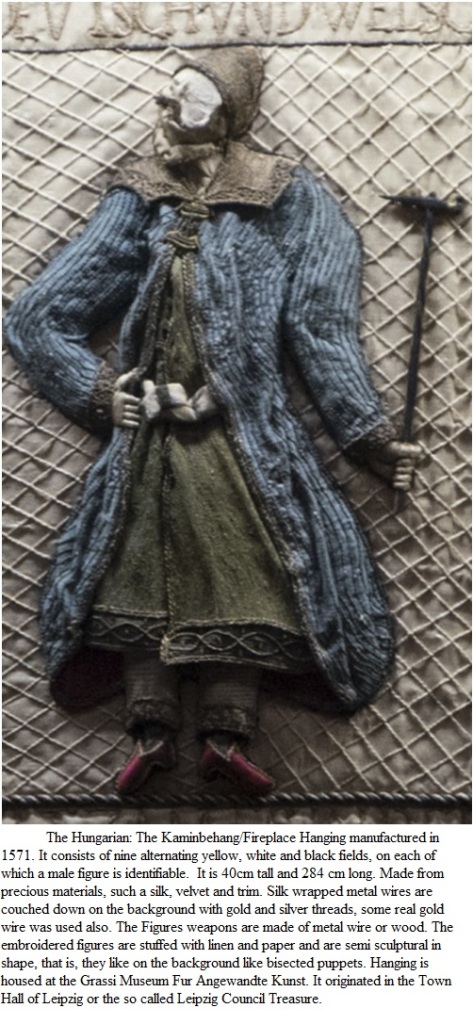

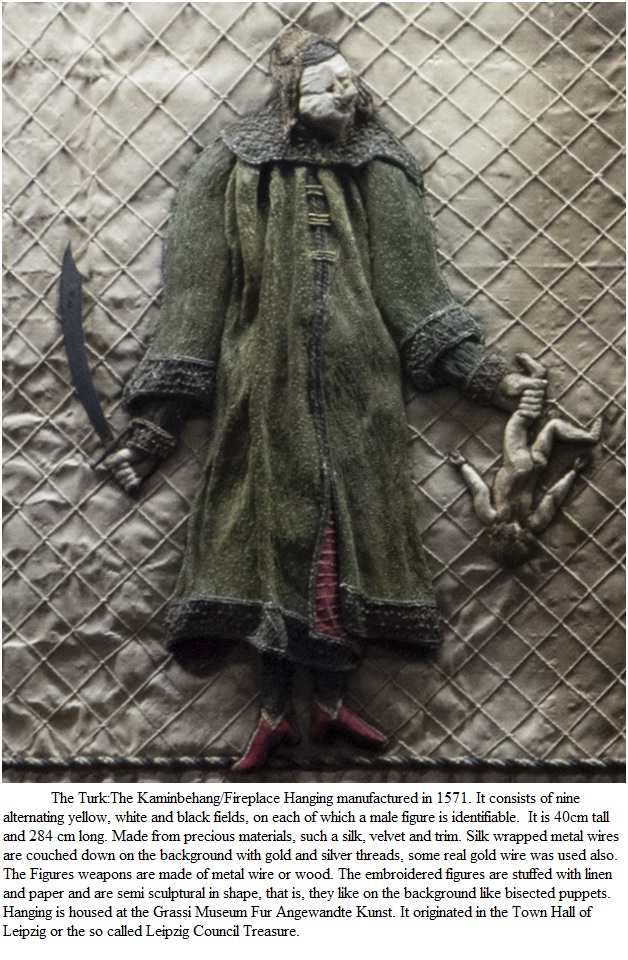


